2014 MERCEDES-BENZ SLK ROADSTER key
[x] Cancel search: keyPage 22 of 357
Leaving parked up .........................1
64
Locking (in an emergency) .............. .80
Locking (key) ................................... 73
Lowering ........................................ 328
Pulling away ................................... 144
Raising ........................................... 325
Registration ..................................... 24
Securing from rolling away ............ 325
Tow-starting ................................... 306
Towing away .................................. 306
Transporting .................................. 308
Unlocking (in an emergency) ........... 80
Unlocking (key) ................................ 73
Vehicle data ................................... 349
Vehicle battery
see Battery (vehicle)
Vehicle data ....................................... 349
Vehicle dimensions ........................... 349
Vehicle emergency locking ................ 80
Vehicle identification number
see VIN
Vehicle identification plate .............. 342
Vehicle tool kit .................................. 295
Video
Operating the DVD ......................... 207
VIN ...................................................... 342 W
Warning and indicator lamps ABS ................................................ 252
Brakes ........................................... 252
Distance warning signal ................. 260
ESP® ............................................. 254
ESP® OFF ...................................... 255
LIM (cruise control) ........................ 169
LIM (DISTRONIC PLUS) .................. 173
LIM (variable SPEEDTRONIC) ......... 181
Overview .......................................... 32
PASSENGER AIR BAG OFF ............... 41
Reserve fuel ................................... 258
Seat belt ........................................ 251
Tyre pressure monitor ................... 261
Warning triangle ................................ 294
Washer fluid
Display message ............................ 249
Wheel and tyre combinations
see Tyres Wheel bolt tightening torque
........... 328
Wheel chock ...................................... 325
Wheeled draught stop
see AIRGUIDE
Wheels
Changing a whee l.......................... 323
Changing/replacing ....................... 323
Checking ........................................ 315
Cleaning ......................................... 288
Cleaning (warning) ......................... 324
Emergency spare wheel ................. 334
Fitting a new wheel ........................ 327
Fitting a wheel ............................... 324
Important safety notes .................. 314
Overview ........................................ 314
Removing a whee l.......................... 327
Storing ........................................... 324
Tightening torque ........................... 328
Wheel size/tyre size ...................... 328
Windows
Cleaning ......................................... 289
see Side windows
Windscreen
Demisting ...................................... 133
Windscreen washer fluid
see Windscreen washer system
Windscreen washer system
Note s............................................. 349
Topping up ..................................... 284
Windscreen wipers
Display message ............................ 249
Problem (malfunction) ................... 123
Replacing the wiper blades ............ 121
Switching on/of f........................... 120
Winter operation
Important safety notes .................. 316
Overview ........................................ 316
Radiator cover ............................... 281
Slippery road surfaces ................... 168
Snow chains .................................. 317
Winter tyres
Limiting the speed (on-board com-
puter) ............................................. 216
M+S tyre s...................................... 316
Wiper blades
Cleaning ......................................... 289
Important safety notes .................. 121
Replacing ....................................... 121 Index
19
Page 43 of 357
Useful information
i This Owner's Manual describes all mod-
els, series and optional equipment for your
vehicle that were available at the time of
going to press. National variations are pos- sible. Note that your vehicle may not be
equipped with all of the functions descri-
bed. This is also the case for systems and
functions relevant to safety.
i Read the information on qualified special-
ist workshops: (Y page 24). Panic alarm
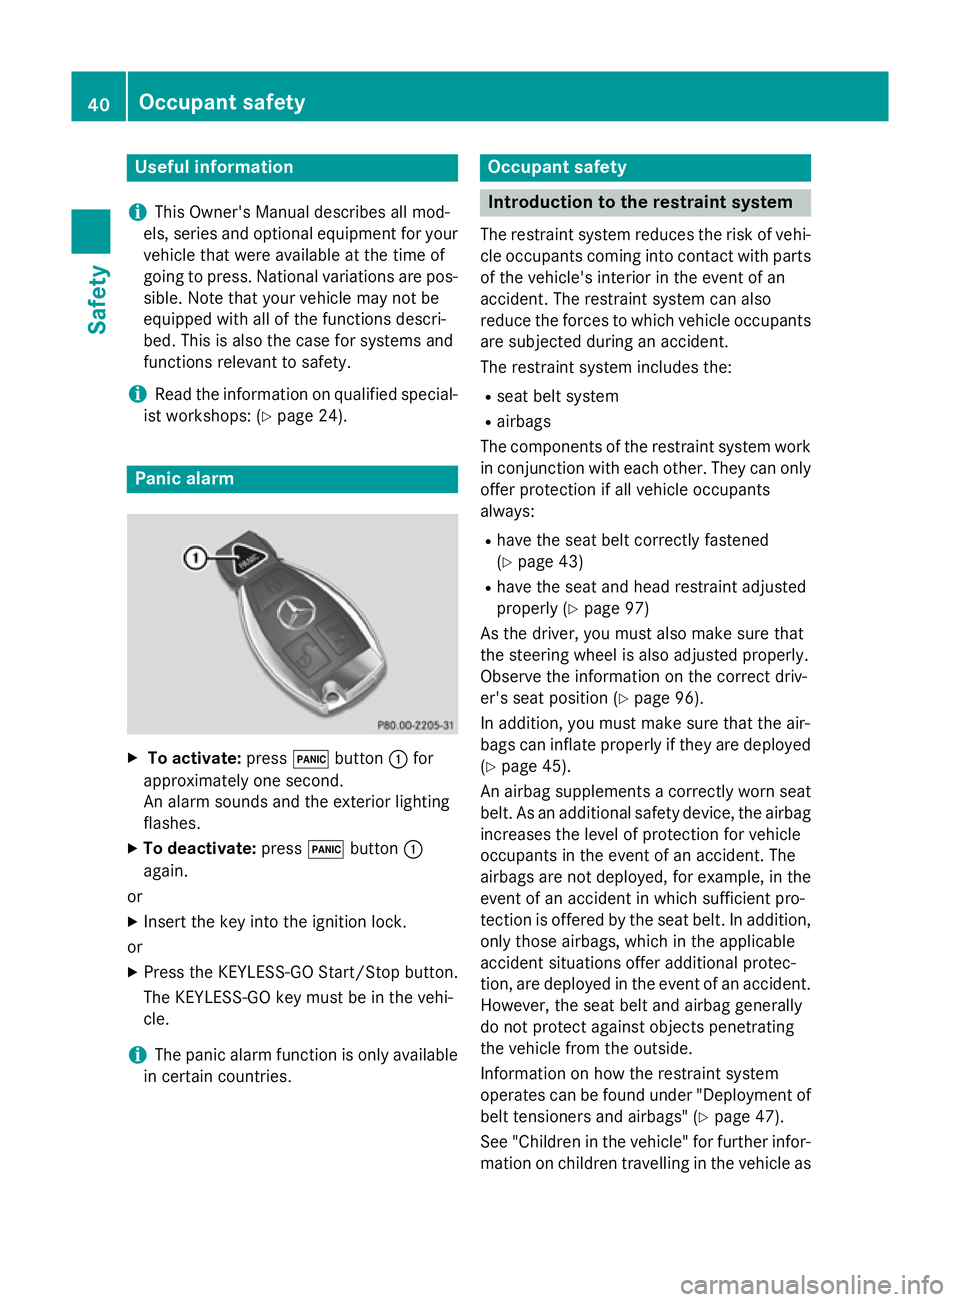
X
To activate: press!button :for
approximately one second.
An alarm sounds and the exterior lighting
flashes.
X To deactivate: press!button :
again.
or
X Insert the key into the ignition lock.
or X Press the KEYLESS-GO Start/Stop button.
The KEYLESS-GO key must be in the vehi-
cle.
i The panic alarm function is only available
in certain countries. Occupant safety
Introduction to the restraint system
The restraint system reduces the risk of vehi- cle occupants coming into contact with parts
of the vehicle's interior in the event of an
accident. The restraint system can also
reduce the forces to which vehicle occupants
are subjected during an accident.
The restraint system includes the:
R seat belt system
R airbags
The components of the restraint system work
in conjunction with each other. They can only
offer protection if all vehicle occupants
always:
R have the seat belt correctly fastened
(Y page 43)
R have the seat and head restraint adjusted
properly (Y page 97)
As the driver, you must also make sure that
the steering wheel is also adjusted properly.
Observe the information on the correct driv-
er's seat position (Y page 96).
In addition, you must make sure that the air-
bags can inflate properly if they are deployed (Y page 45).
An airbag supplements a correctly worn seat belt. As an additional safety device, the airbag
increases the level of protection for vehicle
occupants in the event of an accident. The
airbags are not deployed, for example, in the event of an accident in which sufficient pro-
tection is offered by the seat belt. In addition,
only those airbags, which in the applicable
accident situations offer additional protec-
tion, are deployed in the event of an accident.
However, the seat belt and airbag generally
do not protect against objects penetrating
the vehicle from the outside.
Information on how the restraint system
operates can be found under "Deployment of
belt tensioners and airbags" (Y page 47).
See "Children in the vehicle" for further infor- mation on children travelling in the vehicle as 40
Occupant safetySafety
Page 47 of 357
R
the seat belt is not routed across sharp,
pointed or fragile objects.
If you have such items located on or in your
clothing, e.g. pens, keys or spectacles,
store these in a suitable place.
R only one person is using a seat belt.
Infants and children must never travel sit-
ting on the lap of a vehicle occupant. In the
event of an accident, they could be crushed between the vehicle occupant and seat
belt.
R objects are never secured with a seat belt if
the seat belt is also being used by one of the
vehicle's occupants.
Seat belts are only intended to secure and
restrain vehicle occupants. Always observe
the notes in the "Stowage options/compart-
ments" section for securing objects, luggage
or loads (Y page 264).
Fastening seat belts Observe the safety notes on the seat belt
(Y page 42) and the notes on correct use of
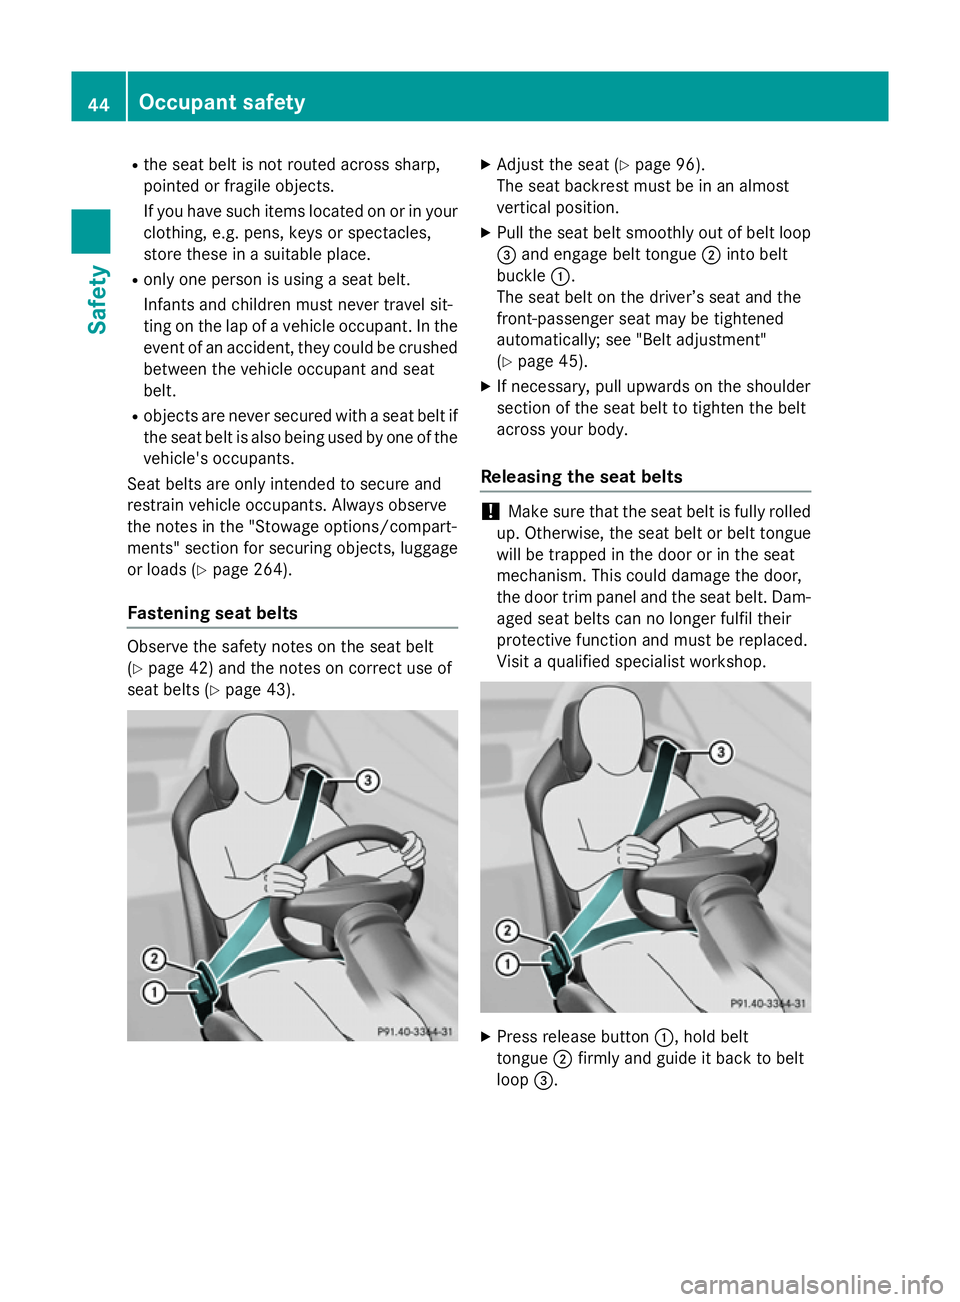
seat belts (Y page 43). X
Adjust the seat (Y page 96).
The seat backrest must be in an almost
vertical position.
X Pull the seat belt smoothly out of belt loop
= and engage belt tongue ;into belt
buckle :.
The seat belt on the driver’s seat and the
front-passenger seat may be tightened
automatically; see "Belt adjustment"
(Y page 45).
X If necessary, pull upwards on the shoulder
section of the seat belt to tighten the belt
across your body.
Releasing the seat belts !
Make sure that the seat belt is fully rolled
up. Otherwise, the seat belt or belt tongue
will be trapped in the door or in the seat
mechanism. This could damage the door,
the door trim panel and the seat belt. Dam- aged seat belts can no longer fulfil their
protective function and must be replaced.
Visit a qualified specialist workshop. X
Press release button :, hold belt
tongue ;firmly and guide it back to belt
loop =. 44
Occupant safetySafety
Page 54 of 357
The seat-belt adjustment is an integral part of
the PRE-SAFE ®
convenience function. Infor-
mation about the convenience function can
be found under "Belt adjustment"
(Y page 45). Automatic measures after an acci-
dent
Immediately after an accident, the following
measures are implemented, depending on
the type and severity of the impact:
R the hazard warning lamps are activated
R the emergency lighting is activated
R the vehicle doors are unlocked
R the front side windows are lowered
R in vehicles with a memory function: the
electrically adjustable steering wheel is
raised
R the engine is switched off
R vehicles with the Mercedes-Benz emer-
gency call system: automatic emergency
call Children in the vehicle
Important safety notes
If a child younger than 12 years old and under
1.50 m in height is travelling in the vehicle:
R always secure the child in a child restraint
system suitable for Mercedes-Benz vehi-
cles. The child restraint system must be
appropriate to the age, weight and size of
the child
R be sure to observe the instructions and
safety notes in this section in addition to
the child restraint system manufacturer's
installation instructions G
WARNING
If you leave children unattended in the vehi-
cle, they may be able to set the vehicle in
motion if, for example, they:
R release the parking brake
R shift the automatic transmission out of park
position Por shift manual transmission into
neutral
R start the engine
In addition, they may operate vehicle equip-
ment and become trapped. There is a risk of
an accident and injury.
When leaving the vehicle, always take the key with you and lock the vehicle. Never leave
children unattended in the vehicle. G
WARNING
If persons (particularly children) are exposed
to heat or cold for a prolonged period, there is a risk of serious or even fatal injuries. Never
leave persons (particularly children) unatten-
ded in the vehicle. G
WARNING
If the child restraint system is placed in direct sunlight, the parts could become very hot.
Children could be suffer burns by touching
these parts, in particular on the metallic parts
of the child restraint system. There is a risk of injury.
If you and your child leave the vehicle, always
make sure that the child restraint system is
not in direct sunlight. Cover it with a blanket, for example. If the child restraint system has
been exposed to direct sunlight, leave it to
cool down before securing the child in it.
Never leave children unattended in the vehi-
cle.
Always ensure that all vehicle occupants have their seat belts fastened correctly and are sit-
ting properly. Particular attention must be
paid to children.
Observe the safety notes on the seat belt
(Y page 42) and the information on the cor-
rect use of the seat belt (Y page 43). Children in the vehicle
51Safety Z
Page 57 of 357
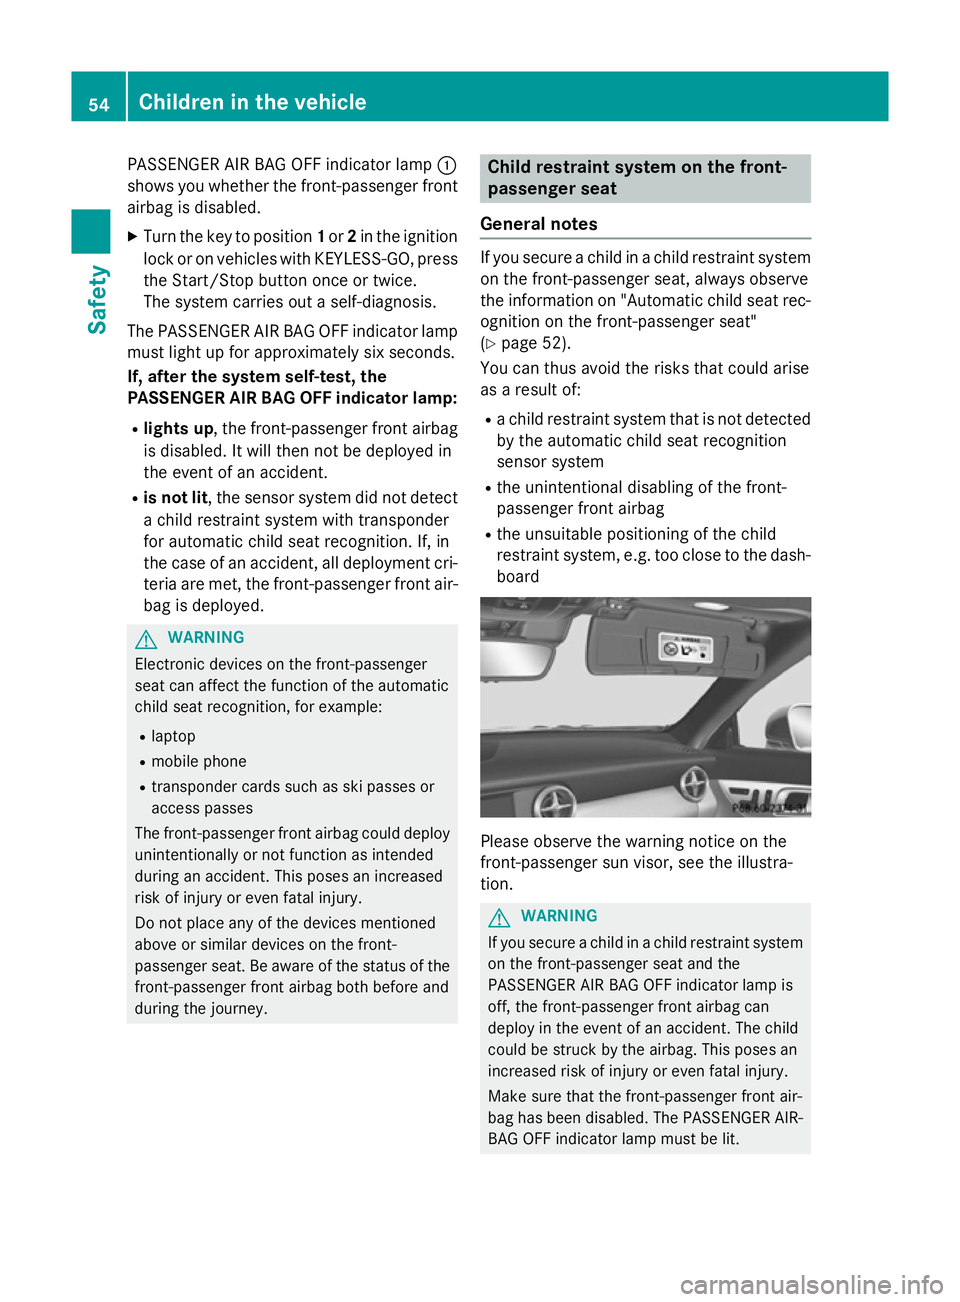
PASSENGER AIR BAG OFF indicator lamp
:
shows you whether the front-passenger front airbag is disabled.
X Turn the key to position 1or 2in the ignition
lock or on vehicles with KEYLESS-GO, press
the Start/Stop button once or twice.
The system carries out a self-diagnosis.
The PASSENGER AIR BAG OFF indicator lamp must light up for approximately six seconds.
If, after the system self-test, the
PASSENGER AIR BAG OFF indicator lamp:
R lights up , the front-passenger front airbag
is disabled. It will then not be deployed in
the event of an accident.
R is not lit, the sensor system did not detect
a child restraint system with transponder
for automatic child seat recognition. If, in
the case of an accident, all deployment cri-
teria are met, the front-passenger front air-
bag is deployed. G
WARNING
Electronic devices on the front-passenger
seat can affect the function of the automatic
child seat recognition, for example:
R laptop
R mobile phone
R transponder cards such as ski passes or
access passes
The front-passenger front airbag could deploy unintentionally or not function as intended
during an accident. This poses an increased
risk of injury or even fatal injury.
Do not place any of the devices mentioned
above or similar devices on the front-
passenger seat. Be aware of the status of the front-passenger front airbag both before and
during the journey. Child restraint system on the front-
passenger seat
General notes If you secure a child in a child restraint system
on the front-passenger seat, always observe
the information on "Automatic child seat rec-
ognition on the front-passenger seat"
(Y page 52).
You can thus avoid the risks that could arise
as a result of:
R a child restraint system that is not detected
by the automatic child seat recognition
sensor system
R the unintentional disabling of the front-
passenger front airbag
R the unsuitable positioning of the child
restraint system, e.g. too close to the dash-
board Please observe the warning notice on the
front-passenger sun visor, see the illustra-
tion.
G
WARNING
If you secure a child in a child restraint system on the front-passenger seat and the
PASSENGER AIR BAG OFF indicator lamp is
off, the front-passenger front airbag can
deploy in the event of an accident. The child
could be struck by the airbag. This poses an
increased risk of injury or even fatal injury.
Make sure that the front-passenger front air-
bag has been disabled. The PASSENGER AIR-BAG OFF indicator lamp must be lit. 54
Children in the vehicleSafety
Page 71 of 357
i
If there is an increased risk of collision,
preventive passenger protection measures
(PRE-SAFE ®
) are activated.
If the risk of collision with the vehicle in front
remains and you do not brake, take evasive
action or accelerate significantly, the vehicle
may perform automatic emergency braking,
up to the point of full brake application. Auto- matic emergency braking is not performed
until immediately prior to an imminent acci-
dent.
You can prevent the intervention of PRE-
SAFE ®
Brake at any time by:
R depressing the accelerator pedal further
R activating kickdown
R releasing the brake pedal
The braking action of PRE-SAFE ®
Brake is
ended automatically if:
R you manoeuvre to avoid the obstacle
R there is no longer any danger of a collision
R there is no longer an obstacle detected in
front of your vehicle Protection against theft
Immobiliser
X To activate with the key: remove the key
from the ignition lock.
X To activate with KEYLESS-GO: switch the
ignition off and open the driver's door.
X To deactivate: switch on the ignition.
The immobiliser prevents your vehicle from
being started without the correct key.
When leaving the vehicle, always take the key with you and lock the vehicle. The engine can
be started by anyone with a valid key that is
left inside the vehicle.
i The immobiliser is always deactivated
when you start the engine. ATA (Anti-Theft Alarm system)
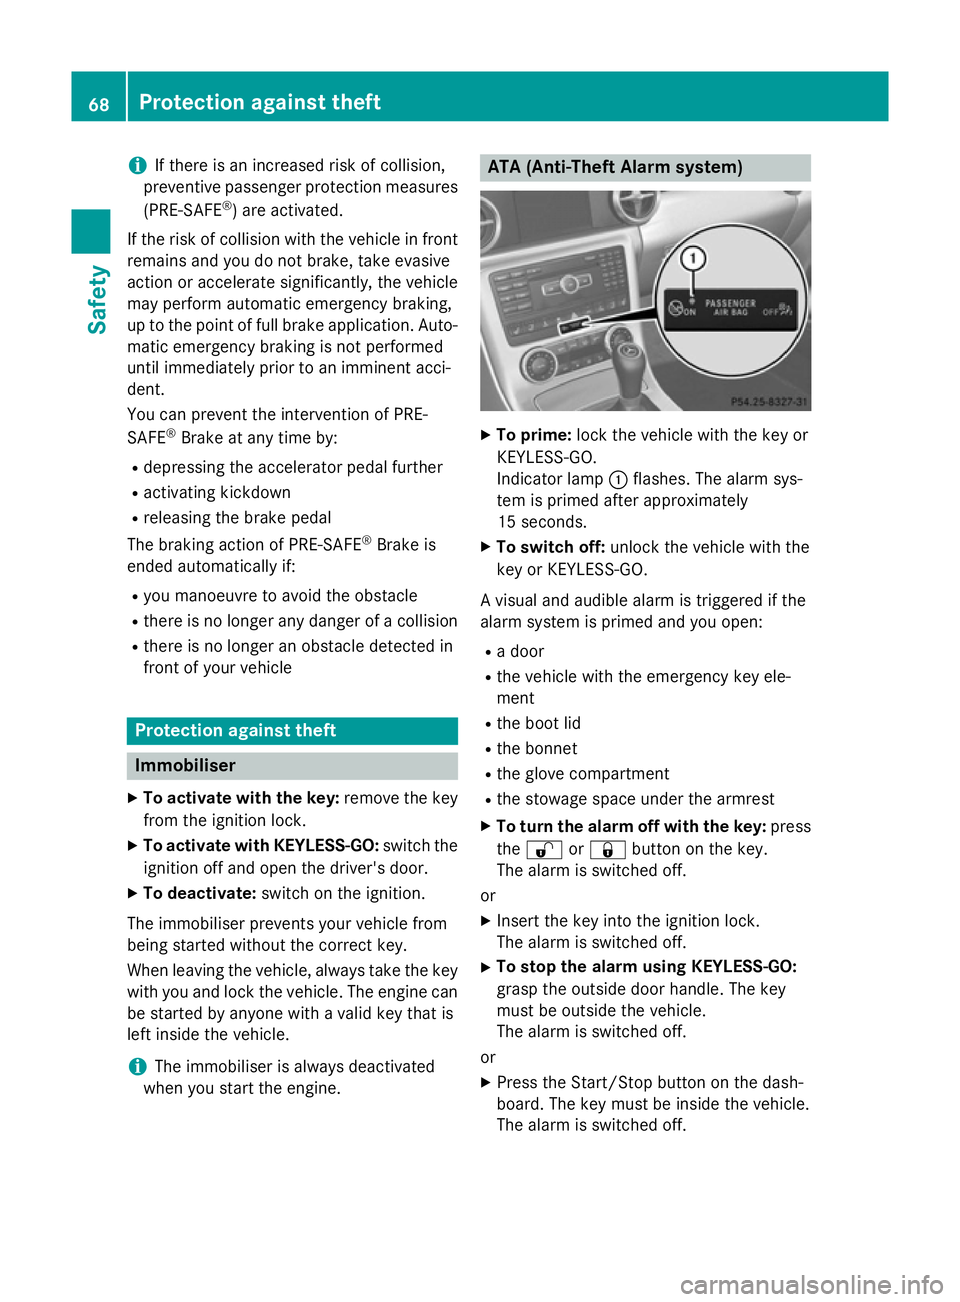
X
To prime: lock the vehicle with the key or
KEYLESS-GO.
Indicator lamp :flashes. The alarm sys-
tem is primed after approximately
15 seconds.
X To switch off: unlock the vehicle with the
key or KEYLESS-GO.
A visual and audible alarm is triggered if the
alarm system is primed and you open: R a door
R the vehicle with the emergency key ele-
ment
R the boot lid
R the bonnet
R the glove compartment
R the stowage space under the armrest
X To turn the alarm off with the key: press
the % or& button on the key.
The alarm is switched off.
or
X Insert the key into the ignition lock.
The alarm is switched off.
X To stop the alarm using KEYLESS-GO:
grasp the outside door handle. The key
must be outside the vehicle.
The alarm is switched off.
or
X Press the Start/Stop button on the dash-
board. The key must be inside the vehicle.
The alarm is switched off. 68
Protection against theftSafety
Page 72 of 357
The alarm is not switched off, even if you
close the open door that has triggered it, for
example.
i If the alarm stays on for more than
30 seconds, the Mercedes‑ Benz emer-
gency call system automatically sends a
message to the Customer Assistance
Centre. This is done by means of a text
message or a data connection. The emer-
gency call system sends a message or
establishes a data connection provided
that:
R you have subscribed to the
Mercedes ‑Benz emergency call system
R the Mercedes‑Benz emergency call sys-
tem has been activated properly
R the necessary mobile phone network is
available Tow-away protection
Function An audible and visual alarm is triggered if your
vehicle's angle of inclination is altered while
tow-away protection is primed. This can occur if the vehicle is jacked up on one side, for
example.
Priming X
Make sure that:
R the doors are closed
R the boot lid is closed
Only then is the tow-away protection
primed.
X Lock the vehicle with the key or KEYLESS-
GO.
Tow-away protection is primed after
approximately 30 seconds. Switching off X
To switch off: unlock the vehicle with the
key or KEYLESS-GO.
Tow-away protection is switched off auto-
matically.
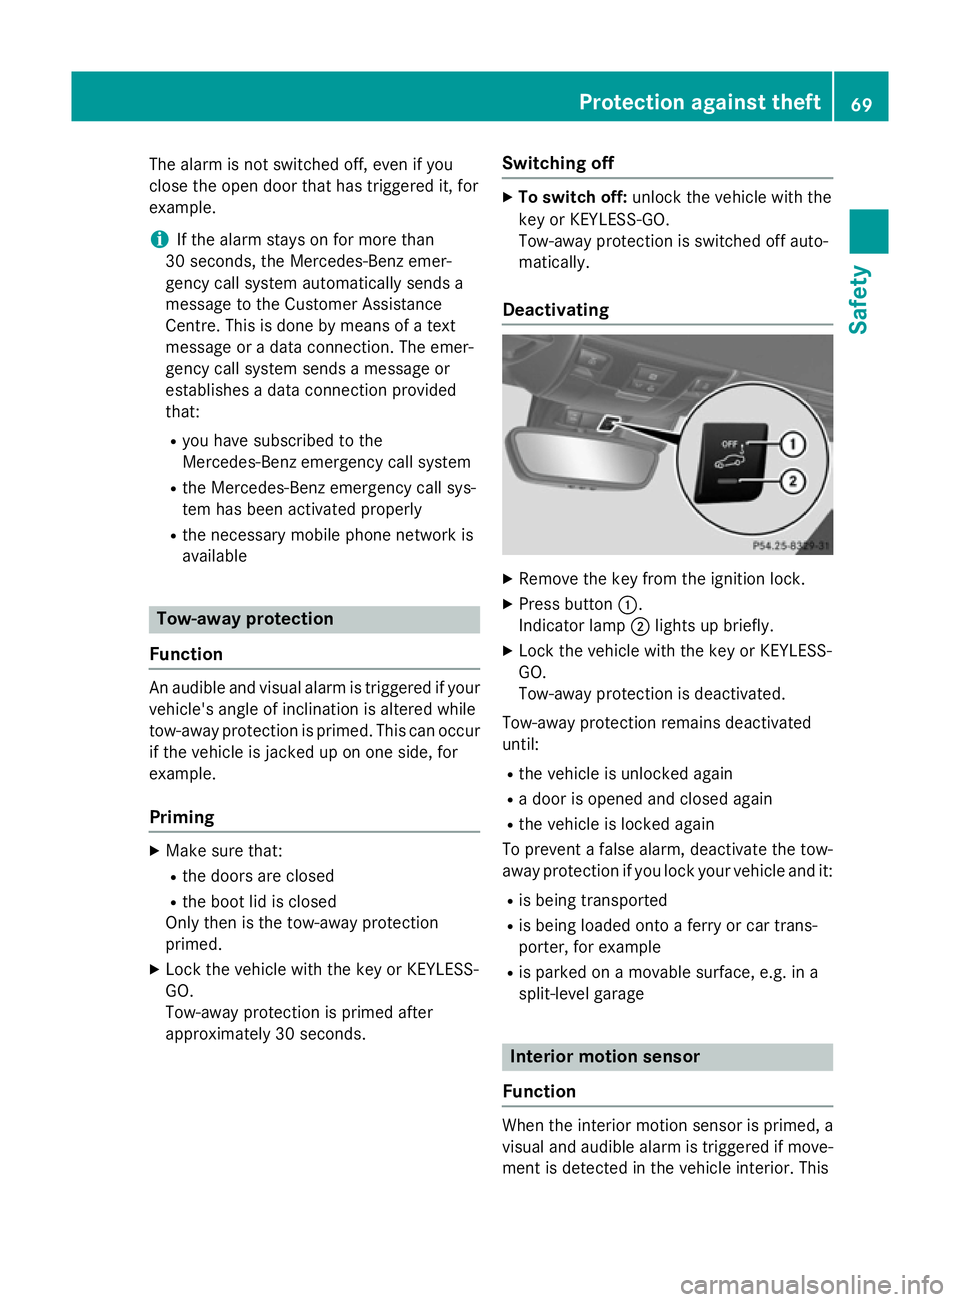
Deactivating X
Remove the key from the ignition lock.
X Press button :.
Indicator lamp ;lights up briefly.
X Lock the vehicle with the key or KEYLESS-
GO.
Tow-away protection is deactivated.
Tow-away protection remains deactivated
until: R the vehicle is unlocked again
R a door is opened and closed again
R the vehicle is locked again
To prevent a false alarm, deactivate the tow-
away protection if you lock your vehicle and it:
R is being transported
R is being loaded onto a ferry or car trans-
porter, for example
R is parked on a movable surface, e.g. in a
split-level garage Interior motion sensor
Function When the interior motion sensor is primed, a
visual and audible alarm is triggered if move-
ment is detected in the vehicle interior. This Protection against theft
69Safety Z
Page 73 of 357
can occur if someone reaches into the vehicle
interior, for example.
Priming X
Make sure that:
R the side windows are closed
R the stowage compartment under the
armrest is closed
This will prevent false alarms.
X Make sure that:
R the roof is closed
R the doors are closed
R the boot lid is closed
Only then is the interior motion sensor
primed.
Vehicles in the Netherlands: the interior
motion sensor is primed even when the
roof is open. However, the roof should be
closed so as to prevent a false alarm.
X Lock the vehicle with the key or KEYLESS-
GO.
The interior motion sensor is primed after
approximately 30 seconds.
Switching off X
Unlock the vehicle with the key or KEY-
LESS-GO.
The interior motion sensor is automatically deactivated.
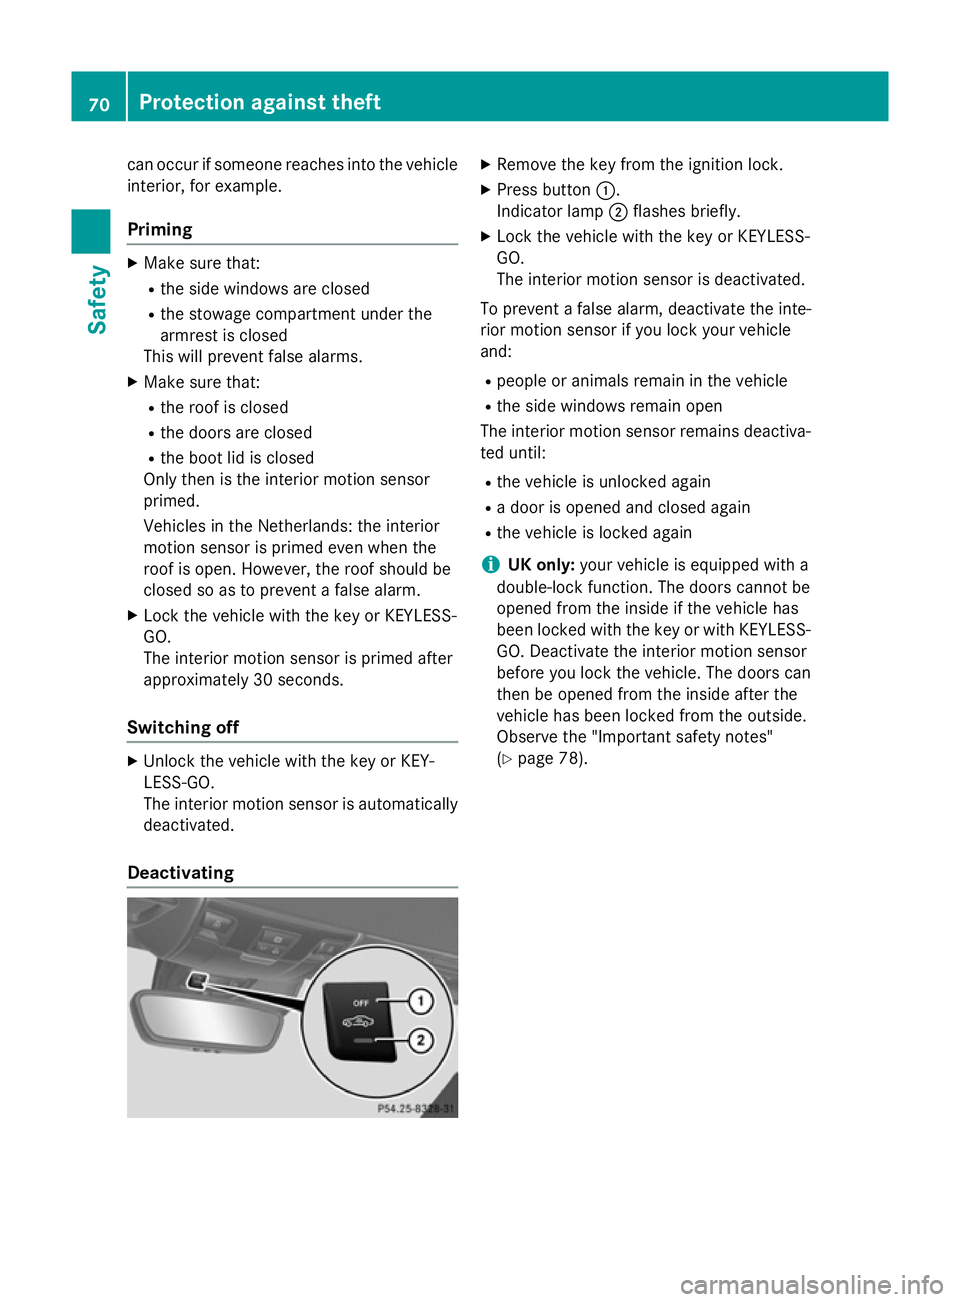
Deactivating X
Remove the key from the ignition lock.
X Press button :.
Indicator lamp ;flashes briefly.
X Lock the vehicle with the key or KEYLESS-
GO.
The interior motion sensor is deactivated.
To prevent a false alarm, deactivate the inte-
rior motion sensor if you lock your vehicle
and:
R people or animals remain in the vehicle
R the side windows remain open
The interior motion sensor remains deactiva- ted until:
R the vehicle is unlocked again
R a door is opened and closed again
R the vehicle is locked again
i UK only:
your vehicle is equipped with a
double-lock function. The doors cannot be
opened from the inside if the vehicle has
been locked with the key or with KEYLESS- GO. Deactivate the interior motion sensor
before you lock the vehicle. The doors can
then be opened from the inside after the
vehicle has been locked from the outside.
Observe the "Important safety notes"
(Y page 78). 70
Protection against theftSafety