2014 MERCEDES-BENZ SLK ROADSTER air condition
[x] Cancel search: air conditionPage 63 of 357
Never leave animals unattended in the vehi-
cle. Always secure animals correctly during a journey, e.g. in an animal transport box. Driving safety systems
Driving safety systems overview
In this section, you will find information about the following driving safety systems:
R ABS ( Anti-lock BrakingSystem)
(Y page 60)
R BAS ( Brake Assist System) (Y page 61)
R BAS PLUS ( BrakeAssist System PLUS)
(Y page 61)
R Adaptive brake lamps (Y page 62)
R ESP ®
(Electronic StabilityProgram)
(Y page 62)
R EBD ( electronic brake force distribution)
(Y page 66)
R ADAPTIVE BRAKE (Y page 66)
R PRE-SAFE ®
Brake (Y page 66) Important safety notes
If you fail to adapt your driving style or if you
are inattentive, the driving safety systems can neither reduce the risk of an accident nor
override the laws of physics. Driving safety
systems are merely aids designed to assist
driving. You are responsible for the distance
to the vehicle in front, for vehicle speed and
for braking in good time. Always adapt your
driving style to suit the prevailing road and
weather conditions and maintain a safe dis-
tance from the vehicle in front. Drive care-
fully.
i The driving safety systems described only
work as effectively as possible when there
is adequate contact between the tyres and the road surface. Please pay special atten-tion to the notes on tyres, recommended
minimum tyre tread depths etc.
(Y page 314). In wintry driving conditions, always use
winter tyres (M+S tyres) and, if necessary,
snow chains. Only in this way will the driv-
ing safety systems described in this section
work as effectively as possible. ABS (Anti-lock Braking System)
General notes ABS regulates brake pressure in such a way
that the wheels do not lock when you brake.
This allows you to continue steering the vehi-
cle when braking.
The yellow !ABS warning lamp in the
instrument cluster lights up when the ignition is switched on. It goes out when the engine is
running.
Important safety notes i
Observe the "Important safety notes" sec-
tion (Y page 60). G
WARNING
If ABS is faulty, the wheels could lock when
braking. The steerability and braking charac-
teristics may be severely impaired. Addition-
ally, further driving safety systems are deac-
tivated. There is an increased danger of skid- ding and accidents.
Drive on carefully. Have ABS checked imme-
diately at a qualified specialist workshop.
If ABS is malfunctioning, other systems,
including driving safety systems, will also
become inoperative. Observe the information on the ABS warning lamp (Y page 252) and
display messages which may be shown in the
instrument cluster (Y page 223).
ABS works from a speed of about
8 km/hupwards, regardless of road-surface
conditions. ABS works on slippery surfaces,
even when you only brake gently. 60
Driving safety systemsSafety
Page 70 of 357
In these cases, PRE-SAFE
®
Brake may:
R give an unnecessary warning and then
brake the vehicle
R neither give a warning nor intervene
There is a risk of an accident.
Always pay particular attention to the traffic
situation and be ready to brake, especially if
PRE-SAFE ®
Brake warns you. Terminate the
intervention in a non-critical driving situation.
In order to maintain the appropriate distance
to the vehicle in front and thus prevent a col- lision, you must apply the brakes yourself. G
WARNING
PRE-SAFE ®
Brake does not react:
R to people or animals
R to oncoming vehicles
R to crossing traffic
R when cornering
As a result, PRE-SAFE ®
Brake may neither
give warnings nor intervene in all critical sit-
uations. There is a risk of an accident.
Always pay careful attention to the traffic sit-
uation and be ready to brake.
In the event of snowfall or heavy rain, detec-
tion can be impaired.
Detection by the radar sensor system is also
impaired in the event of:
R dirt on the sensors or obscured sensors
R interference by other radar sources
R strong radar reflections, for example, in
multi-storey car parks
R a narrow vehicle travelling in front, e.g. a
motorcycle
R a vehicle travelling in front on a different
line
Following damage to the front end of the vehi-
cle, have the radar sensor settings and oper- ation checked at a qualified specialist work-
shop. This also applies to collisions at slow
speeds where there is no visible damage to
the front of the vehicle. Function X
To activate/deactivate: activate or deac-
tivate PRE-SAFE ®
Brake in the on-board
computer (Y page 211).
Vehicles with a black and white multi-
function display: when PRE-SAFE®
Brake
is activated, the Äsymbol appears in
the status overview in the multifunction
display.
Vehicles with a colour multifunction
display: when PRE-SAFE ®
Brake is deacti-
vated, the æsymbol appears in the
assistance graphic in the multifunction dis- play.
This function will issue a warning if:
R at a speed of approximately 30 km/h or
higher, the distance maintained to the vehi-
cle travelling in front is insufficient for sev-
eral seconds.
The · distance warning lamp then lights
up in the instrument cluster.
R at a speed of approximately 7 km/h or
higher, you rapidly approach a vehicle in
front.
An intermittent warning tone will then
sound and the ·distance warning lamp
will light up in the instrument cluster.
X Brake immediately to defuse the situation.
or X Take evasive action provided it is safe to do
so.
The PRE-SAFE ®
Brake function can also brake
the vehicle automatically under the following
conditions:
R the driver and front passenger have their
seat belts fastened
and
R the vehicle speed is between approx-
imately 7 km/h and 200 km/h
Up to a speed of approximately 70 km/h,
PRE-SAFE ®
Brake can also detect stationary
objects. Examples of stationary objects are
stopped or parked vehicles. Driving safety systems
67Safety Z
Page 93 of 357
R
not place any objects on the cover
behind the roll bars
R not allow the load to push up the boot
separator
The boot separator can be used to cover lug- gage and loads in the boot.
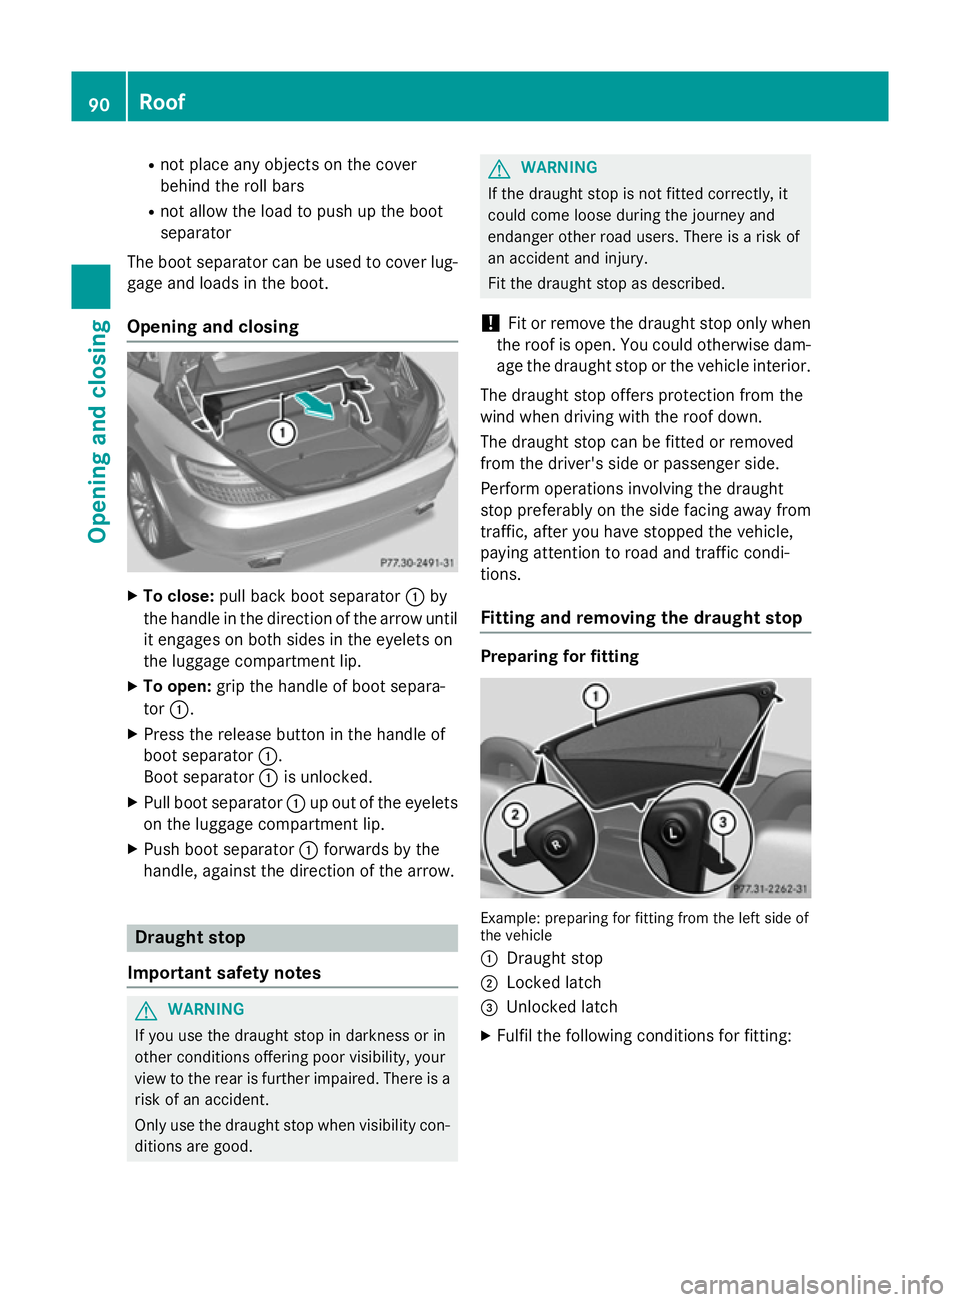
Opening and closing X
To close: pull back boot separator :by
the handle in the direction of the arrow until
it engages on both sides in the eyelets on
the luggage compartment lip.
X To open: grip the handle of boot separa-
tor :.
X Press the release button in the handle of
boot separator :.
Boot separator :is unlocked.
X Pull boot separator :up out of the eyelets
on the luggage compartment lip.
X Push boot separator :forwards by the
handle, against the direction of the arrow. Draught stop
Important safety notes G
WARNING
If you use the draught stop in darkness or in
other conditions offering poor visibility, your
view to the rear is further impaired. There is a
risk of an accident.
Only use the draught stop when visibility con- ditions are good. G
WARNING
If the draught stop is not fitted correctly, it
could come loose during the journey and
endanger other road users. There is a risk of
an accident and injury.
Fit the draught stop as described.
! Fit or remove the draught stop only when
the roof is open. You could otherwise dam- age the draught stop or the vehicle interior.
The draught stop offers protection from the
wind when driving with the roof down.
The draught stop can be fitted or removed
from the driver's side or passenger side.
Perform operations involving the draught
stop preferably on the side facing away from
traffic, after you have stopped the vehicle,
paying attention to road and traffic condi-
tions.
Fitting and removing the draught stop Preparing for fitting
Example: preparing for fitting from the left side of
the vehicle
: Draught stop
; Locked latch
= Unlocked latch
X Fulfil the following conditions for fitting: 90
RoofOpening and closing
Page 94 of 357
R
unlocking buttons Rand Lpoint in the
direction of travel.
R latch =facing you is unlocked.
R latch ;facing away from you is locked.
X To unlock the latch: press unlocking but-
ton Ror Lon the locked latch.
X To lock the latch: push the unlocked latch
upwards by hand until it engages.
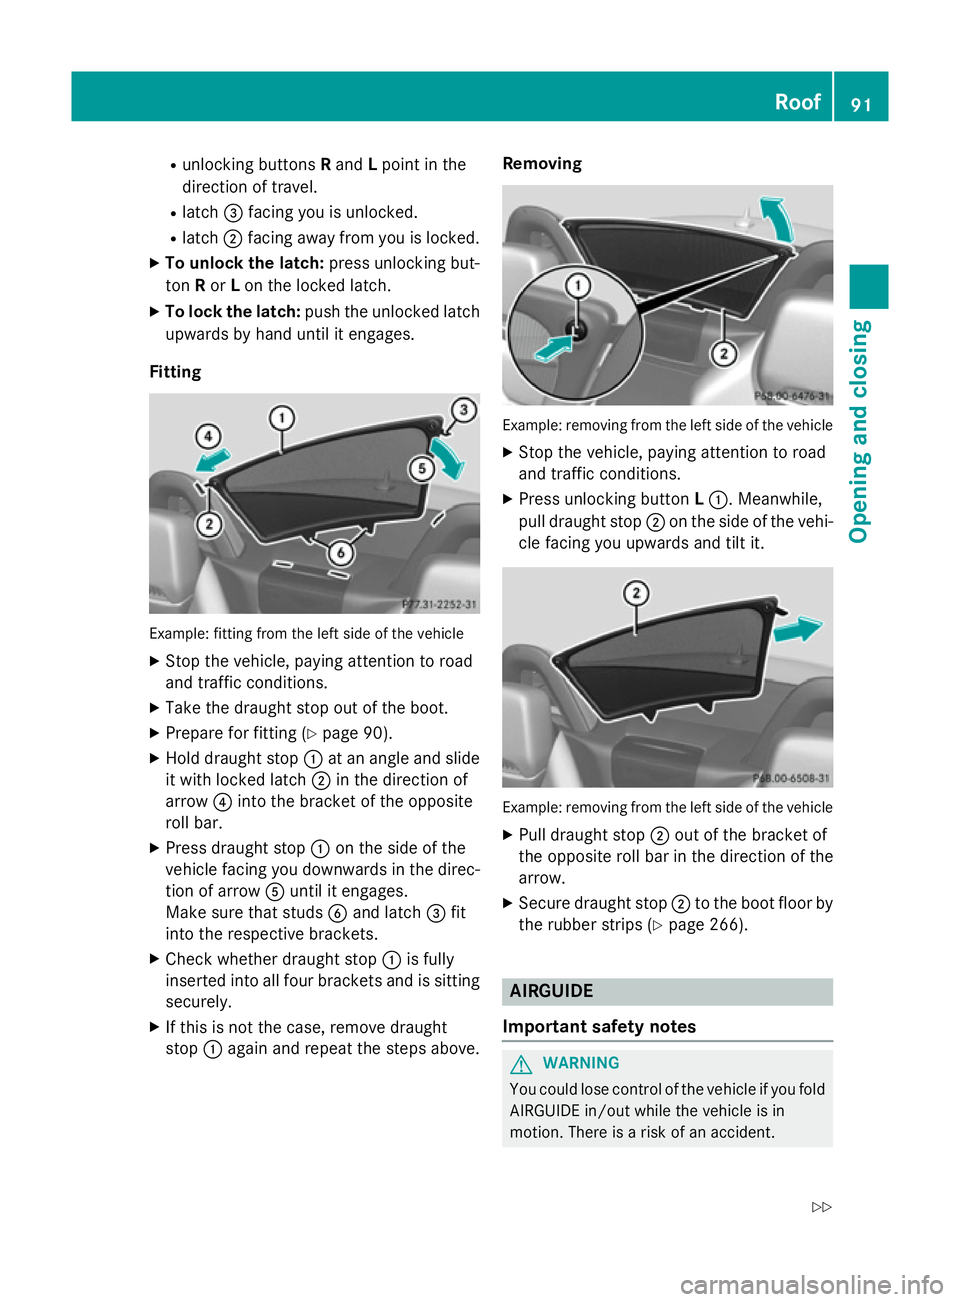
Fitting Example: fitting from the left side of the vehicle
X Stop the vehicle, paying attention to road
and traffic conditions.
X Take the draught stop out of the boot.
X Prepare for fitting (Y page 90).
X Hold draught stop :at an angle and slide
it with locked latch ;in the direction of
arrow ?into the bracket of the opposite
roll bar.
X Press draught stop :on the side of the
vehicle facing you downwards in the direc-
tion of arrow Auntil it engages.
Make sure that studs Band latch =fit
into the respective brackets.
X Check whether draught stop :is fully
inserted into all four brackets and is sitting
securely.
X If this is not the case, remove draught
stop :again and repeat the steps above. Removing
Example: removing from the left side of the vehicle
X Stop the vehicle, paying attention to road
and traffic conditions.
X Press unlocking button L:. Meanwhile,
pull draught stop ;on the side of the vehi-
cle facing you upwards and tilt it. Example: removing from the left side of the vehicle
X Pull draught stop ;out of the bracket of
the opposite roll bar in the direction of the
arrow.
X Secure draught stop ;to the boot floor by
the rubber strips (Y page 266). AIRGUIDE
Important safety notes G
WARNING
You could lose control of the vehicle if you fold AIRGUIDE in/out while the vehicle is in
motion. There is a risk of an accident. Roof
91Opening and closing
Z
Page 95 of 357
Only fold AIRGUIDE in/out while the vehicle is
stationary.
! AIRGUIDE can only be positioned cor-
rectly by folding it in or out. AIRGUIDE can-
not be dismantled. Do not try to remove
AIRGUIDE from its anchorage. Otherwise,
you could damage AIRGUIDE or the vehicle.
AIRGUIDE can be folded out or back in from
the driver's side or passenger side.
When operating AIRGUIDE, preferably stand
on the side of the vehicle away from the traffic
after you have stopped the vehicle in accord- ance with road and traffic conditions.
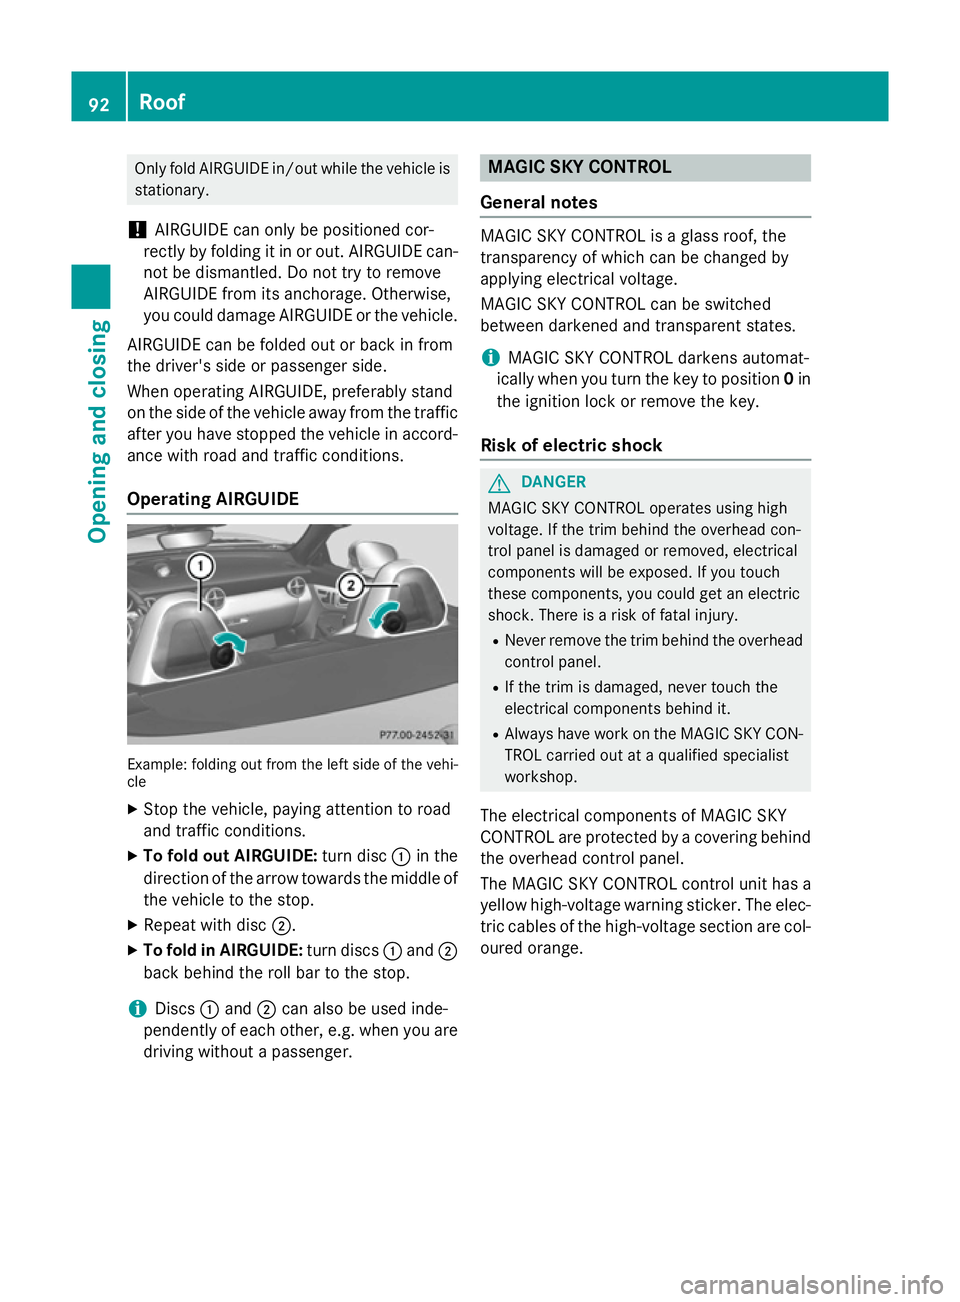
Operating AIRGUIDE Example: folding out from the left side of the vehi-
cle
X Stop the vehicle, paying attention to road
and traffic conditions.
X To fold out AIRGUIDE: turn disc:in the
direction of the arrow towards the middle of
the vehicle to the stop.
X Repeat with disc ;.
X To fold in AIRGUIDE: turn discs:and ;
back behind the roll bar to the stop.
i Discs
:and ;can also be used inde-
pendently of each other, e.g. when you are driving without a passenger. MAGIC SKY CONTROL
General notes MAGIC SKY CONTROL is a glass roof, the
transparency of which can be changed by
applying electrical voltage.
MAGIC SKY CONTROL can be switched
between darkened and transparent states.
i MAGIC SKY CONTROL darkens automat-
ically when you turn the key to position 0in
the ignition lock or remove the key.
Risk of electric shock G
DANGER
MAGIC SKY CONTROL operates using high
voltage. If the trim behind the overhead con-
trol panel is damaged or removed, electrical
components will be exposed. If you touch
these components, you could get an electric
shock. There is a risk of fatal injury.
R Never remove the trim behind the overhead
control panel.
R If the trim is damaged, never touch the
electrical components behind it.
R Always have work on the MAGIC SKY CON-
TROL carried out at a qualified specialist
workshop.
The electrical components of MAGIC SKY
CONTROL are protected by a covering behind the overhead control panel.
The MAGIC SKY CONTROL control unit has a
yellow high-voltage warning sticker. The elec-
tric cables of the high-voltage section are col- oured orange. 92
RoofOpening and closing
Page 99 of 357
Useful information
i This Owner's Manual describes all mod-
els, series and optional equipment for your
vehicle that were available at the time of
going to press. National variations are pos- sible. Note that your vehicle may not be
equipped with all of the functions descri-
bed. This is also the case for systems and
functions relevant to safety.
i Read the information on qualified special-
ist workshops: (Y page 24). Correct driver's seat position
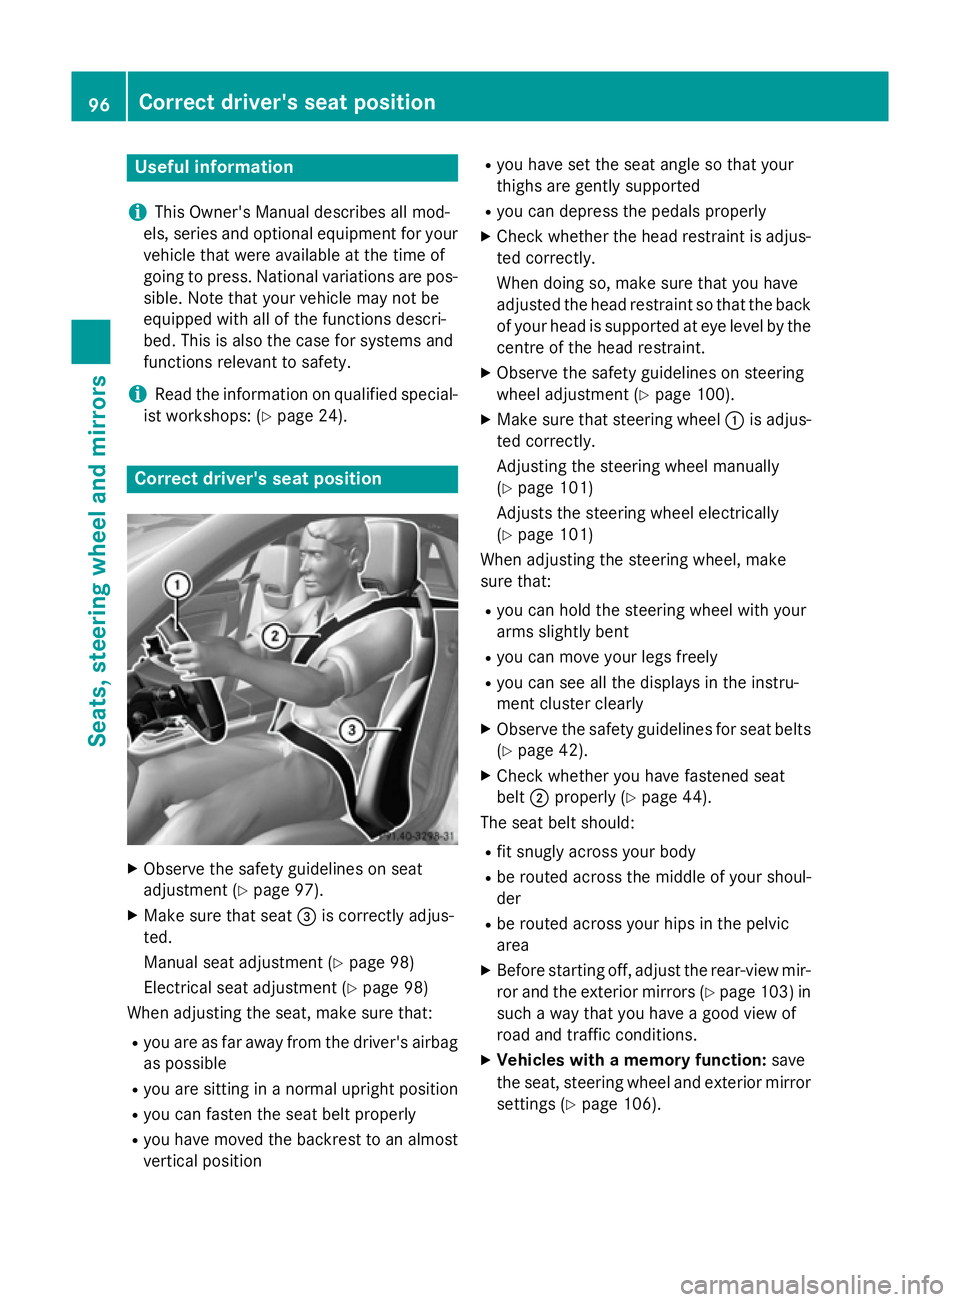
X
Observe the safety guidelines on seat
adjustment (Y page 97).
X Make sure that seat =is correctly adjus-
ted.
Manual seat adjustment (Y page 98)
Electrical seat adjustment (Y page 98)
When adjusting the seat, make sure that:
R you are as far away from the driver's airbag
as possible
R you are sitting in a normal upright position
R you can fasten the seat belt properly
R you have moved the backrest to an almost
vertical position R
you have set the seat angle so that your
thighs are gently supported
R you can depress the pedals properly
X Check whether the head restraint is adjus-
ted correctly.
When doing so, make sure that you have
adjusted the head restraint so that the back
of your head is supported at eye level by the centre of the head restraint.
X Observe the safety guidelines on steering
wheel adjustment (Y page 100).
X Make sure that steering wheel :is adjus-
ted correctly.
Adjusting the steering wheel manually
(Y page 101)
Adjusts the steering wheel electrically
(Y page 101)
When adjusting the steering wheel, make
sure that:
R you can hold the steering wheel with your
arms slightly bent
R you can move your legs freely
R you can see all the displays in the instru-
ment cluster clearly
X Observe the safety guidelines for seat belts
(Y page 42).
X Check whether you have fastened seat
belt ;properly (Y page 44).
The seat belt should:
R fit snugly across your body
R be routed across the middle of your shoul-
der
R be routed across your hips in the pelvic
area
X Before starting off, adjust the rear-view mir-
ror and the exterior mirrors (Y page 103) in
such a way that you have a good view of
road and traffic conditions.
X Vehicles with a memory function: save
the seat, steering wheel and exterior mirror
settings (Y page 106). 96
Correct driver's seat positionSeats, steering wheel and mirrors
Page 129 of 357

Useful information
i This Owner's Manual describes all mod-
els, series and optional equipment for your
vehicle that were available at the time of
going to press. National variations are pos- sible. Note that your vehicle may not be
equipped with all of the functions descri-
bed. This is also the case for systems and
functions relevant to safety.
i Read the information on qualified special-
ist workshops: (Y page 24). Overview of climate control systems
General notes
Observe the settings recommended on the
following pages. The windows could other-
wise mist up.
To prevent the windows from misting up:
R switch off climate control only briefly
R switch on air-recirculation mode only
briefly
R switch on the cooling with air dehumidifi-
cation function
R switch on the "demist windscreen" function
briefly, if required
Climate control regulates the temperature
and the humidity in the vehicle interior and
filters undesirable substances out of the air.
Climate control is only operational when the
engine is running. Optimum operation is only
achieved when the side windows and the roof
are closed.
The residual heat function can only be acti-
vated or deactivated with the ignition
switched off (Y page 135).
i Ventilate the vehicle for a brief period
during warm weather. This will speed up the
cooling process, and the desired vehicle
interior temperature will be reached more
quickly. i
The integrated filter filters out most par-
ticles of dust and soot and completely fil-
ters out pollen. It also reduces gaseous pol-
lutants and odours. A clogged filter reduces the amount of air supplied to the vehicle
interior. For this reason, you should alwaysobserve the interval for replacing the filter,
which is specified in the Service Booklet. As this depends on environmental conditions,
e.g. heavy air pollution, the interval may be shorter than stated in the Service Booklet. 126
Overview of climate control systemsClimate control
Page 130 of 357
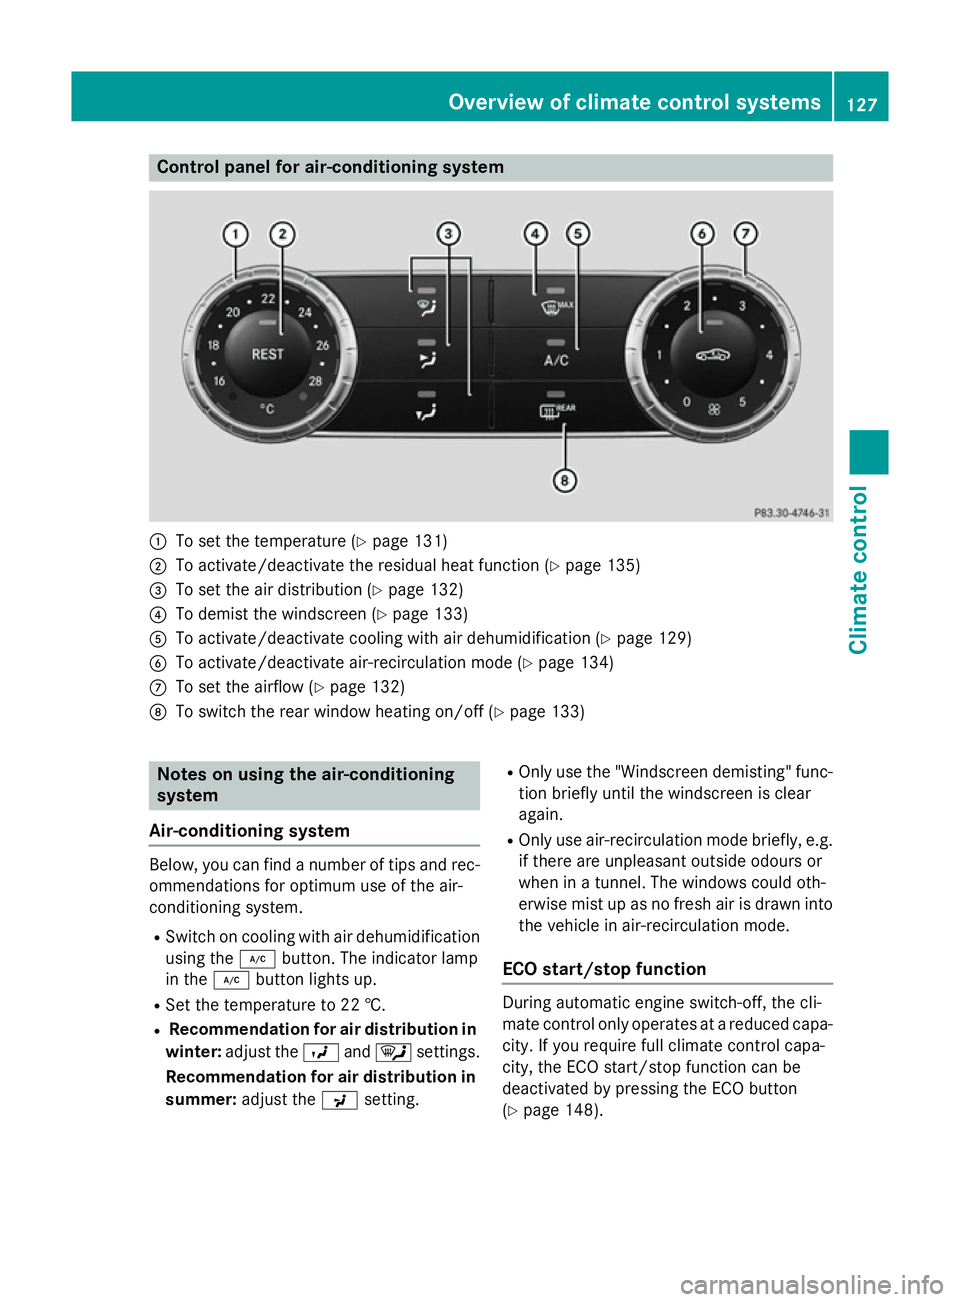
Control panel for air-conditioning system
:
To set the temperature (Y page 131)
; To activate/deactivate the residual heat function (Y page 135)
= To set the air distribution (Y page 132)
? To demist the windscreen (Y page 133)
A To activate/deactivate cooling with air dehumidification (Y page 129)
B To activate/deactivate air-recirculation mode (Y page 134)
C To set the airflow (Y page 132)
D To switch the rear window heating on/off (Y page 133)Notes on using the air-conditioning
system
Air-conditioning system Below, you can find a number of tips and rec-
ommendations for optimum use of the air-
conditioning system.
R Switch on cooling with air dehumidification
using the ¿button. The indicator lamp
in the ¿button lights up.
R Set the temperature to 22 †.
R Recommendation for air distribution in
winter: adjust the Oand¯ settings.
Recommendation for air distribution in summer: adjust the Psetting. R
Only use the "Windscreen demisting" func-
tion briefly until the windscreen is clear
again.
R Only use air-recirculation mode briefly, e.g.
if there are unpleasant outside odours or
when in a tunnel. The windows could oth-
erwise mist up as no fresh air is drawn into
the vehicle in air-recirculation mode.
ECO start/stop function During automatic engine switch-off, the cli-
mate control only operates at a reduced capa-
city. If you require full climate control capa-
city, the ECO start/stop function can be
deactivated by pressing the ECO button
(Y page 148). Overview of climate control systems
127Climate control