2014 MERCEDES-BENZ SLK-CLASS ROADSTER window
[x] Cancel search: windowPage 137 of 356

Setting the side air vents
:
Side window defroster vent
; Side air vent
X To open a side air vent: turn the adjuster
in side air vent ;counter-clockwise.
X To close a side air vent: turn the adjuster
in side air vent ;clockwise until it
engages. Setting the blower output of the
AIRSCARF vents
G
WARNING
Very hot or very cold air can flow from the air
vents. This could result in burns or frostbite in
the immediate vicinity of the air vents. There
is a risk of injury.
Make sure that all vehicle occupants always
maintain a sufficient distance to the air
outlets. If necessary, redirect the airflow to
another area of the vehicle interior. G
WARNING
When AIRSCARF is switched on, very hot air
can flow from the vents in the head restraints.
This could result in burns in the immediate
vicinity of the air vents. There is a risk of injury.
Reduce the heater output before it becomes
too hot. You can adjust the blower output of
AIRSCARF vents
:using the AIRSCARF
button (Y page 100). Setting the air vents
135Climate control Z
Page 169 of 356
such as carbon monoxide (CO) may enter the
vehicle. This is the case, e.g. if the vehicle
becomes trapped in snow. There is a risk of
fatal injury.
If you leave the engine or the auxiliary heating
running, make sure the exhaust pipe and area
around the vehicle are clear of snow. To
ensure an adequate supply of fresh air, open
a window on the side of the vehicle that is not
facing into the wind.
Have your vehicle winterproofed at a qualified
specialist workshop at the onset of winter.
Observe the notes in the "Winter operation"
section (Y page 308).
Driving with summer tires Observe the notes in the "Winter operation"
section (Y
page 308).
Slippery road surfaces G
WARNING
If you shift down on a slippery road surface in
an attempt to increase the engine's braking
effect, the drive wheels could lose their grip.
There is an increased danger of skidding and
accidents.
Do not shift down for additional engine
braking on a slippery road surface.
If the vehicle threatens to skid or cannot be
stopped when moving at low speed:
X Vehicles with manual transmission:
shift to neutral.
X Vehicles with automatic transmission:
shift the transmission to position N.
Drive particularly carefully on slippery road
surfaces. Avoid sudden acceleration, steering
and braking maneuvers. Do not use cruise
control.
The outside temperature indicator is not
designed to serve as an ice-warning device
and is therefore unsuitable for that purpose.
Changes in the outside temperature are
displayed after a short delay. Indicated temperatures just above the
freezing point do not guarantee that the road
surface is free of ice. The road may still be icy,
especially in wooded areas or on bridges. You
should pay special attention to road
conditions when temperatures are around
the freezing point.
i
For more information on driving with
snow chains, see (Y page 309). Driving systems
Cruise control
General notes Cruise control maintains a constant road
speed for you. It brakes automatically in order
to avoid exceeding the set speed. On long and
steep downhill gradients, especially if the
vehicle is laden, you must select a lower gear
in good time. By doing so, you will make use
of the braking effect of the engine. This
relieves the load on the brake system and
prevents the brakes from overheating and
wearing too quickly.
Use cruise control only if road and traffic
conditions make it appropriate to maintain a
steady speed for a prolonged period. You can
store any road speed above 20 mph
(30 km/h).
Important safety notes
If you fail to adapt your driving style, cruise
control can neither reduce the risk of an
accident nor override the laws of physics.
Cruise control cannot take into account the
road, traffic and weather conditions. Cruise
control is only an aid. You are responsible for
the distance to the vehicle in front, for vehicle
speed, for braking in good time and for
staying in lane. Driving systems
167Driving and parking Z
Page 240 of 356
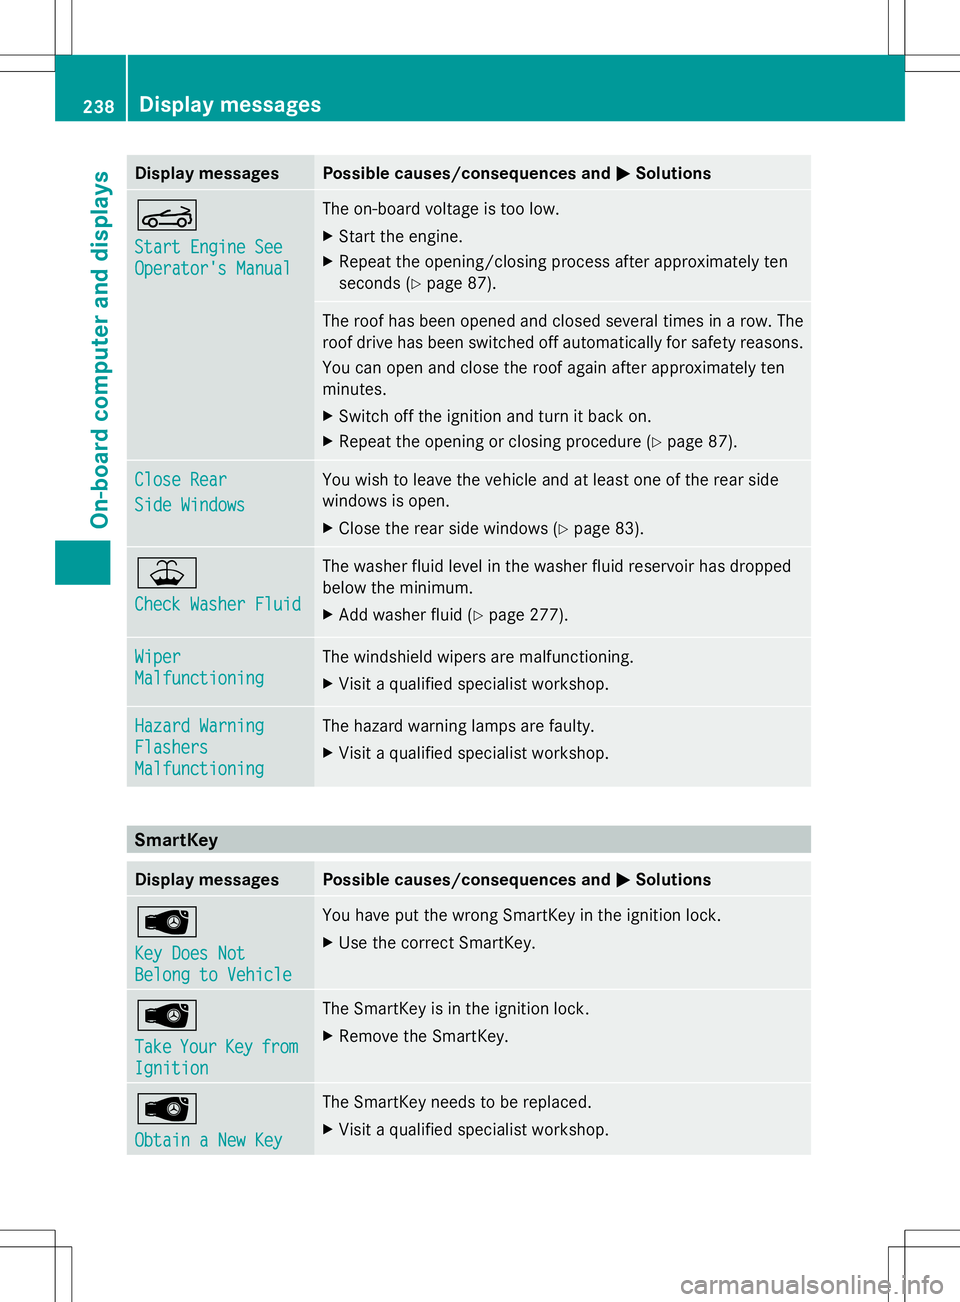
Display messages Possible causes/consequences and
M
MSolutions K
Start Engine See Start Engine See
Operator's Manual Operator's Manual The on-board voltage is too low.
X
Start the engine.
X Repeat the opening/closing process after approximately ten
seconds (Y page 87). The roof has been opened and closed several times in a row. The
roof drive has been switched off automatically for safety reasons.
You can open and close the roof again after approximately ten
minutes.
X
Switch off the ignition and turn it back on.
X Repeat the opening or closing procedure (Y page 87).Close Rear Close Rear
Side Windows Side Windows You wish to leave the vehicle and at least one of the rear side
windows is open.
X
Close the rear side windows (Y page 83).¥
Check Washer Fluid Check Washer Fluid The washer fluid level in the washer fluid reservoir has dropped
below the minimum.
X
Add washer fluid ( Ypage 277). Wiper Wiper
Malfunctioning Malfunctioning The windshield wipers are malfunctioning.
X
Visit a qualified specialist workshop. Hazard Warning Hazard Warning
Flashers Flashers
Malfunctioning Malfunctioning The hazard warning lamps are faulty.
X
Visit a qualified specialist workshop. SmartKey
Display messages Possible causes/consequences and
M MSolutions Â
Key Does Not Key Does Not
Belong to Vehicle Belong to Vehicle You have put the wrong SmartKey in the ignition lock.
X
Use the correct SmartKey. Â
Take Take
Your
YourKey
Keyfrom
from
Ignition
Ignition The SmartKey is in the ignition lock.
X
Remove the SmartKey. Â
Obtain a New Key Obtain a New Key The SmartKey needs to be replaced.
X
Visit a qualified specialist workshop. 238
Display
messagesOn-board computer and displays
Page 259 of 356
Cup holder in the center console
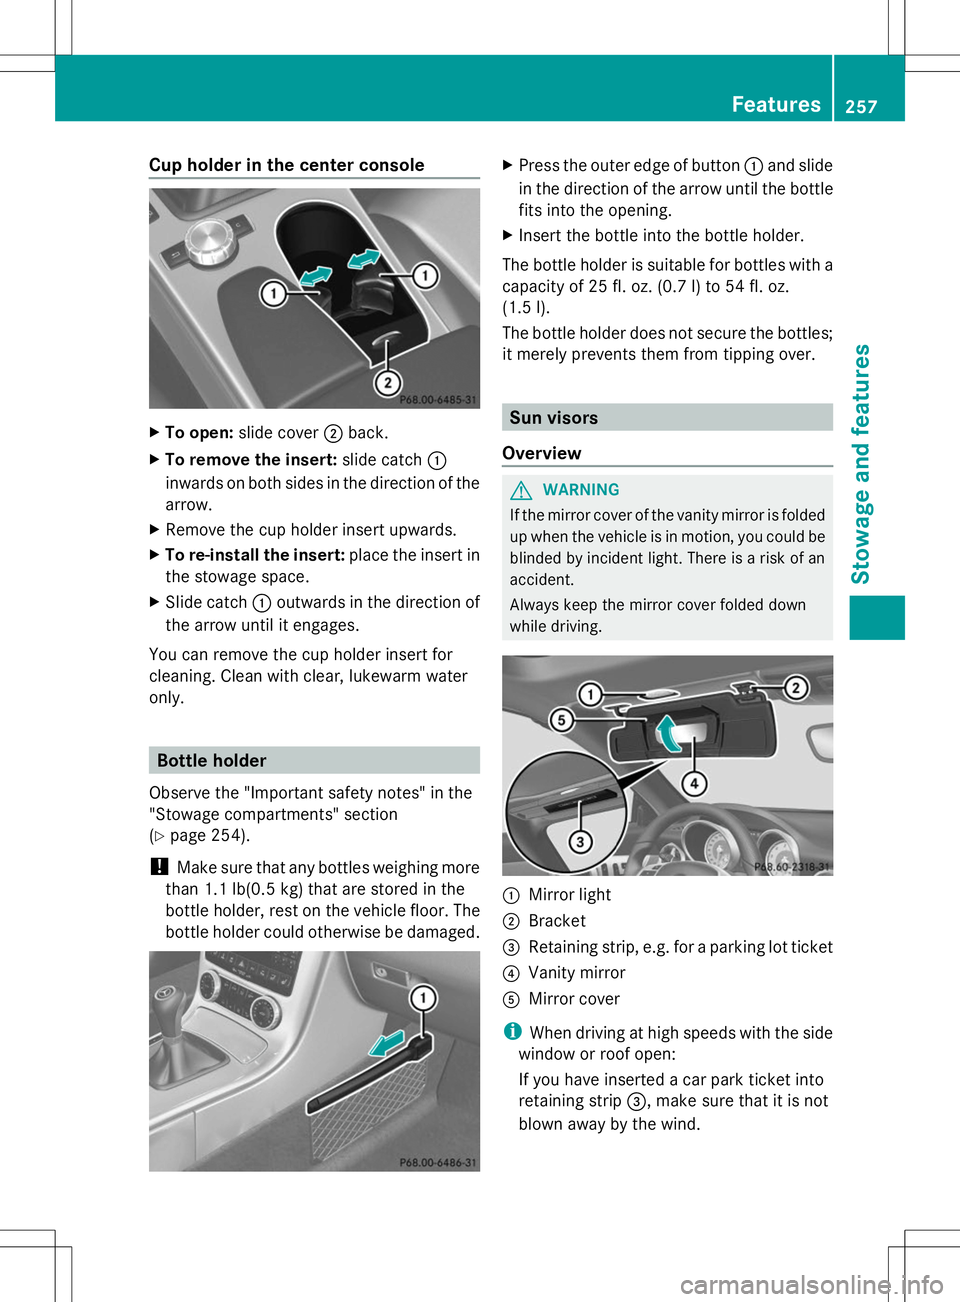
X
To open: slide cover ;back.
X To remove the insert: slide catch:
inwards on both sides in the direction of the
arrow.
X Remove the cup holder insert upwards.
X To re-install the insert: place the insert in
the stowage space.
X Slide catch :outwards in the direction of
the arrow until it engages.
You can remove the cup holder insert for
cleaning. Clean with clear, lukewarm water
only. Bottle holder
Observe the "Important safety notes" in the
"Stowage compartments" section
(Y page 254).
! Make sure that any bottles weighing more
than 1.1 lb(0.5 kg) that are stored in the
bottle holder, rest on the vehicle floor. The
bottle holder could otherwise be damaged. X
Press the outer edge of button :and slide
in the direction of the arrow until the bottle
fits into the opening.
X Insert the bottle into the bottle holder.
The bottle holder is suitable for bottles with a
capacity of 25 fl. oz. (0.7 l) to 54 fl. oz.
(1.5 l).
The bottle holder does not secure the bottles;
it merely prevents them from tipping over. Sun visors
Overview G
WARNING
If the mirror cover of the vanity mirror is folded
up when the vehicle is in motion, you could be
blinded by incident light. There is a risk of an
accident.
Always keep the mirror cover folded down
while driving. :
Mirror light
; Bracket
= Retaining strip, e.g. for a parking lot ticket
? Vanity mirror
A Mirror cover
i When driving at high speeds with the side
window or roof open:
If you have inserted a car park ticket into
retaining strip =, make sure that it is not
blown away by the wind. Features
257Stowage and features Z
Page 266 of 356
You are prompted to confirm route guidance
to the address entered.
X Select Yes Yeswith the =or; buttons
on the COMAND system.
X Confirm with the 9button on the
COMAND system.
The system calculates the route and
subsequently starts the route guidance with
the address entered.
i If you select No
No , the address can be saved
in the address book.
i The destination download function is
available if the relevant mobile phone
network is available and data transfer is
possible.
i The destination download function can
only be used if the vehicle is equipped with
a navigation system.
Route Assistance
This service is part of the mbrace PLUS
Package and cannot be purchased
separately.
i You can also use the Route Assistance
function if your vehicle is not equipped with
a navigation system.
Within the framework of this service, you
receive a professional and reliable form of
navigation support without having to leave
your vehicle.
The customer service representative finds a
suitable route depending on your vehicle's
current position and the desired destination.
You will then be guided live through the
current route section.
Search and Send General notes
i
To use "Search & Send", your vehicle
must be equipped with mbrace and a
navigation system. Additionally, an mbrace
service subscription must be completed. "Search & Send" is a destination entry
service. A destination address which is found
on Google Maps
®
can be transferred via
mbrace directly to your vehicle's navigation
system.
Specifying and sending the destination
address
X Go to the website http://
www.maps.google.com and enter a
destination address into the entry field.
X To send the destination address to the
e-mail address of your mbrace
account: click on the corresponding
button on the website.
i Example:
If you select 'Send to vehicle' and then
'Mercedes-Benz', the destination address
will be sent to your vehicle.
X When the "Send" dialog window appears:
Enter the e-mail address you specified
when setting up your mbrace account into
the corresponding field.
X Click "Send".
i Information on specific commands such
as "Address entry" or "Send" can be found
on the website.
Calling up destination addresses
X Switch on the ignition.
The destination address is loaded into the
vehicle's navigation system.
A display message appears, asking
whether navigation should be started.
X Select Yes
Yes by turning cVdor sliding
XVY the COMAND controller and press
W to confirm.
The system calculates the route and
subsequently starts the route guidance
with the address entered.
i If you select No No, the address can be saved
in the address book. 264
FeaturesStowage and features
Page 274 of 356
X
Push a round pen into opening
=(Y page 271) for approximately three
seconds.
The zone currently selected appears in
compass display ;(Ypage 271).
X To select the zone: push a round pen into
opening =(Ypage 271) until the desired
zone is selected.
If, after a few seconds, the display in
compass display ;(Ypage 271) changes
direction, the zone has been selected.
Calibrating the compass X
Make sure that there is sufficient space for
you to drive in a circle without impeding
traffic.
In order to calibrate the compass correctly,
do the following:
R calibrate the compass in the open and not
in the vicinity of steel structures or high-
voltage transmission lines.
R switch off electrical consumers such as the
climate control, windshield wipers or rear
window defroster.
R close all doors and the trunk lid.
X Switch on the ignition.
X Push a round pen into opening
=(Y page 271) for approximately six
seconds, until symbol C
C is shown in
compass display ;(Ypage 271).
X Drive your vehicle in a full circle at
approximately 3 mph (5 km/h) to 6 mph
(10 km/h).
When the calibration has successfully been
completed, the current direction is shown
in compass display ;(Ypage 271). Floormats
G
WARNING
Objects in the driver's footwell can restrict the
pedal travel or obstruct a depressed pedal. The operating and road safety of the vehicle
is jeopardized. There is a risk of an accident.
Make sure that all objects in the vehicle are
stowed correctly, and that they cannot enter
the driver's footwell. Install the floormats
securely and as specified in order to ensure
sufficient clearance for the pedals. Do not use
loose floormats and do not place floormats on
top of one another. X
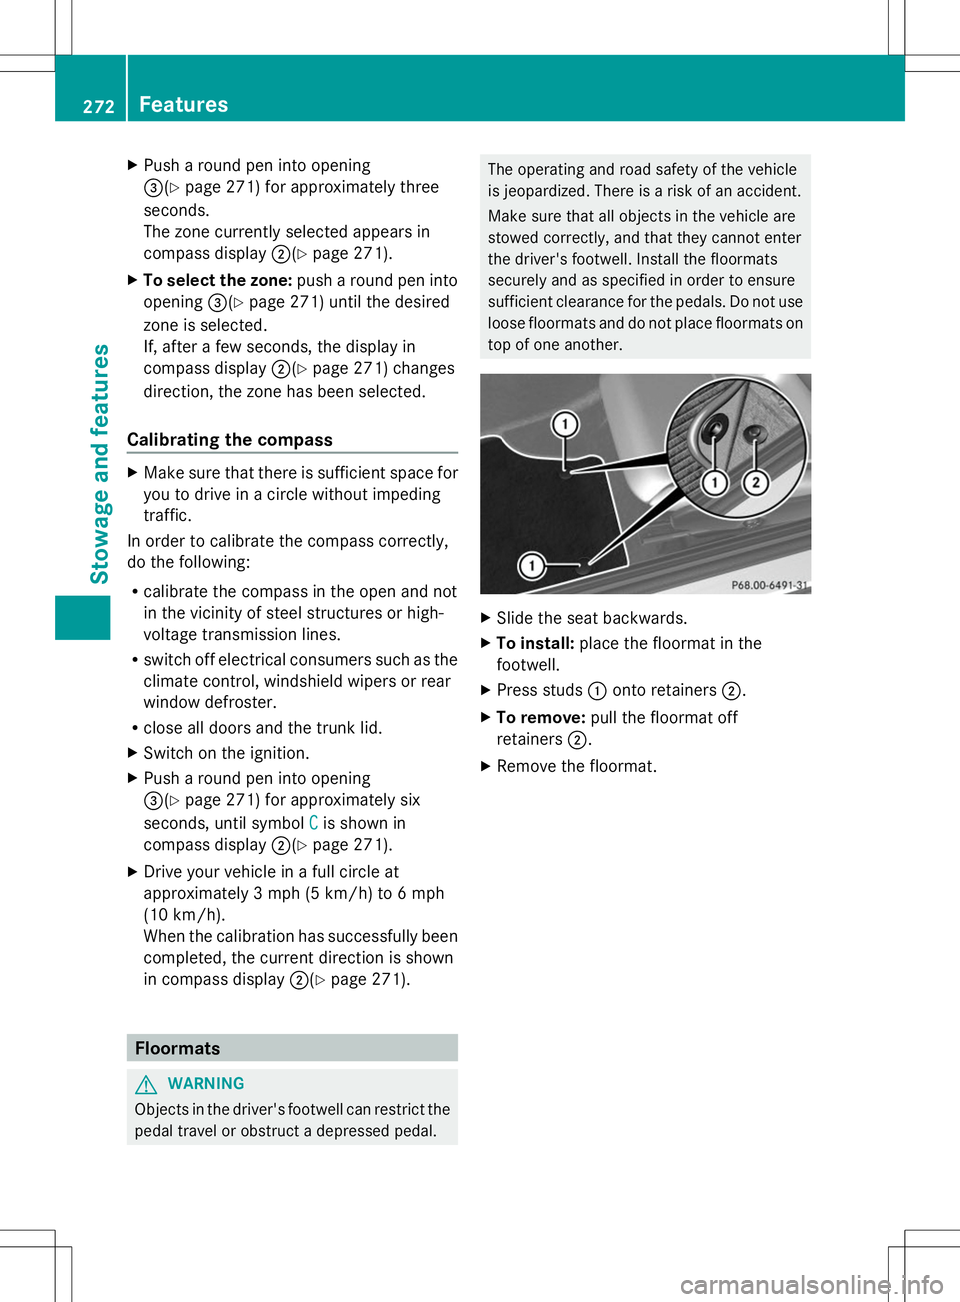
Slide the seat backwards.
X To install: place the floormat in the
footwell.
X Press studs :onto retainers ;.
X To remove: pull the floormat off
retainers ;.
X Remove the floormat. 272
FeaturesStowage and features
Page 282 of 356
should drive for a few minutes after
cleaning. Braking heats the brake discs and
the brake pads/linings, thus drying them.
The vehicle can then be parked.
Regular care of your vehicle is a condition for
retaining the quality in the long term.
Use care products and cleaning agents
recommended and approved by Mercedes-
Benz. Washing the vehicle and cleaning the
paintwork
Automatic car wash G
WARNING
Braking efficiency is reduced after washing
the vehicle. There is a risk of an accident.
After the vehicle has been washed, brake
carefully while paying attention to the traffic
conditions until full braking power is restored.
! If DISTRONIC PLUS or the HOLD function
is activated, the vehicle brakes
automatically in certain situations. To
prevent damage to the vehicle, deactivate
DISTRONIC PLUS and the HOLD function in
the following or other similar situations:
R when towing the vehicle
R in the car wash
! It is preferable to use car washes with
adjustable high-pressure pre-cleaning that
corresponds to the specification for the
Cabriolet program. In car washes that use
high water pressures, there is a risk that a
small amount of water may leak into the
vehicle.
! Lock the car if you wash it in an automatic
car wash. Otherwise, the vehicle might be
damaged.
! Never clean your vehicle in a Touchless
Automatic Car Wash as these use special
cleaning agents. These cleaning agents can
damage the paintwork or plastic parts. !
Make sure that the automatic
transmission is in position Nwhen washing
your vehicle in a tow-through car wash. The
vehicle could be damaged if the
transmission is in another position.
! Make sure that:
R the side windows and the roof are
completely closed
R the climate control blower is switched off
R the windshield wiper switch is at position
0
The vehicle could otherwise be damaged.
You can wash the vehicle in an automatic car
wash from the very start.
If the vehicle is very dirty, pre-wash it before
cleaning it in an automatic car wash.
After using an automatic car wash, wipe off
wax from the windshield and the wiper
blades. This will prevent smears and reduce
wiping noises caused by residue on the
windshield.
Washing by hand In some countries, washing by hand is only
allowed at specially equipped washing bays.
Observe the legal requirements in all
countries concerned.
X
Do not use hot water and do not wash the
vehicle in direct sunlight.
X Use a soft sponge to clean.
X Use a mild cleaning agent, such as a car
shampoo approved by Mercedes-Benz.
X Thoroughly hose down the vehicle with a
gentle jet of water.
X Do not point the water jet directly towards
the air inlet.
X Use plenty of water and rinse out the
sponge frequently.
X Rinse the vehicle with clean water and dry
thoroughly with a chamois.
X Do not let the cleaning agent dry on the
paintwork. 280
CareMaintenance and care
Page 284 of 356
Matte finish care
!
Never polish the vehicle or the light alloy
wheels. Polishing causes the finish to
shine.
! The following may cause the paint to
become shiny and thus reduce the matte
effect:
R Vigorous rubbing with unsuitable
materials.
R Frequent use of car washes.
R Washing the vehicle in direct sunlight.
! Never use paint cleaner, buffing or
polishing products, or gloss preserver, e.g.
wax. These products are only suitable for
high-gloss surfaces. Their use on vehicles
with matte finish leads to considerable
surface damage (shiny, spotted areas).
Always have paintwork repairs carried out
at a qualified specialist workshop.
! Do not use wash programs with a hot wax
treatment under any circumstances.
Observe these notes if your vehicle has a
clear matte finish. This will help you to avoid
damage to the paintwork due to incorrect
treatment.
These notes also apply to light alloy wheels
with a clear matte finish.
i The vehicle should preferably be washed
by hand using a soft sponge, car shampoo
and plenty of water.
i Use only insect remover and car shampoo
from the range of recommended and
approved Mercedes-Benz care products. Cleaning the vehicle parts
Cleaning the wheels !
Do not use acidic wheel cleaning products
to remove brake dust. This could damage
wheel bolts and brake components. !
Do not park the vehicle for an extended
period straight after cleaning it, particularly
after having cleaned the wheels with wheel
cleaner. Wheel cleaners could cause
increased corrosion of the brake discs and
brake pads/linings. For this reason, you
should drive for a few minutes after
cleaning. Braking heats the brake discs and
the brake pads/linings, thus drying them.
The vehicle can then be parked.
Cleaning the windows G
WARNING
You could become trapped by the windshield
wipers if they start moving while cleaning the
windshield or wiper blades. There is a risk of
injury.
Always switch off the windshield wipers and
the ignition before cleaning the windshield or
wiper blades.
! Do not use dry cloths, abrasive products,
solvents or cleaning agents containing
solvents to clean the inside of the windows.
Do not touch the insides of the windows
with hard objects, e.g. an ice scraper or
ring. There is otherwise a risk of damaging
the windows.
! Clean the water drainage channels of the
windshield and the rear window at regular
intervals. Deposits such as leaves, petals
and pollen may under certain
circumstances prevent water from draining
away. This can lead to corrosion damage
and damage to electronic components.
X Clean the inside and outside of the
windows with a damp cloth and a cleaning
agent that is recommended and approved
by Mercedes-Benz.
Cleaning wiper blades G
WARNING
You could become trapped by the windshield
wipers if they start moving while cleaning the 282
CareMaintenance and care