2014 MERCEDES-BENZ SLK-CLASS ROADSTER wheel
[x] Cancel search: wheelPage 65 of 356
You can select between the following states
of ESP ®
:
R ESP ®
is activated.
R ESP ®
is deactivated. G
WARNING
If you deactivate ESP ®
, ESP ®
no longer
stabilizes the vehicle. There is an increased
risk of skidding and an accident.
Only deactivate ESP ®
in the situations
described in the following.
It may be best to deactivate ESP ®
in the
following situations:
R when using snow chains
R in deep snow
R on sand or gravel
i Activate ESP ®
as soon as the situations
described above no longer apply. ESP ®
will
otherwise not be able to stabilize the
vehicle if the vehicle starts to skid or a
wheel starts to spin.
! Avoid spinning the driven wheels for an
extended period with ESP ®
deactivated.
You could otherwise damage the drivetrain.
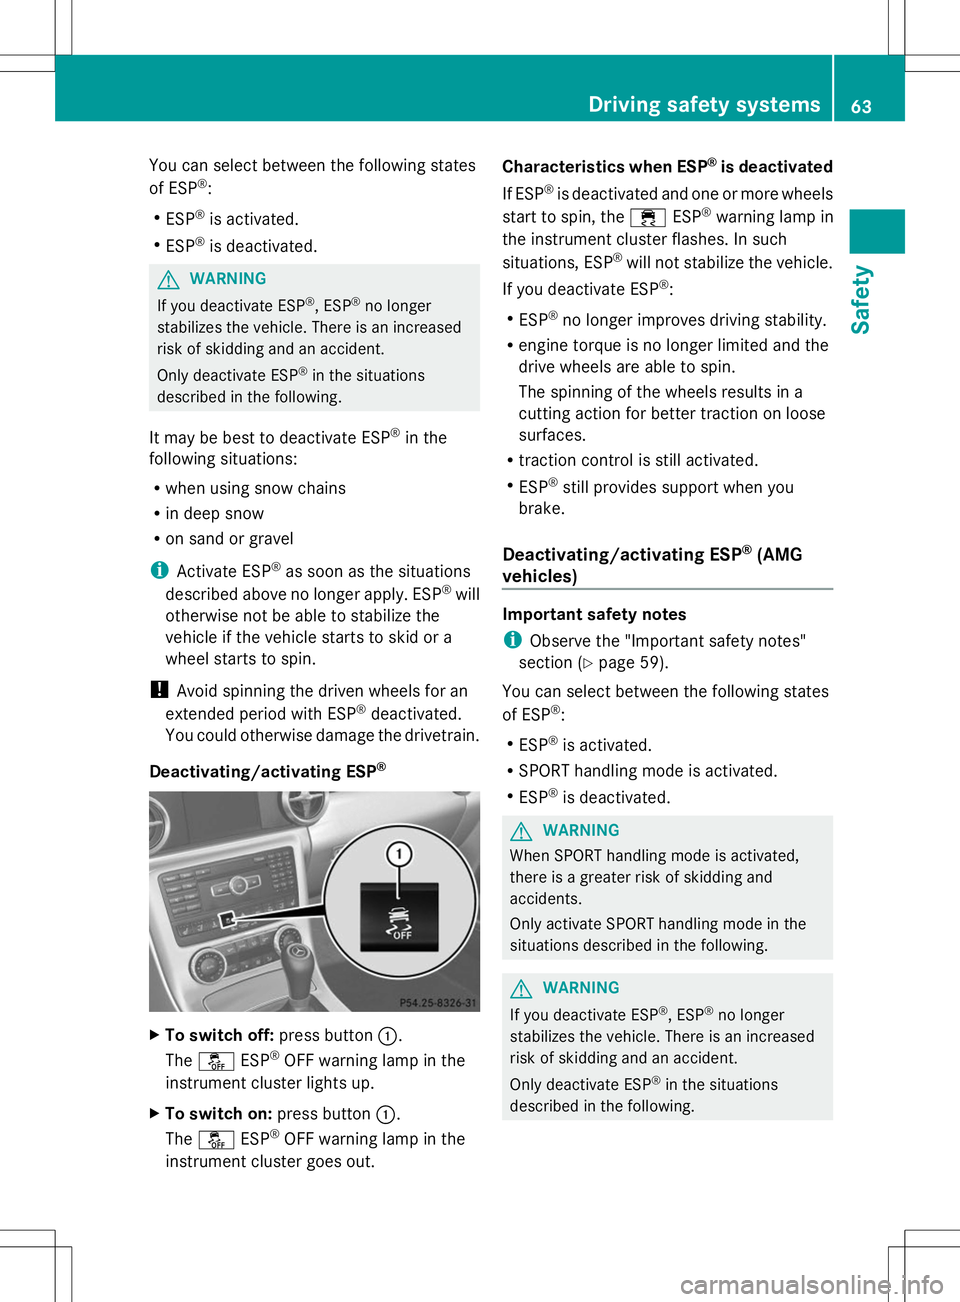
Deactivating/activating ESP ®X
To switch off: press button:.
The å ESP®
OFF warning lamp in the
instrument cluster lights up.
X To switch on: press button:.
The å ESP®
OFF warning lamp in the
instrument cluster goes out. Characteristics when ESP
®
is deactivated
If ESP ®
is deactivated and one or more wheels
start to spin, the ÷ESP®
warning lamp in
the instrument cluster flashes. In such
situations, ESP ®
will not stabilize the vehicle.
If you deactivate ESP ®
:
R ESP ®
no longer improves driving stability.
R engine torque is no longer limited and the
drive wheels are able to spin.
The spinning of the wheels results in a
cutting action for better traction on loose
surfaces.
R traction control is still activated.
R ESP ®
still provides support when you
brake.
Deactivating/activating ESP ®
(AMG
vehicles) Important safety notes
i
Observe the "Important safety notes"
section (Y page 59).
You can select between the following states
of ESP ®
:
R ESP ®
is activated.
R SPORT handling mode is activated.
R ESP ®
is deactivated. G
WARNING
When SPORT handling mode is activated,
there is a greater risk of skidding and
accidents.
Only activate SPORT handling mode in the
situations described in the following. G
WARNING
If you deactivate ESP ®
, ESP ®
no longer
stabilizes the vehicle. There is an increased
risk of skidding and an accident.
Only deactivate ESP ®
in the situations
described in the following. Driving safety systems
63Safety Z
Page 66 of 356
In the following situations, it may be better to
activate SPORT handling mode or deactivate
ESP ®
:
R when using snow chains
R in deep snow
R on sand or gravel
R on designated roads when the vehicle's
own oversteering and understeering
characteristics are desired
Driving in SPORT handling mode or without
ESP ®
requires an extremely qualified and
experienced driver.
i Activate ESP ®
as soon as the situations
described above no longer apply. ESP ®
will
otherwise not be able to stabilize the
vehicle if the vehicle starts to skid or a
wheel starts to spin.
! Avoid spinning the driven wheels for an
extended period with ESP ®
deactivated.
You could otherwise damage the drivetrain.
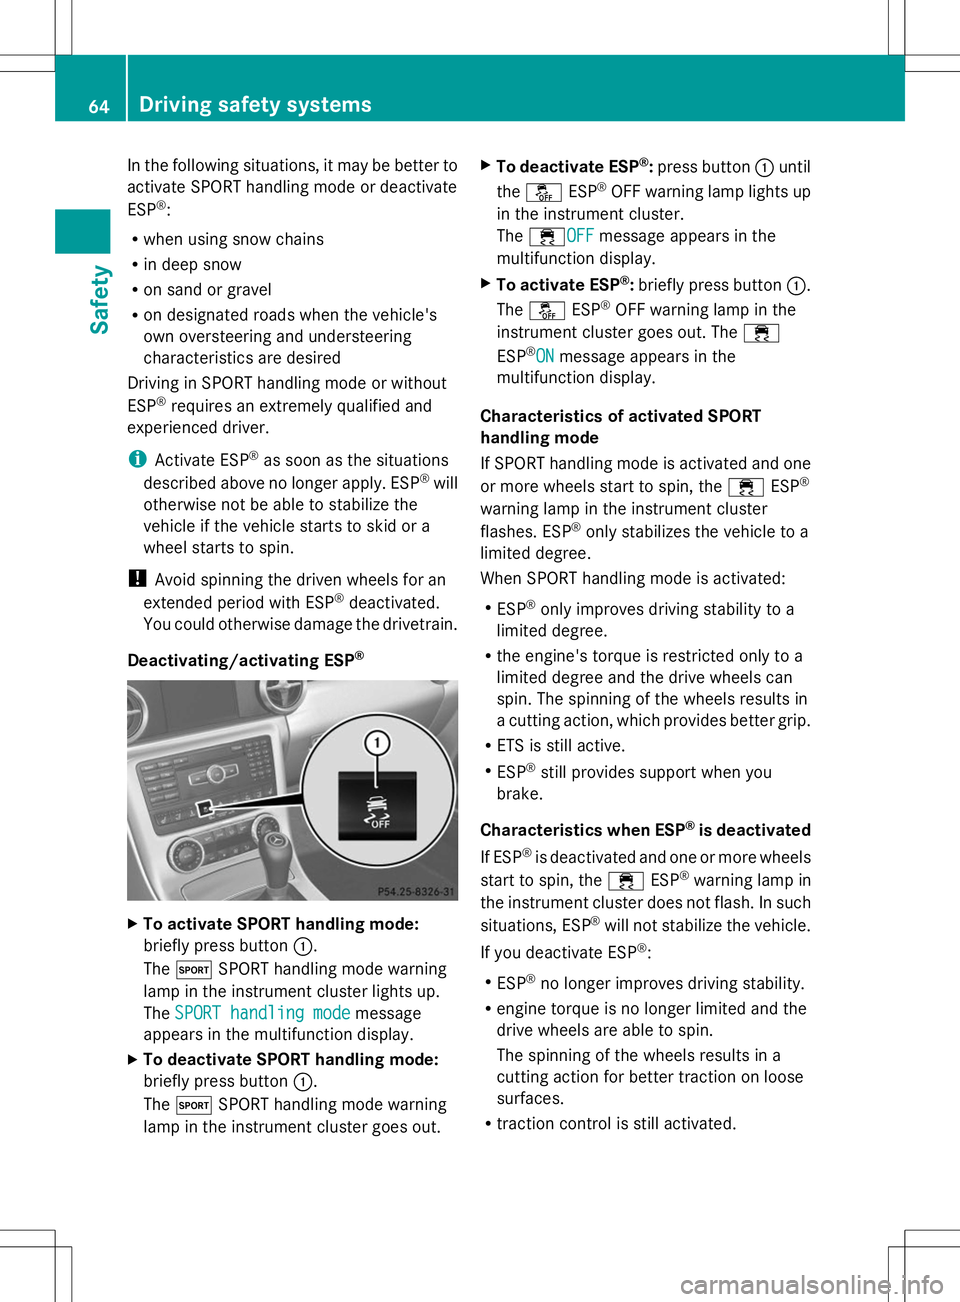
Deactivating/activating ESP ®X
To activate SPORT handling mode:
briefly press button :.
The M SPORT handling mode warning
lamp in the instrument cluster lights up.
The SPORT handling mode
SPORT handling mode message
appears in the multifunction display.
X To deactivate SPORT handling mode:
briefly press button :.
The M SPORT handling mode warning
lamp in the instrument cluster goes out. X
To deactivate ESP ®
:press button :until
the å ESP®
OFF warning lamp lights up
in the instrument cluster.
The ÷OFF OFFmessage appears in the
multifunction display.
X To activate ESP ®
:briefly press button :.
The å ESP®
OFF warning lamp in the
instrument cluster goes out. The ÷
ESP ®
ON ON message appears in the
multifunction display.
Characteristics of activated SPORT
handling mode
If SPORT handling mode is activated and one
or more wheels start to spin, the ÷ESP®
warning lamp in the instrument cluster
flashes. ESP ®
only stabilizes the vehicle to a
limited degree.
When SPORT handling mode is activated:
R ESP ®
only improves driving stability to a
limited degree.
R the engine's torque is restricted only to a
limited degree and the drive wheels can
spin. The spinning of the wheels results in
a cutting action, which provides better grip.
R ETS is still active.
R ESP ®
still provides support when you
brake.
Characteristics when ESP ®
is deactivated
If ESP ®
is deactivated and one or more wheels
start to spin, the ÷ESP®
warning lamp in
the instrument cluster does not flash. In such
situations, ESP ®
will not stabilize the vehicle.
If you deactivate ESP ®
:
R ESP ®
no longer improves driving stability.
R engine torque is no longer limited and the
drive wheels are able to spin.
The spinning of the wheels results in a
cutting action for better traction on loose
surfaces.
R traction control is still activated. 64
Driving safety systemsSafety
Page 67 of 356
R
PRE-SAFE ®
is no longer available, nor is it
activated if you brake firmly and ESP ®
intervenes.
R PRE-SAFE ®
Brake is no longer available, it
is also not activated if you brake firmly and
ESP ®
intervenes.
R ESP ®
still provides support when you
brake. EBD (electronic brake force
distribution)
General information EBD monitors and controls the brake
pressure on the rear wheels to improve
driving stability while braking.
Important safety notes
i
Observe the "Important safety notes"
section for driving safety systems
(Y page 59). G
WARNING
If EBD has malfunctioned, the rear wheels can
still lock, e.g. under full braking. This
increases the risk of skidding and an accident.
You should therefore adapt your driving style
to the different handling characteristics. Have
the brake system checked at a qualified
specialist workshop.
Observe information regarding indicator and
warning lamps ( Ypage 242) as well as
display messages (Y page 213). ADAPTIVE BRAKE
ADAPTIVE BRAKE enhances braking safety
and offers increased braking comfort. In
addition to the braking function, ADAPTIVE
BRAKE also has the HOLD function
(Y page 179) and hill start assist
(Y page 143). PRE-SAFE
®
Brake
General information i
Observe the "Important safety notes"
section (Y page 59).
PRE-SAFE ®
Brake is only available in vehicles
with DISTRONIC PLUS.
For PRE-SAFE ®
Brake to assist you when
driving, the radar sensor system must be
operational.
With the help of the radar sensor system,
PRE-SAFE ®
Brake can detect obstacles that
are in front of your vehicle for an extended
period of time.
PRE-SAFE ®
Brake can help you to minimize
the risk of a collision with a vehicle ahead, and
reduce the effects of such a collision. If PRE-
SAFE ®
Brake has detected a risk of collision,
you will be warned visually and acoustically
as well as by automatic braking. PRE-SAFE ®
Brake cannot prevent a collision without your
intervention.
Important safety notes G
WARNING
PRE-SAFE ®
Brake will initially brake your
vehicle by a partial application of the brakes
if a danger of collision is detected. There may
be a collision unless you also brake.
Automatic emergency braking cannot prevent
a collision. There is a risk of an accident.
Always apply the brakes yourself and try to
take evasive action. G
WARNING
PRE-SAFE ®
Brake cannot always clearly
identify objects and complex traffic
conditions.
In these cases, PRE-SAFE ®
Brake may:
R give an unnecessary warning and then
brake the vehicle
R not give a warning or intervene
There is a risk of an accident. Driving safety systems
65Safety
Z
Page 80 of 356

You cannot unlock the vehicle centrally from
the inside if the vehicle has been locked with
the SmartKey or KEYLESS-GO.
You can open a door from inside the vehicle
even if it has been locked.
If the vehicle has been locked using the
locking button for the central locking, or has
been locked automatically, and a door is
opened from the inside:
R the vehicle will be fully unlocked if it had
previously been fully unlocked
R only the door which has been opened form
the inside is unlocked if only the driver's
door had been previously unlocked Automatic locking feature
:
Disarming
; Arming
X To disarm: press and hold button :for
about five seconds until a tone sounds.
X To arm: press and hold button ;for about
five seconds until a tone sounds.
i If you press one of the two buttons and
do not hear a tone, the relevant setting has
already been selected.
The vehicle is locked automatically when the
ignition is switched on and the wheels are
turning.
You could therefore lock yourself out if:
R the vehicle is being pushed.
R the vehicle is being towed.
R the vehicle is on a roller dynamometer. You can also switch the automatic locking
function on and off using the on-board
computer (Y
page 205). Unlocking the driver's door
(mechanical key)
If the vehicle can no longer be unlocked with
the SmartKey, use the mechanical key.
If you use the mechanical key to unlock and
open the driver's door, the anti-theft alarm
system will be triggered ( Ypage 67).
X Take the mechanical key out of the
SmartKey (Y page 72).
X Insert the mechanical key into the lock of
the driver's door as far as it will go. X
Turn the mechanical key counter-clockwise
to position 1.
The door is unlocked.
X Turn the mechanical key back and remove
it.
X Insert the mechanical key into the
SmartKey. Locking the vehicle (mechanical key)
If the vehicle can no longer be locked with the
SmartKey, use the mechanical key.
X Open the driver's door.
X Close the front-passenger door and the
trunk lid.
X Press the locking button (Y page 77).78
DoorsOpening and closing
Page 97 of 356
Useful information
..............................96
Correct driver's seat position ............96
Seats .................................................... 97
Steering wheel .................................. 100
Mirrors ............................................... 103
Memory function .............................. 105 95Seats, steering wheel and mirrors
Page 98 of 356
Useful information
i This Operator's Manual describes all
models and all standard and optional
equipment of your vehicle available at the
time of publication of the Operator's
Manual. Country-specific differences are
possible. Please note that your vehicle may
not be equipped with all features
described. This also applies to safety-
related systems and functions.
i Read the information on qualified
specialist workshops: (Y page 24).Correct driver's seat position
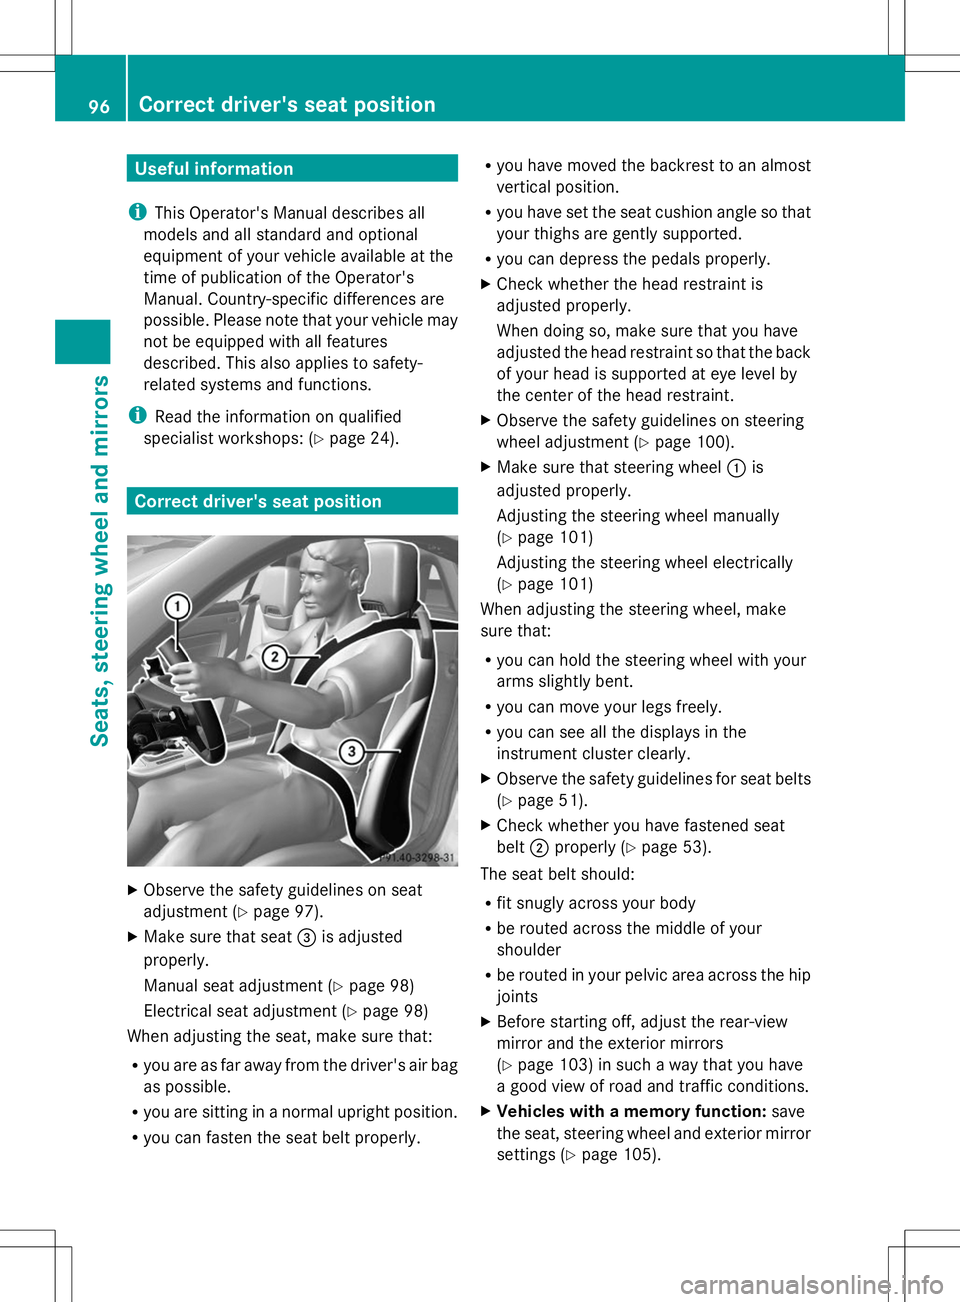
X
Observe the safety guidelines on seat
adjustment (Y page 97).
X Make sure that seat =is adjusted
properly.
Manual seat adjustment (Y page 98)
Electrical seat adjustment (Y page 98)
When adjusting the seat, make sure that:
R you are as far away from the driver's air bag
as possible.
R you are sitting in a normal upright position.
R you can fasten the seat belt properly. R
you have moved the backrest to an almost
vertical position.
R you have set the seat cushion angle so that
your thighs are gently supported.
R you can depress the pedals properly.
X Check whether the head restraint is
adjusted properly.
When doing so, make sure that you have
adjusted the head restraint so that the back
of your head is supported at eye level by
the center of the head restraint.
X Observe the safety guidelines on steering
wheel adjustment (Y page 100).
X Make sure that steering wheel :is
adjusted properly.
Adjusting the steering wheel manually
(Y page 101)
Adjusting the steering wheel electrically
(Y page 101)
When adjusting the steering wheel, make
sure that:
R you can hold the steering wheel with your
arms slightly bent.
R you can move your legs freely.
R you can see all the displays in the
instrument cluster clearly.
X Observe the safety guidelines for seat belts
(Y page 51).
X Check whether you have fastened seat
belt ;properly (Y page 53).
The seat belt should:
R fit snugly across your body
R be routed across the middle of your
shoulder
R be routed in your pelvic area across the hip
joints
X Before starting off, adjust the rear-view
mirror and the exterior mirrors
(Y page 103) in such a way that you have
a good view of road and traffic conditions.
X Vehicles with a memory function: save
the seat, steering wheel and exterior mirror
settings (Y page 105). 96
Correct driver's seat positionSeats, steering wheel and mirrors
Page 99 of 356
Seats
Important safety notes
G
WARNING
Children could become trapped if they adjust
the seats, particularly when unattended.
There is a risk of injury.
When leaving the vehicle, always take the
SmartKey with you and lock the vehicle. Never
leave children unsupervised in the vehicle. G
WARNING
If the driver's seat is not engaged, it could
move unexpectedly while the vehicle is in
motion. This could cause you to lose control
of the vehicle. There is a risk of an accident.
Always make sure that the driver's seat is
engaged before starting the engine. G
WARNING
If you adjust the seat height carelessly, you or
other vehicle occupants could be trapped and
thereby injured. Children in particular could
accidentally press the electrical seat
adjustment buttons and become trapped.
There is a risk of injury.
While moving the seats, make sure that your
hands or other body parts do not get under
the lever assembly of the seat adjustment
system. G
WARNING
When you adjust a seat, you or other vehicle
occupants could become trapped, e.g. on the
seat guide rail. There is a risk of injury.
Make sure when adjusting a seat that no one
has any body parts in the sweep of the seat. G
WARNING
If head restraints are not installed and
adjusted correctly, they cannot provide
protection as intended. There is an increased
risk of injury in the head and neck area, e.g.
in the event of an accident or when braking. Always drive with the head restraints
installed. Before driving off, make sure for
every vehicle occupant that the center of the
head restraint supports the back of the head
at about eye level.
G
WARNING
You could lose control of your vehicle if you
do the following while driving:
R adjust the driver's seat, steering wheel or
mirrors
R fasten the seat belt
There is a risk of an accident.
Adjust the driver's seat, steering wheel or
mirrors and fasten your seat belt before
starting the engine. G
WARNING
When you adjust a seat, you or other vehicle
occupants could become trapped, e.g. on the
seat guide rail. There is a risk of injury.
Make sure when adjusting a seat that no one
has any body parts in the sweep of the seat. G
WARNING
If head restraints are not installed and
adjusted correctly, they cannot provide
protection as intended. There is an increased
risk of injury in the head and neck area, e.g.
in the event of an accident or when braking.
Always drive with the head restraints
installed. Before driving off, make sure for
every vehicle occupant that the center of the
head restraint supports the back of the head
at about eye level.
! To avoid damage to the seats and the seat
heating, observe the following information:
R keep liquids from spilling on the seats. If
liquid is spilled on the seats, dry them as
soon as possible.
R if the seat covers are damp or wet, do not
switch on the seat heating. The seat
heating should also not be used to dry
the seats. Seats
97Seats, steering wheel and mirrors Z
Page 100 of 356
R
clean the seat covers as recommended;
see the "Interior care" section.
R do not transport heavy loads on the
seats. Do not place sharp objects on the
seat cushions, e.g. knives, nails or tools.
The seats should only be occupied by
passengers, if possible.
R when the seat heating is in operation, do
not cover the seats with insulating
materials, e.g. blankets, coats, bags,
seat covers, child seats or booster seats.
! Make sure that there are no objects in the
footwell or behind the seats when resetting
the seats. There is a risk that the seats
and/or the objects could be damaged.
i The head restraints are installed with the
NECK-PRO system (Y page 50). For this
reason, it is not possible to remove the
head restraints from the seats.
For more information, contact a qualified
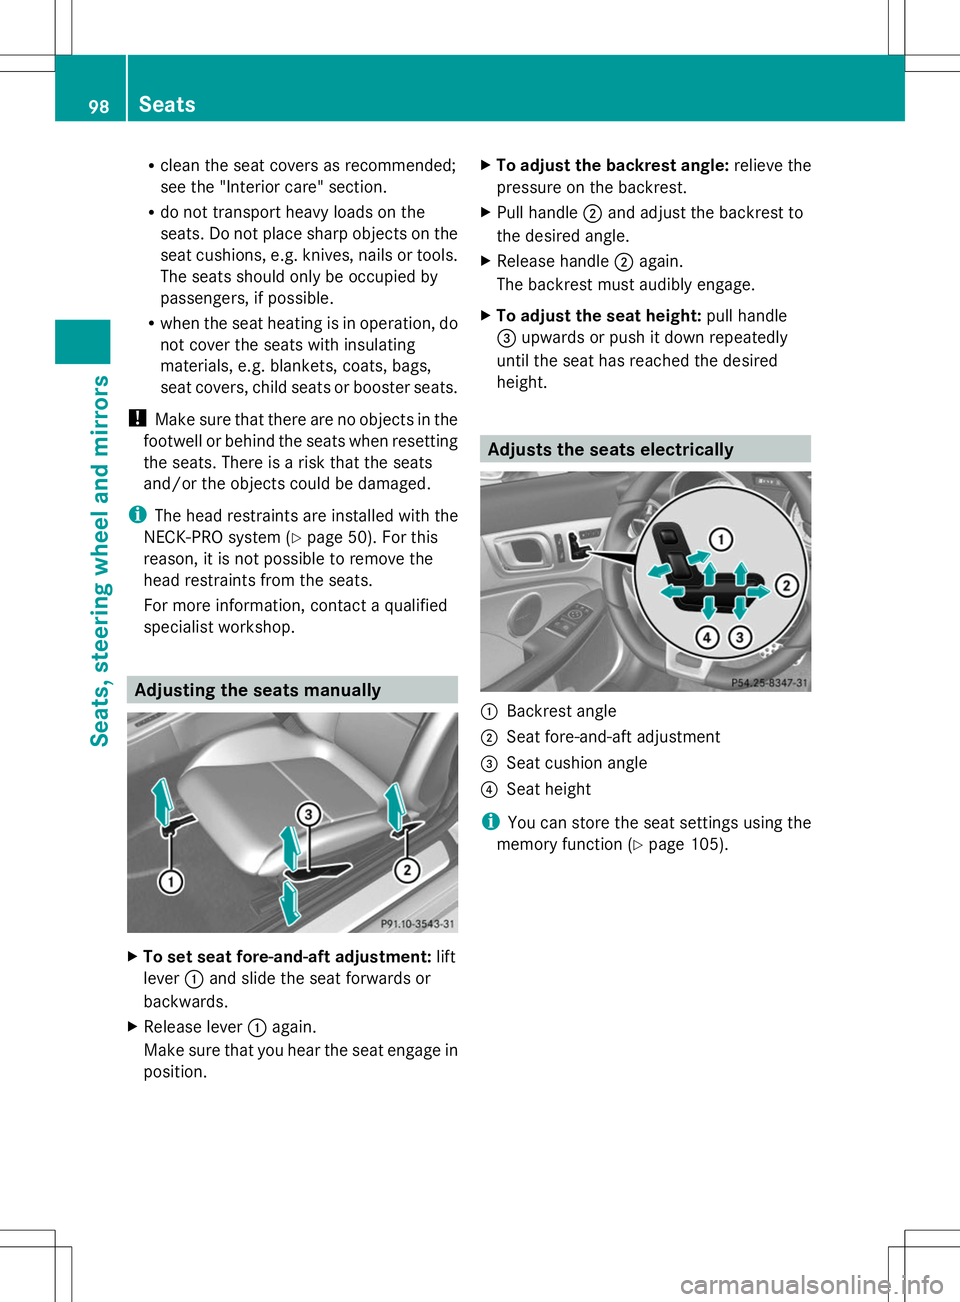
specialist workshop. Adjusting the seats manually
X
To set seat fore-and-aft adjustment: lift
lever :and slide the seat forwards or
backwards.
X Release lever :again.
Make sure that you hear the seat engage in
position. X
To adjust the backrest angle: relieve the
pressure on the backrest.
X Pull handle ;and adjust the backrest to
the desired angle.
X Release handle ;again.
The backrest must audibly engage.
X To adjust the seat height: pull handle
= upwards or push it down repeatedly
until the seat has reached the desired
height. Adjusts the seats electrically
:
Backrest angle
; Seat fore-and-aft adjustment
= Seat cushion angle
? Seat height
i You can store the seat settings using the
memory function (Y page 105).98
SeatsSeats, steering wheel and mirrors