2014 MERCEDES-BENZ SLK-CLASS ROADSTER air condition
[x] Cancel search: air conditionPage 46 of 356
intended protection in the event of an
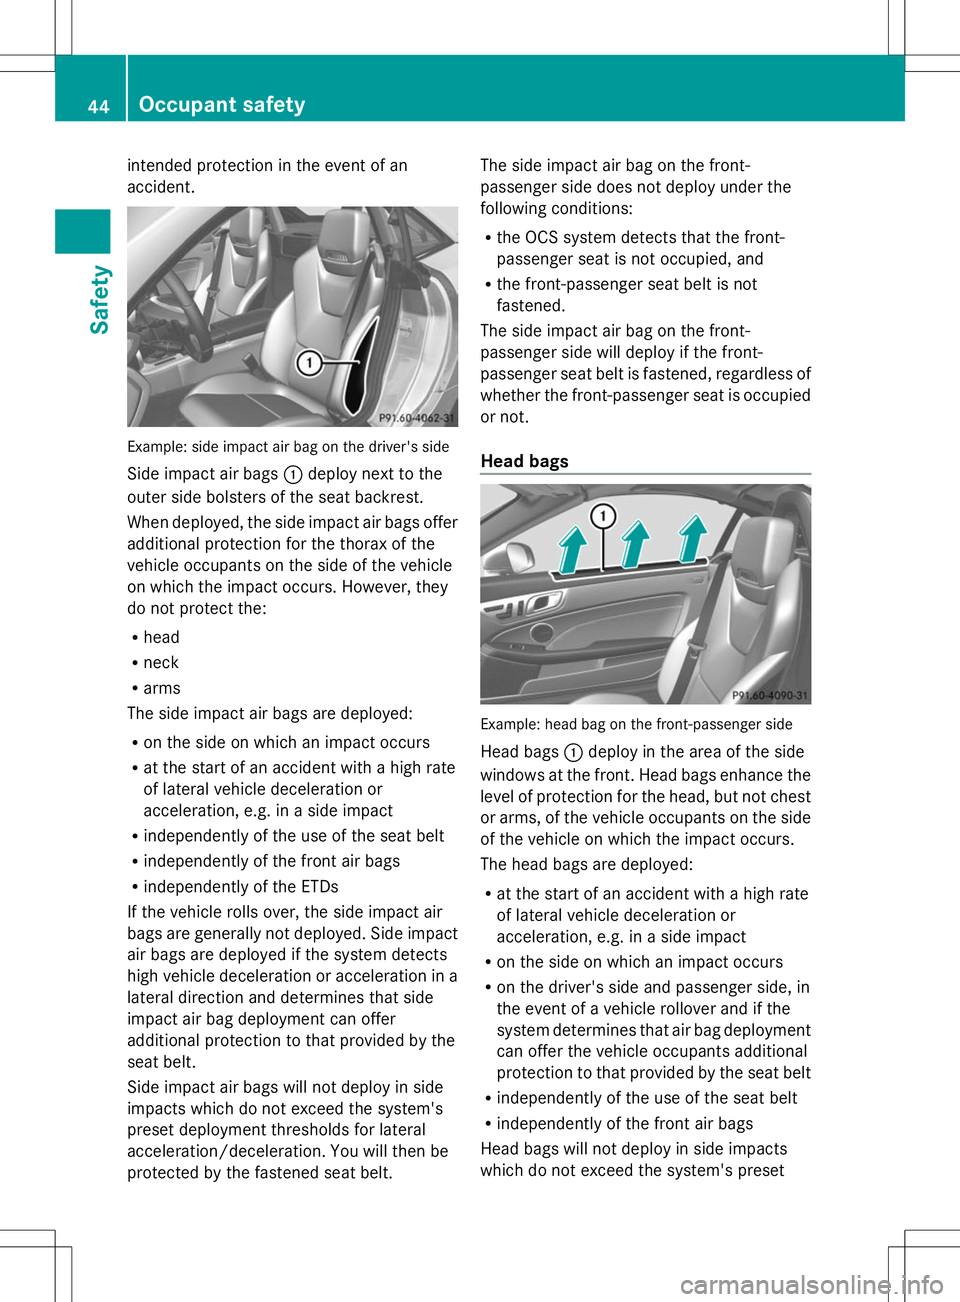
accident. Example: side impact air bag on the driver's side
Side impact air bags :deploy next to the
outer side bolsters of the seat backrest.
When deployed, the side impact air bags offer
additional protection for the thorax of the
vehicle occupants on the side of the vehicle
on which the impact occurs. However, they
do not protect the:
R head
R neck
R arms
The side impact air bags are deployed:
R on the side on which an impact occurs
R at the start of an accident with a high rate
of lateral vehicle deceleration or
acceleration, e.g. in a side impact
R independently of the use of the seat belt
R independently of the front air bags
R independently of the ETDs
If the vehicle rolls over, the side impact air
bags are generally not deployed. Side impact
air bags are deployed if the system detects
high vehicle deceleration or acceleration in a
lateral direction and determines that side
impact air bag deployment can offer
additional protection to that provided by the
seat belt.
Side impact air bags will not deploy in side
impacts which do not exceed the system's
preset deployment thresholds for lateral
acceleration/deceleration. You will then be
protected by the fastened seat belt. The side impact air bag on the front-
passenger side does not deploy under the
following conditions:
R
the OCS system detects that the front-
passenger seat is not occupied, and
R the front-passenger seat belt is not
fastened.
The side impact air bag on the front-
passenger side will deploy if the front-
passenger seat belt is fastened, regardless of
whether the front-passenger seat is occupied
or not.
Head bags Example: head bag on the front-passenger side
Head bags
:deploy in the area of the side
windows at the front. Head bags enhance the
level of protection for the head, but not chest
or arms, of the vehicle occupants on the side
of the vehicle on which the impact occurs.
The head bags are deployed:
R at the start of an accident with a high rate
of lateral vehicle deceleration or
acceleration, e.g. in a side impact
R on the side on which an impact occurs
R on the driver's side and passenger side, in
the event of a vehicle rollover and if the
system determines that air bag deployment
can offer the vehicle occupants additional
protection to that provided by the seat belt
R independently of the use of the seat belt
R independently of the front air bags
Head bags will not deploy in side impacts
which do not exceed the system's preset 44
Occupant safetySafety
Page 52 of 356
PRE-SAFE
®
(anticipatory occupant
protection system)
Introduction i
AMG vehicles do not include the PRE-
SAFE ®
system.
All vehicles (except AMG vehicles): the
PRE-SAFE ®
system is only available in
vehicles with DISTRONIC PLUS.
PRE-SAFE ®
takes preemptive measures to
protect occupants in certain hazardous
situations.
Important safety notes !
Make sure that there are no objects in the
footwell or behind the seats when resetting
the seats. There is a risk that the seats
and/or the objects could be damaged.
Despite your vehicle being equipped with the
PRE-SAFE ®
system, the possibility of
personal injuries occurring as a result of an
accident cannot be eliminated.
Always adapt your driving style to suit the
prevailing road and weather conditions and
maintain a safe distance from the vehicle in
front. Drive carefully.
Function PRE-SAFE
®
intervenes:
R in emergency braking situations, e.g. when
BAS is activated.
R in critical driving situations, e.g. when
physical limits are exceeded and the
vehicle understeers or oversteers severely.
R on vehicles with DISTRONIC PLUS: if
BAS PLUS brakes hard or the radar sensor
system detects an imminent danger of
collision in certain situations. PRE-SAFE
®
takes the following measures
depending on the hazardous situation
detected:
R the seat belts are pre-tensioned.
R if the vehicle skids, the side windows are
closed so that only a small gap remains.
R vehicles with the memory function for
the front-passenger seat: the front-
passenger seat is adjusted if it is in an
unfavorable position.
If the hazardous situation passes without
resulting in an accident, PRE-SAFE ®
slackens
the belt pre-tensioning. All settings made by
PRE-SAFE ®
can then be reversed.
If the seat belts are not released:
X When the vehicle is stationary, move the
backrest or seat back slightly.
The seat belt pre-tensioning is reduced and
the locking mechanism is released.
The seat-belt adjustment is an integral part of
the PRE-SAFE ®
convenience function. More
information about seat-belt adjustment can
be found under "Seat-belt adjustment"
(Y page 53). NECK-PRO head restraints
Important safety notes G
WARNING
Do not secure any objects (e.g. coat hangers)
on the NECK-PRO head restraints. Otherwise,
the NECK-PRO head restraints may not
function properly, or in the event of a rear-end
collision may not be able offer the level of
protection they are designed to provide. G
WARNING
Seat or head restraint covers can cause a
malfunction when the NECK-PRO head
restraints are activated or when the side
impact air bags are deployed, or they can
prevent this completely. The NECK-PRO head
restraints or side impact air bags can 50
Occupant safetySafety
Page 61 of 356

X
Additionally move the seat backwards.
The special seat belt retractor is
deactivated.
If necessary:
X Additionally, remove the seat belt from the
seat belt guide on the seat backrest and
guide the seat belt back to the belt outlet.
The special seat belt retractor is
deactivated. Driving safety systems
Overview of driving safety systems
In this section, you will find information about
the following driving safety systems:
R ABS ( Anti-lock BrakingSystem)
(Y page 59)
R BAS ( Brake Assist System) (Y page 60)
R BAS PLUS ( BrakeAssist System PLUS)
(Y page 60)
R ESP ®
(Electronic StabilityProgram)
(Y page 61)
R EBD ( electronic brake force distribution)
(Y page 65)
R ADAPTIVE BRAK E(Ypage 65)
R PRE-SAFE ®
Brake (Y page 65) Important safety notes
If you fail to adapt your driving style or
become distracted, the driving safety
systems can neither reduce the risk of
accident nor override the laws of physics.
Driving safety systems are merely aids
designed to assist driving. You are
responsible for the distance to the vehicle in
front, for vehicle speed and for braking in
good time. Always adapt your driving style to
suit the prevailing road and weather
conditions and maintain a safe distance from
the vehicle in front. Drive carefully.
i The driving safety systems described only
work as effectively as possible when there is adequate contact between the tires and
the road surface. Please pay special
attention to the notes on tires,
recommended minimum tire tread depths,
etc. (Y
page 306).
In wintry driving conditions, always use
winter tires (M+S tires) and if necessary,
snow chains. Only in this way will the
driving safety systems described in this
section work as effectively as possible. ABS (Anti-lock Braking System)
General information ABS regulates brake pressure in such a way
that the wheels do not lock when you brake.
This allows you to continue steering the
vehicle when braking.
The yellow
!ABS warning lamp in the
instrument cluster lights up when the ignition
is switched on. It goes out when the engine is
running.
Important safety notes i
Observe the "Important safety notes"
section (Y page 59). G
WARNING
If ABS is faulty, the wheels could lock when
braking. The steerability and braking
characteristics may be severely impaired.
Additionally, further driving safety systems
are deactivated. There is an increased danger
of skidding and accidents.
Drive on carefully. Have ABS checked
immediately at a qualified specialist
workshop.
When ABS is malfunctioning, other systems,
including driving safety systems, will also
become inoperative. Observe the information
on the ABS warning lamp (Y page 242) and
display messages which may be shown in the
instrument cluster (Y page 211).
ABS works from a speed of about 5 mph
(8 km/h), regardless of road-surface Driving safety systems
59Safety Z
Page 68 of 356
Always pay particular attention to the traffic
situation and be ready to brake, especially if
PRE-SAFE ®
Brake warns you. Terminate the
intervention in a non-critical driving situation.
In order to maintain the appropriate distance
to the vehicle in front and thus prevent a
collision, you must apply the brakes yourself. G
WARNING
PRE-SAFE ®
Brake does not react:
R to people or animals
R to oncoming vehicles
R to crossing traffic
R when cornering
As a result, PRE-SAFE ®
Brake may neither
give warnings nor intervene in all critical
situations. There is a risk of an accident.
Always pay careful attention to the traffic
situation and be ready to brake.
In the event of snowfall or heavy rain, the
recognition can be impaired.
Recognition by the radar sensor system is
also impaired in the event of:
R dirt on the sensors or anything else
covering the sensors
R interference by other radar sources
R there are strong radar reflections, for
example in parking garages
R a narrow vehicle traveling in front, e.g. a
motorbike
R a vehicle traveling in front on a different line
relative to the center of your vehicle
Following damage to the front end of the
vehicle, have the configuration and operation
of the radar sensors checked at a qualified
specialist workshop. This also applies to
collisions at low speeds where there is no
visible damage to the front of the vehicle. Function X
To activate/deactivate: activate or
deactivate PRE-SAFE ®
Brake in the on-
board computer (Y page 201).
When PRE-SAFE ®
Brake is deactivated, the
assistance graphic shows the æsymbol
in the multifunction display.
Starting at a speed of around 4 mph
(7 km/h), this function warns you if you
rapidly approach a vehicle in front. An
intermittent warning tone will then sound and
the · distance warning lamp will light up
in the instrument cluster.
X Brake immediately to defuse the situation.
or
X Take evasive action provided it is safe to do
so.
PRE-SAFE ®
Brake can also brake the vehicle
automatically under the following conditions:
R the driver and front-passenger have their
seat belts fastened
and
R the vehicle speed is between
approximately 4 mph (7 km/h) and
124 mph (200 km/h)
At speeds of up to approximately 40 mph
(70 km/h) PRE-SAFE ®
Brake can also detect
stationary objects. Examples of stationary
objects are stopped or parked vehicles.
i If there is an increased risk of collision,
preventive passenger protection measures
(PRE-SAFE ®
) are activated.
If the risk of collision with the vehicle in front
remains and you do not brake, take evasive
action or accelerate significantly, the vehicle
may perform automatic emergency braking,
up to the point of full brake application.
Automatic emergency braking is not
performed until immediately prior to an
imminent accident. 66
Driving safety systemsSafety
Page 91 of 356
R
only load the trunk to below the trunk
partition
R not place any objects on or in front of the
trunk partition
R not place any objects on the cover
behind the roll bars
R not allow the cargo to push the trunk
partition upwards
The trunk partition can be used to cover
luggage and loads in the trunk.
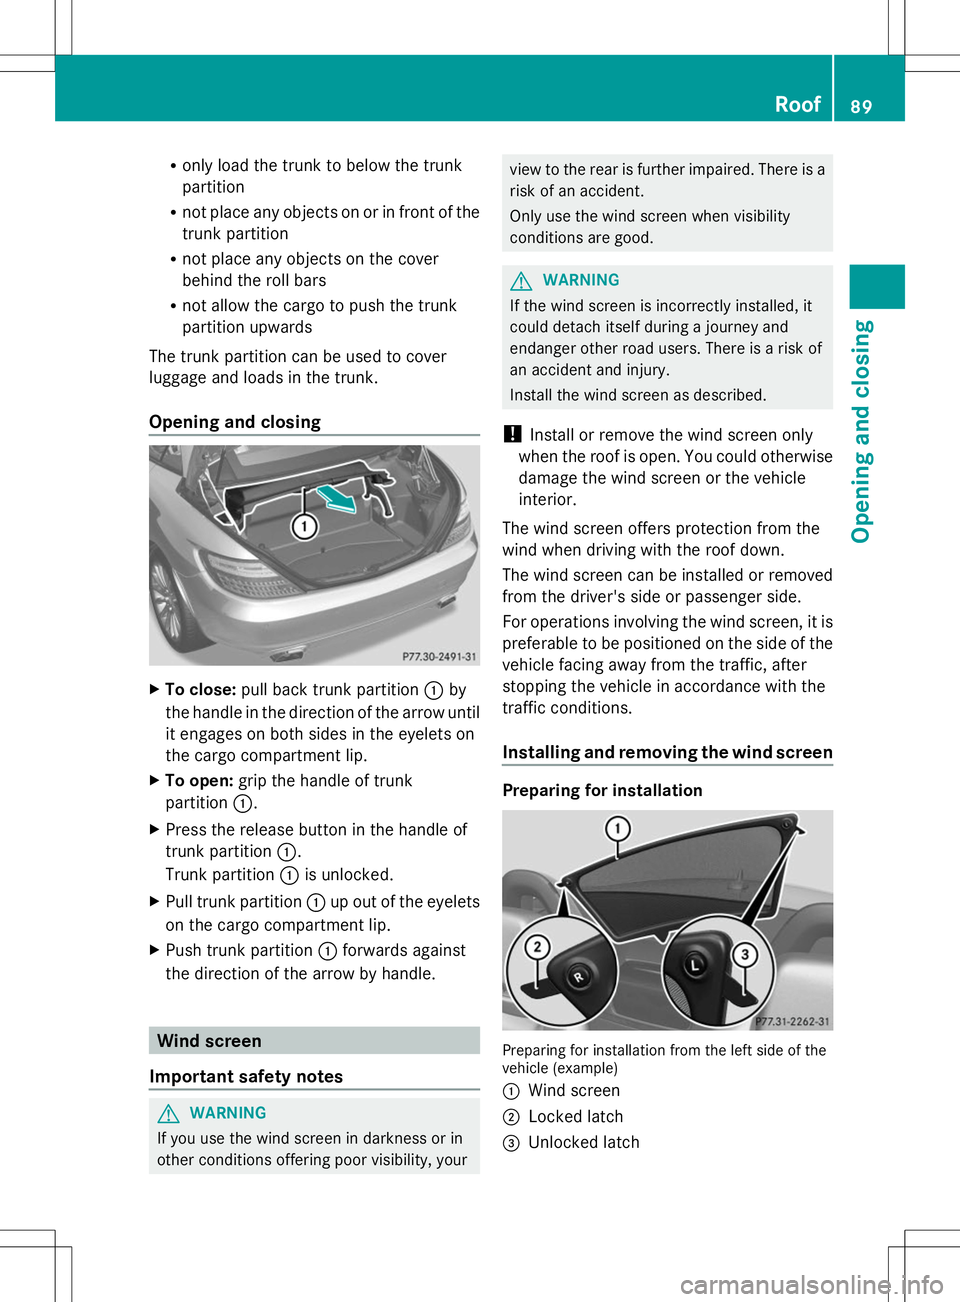
Opening and closing X
To close: pull back trunk partition :by
the handle in the direction of the arrow until
it engages on both sides in the eyelets on
the cargo compartment lip.
X To open: grip the handle of trunk
partition :.
X Press the release button in the handle of
trunk partition :.
Trunk partition :is unlocked.
X Pull trunk partition :up out of the eyelets
on the cargo compartment lip.
X Push trunk partition :forwards against
the direction of the arrow by handle. Wind screen
Important safety notes G
WARNING
If you use the wind screen in darkness or in
other conditions offering poor visibility, your view to the rear is further impaired. There is a
risk of an accident.
Only use the wind screen when visibility
conditions are good.
G
WARNING
If the wind screen is incorrectly installed, it
could detach itself during a journey and
endanger other road users. There is a risk of
an accident and injury.
Install the wind screen as described.
! Install or remove the wind screen only
when the roof is open. You could otherwise
damage the wind screen or the vehicle
interior.
The wind screen offers protection from the
wind when driving with the roof down.
The wind screen can be installed or removed
from the driver's side or passenger side.
For operations involving the wind screen, it is
preferable to be positioned on the side of the
vehicle facing away from the traffic, after
stopping the vehicle in accordance with the
traffic conditions.
Installing and removing the wind screen Preparing for installation
Preparing for installation from the left side of the
vehicle (example)
:
Wind screen
; Locked latch
= Unlocked latch Roof
89Opening and closing Z
Page 93 of 356
AIRGUIDE
Important safety notes G
WARNING
You could lose control of the vehicle if you fold
AIRGUIDE in/out while the vehicle is in
motion. There is a risk of an accident.
Only fold AIRGUIDE in/out while the vehicle
is stationary.
! AIRGUIDE can only be positioned
correctly by folding it in or out. AIRGUIDE
cannot be dismantled. Do not try to remove
AIRGUIDE from its anchorage. Otherwise,
you could damage AIRGUIDE or the vehicle.
AIRGUIDE can be folded out or back in from
the driver's side or passenger side.
When operating AIRGUIDE, preferably stand
on the side of the vehicle away from the
traffic, after you have stopped the vehicle in
accordance with road and traffic conditions.
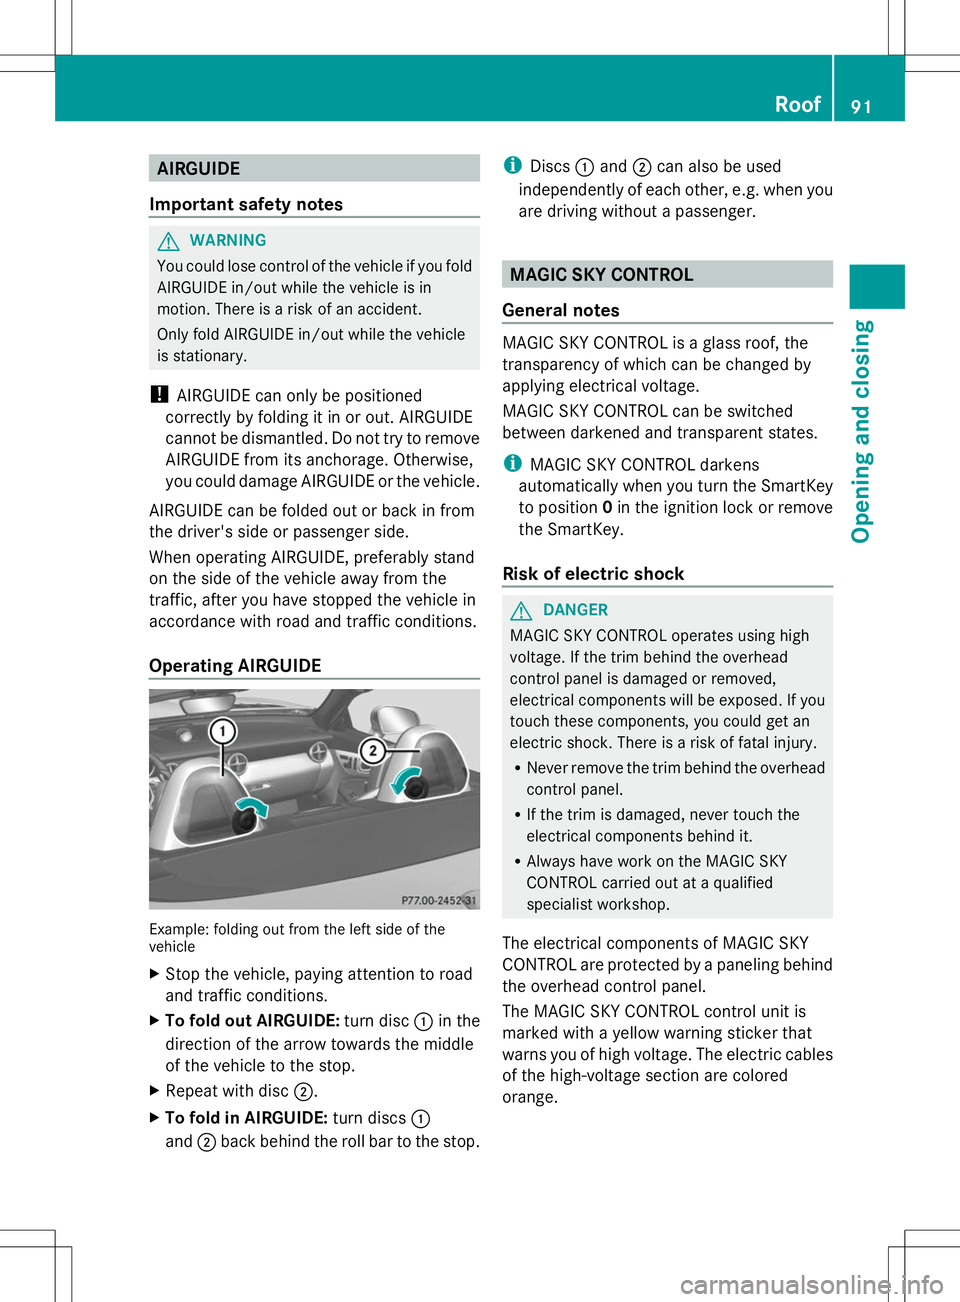
Operating AIRGUIDE Example: folding out from the left side of the
vehicle
X
Stop the vehicle, paying attention to road
and traffic conditions.
X To fold out AIRGUIDE: turn disc:in the
direction of the arrow towards the middle
of the vehicle to the stop.
X Repeat with disc ;.
X To fold in AIRGUIDE: turn discs:
and ;back behind the roll bar to the stop. i
Discs :and ;can also be used
independently of each other, e.g. when you
are driving without a passenger. MAGIC SKY CONTROL
General notes MAGIC SKY CONTROL is a glass roof, the
transparency of which can be changed by
applying electrical voltage.
MAGIC SKY CONTROL can be switched
between darkened and transparent states.
i
MAGIC SKY CONTROL darkens
automatically when you turn the SmartKey
to position 0in the ignition lock or remove
the SmartKey.
Risk of electric shock G
DANGER
MAGIC SKY CONTROL operates using high
voltage. If the trim behind the overhead
control panel is damaged or removed,
electrical components will be exposed. If you
touch these components, you could get an
electric shock. There is a risk of fatal injury.
R Never remove the trim behind the overhead
control panel.
R If the trim is damaged, never touch the
electrical components behind it.
R Always have work on the MAGIC SKY
CONTROL carried out at a qualified
specialist workshop.
The electrical components of MAGIC SKY
CONTROL are protected by a paneling behind
the overhead control panel.
The MAGIC SKY CONTROL control unit is
marked with a yellow warning sticker that
warns you of high voltage. The electric cables
of the high-voltage section are colored
orange. Roof
91Opening and closing Z
Page 98 of 356
Useful information
i This Operator's Manual describes all
models and all standard and optional
equipment of your vehicle available at the
time of publication of the Operator's
Manual. Country-specific differences are
possible. Please note that your vehicle may
not be equipped with all features
described. This also applies to safety-
related systems and functions.
i Read the information on qualified
specialist workshops: (Y page 24).Correct driver's seat position
X
Observe the safety guidelines on seat
adjustment (Y page 97).
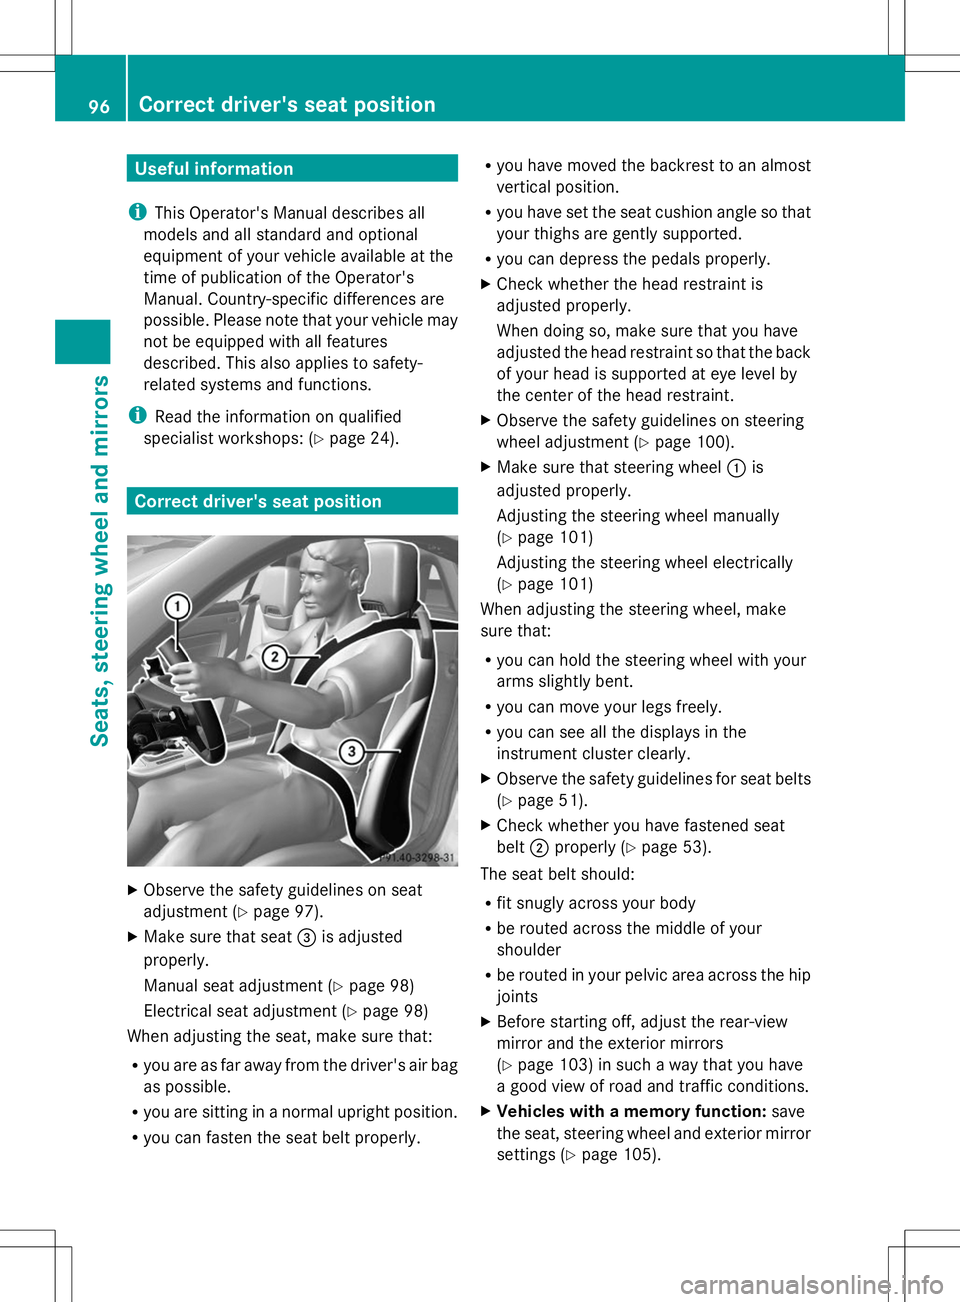
X Make sure that seat =is adjusted
properly.
Manual seat adjustment (Y page 98)
Electrical seat adjustment (Y page 98)
When adjusting the seat, make sure that:
R you are as far away from the driver's air bag
as possible.
R you are sitting in a normal upright position.
R you can fasten the seat belt properly. R
you have moved the backrest to an almost
vertical position.
R you have set the seat cushion angle so that
your thighs are gently supported.
R you can depress the pedals properly.
X Check whether the head restraint is
adjusted properly.
When doing so, make sure that you have
adjusted the head restraint so that the back
of your head is supported at eye level by
the center of the head restraint.
X Observe the safety guidelines on steering
wheel adjustment (Y page 100).
X Make sure that steering wheel :is
adjusted properly.
Adjusting the steering wheel manually
(Y page 101)
Adjusting the steering wheel electrically
(Y page 101)
When adjusting the steering wheel, make
sure that:
R you can hold the steering wheel with your
arms slightly bent.
R you can move your legs freely.
R you can see all the displays in the
instrument cluster clearly.
X Observe the safety guidelines for seat belts
(Y page 51).
X Check whether you have fastened seat
belt ;properly (Y page 53).
The seat belt should:
R fit snugly across your body
R be routed across the middle of your
shoulder
R be routed in your pelvic area across the hip
joints
X Before starting off, adjust the rear-view
mirror and the exterior mirrors
(Y page 103) in such a way that you have
a good view of road and traffic conditions.
X Vehicles with a memory function: save
the seat, steering wheel and exterior mirror
settings (Y page 105). 96
Correct driver's seat positionSeats, steering wheel and mirrors
Page 124 of 356

Useful information
i This Operator's Manual describes all
models and all standard and optional
equipment of your vehicle available at the
time of publication of the Operator's
Manual. Country-specific differences are
possible. Please note that your vehicle may
not be equipped with all features
described. This also applies to safety-
related systems and functions.
i Read the information on qualified
specialist workshops: (Y page 24).Overview of climate control systems
Important safety notes
Observe the settings recommended on the
following pages. The windows could
otherwise fog up.
To prevent the windows from fogging up:
R switch off climate control only briefly
R switch on air-recirculation mode only
briefly
R switch on the cooling with air
dehumidification function
R switch on the defrost windshield function
briefly, if required
Climate control regulates the temperature
and the humidity in the vehicle interior and
filters undesirable substances out of the air.
Climate control can only be operated when
the engine is running. Optimum operation is
only achieved with the side windows and roof
closed.
The residual heat function can only be
activated or deactivated with the ignition
switched off (Y page 133).
i When the weather is warm, ventilate the
vehicle for a brief period. This will speed up
the cooling process and the desired vehicle
interior temperature will be reached more
quickly. i
The integrated filter can filter out most
particles of dust, and completely filters out
pollen. A clogged filter reduces the amount
of air supplied to the vehicle interior. For
this reason, you should always observe the
interval for replacing the filter, which is
specified in the Maintenance Booklet. As it
depends on environmental conditions, e.g.
heavy air pollution, the interval may be
shorter than stated in the Maintenance
Booklet. 122
Overview of climate control systemsClimate control