2014 MERCEDES-BENZ SL-CLASS ROADSTER lock
[x] Cancel search: lockPage 110 of 284
Parking lamps
!
If the battery has been excessively
discharged, the parking lamps or standing
lamps are automatically switched off to
enable the next engine start. Always park
your vehicle safely and sufficiently lit
according to legal standards. Avoid the
continuous use of the Tparking lamps
for several hours. If possible, switch on the
X right or the Wleft standing lamp.
X To switch on: turn the light switch to
T.
The green Tindicator lamp in the
instrument cluster lights up.
Standing lamps
Switching on the standing lamps ensures the
corresponding side of the vehicle is
illuminated.
X To switch on the standing lamps: the
SmartKey is not in the ignition lock or it is
in position 0.
X Turn the light switch to W(left-hand side
of the vehicle) or X(right-hand side of
the vehicle).
Information in the Digital Operator's
Manual In the Digital Operator's Manual you will find
information on the following topics:
R Automatic headlamp mode
R Low-beam headlamps
R Parking lamps
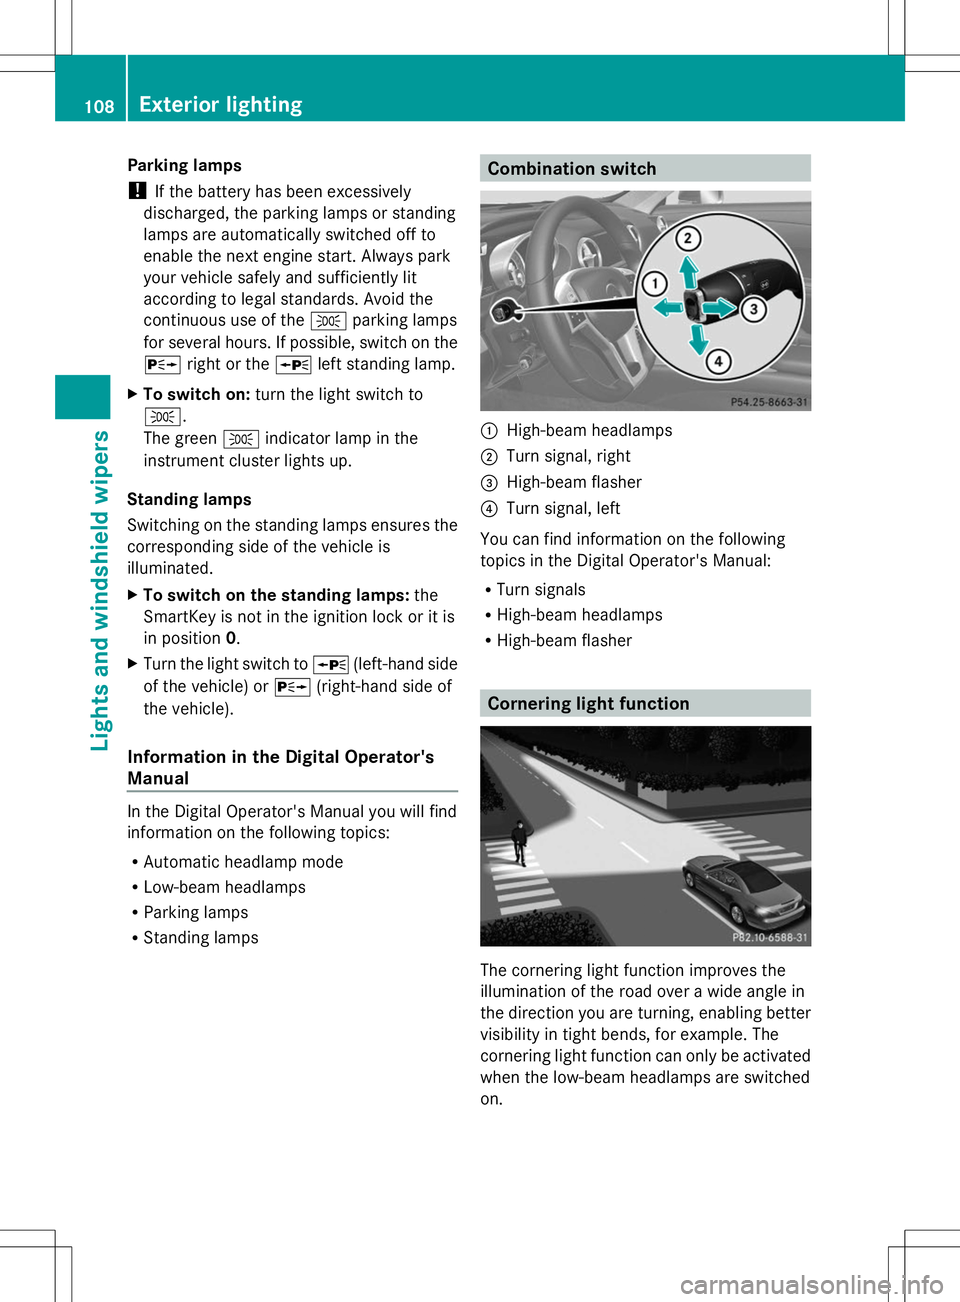
R Standing lamps Combination switch
:
High-beam headlamps
; Turn signal, right
= High-beam flasher
? Turn signal, left
You can find information on the following
topics in the Digital Operator's Manual:
R Turn signals
R High-beam headlamps
R High-beam flasher Cornering light function
The cornering light function improves the
illumination of the road over a wide angle in
the direction you are turning, enabling better
visibility in tight bends, for example. The
cornering light function can only be activated
when the low-beam headlamps are switched
on. 108
Exterior lightingLights and windshield wipers
Page 111 of 284
Active:
R
if you are driving at speeds below
25mph (40 km/h) and switch on the turn
signal or turn the steering wheel.
R if you are driving at speeds between
25mph (40 km/h) and45mph (70 km/h)
and turn the steering wheel
Not active: if you are driving at speeds above
25 mph (40 km/h) or switch off the turn
signals or turn the steering wheel to the
straight-ahead position.
The cornering light function may remain lit for
a short time, but is automatically switched off
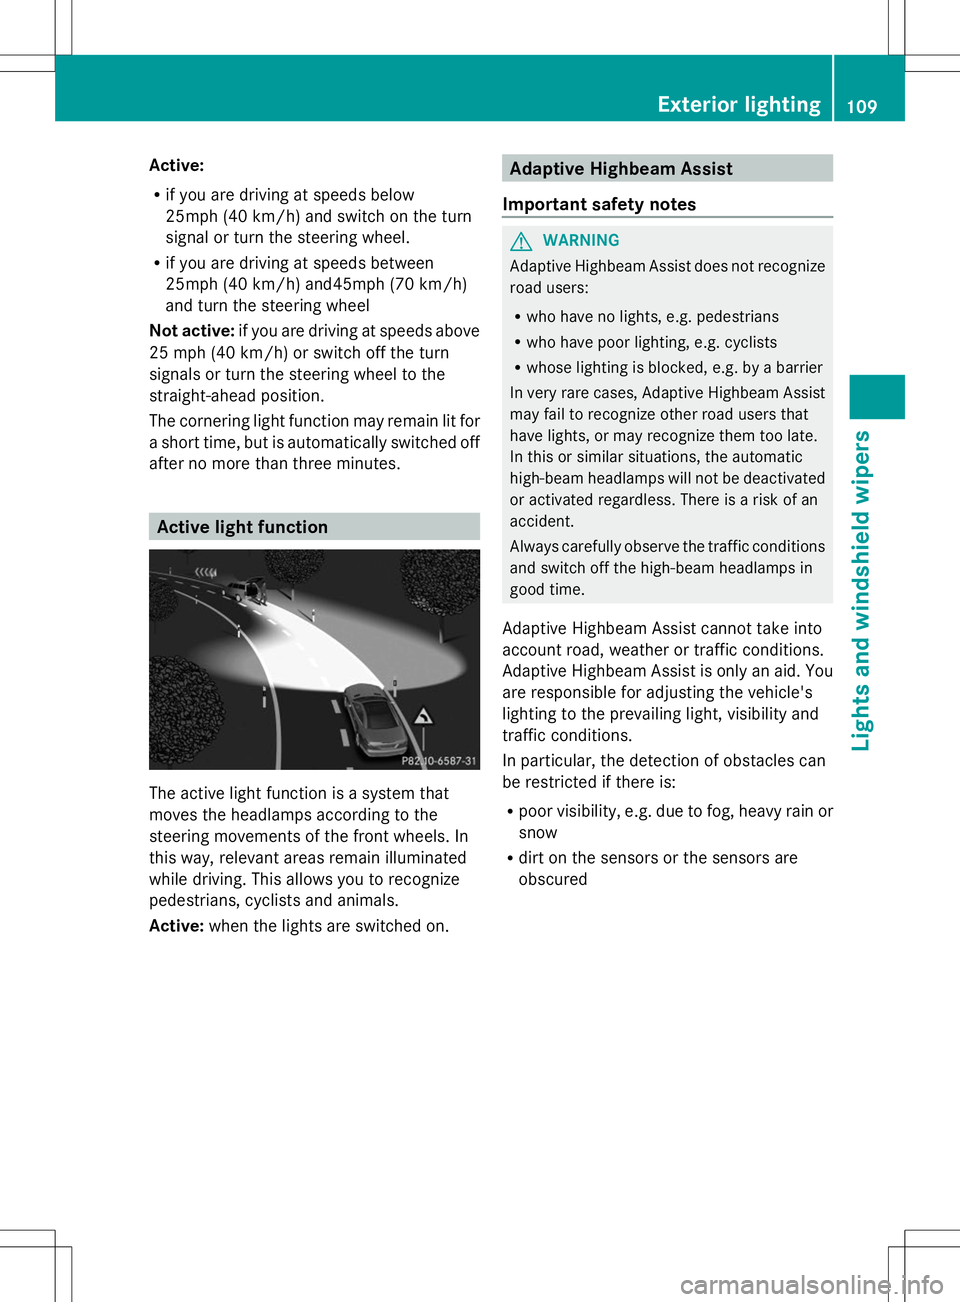
after no more than three minutes. Active light function
The active light function is a system that
moves the headlamps according to the
steering movements of the front wheels. In
this way, relevant areas remain illuminated
while driving. This allows you to recognize
pedestrians, cyclists and animals.
Active: when the lights are switched on. Adaptive Highbeam Assist
Important safety notes G
WARNING
Adaptive Highbeam Assist does not recognize
road users:
R who have no lights, e.g. pedestrians
R who have poor lighting, e.g. cyclists
R whose lighting is blocked, e.g. by a barrier
In very rare cases, Adaptive Highbeam Assist
may fail to recognize other road users that
have lights, or may recognize them too late.
In this or similar situations, the automatic
high-beam headlamps will not be deactivated
or activated regardless. There is a risk of an
accident.
Always carefully observe the traffic conditions
and switch off the high-beam headlamps in
good time.
Adaptive Highbeam Assist cannot take into
account road, weather or traffic conditions.
Adaptive Highbeam Assist is only an aid. You
are responsible for adjusting the vehicle's
lighting to the prevailing light, visibility and
traffic conditions.
In particular, the detection of obstacles can
be restricted if there is:
R poor visibility, e.g. due to fog, heavy rain or
snow
R dirt on the sensors or the sensors are
obscured Exterior lighting
109Lights and windshield wipers Z
Page 113 of 284
the Xenon bulb and touch the electrical
contacts. There is a risk of fatal injury.
Never touch the parts or the electrical
contacts of the Xenon bulb. Always have work
on the Xenon bulbs carried out at a qualified
specialist workshop.
The front and rear lamps of your vehicle are
equipped with either Xenon or LED bulbs. Do
not replace the bulbs yourself. Contact a
qualified specialist workshop which has the
necessary specialist knowledge and tools to
carry out the work required.
Bulbs and lamps are an important aspect of
vehicle safety. You must therefore make sure
that these function correctly at all times.
Have the headlamp setting checked regularly. Windshield wipers
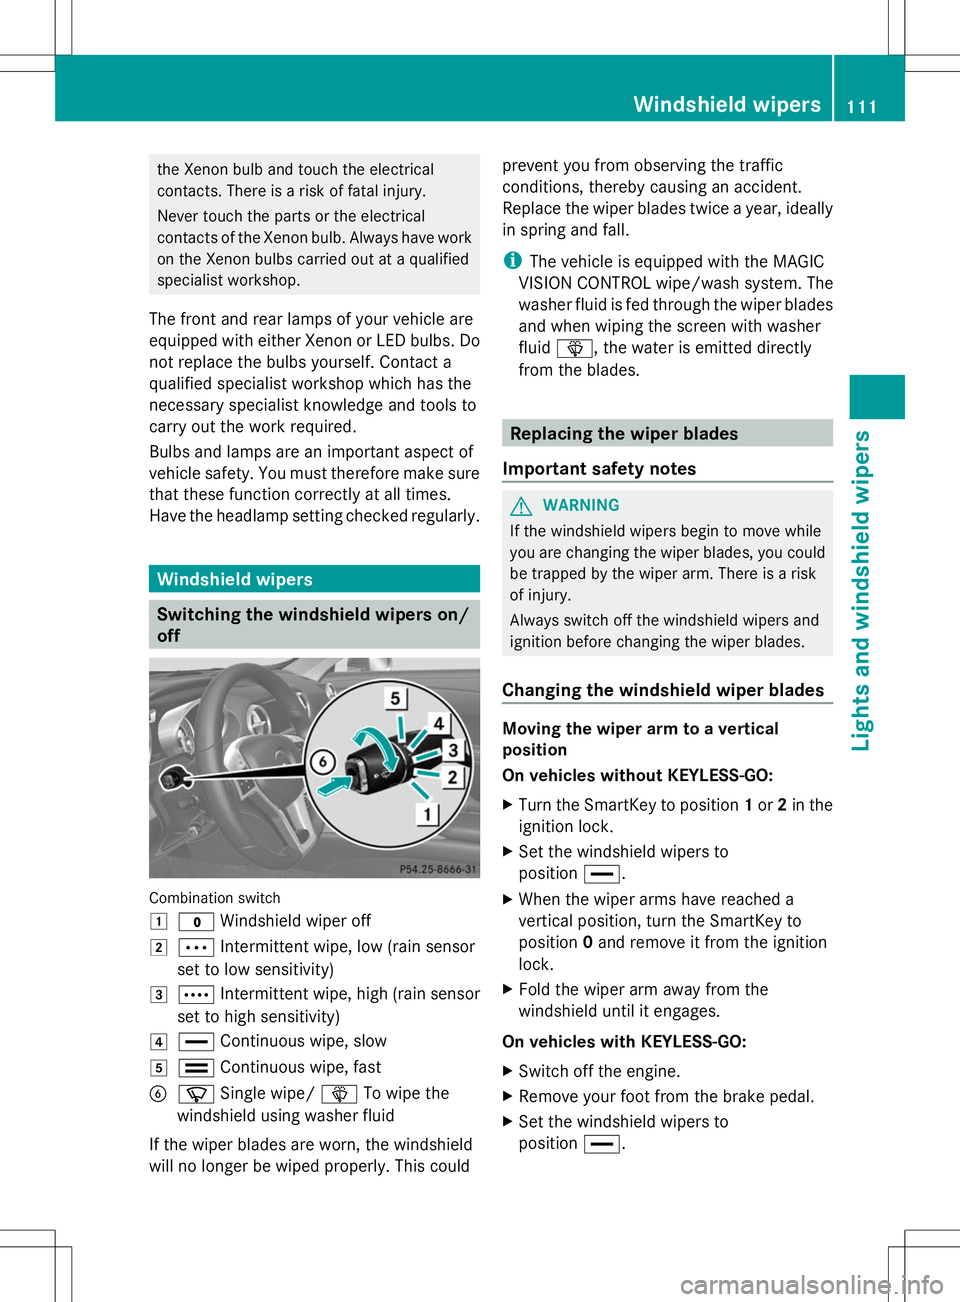
Switching the windshield wipers on/
off Combination switch
1
$ Windshield wiper off
2 Ä Intermittent wipe, low (rain sensor
set to low sensitivity)
3 Å Intermittent wipe, high (rain sensor
set to high sensitivity)
4 ° Continuous wipe, slow
5 ¯ Continuous wipe, fast
B í Single wipe/ îTo wipe the
windshield using washer fluid
If the wiper blades are worn, the windshield
will no longer be wiped properly. This could prevent you from observing the traffic
conditions, thereby causing an accident.
Replace the wiper blades twice a year, ideally
in spring and fall.
i
The vehicle is equipped with the MAGIC
VISION CONTROL wipe/wash system. The
washer fluid is fed through the wiper blades
and when wiping the screen with washer
fluid î, the water is emitted directly
from the blades. Replacing the wiper blades
Important safety notes G
WARNING
If the windshield wipers begin to move while
you are changing the wiper blades, you could
be trapped by the wiper arm. There is a risk
of injury.
Always switch off the windshield wipers and
ignition before changing the wiper blades.
Changing the windshield wiper blades Moving the wiper arm to a vertical
position
On vehicles without KEYLESS-GO:
X
Turn the SmartKey to position 1or 2in the
ignition lock.
X Set the windshield wipers to
position °.
X When the wiper arms have reached a
vertical position, turn the SmartKey to
position 0and remove it from the ignition
lock.
X Fold the wiper arm away from the
windshield until it engages.
On vehicles with KEYLESS-GO:
X Switch off the engine.
X Remove your foot from the brake pedal.
X Set the windshield wipers to
position °. Windshield
wipers
111Lights and windshield wipers Z
Page 122 of 284

Useful information
i This Operator's Manual describes all
models and all standard and optional
equipment of your vehicle available at the
time of publication of the Operator's
Manual. Country-specific differences are
possible. Please note that your vehicle may
not be equipped with all features
described. This also applies to safety-
related systems and functions.
i Read the information on qualified
specialist workshops: (Y page 30).Notes on breaking-in a new vehicle
Important safety notes
New and replaced brake pads and discs only
reach their optimum braking effect after
several hundred kilometers of driving.
Compensate for this by applying greater force
to the brake pedal. The first 1000 miles (1500 km)
The more you look after the engine when it is
new, the more satisfied you will be with its
performance in the future.
R You should therefore drive at varying
vehicle and engine speeds for the first
1,000 miles (1,500 km).
R Avoid heavy loads, e.g. driving at full
throttle, during this period.
R Change gear in good time, before the
tachometer needle is Ôof the way to the
red area of the tachometer.
R Do not manually shift to a lower gear to
brake the vehicle.
R If possible, do not depress the accelerator
pedal past the point of resistance
(kickdown).
R Ideally, for the first 1,000 miles (1,500 km),
drive in program C. After 1,000 miles (1,500 km), you can
increase the engine speed gradually and bring
the vehicle to full speed.
Additional breaking-in notes for AMG
vehicles:
R Do not drive faster than 85 mph
(140 km/h) for the first 1,000 miles
(1,500 km).
R Only allow the engine to reach a maximum
engine speed of 4,500 rpm briefly.
R Change gear in good time.
i You should also observe these notes on
breaking in if the engine or parts of the drive
train on your vehicle have been replaced. AMG vehicles with self-locking rear
axle differential
Your vehicle is equipped with a self-locking
differential on the rear axle. To protect the
differential on the rear axle, carry out an oil
change after a breaking-in phase of
2,000 miles (3,000 km). This oil change
prolongs the service life of the differential.
Have the oil change carried out at a qualified
specialist workshop. Mercedes-Benz
recommends that you use an authorized
Mercedes-Benz Center for this purpose. Driving
Important safety notes
G
WARNING
Objects in the driver's footwell can restrict the
pedal travel or obstruct a depressed pedal.
The operating and road safety of the vehicle
is jeopardized. There is a risk of an accident.
Make sure that all objects in the vehicle are
stowed correctly, and that they cannot enter
the driver's footwell. Install the floormats
securely and as specified in order to ensure
sufficient clearance for the pedals. Do not use
loose floormats and do not place floormats on
top of one another. 120
DrivingDriving and parking
Page 123 of 284
G
WARNING
Unsuitable footwear can hinder correct usage
of the pedals, e.g.:
R shoes with thick soles
R shoes with high heels
R slippers
There is a risk of an accident.
Wear suitable footwear to ensure correct
usage of the pedals. G
WARNING
If you switch off the ignition while driving,
safety-relevant functions are only available
with limitations, or not at all. This could affect,
for example, the power steering and the brake
boosting effect. You will require considerably
more effort to steer and brake. There is a risk
of an accident.
Do not switch off the ignition while driving. G
WARNING
If the parking brake has not been fully
released when driving, the parking brake can:
R overheat and cause a fire
R lose its hold function.
There is a risk of fire and an accident. Release
the parking brake fully before driving off.
! Warm up the engine quickly. Do not use
the engine's full performance until it has
reached operating temperature.
Only shift the automatic transmission to
the desired drive position when the vehicle
is stationary.
Where possible, avoid spinning the drive
wheels when pulling away on slippery
roads. You could otherwise damage the
drive train.
! AMG vehicles: at low engine oil
temperatures below 68 ‡ (+20 †), the
maximum engine speed is restricted in
order to protect the engine. To protect the
engine and maintain smooth engine operation, avoid driving at full throttle when
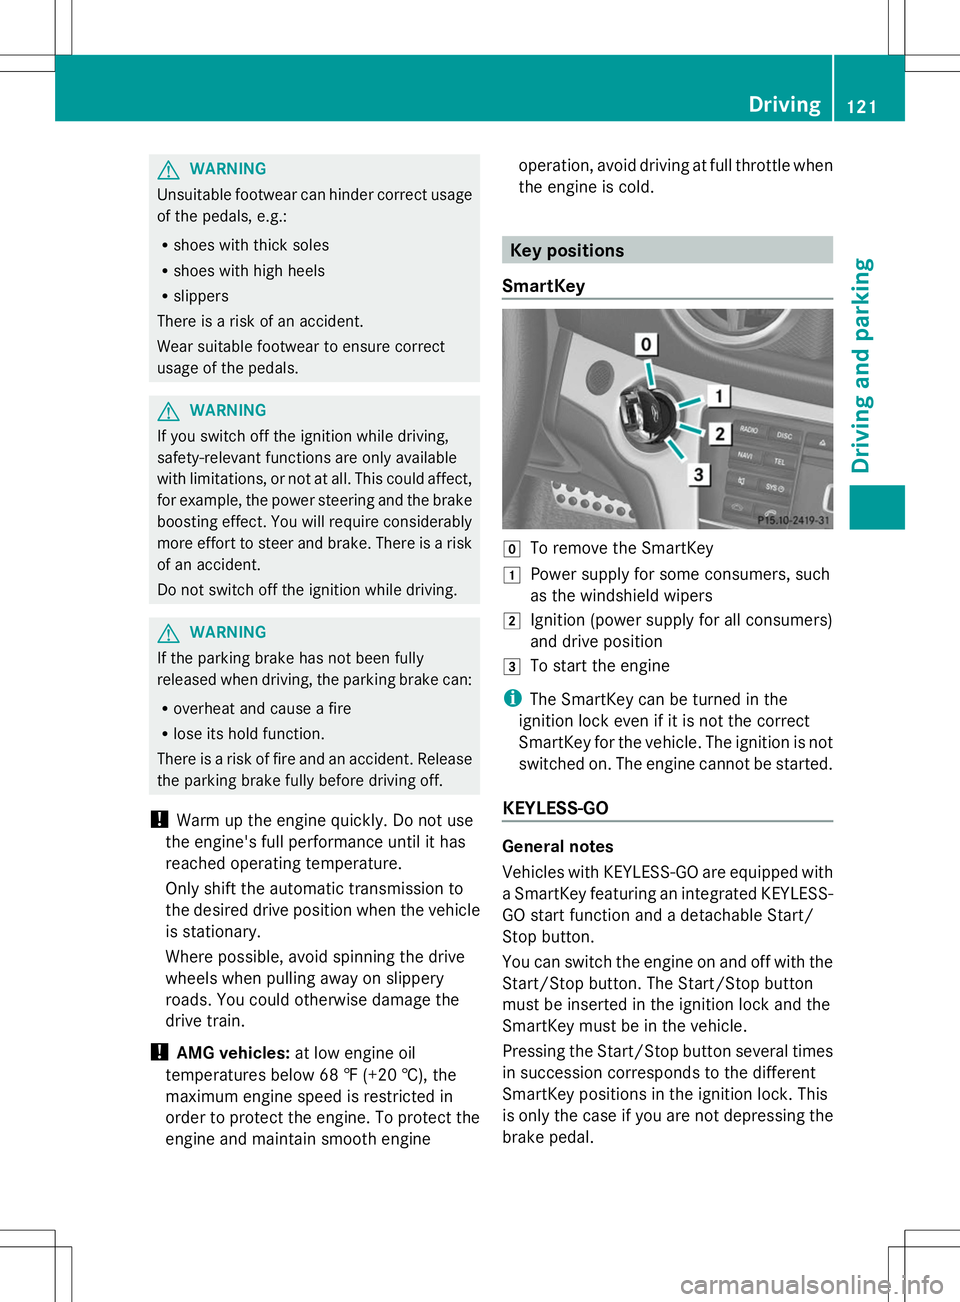
the engine is cold. Key positions
SmartKey g
To remove the SmartKey
1 Power supply for some consumers, such
as the windshield wipers
2 Ignition (power supply for all consumers)
and drive position
3 To start the engine
i The SmartKey can be turned in the
ignition lock even if it is not the correct
SmartKey for the vehicle. The ignition is not
switched on. The engine cannot be started.
KEYLESS-GO General notes
Vehicles with KEYLESS-GO are equipped with
a SmartKey featuring an integrated KEYLESS-
GO start function and a detachable Start/
Stop button.
You can switch the engine on and off with the
Start/Stop button. The Start/Stop button
must be inserted in the ignition lock and the
SmartKey must be in the vehicle.
Pressing the Start/Stop button several times
in succession corresponds to the different
SmartKey positions in the ignition lock. This
is only the case if you are not depressing the
brake pedal. Driving
121Driving and parking Z
Page 124 of 284

If you depress the brake pedal and press the
Start/Stop button, the engine starts
immediately.
The Start/Stop button can be removed from
the ignition lock. Then, you can insert the
SmartKey into the ignition lock.
i You do not have to remove the Start/Stop
button from the ignition lock when you
leave the vehicle. You should, however,
always take the SmartKey with you when
leaving the vehicle. As long as the
SmartKey is in the vehicle:
R the vehicle can be started using the
Start/Stop button and
R electrically powered equipment can be
operated.
i The engine can be turned off while the
vehicle is in motion by pressing and holding
the Start/Stop button for approximately
three seconds. This function operates
independently of the ECO start/stop
automatic engine switch-off function.
Key positions with KEYLESS-GO :
Start/Stop button
; Ignition lock
X Insert Start/Stop button :into ignition
lock ;.
i When you insert Start/Stop button :
into ignition lock ;, the system needs
approximately two seconds recognition
time. You can then use Start/Stop
button :. Start/Stop button
=
USA only
? Canada only
If Start/Stop button :has not yet been
pressed, this corresponds to the SmartKey
being removed from the ignition.
X To switch on the power supply: press
Start/Stop button :once.
The power supply is switched on. You can
now activate the windshield wipers, for
example.
i The power supply is switched off if you
press Start/Stop button :twice when in
this position and the driver's door is open.
X To switch on the ignition: press Start/
Stop button :twice.
The ignition is switched on.
i The power supply is switched off if you
press Start/Stop button :twice when in
this position and the driver's door is open.
As soon as the ignition is switched on, all the
indicator lamps in the instrument cluster light
up. If an indicator lamp does not go out after
starting the engine or lights up while driving,
there may be a technical problem
(Y page 177). 122
DrivingDriving and parking
Page 125 of 284
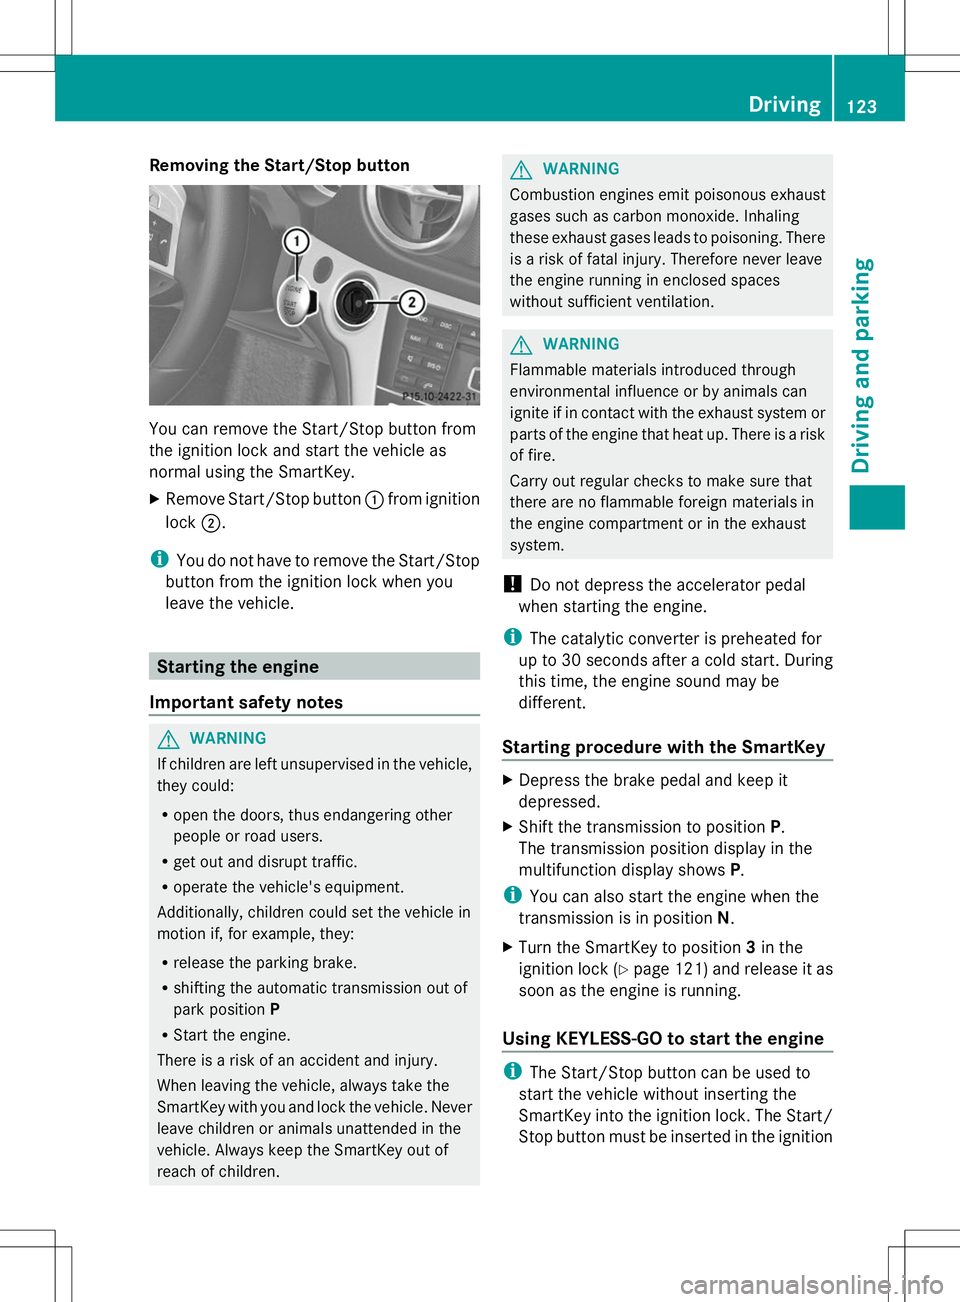
Removing the Start/Stop button
You can remove the Start/Stop button from
the ignition lock and start the vehicle as
normal using the SmartKey.
X Remove Start/Stop button :from ignition
lock ;.
i You do not have to remove the Start/Stop
button from the ignition lock when you
leave the vehicle. Starting the engine
Important safety notes G
WARNING
If children are left unsupervised in the vehicle,
they could:
R open the doors, thus endangering other
people or road users.
R get out and disrupt traffic.
R operate the vehicle's equipment.
Additionally, children could set the vehicle in
motion if, for example, they:
R release the parking brake.
R shifting the automatic transmission out of
park position P
R Start the engine.
There is a risk of an accident and injury.
When leaving the vehicle, always take the
SmartKey with you and lock the vehicle. Never
leave children or animals unattended in the
vehicle. Always keep the SmartKey out of
reach of children. G
WARNING
Combustion engines emit poisonous exhaust
gases such as carbon monoxide. Inhaling
these exhaust gases leads to poisoning. There
is a risk of fatal injury. Therefore never leave
the engine running in enclosed spaces
without sufficient ventilation. G
WARNING
Flammable materials introduced through
environmental influence or by animals can
ignite if in contact with the exhaust system or
parts of the engine that heat up. There is a risk
of fire.
Carry out regular checks to make sure that
there are no flammable foreign materials in
the engine compartment or in the exhaust
system.
! Do not depress the accelerator pedal
when starting the engine.
i The catalytic converter is preheated for
up to 30 seconds after a cold start. During
this time, the engine sound may be
different.
Starting procedure with the SmartKey X
Depress the brake pedal and keep it
depressed.
X Shift the transmission to position P.
The transmission position display in the
multifunction display shows P.
i You can also start the engine when the
transmission is in position N.
X Turn the SmartKey to position 3in the
ignition lock (Y page 121) and release it as
soon as the engine is running.
Using KEYLESS-GO to start the engine i
The Start/Stop button can be used to
start the vehicle without inserting the
SmartKey into the ignition lock. The Start/
Stop button must be inserted in the ignition Driving
123Driving and parking Z
Page 126 of 284
lock and the SmartKey must be in the
vehicle.
X Depress the brake pedal and keep it
depressed.
X Shift the transmission to position P.
The transmission position display in the
multifunction display shows P.
i You can also start the engine when the
transmission is in position N.
X Press the Start/Stop button once
(Y page 121).
The engine starts. Pulling away
Automatic transmission G
WARNING
If the engine speed is above the idling speed
and you engage transmission position Dor
R, the vehicle could pull away suddenly. There
is a risk of an accident.
When engaging transmission position Dor R,
always firmly depress the brake pedal and do
not simultaneously accelerate.
i It is only possible to shift the transmission
from position Pto the desired position if
you depress the brake pedal. Only then is
the shift lock released.
X Depress the brake pedal and keep it
depressed.
X Shift the transmission to position Dor R.
X Release the electric parking brake, see
Digital Operator's Manual.
X Release the brake pedal.
X Carefully depress the accelerator pedal.
! If a warning tone sounds and the
Release Park. Brake Release Park. Brake message appears
in the multifunction display, the parking
brake is still applied. Release the parking
brake. i
The vehicle locks centrally once you have
pulled away. The locking knobs in the doors
drop down.
You can open the doors from the inside at
any time.
You can also deactivate the automatic
locking feature (Y page 161).
i Upshifts take place at higher engine
speeds after a cold start. This helps the
catalytic converter to reach its operating
temperature more quickly.
Hill start assist Hill start assist helps you when pulling away
forwards or in reverse on an uphill gradient.
It holds the vehicle for a short time after you
have removed your foot from the brake pedal.
This gives you enough time to move your foot
from the brake pedal to the accelerator pedal
and to depress it before the vehicle begins to
roll.
G
WARNING
After a short time, hill start assist will no
longer brake your vehicle and it could roll
away. There is a risk of an accident and injury.
Therefore, quickly move your foot from the
brake pedal to the accelerator pedal. Never
leave the vehicle when it is held by hill start
assist.
X Remove your foot from the brake pedal.
The vehicle is then held for about a second.
X Pull away.
Hill start assist is not active if:
R you are pulling away on a level road or on
a downhill gradient.
R the transmission is in position N.
R the parking brake is applied.
R ESP ®
is malfunctioning. 124
DrivingDriving and parking