2014 MERCEDES-BENZ SL-CLASS ROADSTER warning lights
[x] Cancel search: warning lightsPage 82 of 284

Mechanical key
General notes If the vehicle can no longer be locked or
unlocked with the SmartKey, use the
mechanical key.
If you use the mechanical key to unlock and
open the driver's door or the trunk lid, the
anti-theft alarm system will be triggered
(Y page 75).
There are several ways to turn off the alarm:
X To turn the alarm off with the
SmartKey: press the%or& button
on the SmartKey.
or
X Insert the SmartKey into the ignition lock.
or
X To disarm the alarm with KEYLESS-GO:
press the Start/Stop button in the ignition
lock. The SmartKey must be in the vehicle.
or
X Lock or unlock the vehicle using KEYLESS-
GO. The SmartKey must be outside the
vehicle.
If you unlock the vehicle using the mechanical
key, the fuel filler flap will not be unlocked
automatically.
X To unlock the fuel filler flap: insert the
SmartKey into the ignition lock.
Removing the mechanical key X
Push release catch :in the direction of
the arrow and at the same time remove
mechanical key ;from the SmartKey.
For further information about:
R unlocking the driver's door (Y page 84)
R unlocking the trunk (Y page 89)
R locking the vehicle (Y page 84) SmartKey battery
Important safety notes G
WARNING
Batteries contain toxic and corrosive
substances. If batteries are swallowed, it can
result in severe health problems. There is a
risk of fatal injury.
Keep batteries out of the reach of children. If
a battery is swallowed, seek medical attention
immediately.
Mercedes-Benz recommends that you have
the batteries replaced at a qualified specialist
workshop.
The SmartKey batteries contain perchlorate
material, which may require special handling
and regard for the environment. National
guidelines must be observed during disposal.
Checking the battery X
Press the &or% button.
The battery is working properly if battery
check lamp :lights up briefly. 80
SmartKeyOpening and closing
Page 86 of 284
G
WARNING
If children are left unsupervised in the vehicle,
they could:
R open the doors, thus endangering other
people or road users.
R get out and disrupt traffic.
R operate the vehicle's equipment.
Additionally, children could set the vehicle in
motion if, for example, they:
R release the parking brake.
R shifting the automatic transmission out of
park position P
R Start the engine.
There is a risk of an accident and injury.
When leaving the vehicle, always take the
SmartKey with you and lock the vehicle. Never
leave children or animals unattended in the
vehicle. Always keep the SmartKey out of
reach of children. G
WARNING
If persons, particularly children are subjected
to prolonged exposure to extreme heat or
cold, there is a risk of injury, possibly even
fatal. Never leave children unattended in the
vehicle. Information in the Digital Operator's
Manual
In the Digital Operator's Manual you will find
information on the following topics:
R Unlocking and opening doors from the
inside
R Centrally locking and unlocking the vehicle
from the inside
R Automatic locking feature
R Servo locks
R Unlocking the driver's door (mechanical
key)
R Locking the vehicle (mechanical key) Trunk
Important safety notes
G
WARNING
If objects, luggage or loads are not secured or
not secured sufficiently, they could slip, tip
over or be flung around and thereby hit vehicle
occupants. There is a risk of injury,
particularly in the event of sudden braking or
a sudden change in direction.
Always store objects so that they cannot be
flung around. Secure objects, luggage or
loads against slipping or tipping before the
journey. G
WARNING
If persons, particularly children are subjected
to prolonged exposure to extreme heat or
cold, there is a risk of injury, possibly even
fatal. Never leave children unattended in the
vehicle.
! The trunk lid swings upwards when
opened. Therefore, make sure that there is
sufficient clearance above the trunk lid.
! Only close the trunk once the roof is
lowered completely. Otherwise, you could
damage the roof.
If you close the trunk lid before the roof is
lowered completely, the loading aid switch
lights up and a warning tone sounds.
i Opening dimensions of the trunk lid
(Y page 279).
i When the soft top is open, you can use
the loading aid (Y page 204) to raise the
folded soft top when loading it into the
trunk. For this purpose, you can also open
the trunk partition.
The trunk partition must be closed again
after loading. Otherwise, the soft top can
no longer be closed.
You can unlock the trunk lid if the vehicle is
stationary and the roof is completely open or
closed. 84
TrunkOpening and closing
Page 108 of 284

Useful information
i This Operator's Manual describes all
models and all standard and optional
equipment of your vehicle available at the
time of publication of the Operator's
Manual. Country-specific differences are
possible. Please note that your vehicle may
not be equipped with all features
described. This also applies to safety-
related systems and functions.
i Read the information on qualified
specialist workshops: (Y page 30).Exterior lighting
General notes
For reasons of safety, Mercedes-Benz
recommends that you drive with the lights
switched on even during the daytime. In some
countries, operation of the headlamps varies
due to legal requirements and self-imposed
obligations. Driving abroad
Symmetrical low-beam headlamps Switch the headlamps to symmetrical low
beam in countries in which traffic drives on
the opposite side of the road from the country
where the vehicle is registered. This prevents
glare to oncoming traffic. When using
symmetrical lights, the edge of the road is not
lit as widely and as far ahead as normal.
Have the headlamps converted at a qualified
specialist workshop as close to the border as
possible before driving in these countries.
Asymmetrical low beam Have the headlamps converted back to
asymmetrical low-beam headlamps at a
qualified specialist workshop as soon as
possible after crossing the border again. Information in the Digital Operator's
Manual
In the Digital Operator's Manual you will find
information on the following topics:
R Hazard warning lamps
R Headlamps fogged up on the inside Setting the exterior lighting
Setting options Exterior lighting can be set using:
R
the light switch
R the combination switch (Y page 108)
R the on-board computer (Y page 161)
Light switch Operation
1W
Left-hand standing lamps
2X Right-hand standing lamps
3T Parking lamps, license plate and
instrument cluster lighting
4Ã Automatic headlamp mode,
controlled by the light sensor
5L Low-beam/high-beam headlamps
If you hear a warning tone when you leave the
vehicle, the lights may still be switched on.
X Turn the light switch to Ã.106
Exterior lightingLights and windshield wipers
Page 109 of 284

The exterior lighting (except the parking/
standing lamps) switches off automatically if
you:
R remove the SmartKey from the ignition lock
R open the driver's door with the SmartKey
in position 0.
Automatic headlamp mode G
WARNING
When the light switch is set to Ã, the low-
beam headlamps may not be switched on
automatically if there is fog, snow or other
causes of poor visibility due to the weather
conditions such as spray. There is a risk of an
accident.
In such situations, turn the light switch to
L.
The automatic headlamp feature is only an
aid. The driver is responsible for the vehicle's
lighting at all times.
à is the favored light switch setting. The
light setting is automatically selected
according to the brightness of the ambient
light (exception: poor visibility due to weather
conditions such as fog, snow or spray):
R SmartKey in position 1in the ignition lock:
the parking lamps are switched on or off
automatically depending on the brightness
of the ambient light.
R With the engine running: if you have
activated the daytime running lamps
function via the on-board computer, the
daytime running lamps or the low-beam
headlamps and parking lamps are switched
on or off automatically depending on the
brightness of the ambient light.
X To switch on automatic headlamp
mode: turn the light switch to Ã.
Only for Canada:
The daytime running lamps improve the
visibility of your vehicle during the day. The
daytime running lamps function is required by
law in Canada. It cannot therefore be
deactivated. When the engine is running and the vehicle is
stationary: if you move the selector lever from
a drive position to
P, the daytime running
lamps/low-beam headlamps go out after
three minutes.
When the engine is running, the vehicle is
stationary and in bright ambient light: if you
turn the light switch to T, the daytime
running lamps and parking lamps switch on.
If the engine is running and you turn the light
switch to L, the manual settings take
precedence over the daytime running lamps.
USA only:
The daytime running lamps improve the
visibility of your vehicle during the day. To do
this, the daytime running lamps function must
be switched on using the on-board computer
(Y page 161).
If the engine is running and you turn the light
switch to TorL, the manual settings
take precedence over the daytime running
lamps.
Low-beam headlamps G
WARNING
When the light switch is set to Ã, the low-
beam headlamps may not be switched on
automatically if there is fog, snow or other
causes of poor visibility due to the weather
conditions such as spray. There is a risk of an
accident.
In such situations, turn the light switch to
L.
Even if the light sensor does not detect that
it is dark, the parking lamps and low-beam
headlamps switch on when the ignition is
switched on and the light switch is set to the
L position. This is a particularly useful
function in the event of rain and fog.
X To switch on the low-beam headlamps:
turn the SmartKey in the ignition lock to
position 2or start the engine.
X Turn the light switch to L.
The green Lindicator lamp in the
instrument cluster lights up. Exterior lighting
107Lights and windshield wipers Z
Page 111 of 284
Active:
R
if you are driving at speeds below
25mph (40 km/h) and switch on the turn
signal or turn the steering wheel.
R if you are driving at speeds between
25mph (40 km/h) and45mph (70 km/h)
and turn the steering wheel
Not active: if you are driving at speeds above
25 mph (40 km/h) or switch off the turn
signals or turn the steering wheel to the
straight-ahead position.
The cornering light function may remain lit for
a short time, but is automatically switched off
after no more than three minutes. Active light function
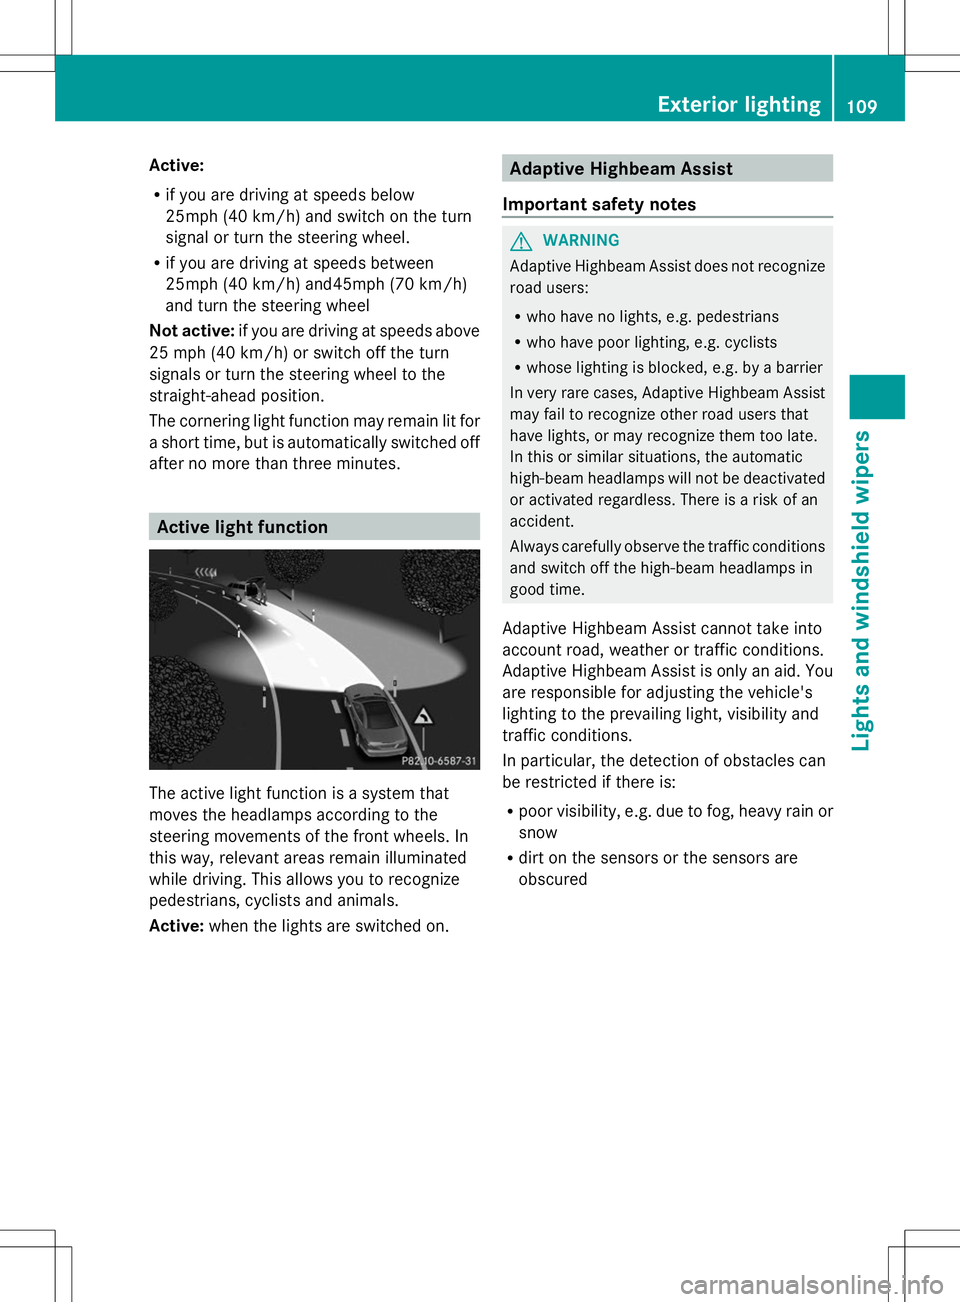
The active light function is a system that
moves the headlamps according to the
steering movements of the front wheels. In
this way, relevant areas remain illuminated
while driving. This allows you to recognize
pedestrians, cyclists and animals.
Active: when the lights are switched on. Adaptive Highbeam Assist
Important safety notes G
WARNING
Adaptive Highbeam Assist does not recognize
road users:
R who have no lights, e.g. pedestrians
R who have poor lighting, e.g. cyclists
R whose lighting is blocked, e.g. by a barrier
In very rare cases, Adaptive Highbeam Assist
may fail to recognize other road users that
have lights, or may recognize them too late.
In this or similar situations, the automatic
high-beam headlamps will not be deactivated
or activated regardless. There is a risk of an
accident.
Always carefully observe the traffic conditions
and switch off the high-beam headlamps in
good time.
Adaptive Highbeam Assist cannot take into
account road, weather or traffic conditions.
Adaptive Highbeam Assist is only an aid. You
are responsible for adjusting the vehicle's
lighting to the prevailing light, visibility and
traffic conditions.
In particular, the detection of obstacles can
be restricted if there is:
R poor visibility, e.g. due to fog, heavy rain or
snow
R dirt on the sensors or the sensors are
obscured Exterior lighting
109Lights and windshield wipers Z
Page 113 of 284
the Xenon bulb and touch the electrical
contacts. There is a risk of fatal injury.
Never touch the parts or the electrical
contacts of the Xenon bulb. Always have work
on the Xenon bulbs carried out at a qualified
specialist workshop.
The front and rear lamps of your vehicle are
equipped with either Xenon or LED bulbs. Do
not replace the bulbs yourself. Contact a
qualified specialist workshop which has the
necessary specialist knowledge and tools to
carry out the work required.
Bulbs and lamps are an important aspect of
vehicle safety. You must therefore make sure
that these function correctly at all times.
Have the headlamp setting checked regularly. Windshield wipers
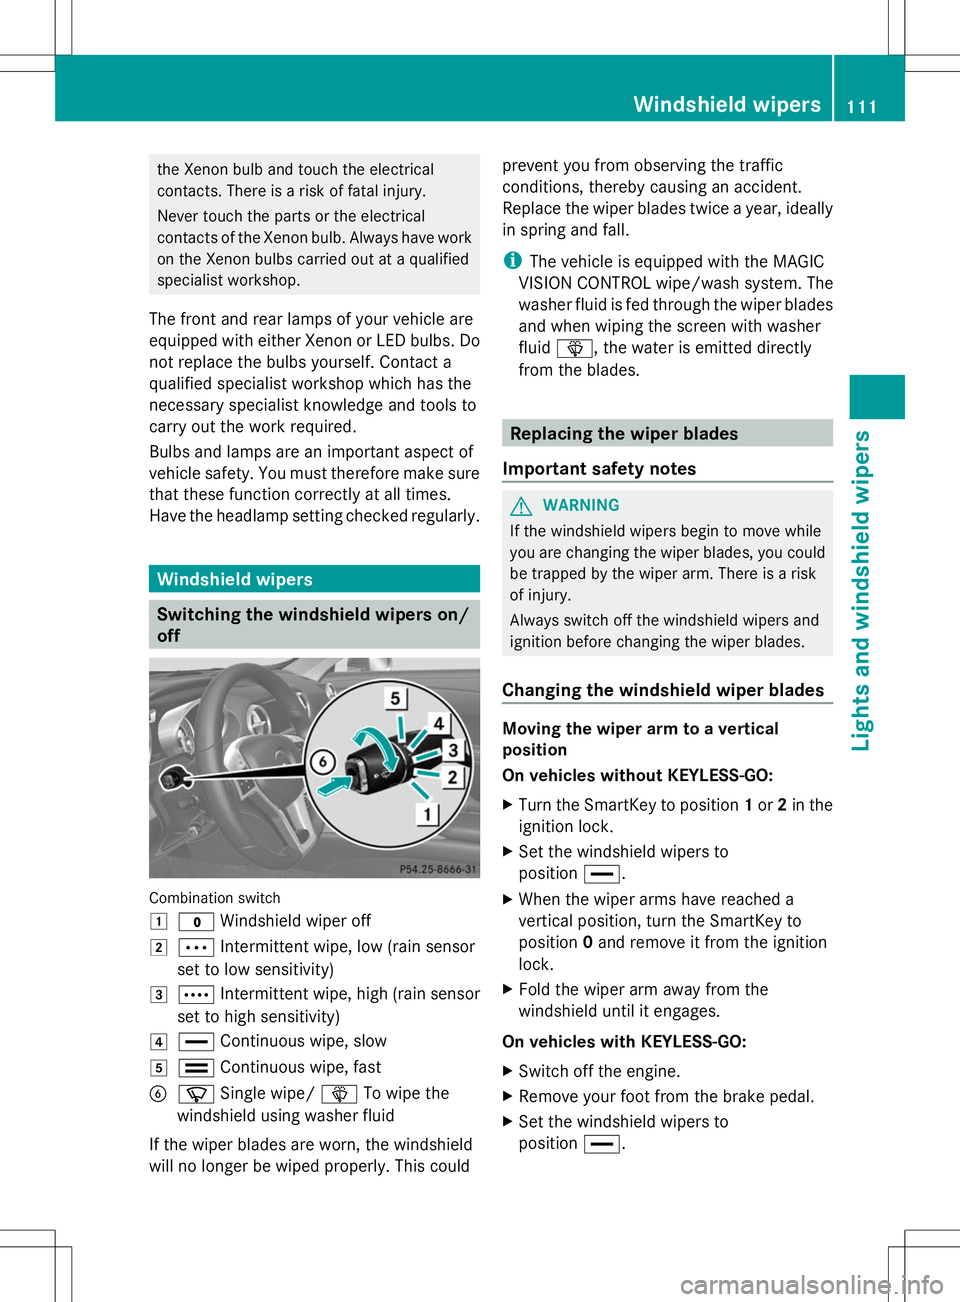
Switching the windshield wipers on/
off Combination switch
1
$ Windshield wiper off
2 Ä Intermittent wipe, low (rain sensor
set to low sensitivity)
3 Å Intermittent wipe, high (rain sensor
set to high sensitivity)
4 ° Continuous wipe, slow
5 ¯ Continuous wipe, fast
B í Single wipe/ îTo wipe the
windshield using washer fluid
If the wiper blades are worn, the windshield
will no longer be wiped properly. This could prevent you from observing the traffic
conditions, thereby causing an accident.
Replace the wiper blades twice a year, ideally
in spring and fall.
i
The vehicle is equipped with the MAGIC
VISION CONTROL wipe/wash system. The
washer fluid is fed through the wiper blades
and when wiping the screen with washer
fluid î, the water is emitted directly
from the blades. Replacing the wiper blades
Important safety notes G
WARNING
If the windshield wipers begin to move while
you are changing the wiper blades, you could
be trapped by the wiper arm. There is a risk
of injury.
Always switch off the windshield wipers and
ignition before changing the wiper blades.
Changing the windshield wiper blades Moving the wiper arm to a vertical
position
On vehicles without KEYLESS-GO:
X
Turn the SmartKey to position 1or 2in the
ignition lock.
X Set the windshield wipers to
position °.
X When the wiper arms have reached a
vertical position, turn the SmartKey to
position 0and remove it from the ignition
lock.
X Fold the wiper arm away from the
windshield until it engages.
On vehicles with KEYLESS-GO:
X Switch off the engine.
X Remove your foot from the brake pedal.
X Set the windshield wipers to
position °. Windshield
wipers
111Lights and windshield wipers Z
Page 142 of 284
Obstructions and stationary vehicles
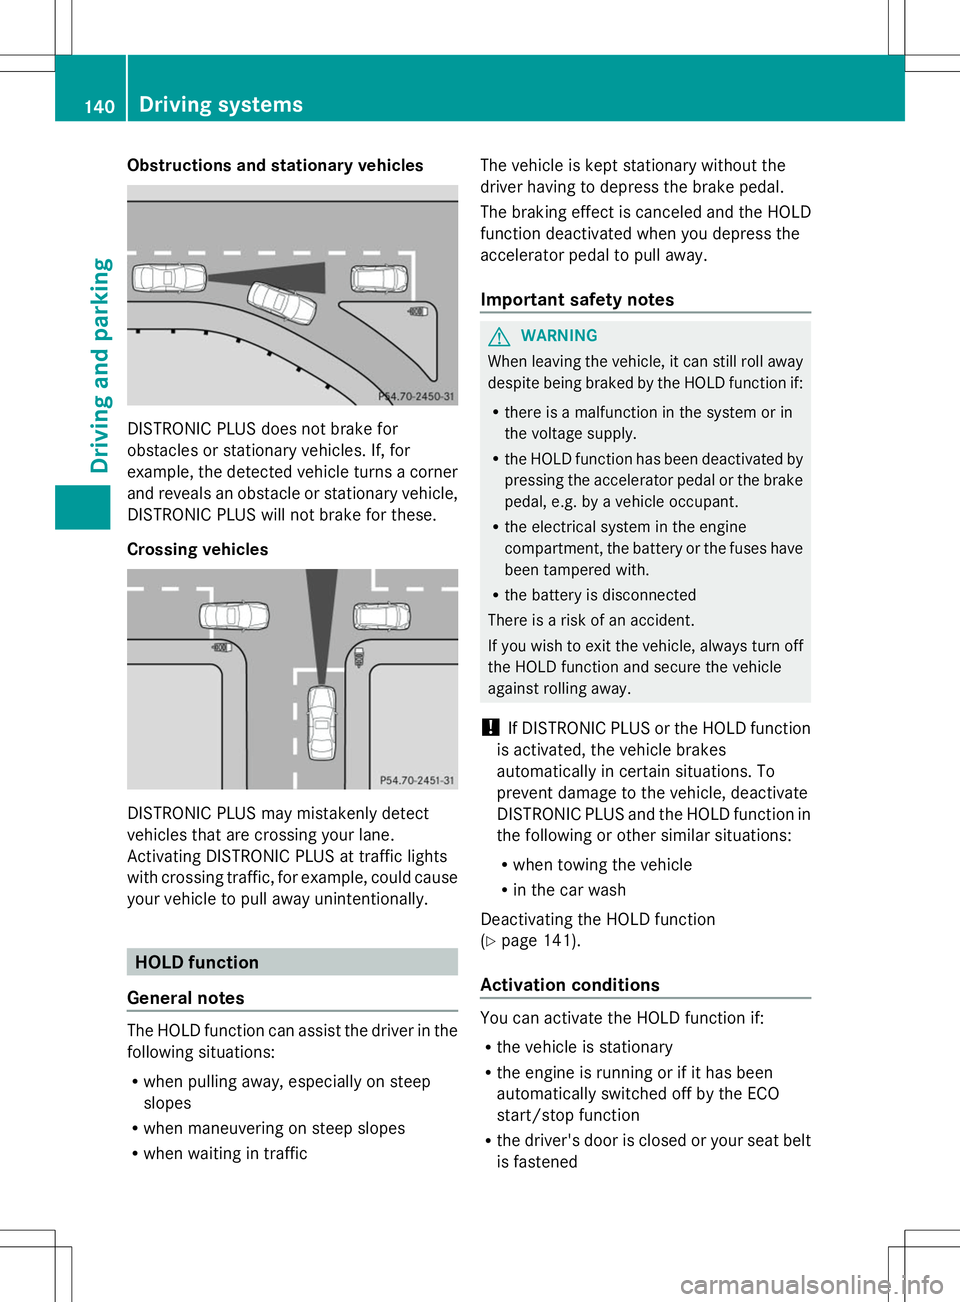
DISTRONIC PLUS does not brake for
obstacles or stationary vehicles. If, for
example, the detected vehicle turns a corner
and reveals an obstacle or stationary vehicle,
DISTRONIC PLUS will not brake for these.
Crossing vehicles DISTRONIC PLUS may mistakenly detect
vehicles that are crossing your lane.
Activating DISTRONIC PLUS at traffic lights
with crossing traffic, for example, could cause
your vehicle to pull away unintentionally. HOLD function
General notes The HOLD function can assist the driver in the
following situations:
R when pulling away, especially on steep
slopes
R when maneuvering on steep slopes
R when waiting in traffic The vehicle is kept stationary without the
driver having to depress the brake pedal.
The braking effect is canceled and the HOLD
function deactivated when you depress the
accelerator pedal to pull away.
Important safety notes
G
WARNING
When leaving the vehicle, it can still roll away
despite being braked by the HOLD function if:
R there is a malfunction in the system or in
the voltage supply.
R the HOLD function has been deactivated by
pressing the accelerator pedal or the brake
pedal, e.g. by a vehicle occupant.
R the electrical system in the engine
compartment, the battery or the fuses have
been tampered with.
R the battery is disconnected
There is a risk of an accident.
If you wish to exit the vehicle, always turn off
the HOLD function and secure the vehicle
against rolling away.
! If DISTRONIC PLUS or the HOLD function
is activated, the vehicle brakes
automatically in certain situations. To
prevent damage to the vehicle, deactivate
DISTRONIC PLUS and the HOLD function in
the following or other similar situations:
R when towing the vehicle
R in the car wash
Deactivating the HOLD function
(Y page 141).
Activation conditions You can activate the HOLD function if:
R
the vehicle is stationary
R the engine is running or if it has been
automatically switched off by the ECO
start/stop function
R the driver's door is closed or your seat belt
is fastened 140
Driving systemsDriving and parking
Page 144 of 284
Active Body Control (except AMG
vehicles)
Vehicle level General notes
In order to reduce fuel consumption and
improve the driving dynamics, the vehicle is
lowered as its speed increases. With the
SPORT suspension tuning, it is lowered by up
to 0.5 in (13 mm), with COMFORT by up to
0.2 in (5 mm). As the speed is reduced, the
vehicle is raised up to the set vehicle height.
Select the "Normal" setting for normal road
surfaces and "Raised" for driving with snow
chains or on particularly poor road surfaces.
Your selection remains stored even if you
remove the SmartKey from the ignition lock.
Important safety notes G
WARNING
The vehicle is slightly lowered if you:
R have selected the SPORT suspension
tuning at normal level and
R switch off the engine
Persons in the vicinity of the wheel arch or the
underbody may thus become trapped. There
is a risk of injury.
Make sure that nobody is in the vicinity of the
wheel arch or the underbody when you switch
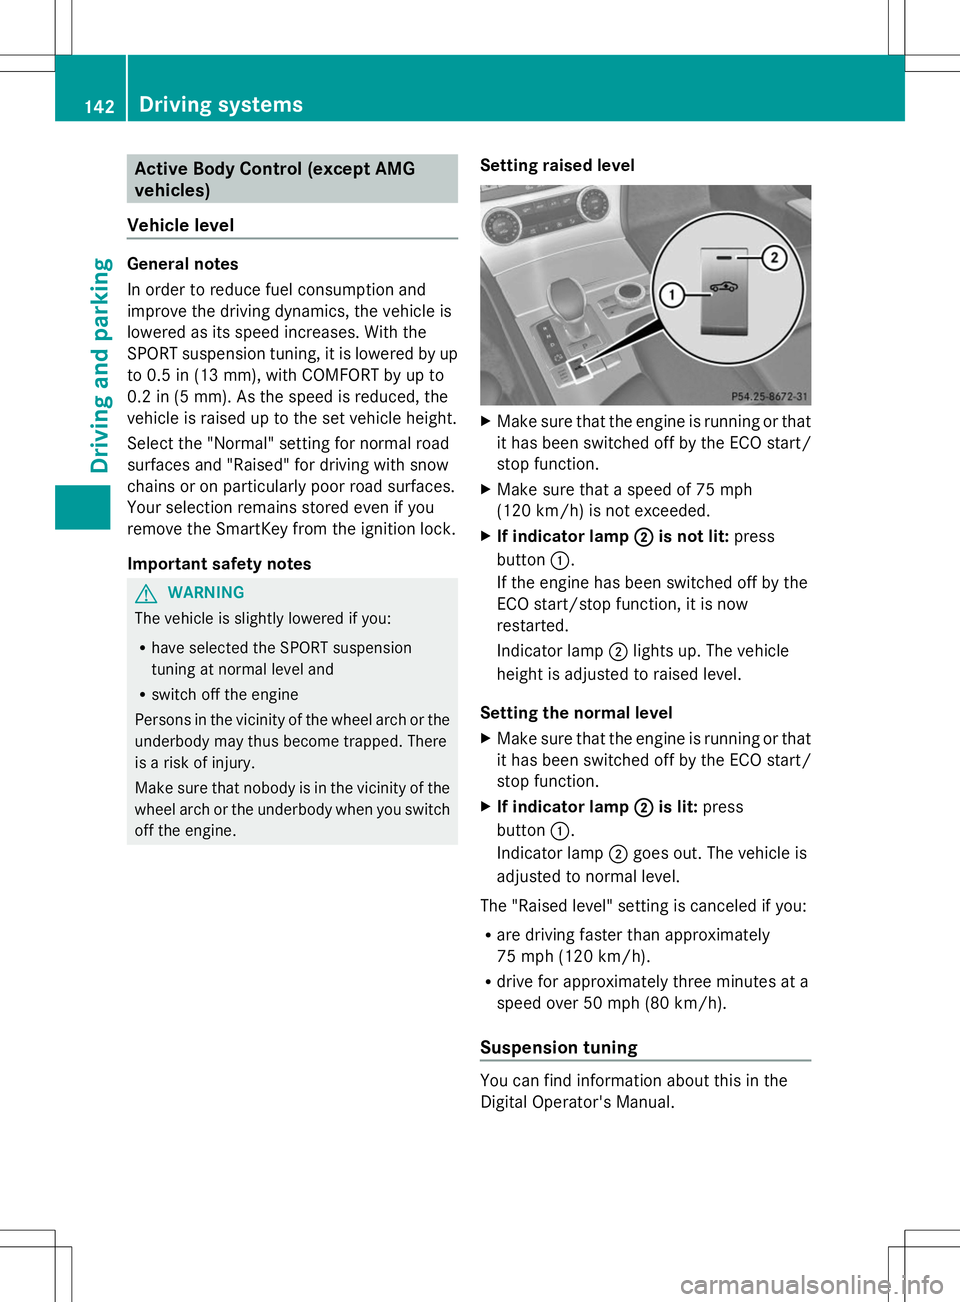
off the engine. Setting raised level X
Make sure that the engine is running or that
it has been switched off by the ECO start/
stop function.
X Make sure that a speed of 75 mph
(120 km/h) is not exceeded.
X If indicator lamp ; ;is not lit: press
button :.
If the engine has been switched off by the
ECO start/stop function, it is now
restarted.
Indicator lamp ;lights up. The vehicle
height is adjusted to raised level.
Setting the normal level
X Make sure that the engine is running or that
it has been switched off by the ECO start/
stop function.
X If indicator lamp ; ;is lit: press
button :.
Indicator lamp ;goes out. The vehicle is
adjusted to normal level.
The "Raised level" setting is canceled if you:
R are driving faster than approximately
75 mph (120 km/h).
R drive for approximately three minutes at a
speed over 50 mph (80 km/h).
Suspension tuning You can find information about this in the
Digital Operator's Manual.142
Driving systemsDriving and pa
rking