2014 MERCEDES-BENZ SL-CLASS ROADSTER reset
[x] Cancel search: resetPage 198 of 284

Function Page
F
Number pad
• Selects stations via the
station presets
• Stores stations manually
• Mobile phone
authorization
• Telephone number entry
• Sends DTMF tones
• Character entry
• Selects a location for the
weather forecast from the
memory
z
Displays the current
track being played g
Selects stations by
entering the frequency
manually g
Selects a track G
Switches COMAND on/off
Adjusts the volume Function Page
H
SD memory card slot
I
Calls up the system menu
J
Accepts a call
Dials a number
Redials
Accepts a waiting call
K
Switches the sound on or
off
Switches the hands-free
microphone on/off
Cancels the text message
read-aloud function
Switches off navigation
announcements
L
Rejects a call
Ends an active call
Rejects a waiting call
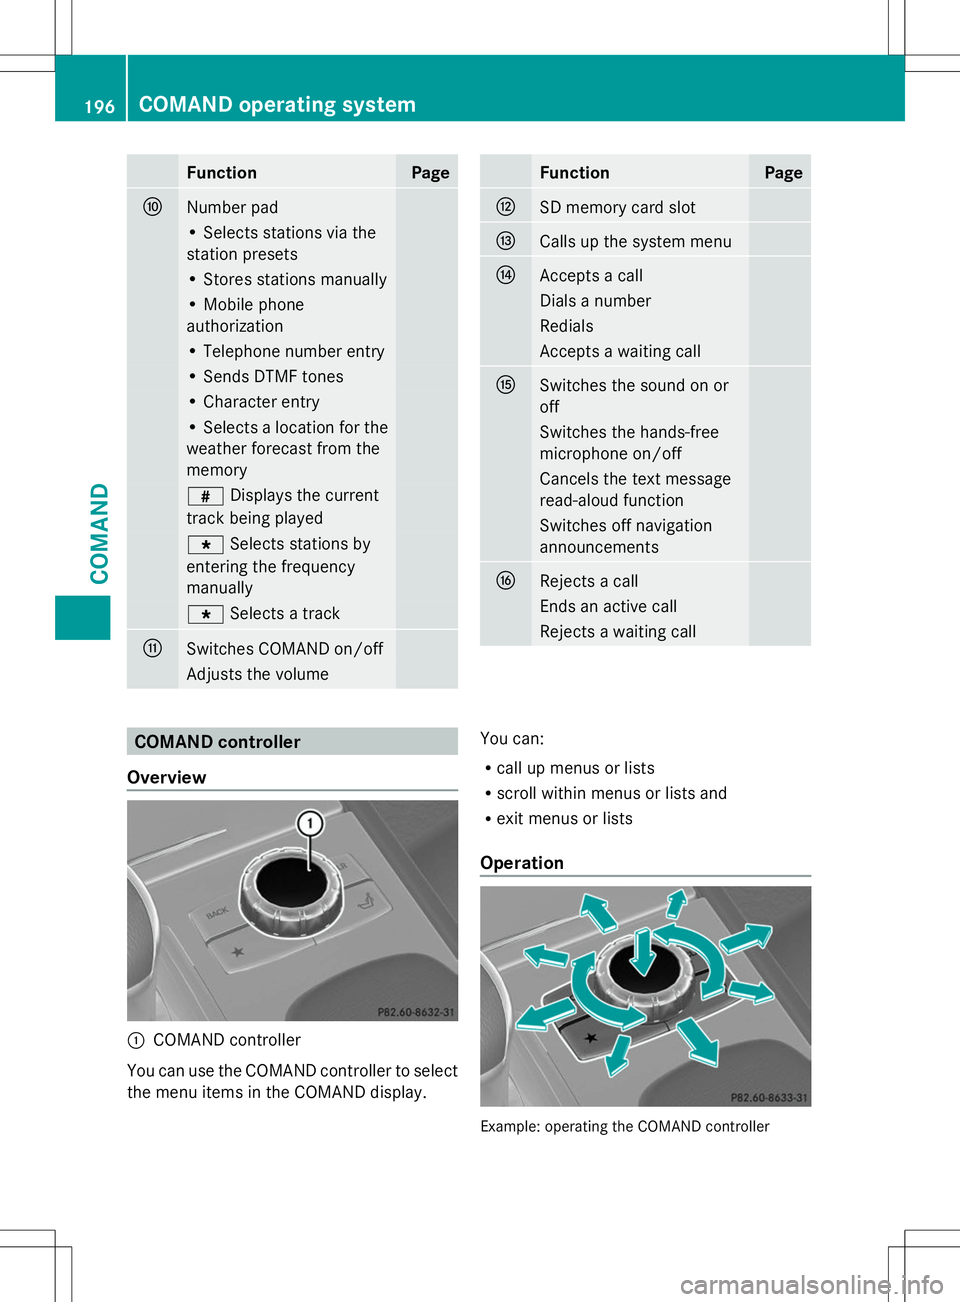
COMAND controller
Overview :
COMAND controller
You can use the COMAND controller to select
the menu items in the COMAND display. You can:
R
call up menus or lists
R scroll within menus or lists and
R exit menus or lists
Operation Example: operating the COMAND controller196
COMAND operating systemCOMAND
Page 223 of 284

Displaying service messages
X Switch on the ignition.
X Press the =or; button on the
steering wheel to select the Service
Service
menu.
X Press the 9or: button to select the
ASSYST PLUS
ASSYST PLUS submenu and confirm by
pressing the abutton.
The service due date appears in the
multifunction display. Information about Service
Resetting the ASSYST PLUS service
interval display !
If the ASSYST PLUS service interval
display has been inadvertently reset, this
setting can be corrected at a qualified
specialist workshop.
Have service work carried out as described
in the Maintenance Booklet. This may
otherwise lead to increased wear and
damage to the major assemblies or the
vehicle.
A qualified specialist workshop, e.g. an
authorized Mercedes-Benz Center, will reset
the ASSYST PLUS service interval display
after the service work has been carried out.
You can also obtain further information on
maintenance work, for example.
Special service requirements The specified maintenance interval takes only
the normal operation of the vehicle into
account. Under arduous operating conditions
or increased load on the vehicle,
maintenance work must be carried out more
frequently, for example:
R regular city driving with frequent
intermediate stops
R if the vehicle is primarily used to travel
short distances R
use in mountainous terrain or on poor road
surfaces
R if the engine is often left idling for long
periods
Under these or similar conditions, have, for
example, the air filter, engine oil and oil filter
replaced or changed more frequently. Under
arduous operating conditions, the tires must
be checked more often. Further information
can be obtained at a qualified specialist
workshop, e.g. an authorized Mercedes-Benz
Center.
Driving abroad An extensive Mercedes-Benz Service network
is also available in other countries. You can
obtain further information from any
authorized Mercedes-Benz Center.
Care
Notes on care
H
Environmental note
Dispose of empty packaging and cleaning
cloths in an environmentally responsible
manner.
! For cleaning your vehicle, do not use any
of the following:
R dry, rough or hard cloths
R abrasive cleaning agents
R solvents
R cleaning agents containing solvents
Do not scrub.
Do not touch the surfaces or protective
films with hard objects, e.g. a ring or ice
scraper. You could otherwise scratch or
damage the surfaces and protective film.
! Do not park the vehicle for an extended
period straight after cleaning it, particularly
after having cleaned the wheels with wheel
cleaner. Wheel cleaners could cause
increased corrosion of the brake discs and
brake pads/linings. For this reason, you Care
221Maintenance and care Z
Page 235 of 284

electronic components, such as the
alternator, may be damaged.
R you first remove the negative terminal
clamp and then the positive terminal
clamp. Never swap the terminal clamps.
Otherwise, the vehicle's electronic
system may be damaged.
R the transmission is locked in position P
after disconnecting the battery. The
vehicle is secured against rolling away.
You can then no longer move the vehicle.
The battery and the cover of the positive
terminal clamp must be installed securely
during operation.
In order for the battery to achieve the
maximum possible service life, it must always
be sufficiently charged.
Comply with safety precautions and take
protective measures when handling
batteries. Risk of explosion.
Fire, open flames and smoking are
prohibited when handling the
battery. Avoid creating sparks. Battery acid is caustic. Avoid
contact with skin, eyes or clothing.
Wear suitable protective clothing,
especially gloves, apron and
faceguard.
Rinse any acid spills immediately
with clear water. Contact a
physician if necessary. Wear eye protection.
Keep children away.
Observe this Operator's Manual. The vehicle battery, like other batteries, can
discharge over time if you do not use the
vehicle. In this case, have the battery
disconnected at a qualified specialist
workshop. You can also charge the battery
with a charger recommended by Mercedes-
Benz. Contact a qualified specialist workshop
for further information.
Have the battery condition of charge checked
more frequently if you use the vehicle mainly
for short trips or if you leave it standing idle
for a lengthy period. Consult a qualified
specialist workshop if you wish to leave your
vehicle parked for a long period of time.
i Remove the SmartKey if you park the
vehicle and do not require any electrical
consumers. The vehicle will then use very
little energy, thus conserving battery
power.
i After an interruption to the power supply,
e.g. due to a discharged battery, you must
reset the clock. Information on setting the
clock can be found in the Digital Operator's
Manual. Charging the battery
G
WARNING
During charging and jump-starting, explosive
gases can escape from the battery. There is a
risk of an explosion.
Particularly avoid fire, open flames, creating
sparks and smoking. Ensure there is sufficient
ventilation while charging and jump-starting.
Do not lean over a battery. G
WARNING
Battery acid is caustic. There is a risk of injury.
Avoid contact with the skin, eyes or clothing.
Do not inhale any battery gases. Do not lean
over the battery. Keep children away from
batteries. Wash battery acid immediately with
water and seek medical attention. Battery (vehicle)
233Breakdown assistance Z
Page 241 of 284

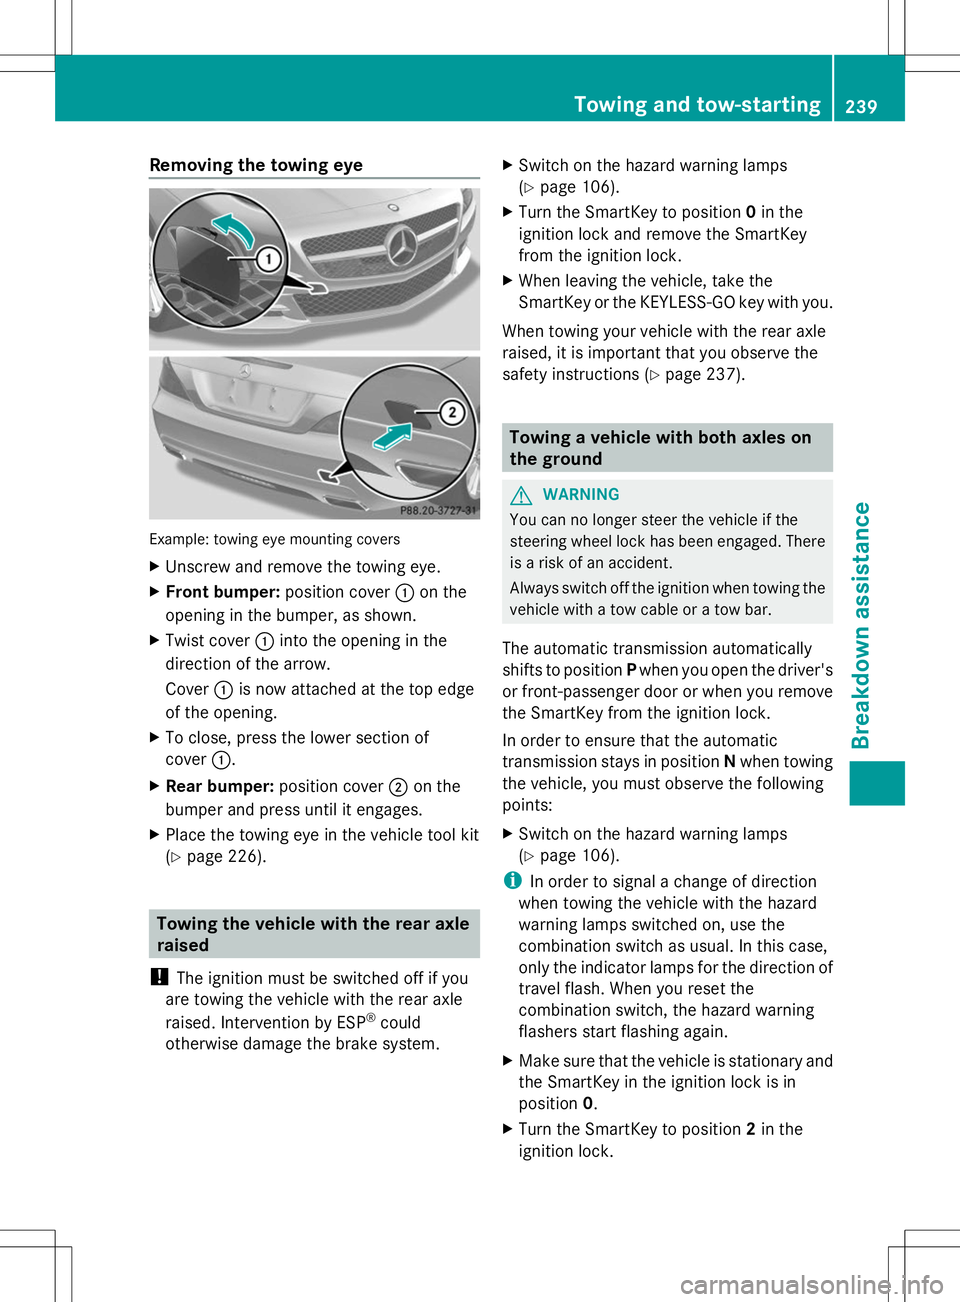
Removing the towing eye
Example: towing eye mounting covers
X
Unscrew and remove the towing eye.
X Front bumper: position cover:on the
opening in the bumper, as shown.
X Twist cover :into the opening in the
direction of the arrow.
Cover :is now attached at the top edge
of the opening.
X To close, press the lower section of
cover :.
X Rear bumper: position cover;on the
bumper and press until it engages.
X Place the towing eye in the vehicle tool kit
(Y page 226). Towing the vehicle with the rear axle
raised
! The ignition must be switched off if you
are towing the vehicle with the rear axle
raised. Intervention by ESP ®
could
otherwise damage the brake system. X
Switch on the hazard warning lamps
(Y page 106).
X Turn the SmartKey to position 0in the
ignition lock and remove the SmartKey
from the ignition lock.
X When leaving the vehicle, take the
SmartKey or the KEYLESS-GO key with you.
When towing your vehicle with the rear axle
raised, it is important that you observe the
safety instructions (Y page 237). Towing a vehicle with both axles on
the ground
G
WARNING
You can no longer steer the vehicle if the
steering wheel lock has been engaged. There
is a risk of an accident.
Always switch off the ignition when towing the
vehicle with a tow cable or a tow bar.
The automatic transmission automatically
shifts to position Pwhen you open the driver's
or front-passenger door or when you remove
the SmartKey from the ignition lock.
In order to ensure that the automatic
transmission stays in position Nwhen towing
the vehicle, you must observe the following
points:
X Switch on the hazard warning lamps
(Y page 106).
i In order to signal a change of direction
when towing the vehicle with the hazard
warning lamps switched on, use the
combination switch as usual. In this case,
only the indicator lamps for the direction of
travel flash. When you reset the
combination switch, the hazard warning
flashers start flashing again.
X Make sure that the vehicle is stationary and
the SmartKey in the ignition lock is in
position 0.
X Turn the SmartKey to position 2in the
ignition lock. Towing and tow-starting
239Breakdown assistance Z
Page 249 of 284

General notes
The recommended tire pressures for the tires
mounted at the factory can be found on the
labels described here.
Further information on tire pressures can be
obtained at a qualified specialist workshop.
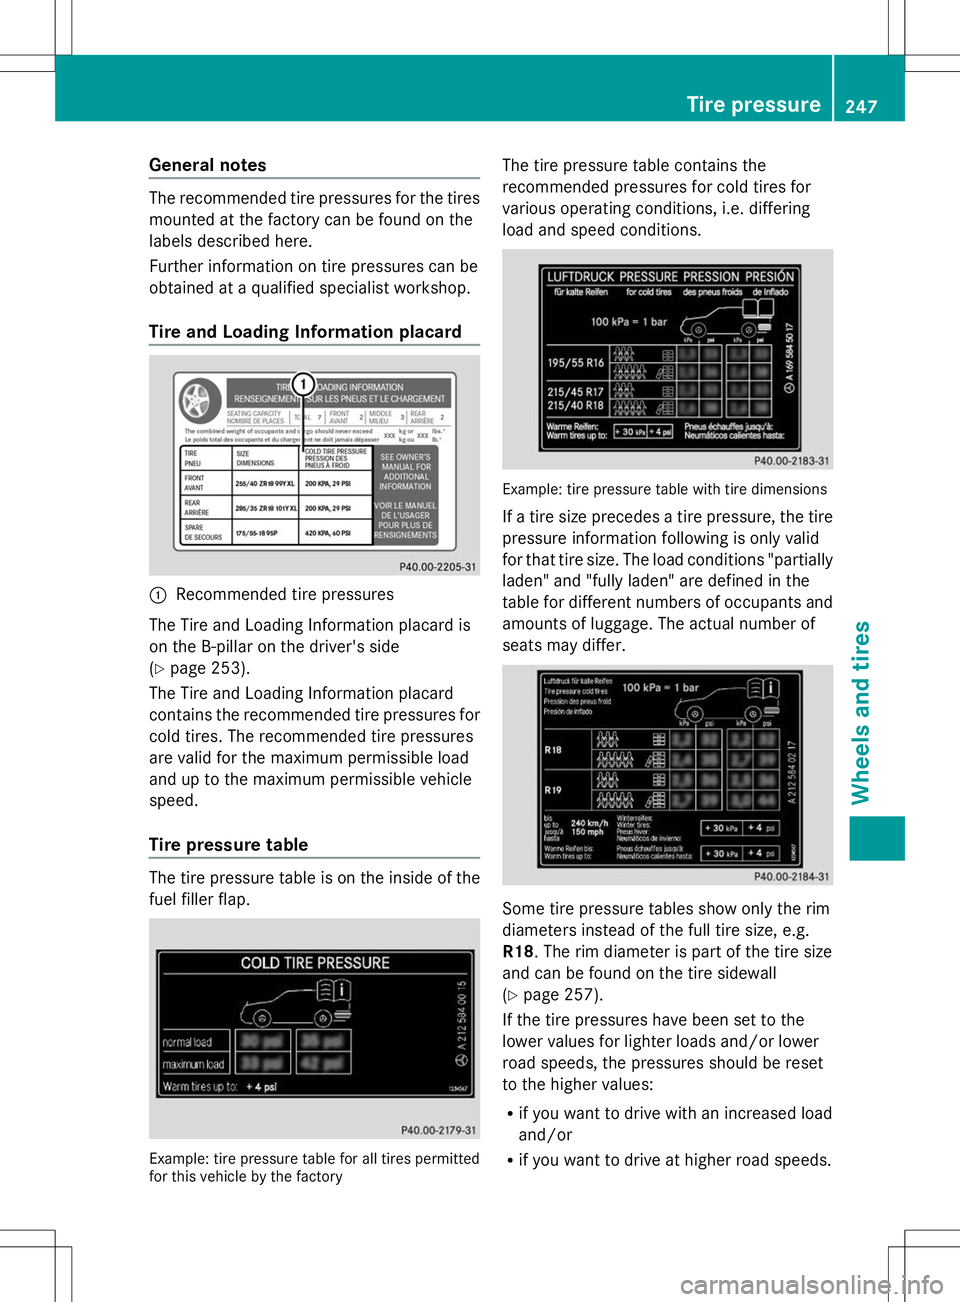
Tire and Loading Information placard :
Recommended tire pressures
The Tire and Loading Information placard is
on the B-pillar on the driver's side
(Y page 253).
The Tire and Loading Information placard
contains the recommended tire pressures for
cold tires. The recommended tire pressures
are valid for the maximum permissible load
and up to the maximum permissible vehicle
speed.
Tire pressure table The tire pressure table is on the inside of the
fuel filler flap. Example: tire pressure table for all tires permitted
for this vehicle by the factory The tire pressure table contains the
recommended pressures for cold tires for
various operating conditions, i.e. differing
load and speed conditions.
Example: tire pressure table with tire dimensions
If a tire size precedes a tire pressure, the tire
pressure information following is only valid
for that tire size. The load conditions "partially
laden" and "fully laden" are defined in the
table for different numbers of occupants and
amounts of luggage. The actual number of
seats may differ.
Some tire pressure tables show only the rim
diameters instead of the full tire size, e.g.
R18. The rim diameter is part of the tire size
and can be found on the tire sidewall
(Y
page 257).
If the tire pressures have been set to the
lower values for lighter loads and/or lower
road speeds, the pressures should be reset
to the higher values:
R if you want to drive with an increased load
and/or
R if you want to drive at higher road speeds. Tire pressure
247Wheels and tires Z