2014 MERCEDES-BENZ SL-CLASS ROADSTER lock
[x] Cancel search: lockPage 19 of 284

Steering (display message)
..............175
Steering wheel Adjusting (electrically) ...................102
Button overview ............................... 37
Buttons (on-board computer) ......... 160
Important safety notes ..................102
Paddle shifters ............................... 126
Storing settings (memory function) 103
Steering wheel (cleaning
instructions) ...................................... 223
Steering wheel paddle shifters ........126
Stopwatch (RACETIMER) ................... 161
Stowage areas ................................... 204
Stowage compartments Armrest (under) ............................. 204
Center console .............................. 204
Cup holders ................................... 206
Display message) ........................... 163
Eyeglasses compartment ...............204
Glove box ...................................... .204
Important safety information .........204
Stowage net ................................... 204
Stowage net ....................................... 204
Stowage space Center console (rear) .....................204
Umbrella holder ............................. 204
Stowage well beneath the trunk
floor .................................................... 206
Sun visor ............................................ 206
Surround lighting (on-board
computer) .......................................... 161
Suspension tuning Active Body Control (AMG vehicles) 144
Active Body Control (except AMG
vehicles) ........................................ 142
SETUP (on-board computer) ..........161
Switching air-recirculation mode
on/off ................................................. 116
Switching off the alarm (ATA) ............75
Systems settings (COMAND) see also Digital Operator's Manual 188 T
Tachometer ........................................ 160
Tail lamps Display message ............................ 163
see Lights Tank content
Fuel gauge ....................................... 35
Technical data
Capacities ...................................... 275
Information .................................... 274
Tires/wheels ................................. 268
Vehicle data ................................... 279
TELEAID
Call priority .................................... 211
Downloading destinations
(COMAND) ..................................... 207
Downloading routes .......................207
Emergency call .............................. 208
Geo fencing ................................... 207
Locating a stolen vehicle ...............207
MB info call button ........................210
Remote vehicle locking ..................207
Roadside Assistance button ..........209
Search & Send ............................... 207
Self-test ......................................... 207
Speed alert .................................... 207
System .......................................... 207
Triggering the vehicle alarm ........... 207
Vehicle remote malfunction
diagnosis ....................................... 207
Vehicle remote unlocking ..............207
Tele Aid
General notes ................................ 207
Telephone
Accepting a call ............................. 161
Menu (on-board computer) ............161
Number from the phone book ....... .161
Redialing ........................................ 161
Rejecting/ending a call .................161
see also Digital Operator's Manual 188
Telephone compartment ................204
Temperature
Coolant .......................................... 160
Coolant (on-board computer) ......... 161
Engine oil (on-board computer) ...... 161
Outside temperature ..................... .160
Setting (climate control) ................116
Theft deterrent systems
ATA (Anti-Theft Alarm system) .........75
Immobilizer ...................................... 75
Timing (RACETIMER) .........................161
TIREFIT kit .......................................... 228 Index
17
Page 21 of 284

Removing the towing eye
...............239
With the rear axle raised ................239
Towing away
With both axles on the ground .......239
Tow-starting
Emergency engine starting ............240
Important safety notes ..................237
Traffic reports
see also Digital Operator's Manual 188
Transmission
Selector lever ................................ 126
see Automatic transmission
Transporting the vehicle ..................240
Trim pieces (cleaning instructions) .223
Trip computer (on-board
computer) .......................................... 161
Trip odometer Calling up ....................................... 161
Resetting (on-board computer) ......161
Trunk
Emergency release ..........................89
Important safety notes ....................84
Locking separately ...........................88
Opening/closing (automatically
from inside) ...................................... 88
Opening/closing (automatically
from outside) ................................... 86
Opening/closing (from outside,
HANDS-FREE ACCESS) ....................86
Opening/closing (manually from
outside) ............................................ 85
Overview .......................................... 84
Trunk lid
Display message ............................ 163
Opening/closing .............................. 84
Opening dimensions ......................279
Power closing feature ......................84
Trunk load (maximum) ......................279
Trunk partition Display message ............................ 163
General notes .................................. 93
Installing .......................................... 94
Opening/closing .............................. 94
Removing ......................................... 94
Turn signals
Display message ............................ 163
Switching on/off ........................... 108Type identification plate
see Vehicle identification plate U
Umbrella holder ................................. 204
Unlocking Emergency unlocking .......................84
From inside the vehicle (central
unlocking button) ............................. 84 V
Vanity mirror (in the sun visor) ........206
Vehicle Correct use ...................................... 31
Data acquisition ............................... 32
Display message ............................ 175
Equipment ....................................... 27
Individual settings ..........................161
Limited Warranty ............................. 31
Loading .......................................... 253
Locking (in an emergency) ...............84
Locking (SmartKey) .......................... 78
Lowering ........................................ 267
Maintenance .................................... 28
Parking for a long period ................ 131
Pulling away ................................... 124
Raising ........................................... 265
Reporting problems .........................31
Securing from rolling away ............264
Towing away .................................. 237
Tow-starting ................................... 237
Transporting .................................. 240
Unlocking (in an emergency) ...........84
Unlocking (SmartKey) ......................78
Vehicle data ................................... 279
Vehicle battery
see Battery (vehicle)
Vehicle data ....................................... 279
Vehicle dimensions ...........................279
Vehicle emergency locking ................84
Vehicle identification number see VIN
Vehicle identification plate ..............274 Index
19
Page 23 of 284
Introduction
In addition to the printed Operator's Manual,
the vehicle document wallet also contains
further operating instructions, such as:
R Digital Operator's Manual on CD
R Maintenance Booklet
R Equipment-dependent supplements
The printed Operator's Manual provides
information on selected functions of your
vehicle.
You can also access the Digital Operator's
Manual via COMAND. If you have further
questions that are not covered in the printed
Operator's Manual, please consult the Digital
Operator's Manual.
i You will not incur any costs when calling
up the Digital Operator's Manual. It works
without connecting to the Internet.
In the following sections you will find further
information about:
R how to install the Digital Operator's Manual
on your COMAND (Y page 21)
R how to access and operate the Digital
Operator's Manual
R various options for accessing the individual
topics covered by the Digital Operator's
Manual.
There are three options for accessing via the
basic menu of the Digital Operator's Manual:
R Visual search
R Keyword Search
R Contents
You can change the set language for the
Digital Operator's Manual under "Settings" in
the basic menu. Installation
Check whether or not the Digital Operator's
Manual has already been installed. To do so,
call up the Digital Operator's Manual via
COMAND as follows: X
Using the COMAND controller, select the
® symbol from the menu bar in the
COMAND display and press Wto confirm.
X Choose the "Operator's Manual" selection
card and press Wto confirm.
There are two possibilities:
1. The Digital Operator's Manual is
installed. The basic menu for the Digital
Operator's Manual opens.
2. The Digital Operator's Manual is not
installed. The following message appears:
The Operator's Manual has not yet
The Operator's Manual has not yet
been installed. Please insert the been installed. Please insert the
correct disc. correct disc.
If the Digital Operator's Manual has not yet
been installed, you have the option of
installing it yourself. You will find the
installation CD required in the vehicle
document wallet.
The duration of the installation process can
vary.
The installation process takes approximately
5 minutes. This timespan only applies if you
install the Digital Operator's Manual while the
vehicle is at a standstill and no other
COMAND functions are in use at the time. The
duration of the installation process may
increase accordingly if other
COMAND functions such as navigation or
telephony are in use at the time.
If you encounter any problems during
installation, please contact your authorized
Mercedes-Benz Center.
X To install the Digital Operator's
Manual: stop the vehicle safely, paying
attention to road and traffic conditions.
X Turn the SmartKey to position 2in the
ignition lock (Y page 121).
X Switch on COMAND.
X Insert the installation CD into the CD/DVD
drive.
X Select the desired language for the
installation.
X Follow the installation steps on the
COMAND display. Digital Operator's Manual
21
Page 36 of 284
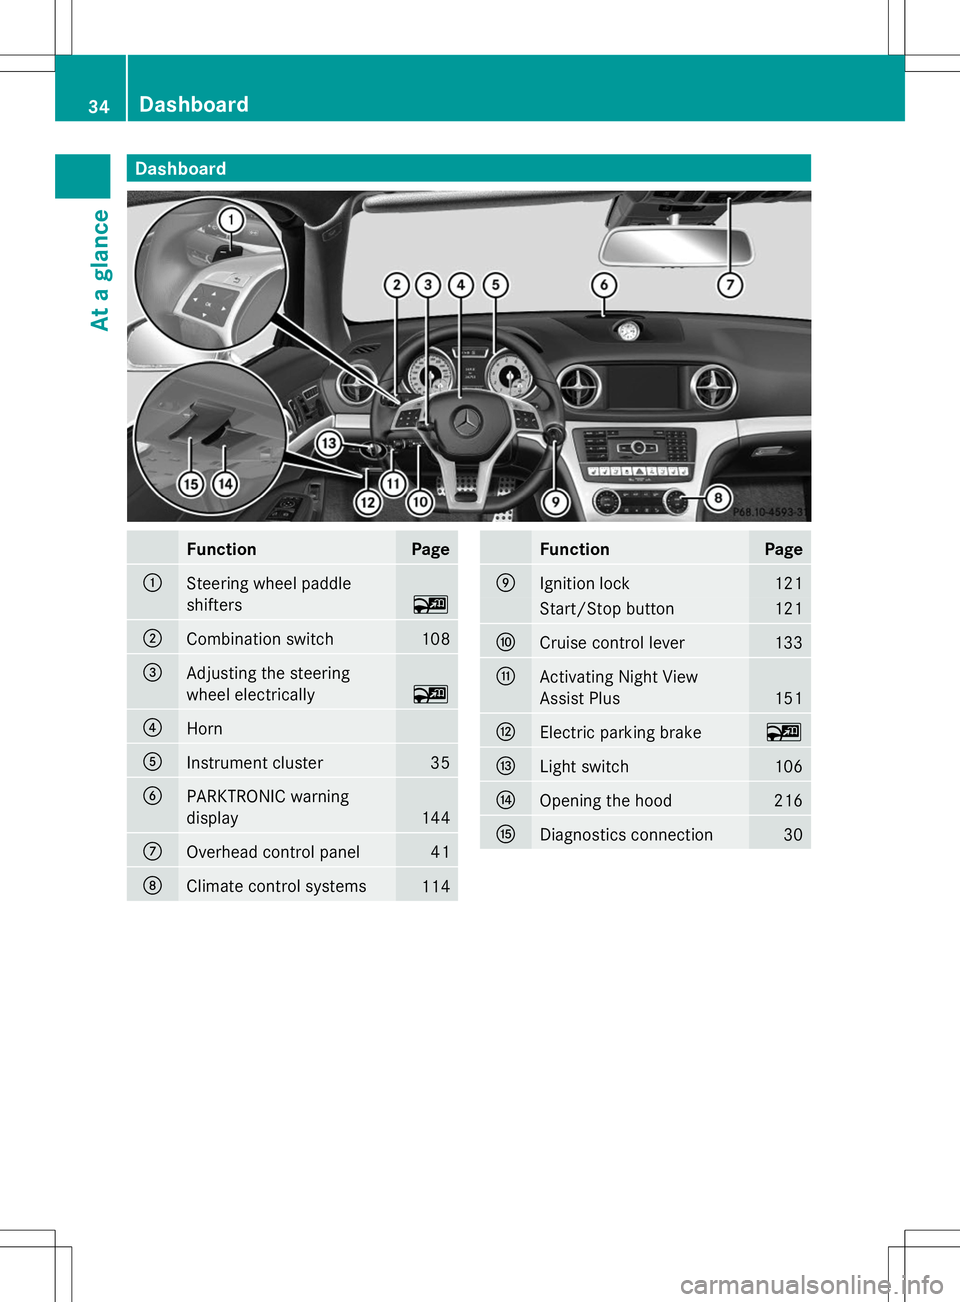
Dashboard
Function Page
:
Steering wheel paddle
shifters
~
;
Combination switch 108
=
Adjusting the steering
wheel electrically
~
?
Horn
A
Instrument cluster 35
B
PARKTRONIC warning
display
144
C
Overhead control panel 41
D
Climate control systems
114 Function Page
E
Ignition lock 121
Start/Stop button 121
F
Cruise control lever 133
G
Activating Night View
Assist Plus 151
H
Electric parking brake ~
I
Light switch 106
J
Opening the hood 216
K
Diagnostics connection 3034
Dashboa
rdAt a glance
Page 44 of 284
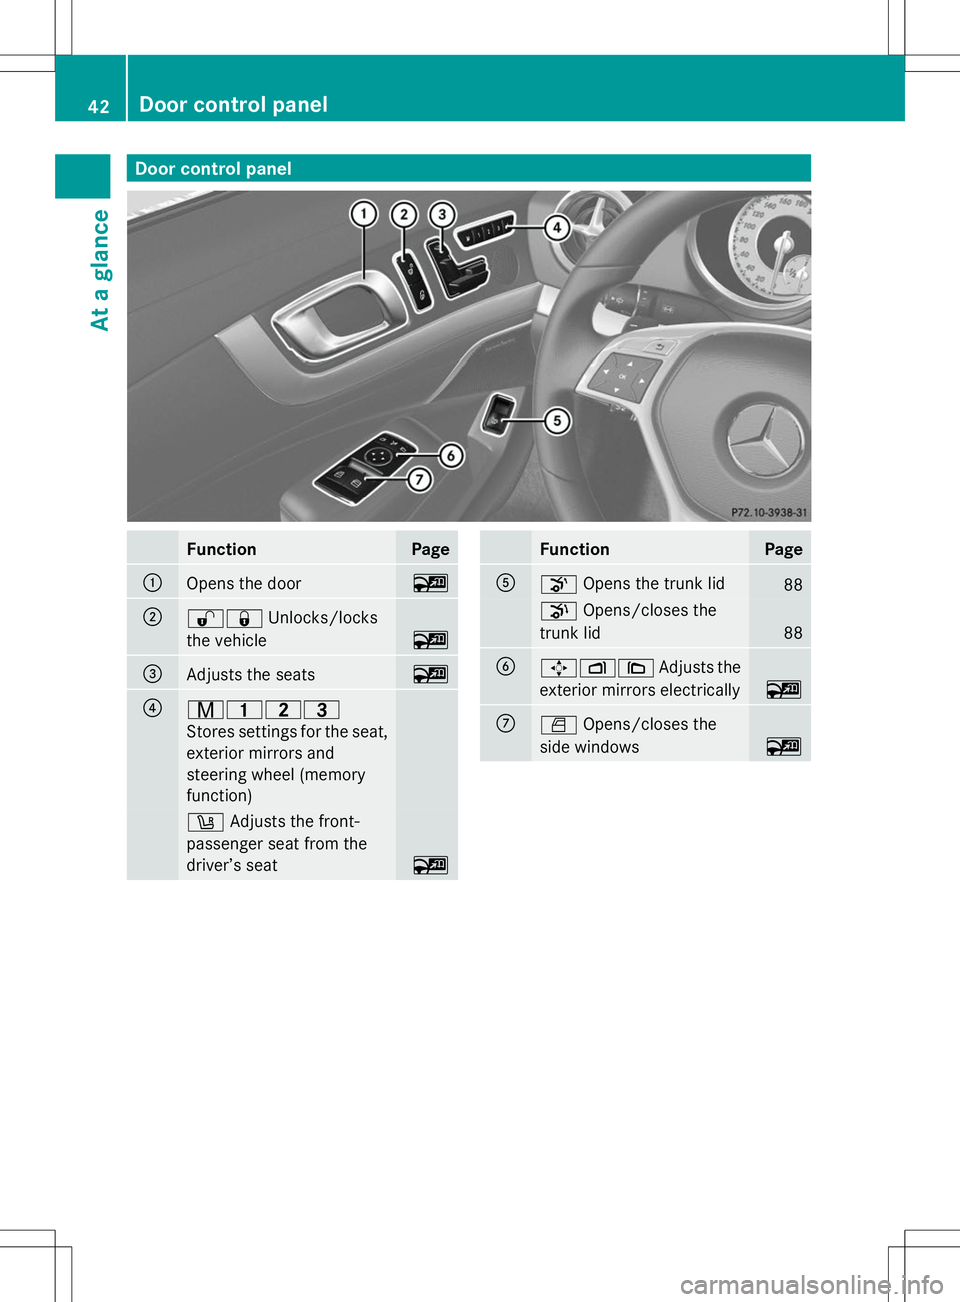
Door control panel
Function Page
:
Opens the door ~
;
%&
Unlocks/locks
the vehicle ~
=
Adjusts the seats ~
?
r45=
Stores settings for the seat,
exterior mirrors and
steering wheel (memory
function)
w
Adjusts the front-
passenger seat from the
driver’s seat ~ Function Page
A
o
Opens the trunk lid 88
p
Opens/closes the
trunk lid 88
B
7Z\
Adjusts the
exterior mirrors electrically ~
C
W
Opens/closes the
side windows ~42
Door cont
rol panelAt a glance
Page 45 of 284
Useful information
..............................44
Panic alarm .......................................... 44
Occupant safety .................................. 44
Child restraint systems ......................62
Driving safety systems .......................66
Theft deterrent locking system .........75 43Safety
Page 46 of 284

Useful information
i This Operator's Manual describes all
models and all standard and optional
equipment of your vehicle available at the
time of publication of the Operator's
Manual. Country-specific differences are
possible. Please note that your vehicle may
not be equipped with all features
described. This also applies to safety-
related systems and functions.
i Read the information on qualified
specialist workshops: (Y page 30).Panic alarm
X
To activate: press!button :for at
least one second.
An alarm sounds and the exterior lighting
flashes.
X To deactivate: press!button :
again.
or
X Insert the SmartKey into the ignition lock.
or
X Press the KEYLESS-GO Start/Stop button.
The KEYLESS-GO key must be in the
vehicle. Occupant safety
Important safety notes
G
WARNING
Modifications to the restraint systems could
result in them not functioning properly any
more. The restraint systems could then no
longer protect vehicle occupants as they are
designed to do and could fail in the event of
an accident or activate unexpectedly, for
example. There is an increased risk of injury.
Never modify parts of the restraint systems.
Do not attempt to modify the wiring as well as
electronic components or their software.
If it is necessary to modify an air bag system
to accommodate a person with disabilities,
contact an authorized Mercedes-Benz center.
USA only: for further information contact our
Customer Assistance Center at
1-800-FOR-MERCedes (1800-367-6372).
In this section, you will learn the most
important facts about the restraint system
components of the vehicle.
The restraint system consists of:
R Seat belts
R Child restraint systems
R LATCH-type (ISOFIX) child seat securing
system
Additional protection is provided by:
R SRS (Supplemental Restraint System)
R NECK-PRO head restraints
R PRE-SAFE ®
R Roll bar
R Air bag system components with:
-PASSENGER AIR BAG OFF indicator lamp
- Front-passenger seat with Occupant
Classification System (OCS)
Although the systems are independent, their
protective functions work in conjunction with
each other. Not all air bags are always
deployed in an accident.
i For information on infants and children
traveling with you in the vehicle restraint 44
Occupant safetySafety
Page 56 of 284

:
PASSENGER AIR BAG OFF indicator lamp
; PASSENGER AIR BAG ON indicator lamp
If the SmartKey is removed from the ignition
lock or is in position 0, PASSENGER AIR BAG
OFF indicator lamp :does not light up.
PASSENGER AIR BAG ON indicator lamp ;
has no function. It lights up briefly when the
ignition is switched on and then goes out
again.
Occupant Classification System (OCS)
categories the occupant on the front-
passenger seat using a weight sensor. The
front-passenger front air bag and the front-
passenger knee bag are deactivated
automatically for certain weight categories.
PASSENGER AIR BAG OFF indicator lamp :
shows you the current status. If PASSENGER
AIR BAG OFF indicator lamp :lights up, the
front-passenger front air bag and the front-
passenger knee bag are deactivated.
The system does not deactivate:
R the side impact air bag
R the front-passenger head bag
R the Emergency Tensioning Devices
To be classified correctly, the front passenger
must sit:
R with the seat belt fastened correctly
R in a position that is as upright as possible
with their back against the seat backrest
R with their feet on the floor
The OCS weight sensor reading is affected if
the occupant's weight is transferred, e.g. by
leaning on the armrest. If the front-passenger seat, the seat cover or
the seat cushion are damaged, have the
necessary repair work carried out at a
qualified specialist workshop.
Mercedes-Benz recommends that you only
use seat accessories which have been
approved by Mercedes-Benz.
Both the driver and the front passenger
should always observe PASSENGER AIR BAG
OFF indicator lamp
:as an indication of
whether or not the front passenger is
positioned correctly. Observe also the air bag
display messages that can be displayed in the
instrument cluster (Y page 170).
If the driver's air bag deploys, this does not
mean that the front-passenger front air bag
will also deploy.
The OCS may have detected that the seat:
R is empty or occupied by the weight of a
typical child up to twelve months old,
seated in a child restraint system.
R is occupied by a small individual, such as a
young teenager or a small adult.
R is occupied by a child in a child restraint
system whose weight is greater than that
of a typical twelve month old child.
These are examples of when the OCS
deactivates the front-passenger front air bag
and front-passenger knee bag. Deactivation
takes place although the collision fulfills the
criteria for deploying the driver's air bag.
For further information, see "Air bag display
messages" (Y page 170).
System self-test G
WARNING
If the 4 PASSENGER AIR BAG OFF
indicator lamp does not illuminate, the system
is not functioning. Consult an authorized
Mercedes-Benz Center before seating a child
on the front-passenger seat. 54
Occupant safetySafety