2014 MERCEDES-BENZ SL-Class CD player
[x] Cancel search: CD playerPage 7 of 274

C
Call Accepting/ending/rejecting .......... 134
Connectin g.................................... 135
see Telephone
Call lists
Displaying details ........................... 143
Opening and selecting an entry .....143
Saving an entry in the address
book .............................................. 143
Car pool lanes ...................................... 62
Category lis t(music search) ............206
CD Cop yprotection ............................. 206
Fast forward/fast rewind ...............201
General information .......................206
Inserting ........................................ 194
Inserting/loading (Rear Seat
Entertainment System) ..................247
Mode ,switchin gto........................ 197
Multisession .................................. 204
Notes on discs ............................... 206
Pause function ............................... 199
Player/change roperation
(COMAND )..................................... 194
Removing/ejecting (Rear Seat
Entertainment System) ..................247
Safety notes .................................. 193
Selecting amedia type .................. 199
Selecting atrack ............................ 200
Sound settings (balance, bass,
treble ).............................................. 30
CD/DVD
Ejecting (DVD drive )....................... 195
Inserting (DVD changer )................ 194
Inserting (single DVD drive )........... 194
Removing (single DVD drive) .......... 194
CD mode
Playback options ........................... 204
Changing direction
Announcement phase ......................88
Change of direction phase ...............88
Preparation phase ............................ 88
Changing the character set ................37
Channel presets ................................ 186Characters
Changing the character set .............. 35
Changing the language ....................35
Deleting ........................................... 35
Entering ........................................... 36
Entering (address book, phone
book) ............................................... 34
Entering (navigation) ........................36
Moving the curso r............................ 35
Switching to letters ..........................35
Clear button ......................................... 27
Color, setting (TV, video) ..................228
COMAND Active multicontour sea t.................. 52
Basi cfunction s................................ 29
Calling up drive status regulator
(ABC) ............................................... 52
Display ............................................. 20
Examples of operatio n..................... 27
Importing POIs ............................... 167
Menu overview ................................. 22
Multicontour sea t............................ 52
Seat functions .................................. 52
Settings ......................................... 180
Switching on/off .............................. 29
COMAND controller .............................26
COMAND control panel .......................25
COMAND display Cleaning instructions .......................24
Setting ............................................. 42
Switching on/off .............................. 24
Compass function ............................. 117
Connecting aUSB device ................. 197
Contacts Deleting ......................................... 156
Importing ....................................... 154
Contrast, setting (TV, video) ............228
Copy protection (CD/DVD) ...............206
Country-specific information
(navigation) ........................................ 118 D
Data medium Audi oDVD ..................................... 204
CD/DVD ........................................ 206 Index
5
Page 9 of 274

G
Google Maps ®
...................................... 87
Google™ local search Importing a destination/route .......163
PopularS earches .......................... .164
Search ........................................... 161
Search history ............................... 164
Selecting a search position ............162
Using as the destination ................163
GPS reception ...................................... 60
Gracenote ®
Media Database ............202 H
Harman/kardon ®
Logic 7 ®
surround sound system see Surround sound (harman/
kardon ®
surround sound system)
Heading up (navigation) ...................109
Headphones Changing batteries ........................242
Home address
Entering and saving .........................69
Selecting from the destination
memory ........................................... 70I
Incident (traffic report) .......................99
Indicator lamp Remote control .............................. 242
Interface (USB, iPod ®
)
see Medi aInterface
Internet
Calling up the carousel vie w.......... 172
Conditions for access ....................160
Creating favorites .......................... 177
Entering the URL ............................ 172
Favorites manager .........................177
Favorites menu .............................. 178
Menu functions .............................. 175
Opening favorites .......................... 176
Selecting favorites .........................173
Internet radio
Calling up ....................................... 171
Searching for stations .................... 171 iPod
®
Alphabetical track selection ..........223
Connecting to the Media Interface 219
Selecting a category/playlis t......... 222
iTunes ®
............................................... 223 L
Lane recommendations Explanation ...................................... 90
Presentation .................................... 90
Load/eject button .............................194
Lumbar support Adjusting (COMAND) .......................53 M
Map (navigation) Adjusting the scal e........................ 108
Arrival time/distance to the
destination ..................................... 111
City mode l..................................... 112
Geo-coordinate displa y.................. 111
Heading ......................................... 109
Information in the displa y.............. 111
Map settings .................................. 109
Moving ........................................... 108
North orientation ........................... 109
Notes ............................................. 108
Point of interest symbols ...............110
Roa ddisplay .................................. 111
Saving the crosshair position .........109
Showing the map data version ....... 118
Topographica lmap........................ 112
Updating ........................................ 119
Updating process ........................... 119
Media Interface
Alphabetical track selection ..........223
Basi cmenu .................................... 221
Connecting an external audio
source ............................................ 219
Connectio noption s....................... 219
iPod ®
............................................. 219
Mode ............................................. 219
MP3 player. ................................... 219
Notes for the MP3 player. ..............225
Playback options ........................... 224
Selecting categories ......................222 Index
7
Page 199 of 274
further information at any authorized
Mercedes-Benz Center.
Insert an SD memory card X
Insert the memory card into the slot on the
control panel until it engages in place. The
side with the contacts must face
downwards and point towards the slot.
If no MP3 tracks can be found, you will see
a message to this effect.
The first 100 MP3 tracks are loaded. The
first MP3 track is then played. Further
tracks are loaded in the background; this is
indicated by an hourglass symbol.
Ejecting an SD memory card X
Press the memory card.
The memory card is ejected.
X Remove the memory card from slot. Connecting
aUSB device
The USB port is located in the stowage
compartment in the center console.
Electrical consumption at this connection
must not exceed a continuous current of
500 mA. If the electrical consumption is
higher, use a separate source to provide
power for the USB device (e.g.
12 Vp ower supply).
X Connect the USB device (e.g. USB stick)to
the USB port.
If no MP 3tracks can be found, you will see
a message to this effect.
The first 100 MP3 tracks are loaded. The
first MP3 track is then played. Further
tracks are loaded in the background; this is
indicated by an hourglass symbol.
i Due to the wide range of USB devices
available on the market, playback cannot
be guaranteed for all brands of USB device.
Information about suitable USB devices
can be obtained from an authorized
Mercedes-Benz Center. MP3 players must support Media Transfer
Protocol (MTP). The MTP mode must be
active. Switching to audio CD/DVD or MP3
mode
Inserting or connecting amedium X
Insert CDs/DVD s(Ypage 194)
or
X Insert an SD memory card (Y page 197)
or
X Connect a USB device (Y page 197).
COMAND loads the medium inserted and
starts to play it.
Switching modes using the function
button X
Press the 0007function button one or more
times.
By pressing the function button repeatedly,
you can change the operating mode in the
following order:
R CD/audio DVD/video DVD/MP3 CD/MP3
DVD in the DVD changer or single DVD
drive (disc mode)
R Memory card mode
R MUSIC REGISTER
R USB storage device
R Media Interface or audio AUX mode
R Bluetooth ®
audio mode
X Select an audio medium from the media list
(Y page 199).
Switching modes via the audio menu X
Select Audio in the main function bar by
sliding 00360012and turning 003C0012003Dthe COMAND
controller and press 0037to confirm.
The last active audio source is now
activated.
You can activate a differen taudio source
using the audio menu. CD/audio DVD and MP3 mode
197Audio Z
Page 216 of 274
You can authorize up to fifteen Bluetooth
®
devices.
i If you authorize a mobile phone that
supports Bluetooth ®
audio, the A2DP and
AVRCP Bluetooth ®
audio profiles are
connected automatically.
The mobile phone is the nentered:
R in the Bluetooth ®
telephone list
(Y page 130)
R in the Bluetooth ®
device list
(Y page 214).
Mercedes-Benz recommends authorizing a
mobile phone in Bluetooth ®
telephony
(Y page 130).
Searching for and authorizing a
Bluetooth ®
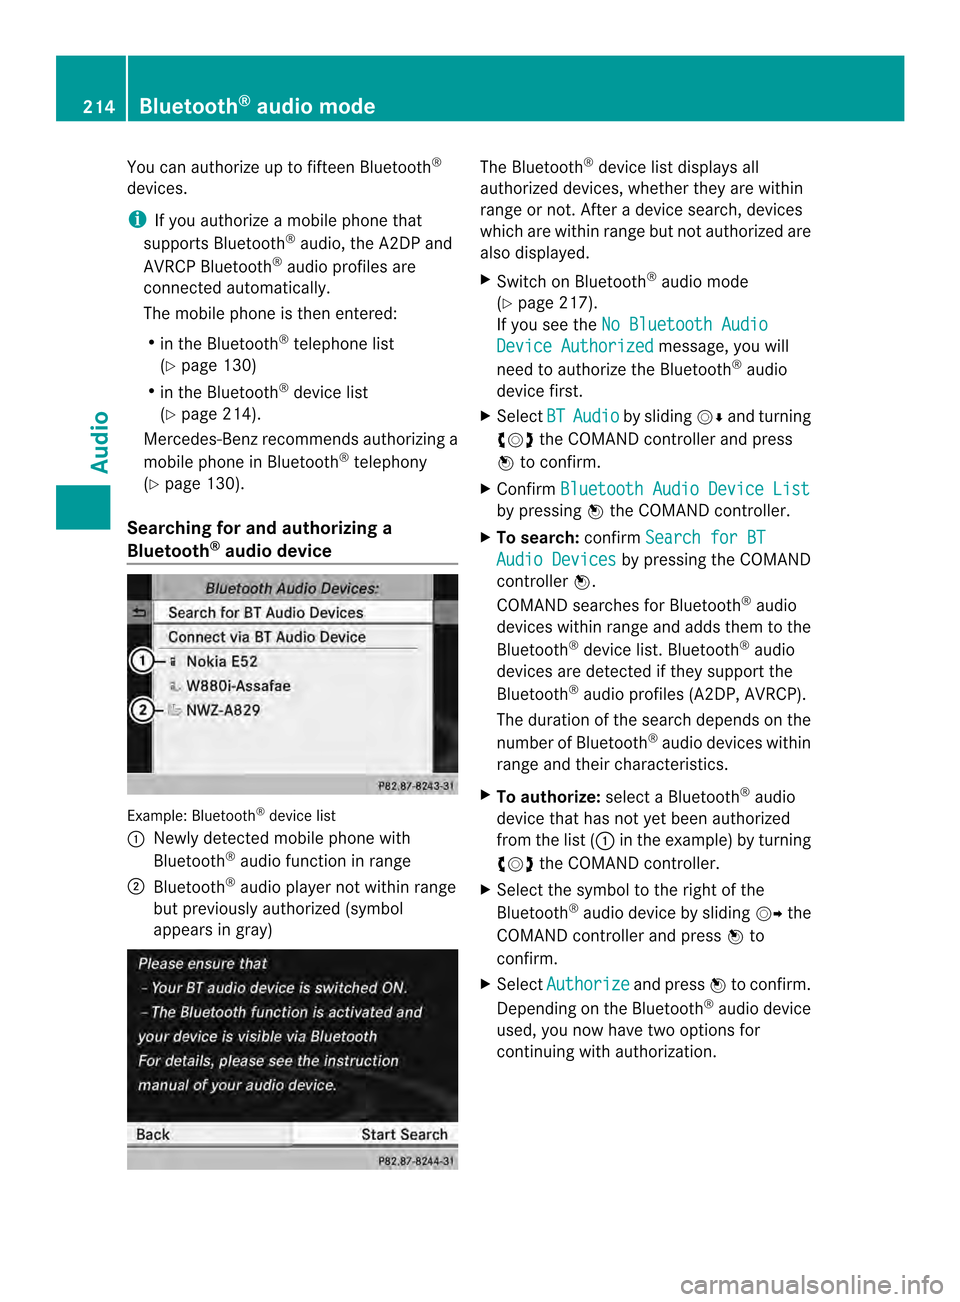
audio device Example: Bluetooth
®
device list
0001 Newly detected mobile phone with
Bluetooth ®
audio function in range
0002 Bluetooth ®
audio player not withi nrange
but previously authorized (symbol
appears in gray) The Bluetooth
®
device list displays all
authorized devices, whether they are within
range or not. After a device search, devices
which are within range but no tauthorized are
also displayed.
X Switch on Bluetooth ®
audio mode
(Y page 217).
If you see the No Bluetooth Audio Device Authorized message, you will
need to authorize the Bluetooth ®
audio
device first.
X Select BT Audio by sliding
00120008and turning
003C0012003D the COMAND controller and press
0037 to confirm.
X Confirm Bluetooth Audio Device List by pressing
0037the COMAND controller.
X To search: confirmSearch for BT Audio Devices by pressing the COMAND
controller 0037.
COMAND searches for Bluetooth ®
audio
devices within range and adds them to the
Bluetooth ®
device list .Bluetooth ®
audio
devices are detected if they support the
Bluetooth ®
audio profiles (A2DP, AVRCP).
The duration of the searc hdepends on the
number of Bluetooth ®
audio devices within
range and their characteristics.
X To authorize: select a Bluetooth ®
audio
device that has not yet been authorized
from the list ( 0001in the example) by turning
003C0012003D the COMAND controller.
X Select the symbol to the right of the
Bluetooth ®
audio device by sliding 00120035the
COMAND controller and press 0037to
confirm.
X Select Authorize and press
0037to confirm.
Depending on the Bluetooth ®
audio device
used, you now have two options for
continuing with authorization. 214
Bluetooth ®
audio modeAudio
Page 217 of 274
X
Option 1: enter the passkey (Y page 130).
After successful authorization, the
Bluetooth ®
audio device is connected and
starts playing.
X Option 2 (Secure Simple Pairing): if the
digit codes displayed in COMAND and on
the Bluetooth ®
audio device are the same,
confirm Yes by pressing
0037.
If you select Yes , authorization continues
and the Bluetooth ®
audio device is
connected. Playback starts.
If you select No , authorization will be
canceled.
i The Bluetooth ®
audio device must
support Bluetooth ®
version 2.1 for
connection via Secure Simple Pairing.
COMAND creates a six-digit code, which is
displayed on both devices that are to be
connected
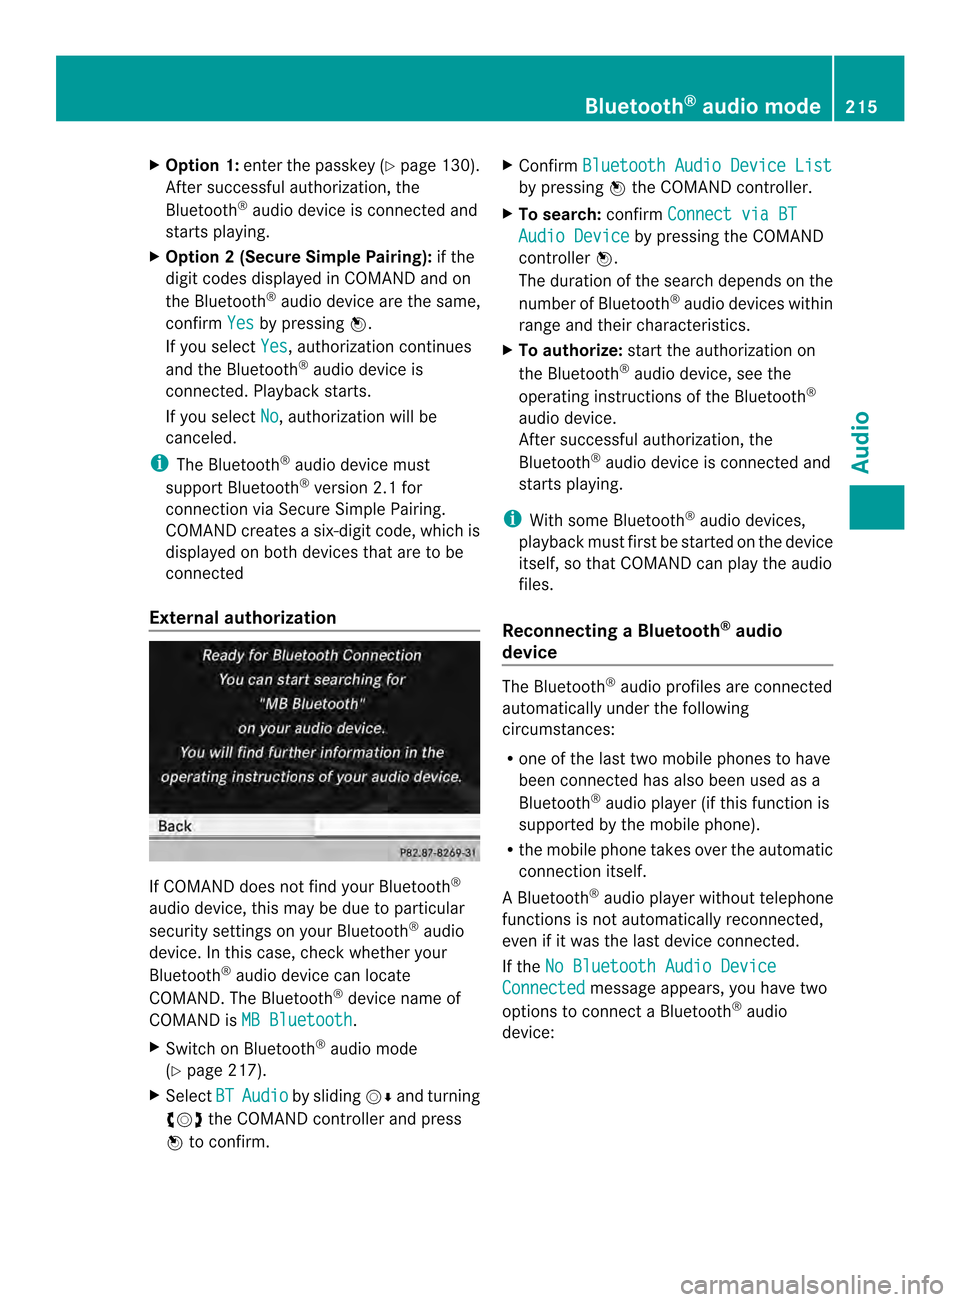
External authorization If COMAND does not find your Bluetooth
®
audio device, this may be due to particular
security settings on your Bluetooth ®
audio
device. In this case, check whether your
Bluetooth ®
audio device can locate
COMAND .The Bluetooth ®
device name of
COMAND is MB Bluetooth .
X Switch on Bluetooth ®
audio mode
(Y page 217).
X Select BT Audio by sliding
00120008and turning
003C0012003D the COMAND controller and press
0037 to confirm. X
Confirm Bluetooth Audio Device List by pressing
0037the COMAND controller.
X To search: confirmConnect via BT Audio Device by pressing the COMAND
controller 0037.
The duration of the search depends on the
number of Bluetooth ®
audio devices within
range and their characteristics.
X To authorize: start the authorization on
the Bluetooth ®
audio device, see the
operating instructions of the Bluetooth ®
audio device.
After successful authorization, the
Bluetooth ®
audio device is connected and
starts playing.
i With some Bluetooth ®
audio devices,
playback must first be started on the device
itself, so that COMAND can play the audio
files.
Reconnecting aBluetooth ®
audio
device The Bluetooth
®
audio profiles are connected
automatically under the following
circumstances:
R one of the last two mobile phones to have
been connected has also been used as a
Bluetooth ®
audio player (if this function is
supported by the mobile phone).
R the mobile phone takes over the automatic
connection itself.
AB luetooth ®
audio player without telephone
functions is not automatically reconnected,
even if it was the last device connected.
If the No Bluetooth Audio Device Connected message appears, you have two
options to connect a Bluetooth ®
audio
device: Bluetooth
®
audio mode 215Audio Z
Page 221 of 274
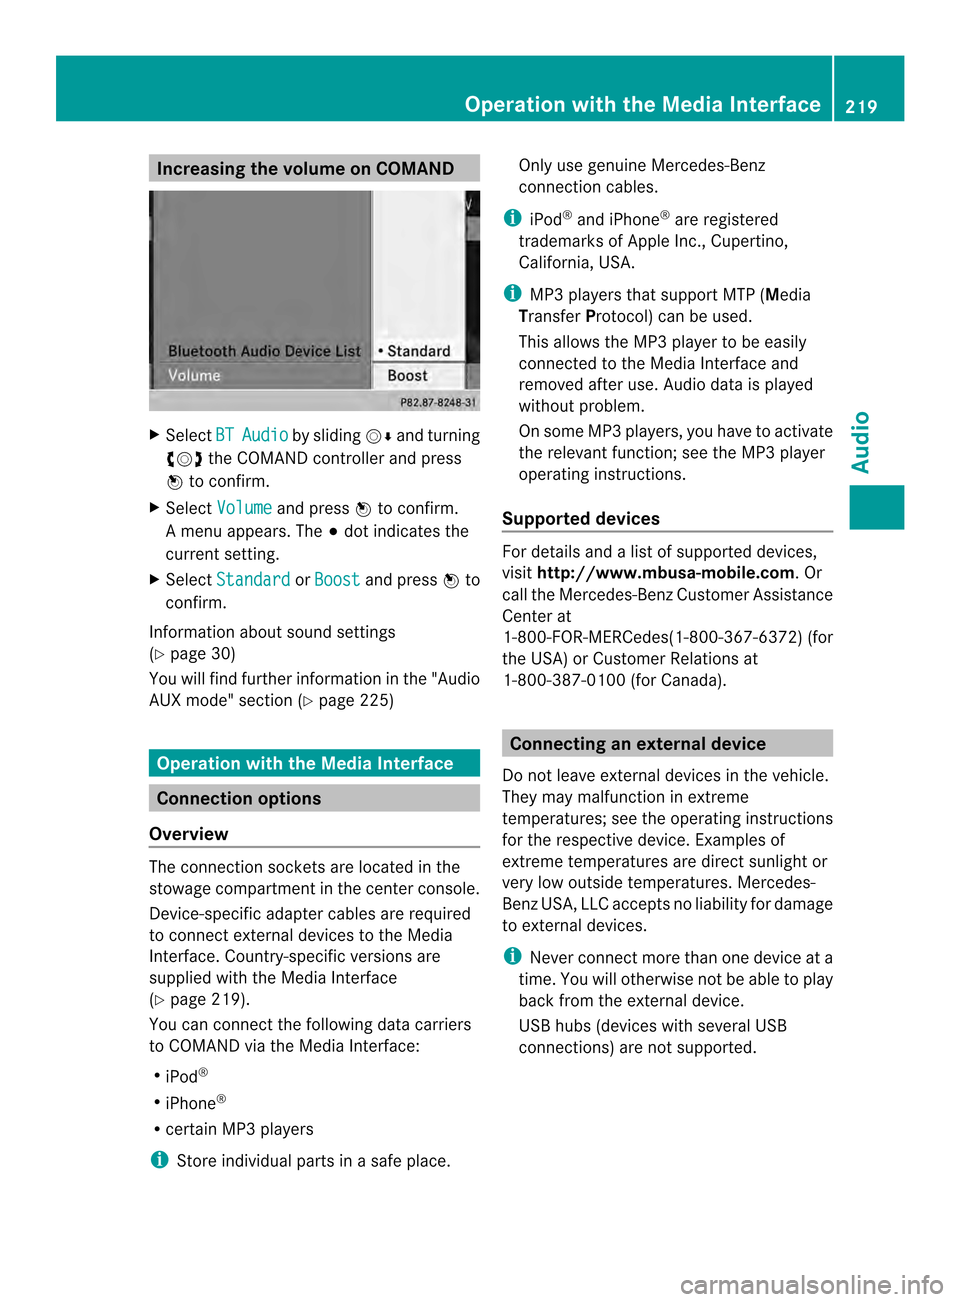
Increasing the volume on COMAND
X
Select BT Audio by sliding
00120008and turning
003C0012003D the COMAND controller and press
0037 to confirm.
X Select Volume and press
0037to confirm.
Am enu appears. The 000Fdot indicates the
current setting.
X Select Standard or
Boost and press
0037to
confirm.
Information about sound settings
(Y page 30)
You will find further information in the "Audio
AUX mode" section (Y page 225)Operation with the Media Interface
Connection options
Overview The connection sockets are located in the
stowage compartment in the center console.
Device-specific adapter cables are required
to connect external devices to the Media
Interface. Country-specific versions are
supplied with the Media Interface
(Y page 219).
You can connectt he following data carriers
to COMAND via the Media Interface:
R iPod ®
R iPhone ®
R certain MP3 players
i Store individual parts in asafe place. Only use genuine Mercedes-Benz
connection cables.
i iPod ®
and iPhone ®
are registered
trademarks of Apple Inc., Cupertino,
California, USA.
i MP3 players that support MTP ( Media
Transfer Protocol) can be used.
This allows the MP3 player to be easily
connected to the Media Interface and
removed after use. Audio data is played
without problem.
On some MP3 players, you have to activate
the relevan tfunction; see the MP3 player
operating instructions.
Supported devices Fo
rd etails and a list of supported devices,
visit http://www.mbusa-mobile.com. Or
call the Mercedes-BenzC ustomerAssistance
Center at
1-800-FOR-MERCedes(1-800-367-6372) (for
the USA) or Customer Relations at
1-800-387-0100 (for Canada). Connecting an external device
Do not leave external devices in the vehicle.
They may malfunction in extreme
temperatures; see the operating instructions
for the respective device. Examples of
extreme temperatures are direct sunlight or
very low outside temperatures. Mercedes-
Benz USA, LLC accepts no liability for damage
to external devices.
i Never connect more than one device at a
time. You will otherwise not be able to play
back from the external device.
USB hubs (devices with several USB
connections) are not supported. Operation with the Media Interface
219Audio Z
Page 222 of 274
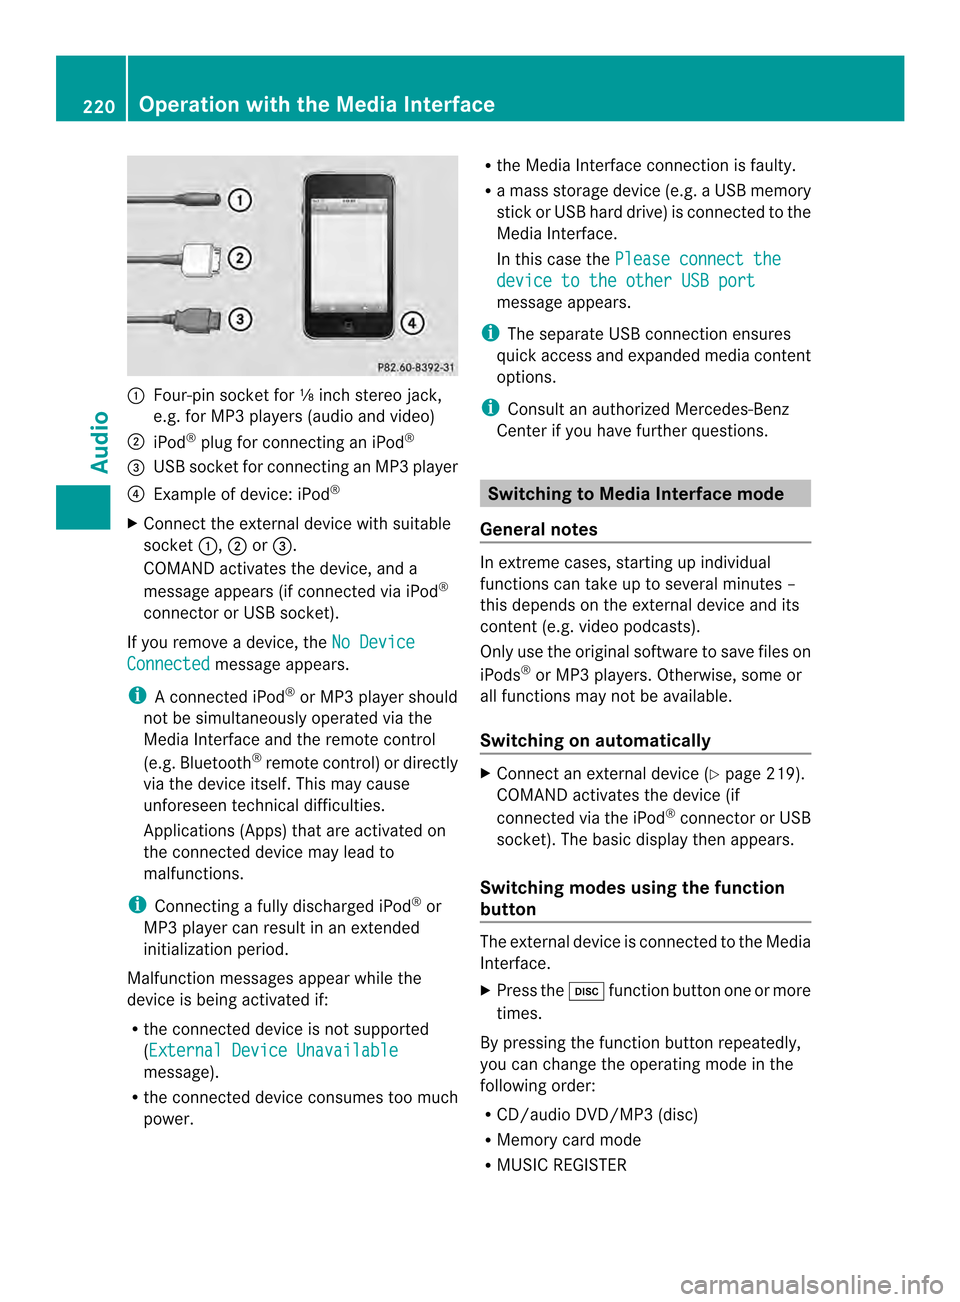
0001
Four-pin socket for ⅛ inch stereo jack,
e.g. for MP3 players (audio and video)
0002 iPod ®
plug for connecting an iPod ®
0014 USB socket for connecting an MP3 player
0013 Example of device: iPod ®
X Connect the external device with suitable
socket 0001,0002or0014.
COMAND activates the device, and a
message appears (i fconnected via iPod ®
connector or USB socket).
If you remove a device, the No DeviceConnected message appears.
i A connected iPod ®
or MP3 players hould
not be simultaneously operated via the
Media Interface and the remote control
(e.g. Bluetooth ®
remote control) or directly
via the device itself. This may cause
unforeseen technical difficulties.
Applications (Apps) that are activated on
the connected device may lead to
malfunctions.
i Connecting a fully discharged iPod ®
or
MP3 player can result in an extended
initialization period.
Malfunction messages appearw hile the
device is being activated if:
R the connected device is not supported
(External Device Unavailable message).
R the connected device consumes too much
power. R
the Media Interface connection is faulty.
R a mass storage device (e.g. a USB memory
stick or USB hard drive) is connected to the
Media Interface.
In this case the Please connect the device to the other USB port
message appears.
i The separate USB connection ensures
quick access and expanded media content
options.
i Consult an authorized Mercedes-Benz
Center if you have further questions. Switching to Media Interface mode
General notes In extreme cases, starting up individual
functions can take up to several minutes –
this depends on the external device and its
content (e.g. video podcasts).
Only use the original software to save files on
iPods
®
or MP3 players. Otherwise, some or
all functions may not be available.
Switching on automatically X
Connect an external device (Y page 219).
COMAND activates the device (if
connected via the iPod ®
connector or USB
socket). The basic display then appears.
Switching modes using the function
button The external device is connected to the Media
Interface.
X
Press the 0007function button one or more
times.
By pressing the function button repeatedly,
you can change the operating mode in the
following order:
R CD/audio DVD/MP3 (disc)
R Memory card mode
R MUSIC REGISTER 220
Operation with the Media InterfaceAudio
Page 223 of 274
R
USB storage device
R Media Interface or audio AUX mode
R Bluetooth ®
audio mode
Switching on using anumber key X
Press the 001Dnumber key (for a DVD
changer) or the 002Dnumber key (for a
single DVD drive).
This selects the connected external audio
device directly.
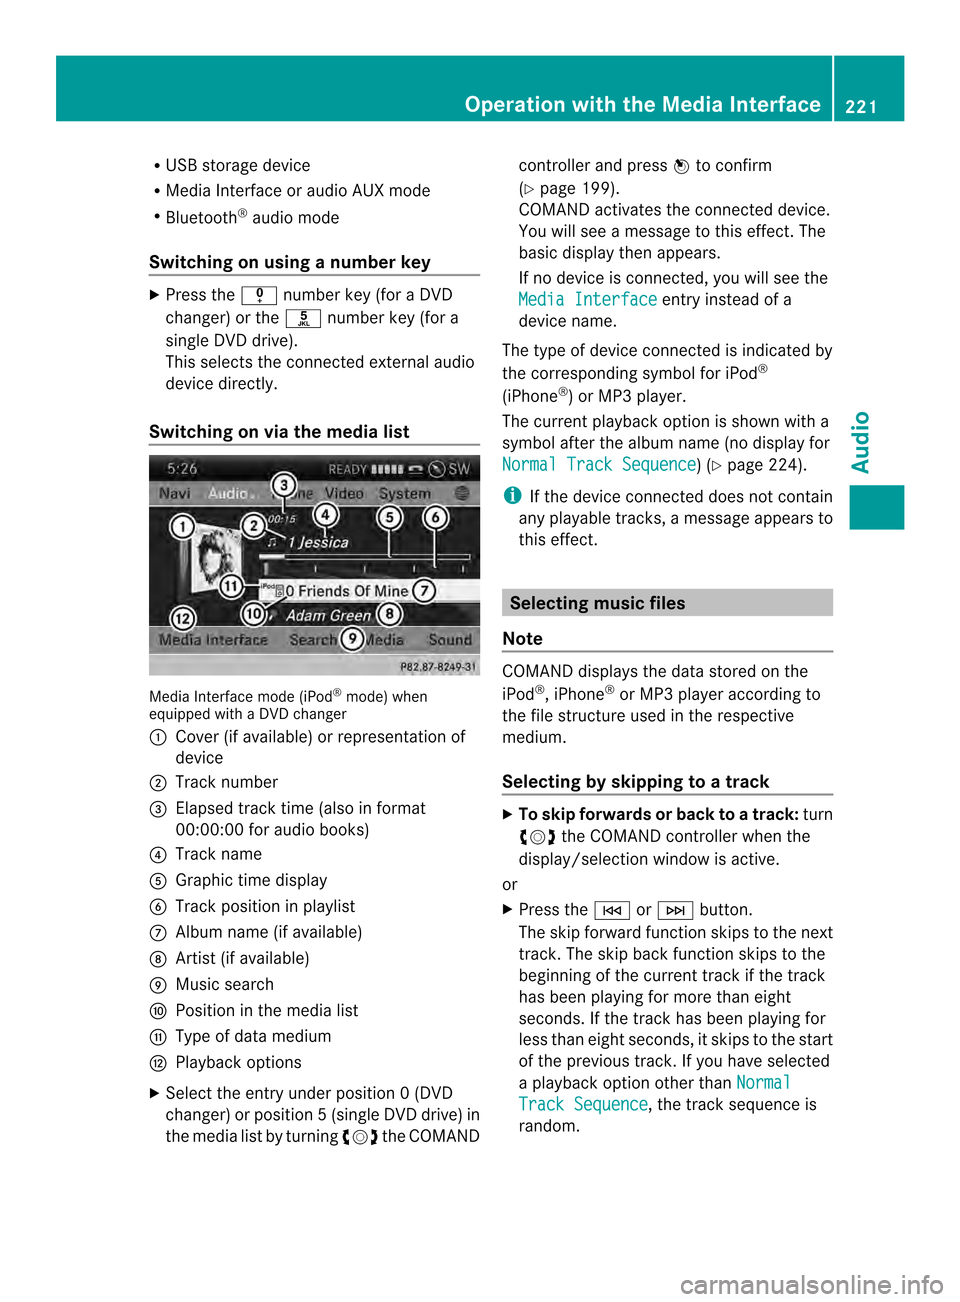
Switching on via the media list Media Interface mode (iPod
®
mode) when
equipped with a DVD changer
0001 Cove r(if available) or representation of
device
0002 Track number
0014 Elapsed track time (also in format
00:00:00 for audio books)
0013 Track name
0011 Graphic time display
0012 Trac kposition in playlist
0005 Album name (if available)
0006 Artist (if available)
0007 Music search
0008 Position in the media list
0009 Type of data medium
000B Playback options
X Select the entry under position 0 (DVD
changer) or position 5(single DVD drive) in
the media list by turning 003C0012003Dthe COMAND controller and press
0037to confirm
(Y page 199).
COMAND activates the connected device.
You will see a message to this effect. The
basic display then appears.
If no device is connected, you will see the
Media Interface entry instead of a
device name.
The type of device connected is indicated by
the corresponding symbol for iPod ®
(iPhone ®
) or MP3 player.
The current playback option is shown with a
symbol after the albumn ame (no display for
Normal Track Sequence ) (Y
page 224).
i If the device connected does not contain
any playable tracks, a message appears to
this effect. Selecting music files
Note COMAND displays the data stored on the
iPod
®
, iPhone ®
or MP3 player according to
the file structure used in the respective
medium.
Selecting by skipping to atrack X
To skip forwards or back to a track: turn
003C0012003D the COMAND controller when the
display/selectio nwindow is active.
or
X Press the 0001or0002 button.
The skip forward function skips to the next
track. The skip back function skips to the
beginning of the current track if the track
has been playing for more than eight
seconds .Ifthe track has been playing for
less than eight seconds, it skips to the start
of the previous track.Ify ou have selected
a playback option other than Normal Track Sequence , the track sequence is
random. Operation with the Media Interface
221Audio Z