2014 MERCEDES-BENZ S-Class instrument cluster
[x] Cancel search: instrument clusterPage 145 of 434

indicator lamp in the multifunction display
remains lit.
X To switch off: move the combination
switch back to its normal position or move
the light switch to another position.
The 00CE indicator lamp in the instrument
cluster goes out. Adaptive Highbeam Assist PLUS
General notes With Adaptive Highbeam Assist Plus, you can
automatically switch between low-beam,
partial high-beam and high-beam headlamps.
Partial high-beam is a form of illumination
whereby the high-beam is directed past other
road users. Other road users are kept out of
the high-beam. This prevents glare. When
there is a vehicle in front, for example, the
high-beam headlamps illuminate the areas to
its right and left, and the vehicle in front is
illuminated by the low-beam headlamps.
The system automatically adapts the low-
beam headlamp range depending on the
distance to the other vehicle. Once the
system no longer detects any other vehicles,
it reactivates the high-beam headlamps.
If the high-beam or partial high-beam are
causing too much reflection from traffic signs, the lights are automatically dimmed
and glare for the driver caused by the
reflections is thus avoided.
The system's optical sensor is located behind
the windshield near the overhead control
panel.
Important safety notes
G
WARNING
Adaptive Highbeam Assist Plus does not
recognize road users:
R who have no lights, e.g. pedestrians
R who have poor lighting, e.g. cyclists
R whose lighting is blocked, e.g. by a barrier
In very rare cases, Adaptive Highbeam Assist
Plus may not recognize road users who do
have lights, or may recognize them too late.
In this or similar situations, the automatic
high-beam headlamps will not be deactivated
or will be activated regardless. There is a risk
of an accident.
Always carefully observe the traffic conditions
and switch off the high-beam headlamps in
good time.
Adaptive Highbeam Assist Plus cannot take
into account road, weather or traffic
conditions. Adaptive Highbeam Assist Plus is
only an aid. You are responsible for adjusting
the vehicle's lighting to the prevailing light,
visibility and traffic conditions.
In particular, the detection of obstacles can
be restricted if there is:
R poor visibility, e.g. due to fog, heavy rain or
snow
R dirt on the sensors or the sensors are
obscured Exterior lighting
143Lights and windshield wipers Z
Page 146 of 434

Switching Adaptive Highbeam Assist
PLUS on/off 0043
High-beam headlamps
0044 Turn signal, right
0087 High-beam flasher
0085 Turn signal, left
X To switch on: turn the light switch to
0058.
X Press the combination switch beyond the
pressure point in the direction of
arrow 0043.
The 00CE indicator lamp in the
multifunction display lights up if it is dark
and the light sensor activates the low-beam
headlamps.
If you are driving at speeds above
approximately 16 mph (25 km/h):
The headlamp range is set automatically
depending on the distance between the
vehicle and other road users.
If you are driving at speeds above
approximately 19 mph (30 km/h) and no
other road users have been detected:
The high-beam headlamps are switched on
automatically. The 0057indicator lamp in
the instrument cluster also lights up.
If you are driving at speeds above
approximately 28 mph (45 km/h) and other
road users have been detected:
Partial high-beam is selected
automatically. The 0057indicator lamp in
the instrument cluster also lights up.
If you are driving at speeds below
approximately 25 mph (40 km/h): The partial high-beam headlamps are
switched off automatically. If no other road
users are recognize, the high-beam
headlamps are switched on.
If you are driving at speeds below
approximately 16 mph (25 km/h) or the
roads are adequately illuminated:
The high-beam headlamps are switched off
automatically. The
0057indicator lamp in
the instrument cluster goes out. The 00CE
indicator lamp in the multifunction display
remains lit.
X To switch off: move the combination
switch back to its normal position or move
the light switch to another position.
The 00CE indicator lamp in the instrument
cluster goes out. Headlamps fogged up on the inside
Certain climatic and physical conditions may
cause moisture to form in the headlamp. This
moisture does not affect the functionality of
the headlamp. Interior lighting
Overview of interior lighting
Front overhead control panel 0043
003D To switch the left-hand front reading
lamp on/off
0044 0033 To switch the automatic interior
lighting control on/off 144
Interior lightingLights and windshield wipers
Page 174 of 434

Pressing the Start/Stop button several times
in succession corresponds to the different
key positions in the ignition lock. This is only
the case if you are not depressing the brake
pedal.
If you depress the brake pedal and press the
Start/Stop button, the engine starts
immediately.
Do not keep the SmartKey:
R with electronic devices, e.g. a mobile
phone or another SmartKey
R with metallic objects, e.g. coins or metal
foil
R inside metallic objects, e.g. a metal case
This can affect the functionality of the
SmartKey.
Do not keep the SmartKey in the
temperature-controlled cup holder
(Y page 323). Otherwise, the SmartKey will
not be detected, e.g. when starting the engine
with the Start/Stop button.
The Start/Stop button can be removed from
the ignition lock. Then, you can insert the
SmartKey into the ignition lock.
i If you lock the vehicle with the SmartKey's
remote control or with KEYLESS-GO, after
a short time:
R you will not be able to switch on the
ignition with the Start/Stop button.
R you will not be able to start the engine
until the vehicle is unlocked again.
If you lock the vehicle centrally using the
button on the front door (Y page 91), you
can continue to start the engine with the
Start/Stop button.
i You do not have to remove the Start/Stop
button from the ignition lock when you
leave the vehicle. You should, however,
always take the SmartKey with you when
leaving the vehicle. As long as the
SmartKey is in the vehicle: R
the vehicle can be started using the
Start/Stop button
R the electrically powered equipment can
be operated
i The engine can be turned off while the
vehicle is in motion by pressing and holding
the Start/Stop button for approximately
three seconds. This function operates
independently of the ECO start/stop
automatic engine switch-off function.
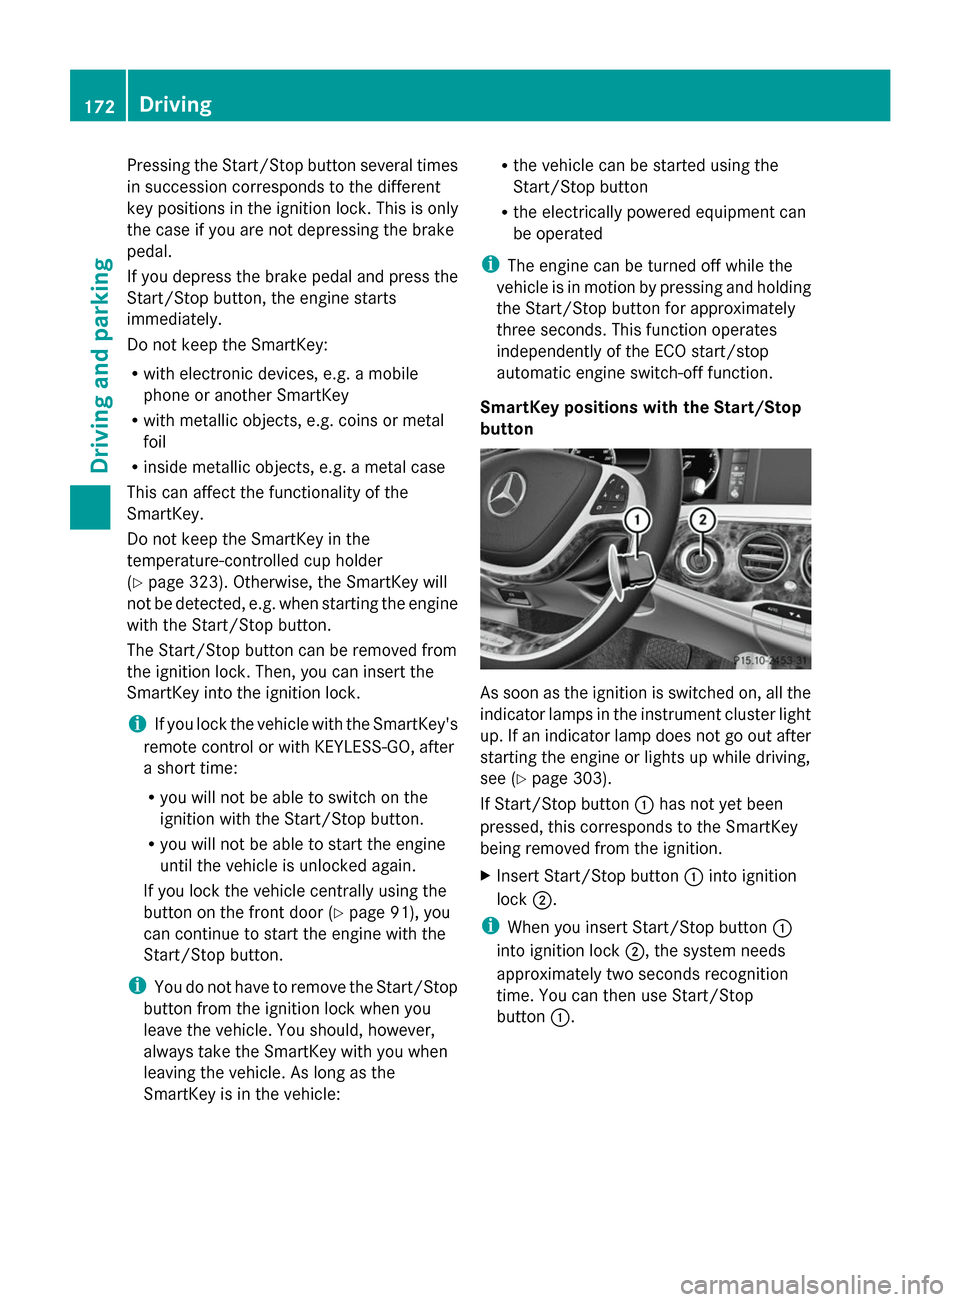
SmartKey positions with the Start/Stop
button As soon as the ignition is switched on, all the
indicator lamps in the instrument cluster light
up. If an indicator lamp does not go out after
starting the engine or lights up while driving,
see (Y
page 303).
If Start/Stop button 0043has not yet been
pressed, this corresponds to the SmartKey
being removed from the ignition.
X Insert Start/Stop button 0043into ignition
lock 0044.
i When you insert Start/Stop button 0043
into ignition lock 0044, the system needs
approximately two seconds recognition
time. You can then use Start/Stop
button 0043. 172
DrivingDriving and parking
Page 176 of 434

Automatic transmission
X
Shift the transmission to position
P(Y page 179).
The transmission position display in the
multifunction display shows
P(Y page 181).
i You can also start the engine when the
transmission is in position N.
Starting procedure with the SmartKey X
Turn the SmartKey to position 3in the
ignition lock (Y page 171) and release it as
soon as the engine is running.
i To start the engine using the SmartKey
instead of the Start/Stop button, pull the
Start/Stop button out of the ignition lock.
Starting procedure with the Start/Stop
button You can start the engine if a valid SmartKey
is in the vehicle. Always take the SmartKey
with you when leaving the vehicle, even if you
only leave it for a short time. Pay attention to
the important safety notes.
X Depress the brake pedal and keep it
depressed.
X Press the Start/Stop button once
(Y page 171).
The engine starts.
i The Start/Stop button can be used to
start the vehicle manually without inserting
the SmartKey into the ignition lock. The
Start/Stop button must be inserted in the
ignition lock and the SmartKey must be in
the vehicle. This mode for starting the
engine operates independently of the ECO
start/stop automatic engine start function. Pulling away
Automatic transmission G
WARNING
If the engine speed is above the idling speed
and you engage transmission position Dor
R, the vehicle could pull away suddenly. There
is a risk of an accident.
When engaging transmission position Dor R,
always firmly depress the brake pedal and do
not simultaneously accelerate.
X Depress the brake pedal and keep it
depressed.
X Shift the transmission to position Dor R.
X Release the brake pedal.
X Carefully depress the accelerator pedal.
The electric parking brake (Y page 192) is
automatically released.
The red 0049(USA only) or 0024(Canada
only) indicator lamp in the instrument
cluster goes out.
i It is only possible to shift the transmission
from position Pto the desired position if
you depress the brake pedal. Only then is
the parking lock released. If you do not
depress the brake pedal, you can move the
DIRECT SELECT lever but the parking lock
remains engaged.
i The vehicle locks centrally once you have
pulled away. The locking knobs in the doors
drop down.
You can open the doors from the inside at
any time.
You can also deactivate the automatic
locking feature (Y page 92).
i Upshifts take place at higher engine
speeds after a cold start. This helps the
catalytic converter to reach its operating
temperature more quickly. 174
DrivingDriving and pa
rking
Page 180 of 434

Problems with the engine
Problem Possible causes/consequences and
0050
0050Solutions The engine does not
start. The starter motor
can be heard. R
There is a malfunction in the engine electronics.
R There is a malfunction in the fuel supply.
X Before attempting to start the engine again, turn the SmartKey
in the ignition back to position 0or press the Start/Stop button
repeatedly until all indicator lamps in the instrument cluster go
out.
X Try to start the engine again (Y page 173). Avoid excessively
long and frequent attempts to start the engine as these will drain
the battery.
If the engine does not start after several attempts:
X Consult a qualified specialist workshop. The engine does not
start. You cannot hear
the starter motor. The on-board voltage is too low because the battery is too weak
or discharged.
X
Jump-start the vehicle (Y page 373).
If the engine does not start despite attempts to jump-start it:
X Consult a qualified specialist workshop. The starter motor was exposed to a thermal load that was too high.
X
Try to start the engine again.
If the engine still does not start:
X Consult a qualified specialist workshop. The engine is not
running smoothly and
is misfiring. There is a malfunction in the engine electronics or in a mechanical
component of the engine management system.
X
Only depress the accelerator pedal slightly.
Otherwise, non-combusted fuel may get into the catalytic
converter and damage it.
X Have the cause rectified immediately at a qualified specialist
workshop. The coolant
temperature gauge
shows a value above
248 ‡ (120 †). The coolant level is too low. The coolant is too hot and the engine
is no longer being cooled sufficiently.
X Stop as soon as possible and allow the engine and the coolant
to cool down.
X Check the coolant level (Y page 351). Observe the warning
notes as you do so and add coolant if necessary. 178
DrivingDriving and parking
Page 187 of 434

The gearshift recommendations assist you in
adopting an economical driving style. The
recommended gear is shown in the
multifunction display.
X Shift to recommended gear 0044according
to gearshift recommendation 0043when
shown in the multifunction display of the
instrument cluster.
Deactivating
If you have activated manual drive program
M, it will remain active for a certain amount
of time. Under certain conditions the
minimum amount of time is extended, e.g. in
the case of lateral acceleration, during an
overrun phase or when driving on steep
terrain.
If manual drive program Mhas been
deactivated, the automatic transmission
shifts into the automatic drive program that
was last selected.
You can also deactivate manual drive
program Myourself:
X Pull on the right-hand steering wheel
paddle shifter and hold it in place
(Y page 183).
or
X Use the DIRECT SELECT lever to switch the
transmission position.
or
X Use the program selector button to change
the drive program (Y page 182).
Manual drive program Mis deactivated.
The automatic transmission switches to
the previously activated drive program E
(drive program Con AMG vehicles) or S. Manual drive program (AMG vehicles)
General information In this drive program, you can permanently
change gear yourself by using the steering
wheel paddle shifters. The transmission must
be in position D. Manual drive program
Mis different from
drive program Swith regard to spontaneity,
responsiveness and smoothness of gear
changes.
Switching on the manual drive program In manual drive program
M, you can change
gear using the steering wheel paddle shifters
if the transmission is in position D. You can
see the currently selected drive program and
which gear is engaged in the multifunction
display.
X Press the program selector button
(Y page 182) repeatedly until Mappears in
the multifunction display.
Upshifting !
In manual drive program M, the automatic
transmission does not shift up
automatically even when the engine
limiting speed for the current gear is
reached. When the engine limiting speed is
reached, the fuel supply is cut to prevent
the engine from overrevving. Always make
sure that the engine speed does not reach
the red area of the tachometer. There is
otherwise a risk of engine damage. 0043
Gear indicator
0044 Upshift indicator
Before the engine speed reaches the red area,
an upshift indicator will be shown in the
multifunction display.
X If the color in the speedometer
multifunction display changes to red and Automatic transmission
185Driving and parking Z
Page 190 of 434

If you or others come into contact with fuel,
observe the following:
R Wash away fuel from skin immediately
using soap and water.
R If fuel comes into contact with your eyes,
immediately rinse them thoroughly with
clean water. Seek medical assistance
without delay.
R If fuel is swallowed, seek medical
assistance without delay. Do not induce
vomiting.
R Immediately change out of clothing which
has come into contact with fuel. G
WARNING
Electrostatic buildup can create sparks and
ignite fuel vapors. There is a risk of fire and
explosion.
Always touch the vehicle body before opening
the fuel filler flap or touching the fuel pump
nozzle. Any existing electrostatic buildup is
thereby discharged.
Do not get into the vehicle again during the
refueling process. Otherwise, electrostatic
charge could build up again.
! Do not use diesel to refuel vehicles with a
gasoline engine. Do not switch on the
ignition if you accidentally refuel with the
wrong fuel. Otherwise, the fuel will enter
the fuel system. Even small amounts of the
wrong fuel could result in damage to the
fuel system and the engine. Notify a
qualified specialist workshop and have the
fuel tank and fuel lines drained completely.
! Overfilling the fuel tank could damage the
fuel system.
! Take care not to spill any fuel on painted
surfaces. You could otherwise damage the
paintwork.
! Use a filter when refueling from a fuel can.
Otherwise, the fuel lines and/or injection
system could be blocked by particles from
the fuel can. If you overfill the fuel tank, fuel could spray
out when the fuel pump nozzle is removed.
For further information on fuel and fuel quality
(Y page 423). Refueling
General information Pay attention to the important safety notes
(Y
page 187).
If you unlock/lock the vehicle from the
outside, the fuel filler flap also unlocks/locks.
The position of the fuel filler cap is shown in
the instrument cluster 00B6. The arrow next
to the filling pump indicates the side of the
vehicle.
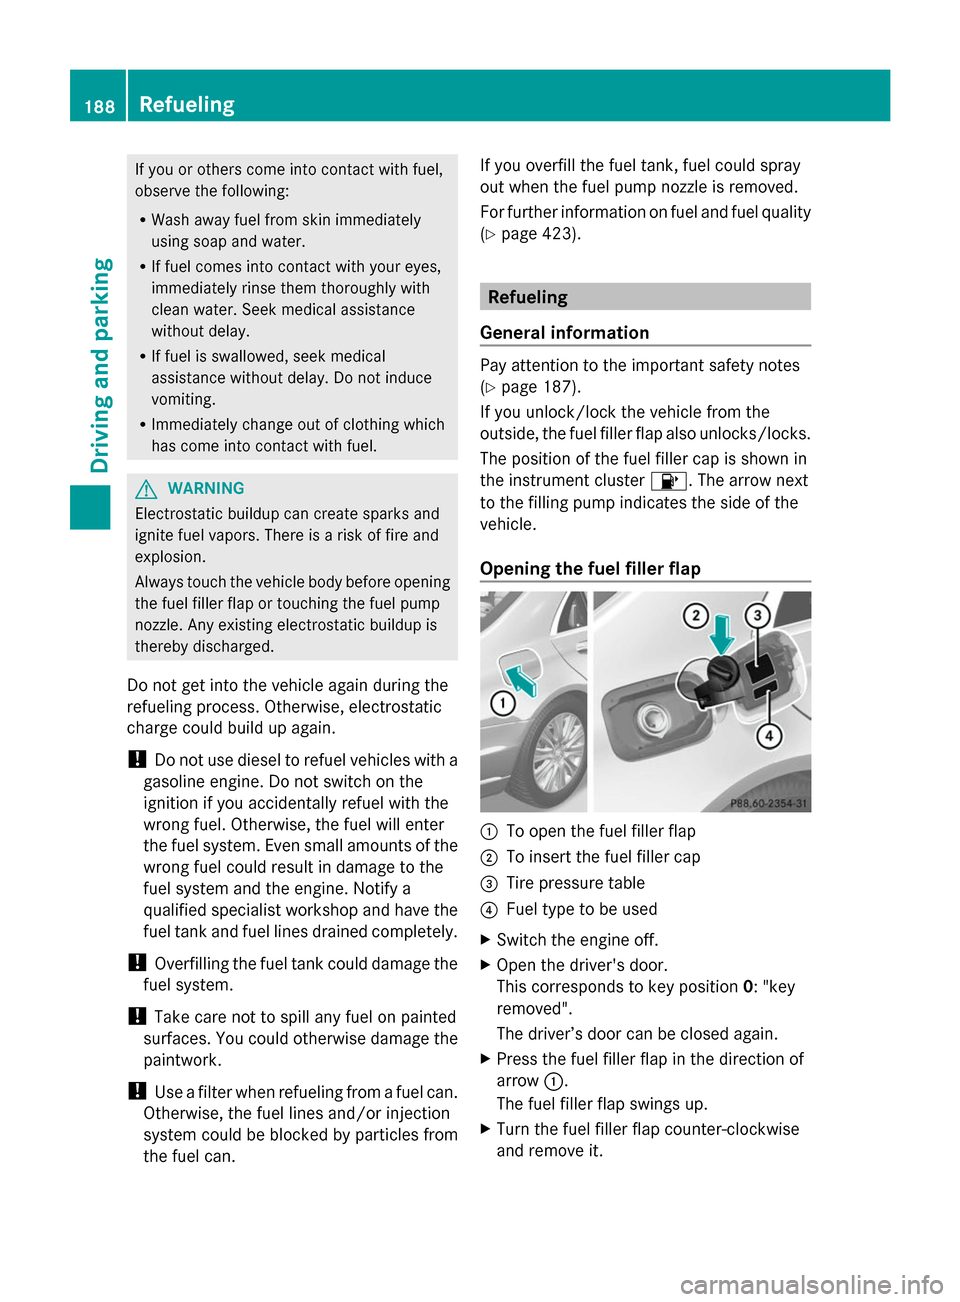
Opening the fuel filler flap 0043
To open the fuel filler flap
0044 To insert the fuel filler cap
0087 Tire pressure table
0085 Fuel type to be used
X Switch the engine off.
X Open the driver's door.
This corresponds to key position 0: "key
removed".
The driver’s door can be closed again.
X Press the fuel filler flap in the direction of
arrow 0043.
The fuel filler flap swings up.
X Turn the fuel filler flap counter-clockwise
and remove it. 188
RefuelingDriving and parking
Page 191 of 434

X
Insert the fuel filler cap into the holder on
the inside of filler flap 0044.
X Completely insert the filler neck of the fuel
pump nozzle into the tank, hook in place
and refuel.
X Only fill the tank until the pump nozzle
switches off.
i Do not add any more fuel after the pump
stops filling for the first time. Otherwise,
fuel may leak out.
Closing the fuel filler flap X
Replace the cap on the filler neck and turn
clockwise until it engages audibly.
X Close the fuel filler flap.
i Close the fuel filler flap before locking the
vehicle.
i If you are driving with the fuel filler cap
open, the 00B6reserve fuel warning lamp
flashes. A message appears in the
multifunction display (Y page 286).
In addition, the 00B9Check Engine warning
lamp may light up (Y page 308).
For further information on warning and
indicator lamps in the instrument cluster,
see (Y page 308). Refueling
189Driving and parking Z