2014 MERCEDES-BENZ S-CLASS COUPE instrument cluster
[x] Cancel search: instrument clusterPage 79 of 413
Drive on carefully. Have ESP
®
checked at a
qualified specialist workshop.
! Vehicles with 4MATIC: switch off the igni-
tion when the electric parking brake is
being tested using a dynamometer.
Application of the brakes by ESP ®
may oth-
erwise destroy the brake system.
Vehicles without 4MATIC: when towing your
vehicle with the rear axle raised, it is impor-
tant that you observe the notes on ESP ®
(Y page 369).
ESP ®
is deactivated if the åwarning lamp
in the instrument cluster lights up continu-
ously when the engine is running.
If the ÷ warning lamp lights up continu-
ously, ESP ®
is not available due to a malfunc-
tion.
Observe the information on warning lamps
(Y page 304) and display messages which
may be shown in the instrument cluster
(Y page 266).
Only use wheels with the recommended tyre
sizes. Only then will ESP ®
function properly.
Characteristics of ESP ®General notes
If the
÷ ESP warning lamp goes out before
beginning the journey, ESP ®
is automatically
active.
If ESP ®
intervenes, the ÷ESP®
warning
lamp flashes in the instrument cluster.
If ESP ®
intervenes:
X Do not deactivate ESP ®
under any circum-
stances.
X When pulling away, only depress the accel-
erator pedal as far as is necessary.
X Adapt your driving style to suit the prevail-
ing road and weather conditions. ECO start/stop function
The ECO start/stop function switches the
engine off automatically if the vehicle stops
moving. When pulling away again, the engine
starts automatically. ESP ®
remains in its pre-
viously selected status. Example:if ESP®
was deactivated before the engine was
switched off, ESP ®
remains deactivated when
the engine is switched on again.
Deactivating/activating ESP ® Important safety notes
i Observe the "Important safety notes" sec-
tion (Y page 69).
You can select between the following states
of ESP ®
:
R ESP ®
is activated
R ESP ®
is deactivated G
WARNING
If you deactivate ESP ®
, ESP ®
no longer sta-
bilises the vehicle. There is an increased risk
of skidding and an accident.
Only deactivate ESP ®
in the situations descri-
bed in the following.
It may be best to deactivate ESP ®
in the fol-
lowing situations:
R when using snow chains
R in deep snow
R on sand or gravel
i Activate ESP ®
as soon as the situations
described above no longer apply. ESP ®
will
otherwise not be able to stabilise the vehi-
cle if the vehicle starts to skid or a wheel
starts to spin.
Deactivating/activating ESP ®
You can deactivate or activate ESP ®
via the
on-board computer.
X To deactivate: (Ypage 257).
The å ESP®
OFF warning lamp in the
instrument cluster lights up. 76
Driving safety systemsSafety
Page 80 of 413
X
To activate: (Ypage 257).
The å ESP®
OFF warning lamp in the
instrument cluster goes out.
Characteristics when ESP ®
is deactivated
If ESP ®
is deactivated and one or more wheels
start to spin, the ÷ESP®
warning lamp in
the instrument cluster flashes. In such situa-
tions, ESP ®
will not stabilise the vehicle.
If you deactivate ESP ®
:
R ESP ®
no longer improves driving stability.
R engine torque is no longer limited and the
drive wheels are able to spin.
The spinning of the wheels results in a cut-
ting action for better traction on loose sur- faces.
R traction control is still activated.
R ESP ®
still provides support when you
brake.
Crosswind Assist (vehicles without
MAGIC BODY CONTROL) General notes
Vehicles with MAGIC BODY CONTROL: infor-
mation on stabilising the vehicle in the event of crosswind (Y page 204).
Strong crosswind gusts can impair the road-
holding of your vehicle when driving straight
ahead. The crosswind driving assistance
function integrated in ESP ®
noticeably
reduces these impairments.
Depending on the direction and intensity of
the side wind, ESP ®
is activated automati-
cally.
ESP intervenes with stabilising braking to
assist you in keeping the vehicle in the lane.
Crosswind Assist is active at vehicle speeds
above 80 km/h when driving straight ahead
or cornering gently.
Important safety notes
Crosswind Assist does not work if ESP ®
is
deactivated or disabled because of a mal-
function. EBD (electronic brake force distribu-
tion)
General notes EBD monitors and controls the brake pres-
sure on the rear wheels to improve driving
stability while braking.
Important safety notes i
Observe the "Important safety notes" sec-
tion (Y page 69). G
WARNING
If EBD is malfunctioning, the rear wheels can
lock, e.g. under full braking. This increases the risk of skidding and an accident.
You should therefore adapt your driving style
to the different handling characteristics. Have the brake system checked at a qualified spe-
cialist workshop.
Observe information regarding indicator and
warning lamps (Y page 302) as well as dis-
play messages (Y page 269). ADAPTIVE BRAKE
ADAPTIVE BRAKE enhances braking safety
and offers increased braking comfort. In addi- tion to the braking function, ADAPTIVE BRAKE
also has the HOLD function (Y page 202)and
hill start assist (Y page 162). PRE-SAFE
®
Brake
General notes i
Pay attention to the important safety
notes in the "Driving safety systems" sec-
tion (Y page 69).
PRE‑SAFE ®
Brake is only available for vehi-
cles with the Driving Assistance package.
For PRE-SAFE ®
Brake to assist you when driv-
ing, the radar sensor system and the camera
system must be switched on and operational. Driving safety systems
77Safety Z
Page 82 of 413
R
a narrow vehicle travelling in front, e.g. a
motorcycle
R a vehicle travelling in front on a different
line
Detection by the camera system is also
impaired in the event of:
R dirt on the camera or if the camera is cov-
ered
R glare on the camera system, e.g. from the
sun being low in the sky
R darkness
R if:
- pedestrians move quickly, e.g. into the
path of the vehicle
- the camera system no longer detects a
pedestrian as a person due to special
clothing or other objects
- a pedestrian is concealed by other
objects
- the typical outline of a person is not dis-
tinguishable from the background
Following damage to the front end of the vehi-
cle, have the radar sensor settings and oper- ation checked at a qualified specialist work-
shop. This also applies to collisions at slow
speeds where there is no visible damage to
the front of the vehicle.
Following damage to the windscreen, have
the configuration and operation of the cam-
era system checked at a qualified specialist
workshop.
Function X
To activate/deactivate: activate or deac-
tivate PRE-SAFE ®
Brake in the on-board
computer (Y page 258).
If the PRE-SAFE ®
Brake is not activated, the
æ symbol appears in the multifunction
display.
This function will issue a warning if:
R at a speed of around 30 km/h or more, the
distance maintained to the vehicle travel-
ling in front is insufficient for several sec-
onds. The
· distance warning lamp then lights
up in the instrument cluster.
R at a speed of approximately 7 km/h or
higher, you very quickly approach a vehicle
in front or a pedestrian.
An intermittent warning tone will then
sound and the ·distance warning lamp
lights up in the instrument cluster.
X Brake immediately to defuse the situation.
or
X Take evasive action provided it is safe to do
so.
i If there is an increased risk of collision,
preventive passenger protection measures
(PRE-SAFE ®
) are activated.
If the risk of collision with the vehicle in front
remains and you do not brake, take evasive
action or accelerate significantly, the vehicle
may perform automatic emergency braking,
up to the point of full brake application. Auto- matic emergency braking is not performed
until immediately prior to an imminent acci-
dent.
You can prevent the intervention of PRE-
SAFE ®
Brake at any time by:
R depressing the accelerator pedal further
R activating kickdown
R releasing the brake pedal
The braking action of PRE-SAFE ®
Brake is
ended automatically if:
R you manoeuvre to avoid the obstacle
R there is no longer a risk of collision
R there is no longer an obstacle detected in
front of your vehicle STEER CONTROL
General notes STEER CONTROL helps you by transmitting a
noticeable steering force to the steering
wheel in the direction required for vehicle
stabilisation. Driving safety systems
79Safety Z
Page 128 of 413
The exterior lighting (except the side lamps/
parking lamps) switches off automatically if
you:
R remove the key from the ignition lock
R open the driver's door with the key in posi-
tion 0
Automatic headlamp mode G
WARNING
When the light switch is set to Ã, the
dipped-beam headlamps may not be switched on automatically if there is fog, snow or othercauses of poor visibility due to the weather
conditions such as spray. There is a risk of an
accident.
In such situations, turn the light switch to
L.
The automatic headlamp feature is only an
aid. The driver is responsible for the vehicle
lighting at all times.
The daytime driving lights improve the detect- ability of your vehicle during the day.
When the side lamps and dipped-beam head-lamps are switched on, the green T(side
lamps) and L(dipped-beam headlamps)
indicator lamps in the instrument cluster light
up.
à is the preferred light switch setting. The
light setting is automatically selected accord- ing to the brightness of the ambient light
(exception: poor visibility due to weather con-
ditions such as fog, snow or spray):
R key in position 1in the ignition lock: the
side lamps are switched on or off automat- ically depending on the brightness of the
ambient light
R with the engine running: depending on the
ambient light conditions, the daytime driv-
ing lights or the parking and dipped-beam
headlamps are switched on or off automat- ically
X To switch on automatic headlamp
mode: turn the light switch to Ã.Dipped-beam headlamps
When the ignition is switched on and the light
switch is in position L, the side lamps and
dipped-beam headlamps are switched on
even if the light sensor does not sense dark
ambient light conditions. This is advanta-
geous when there is fog or rain.
X To switch on the dipped-beam head-
lamps: turn the key in the ignition lock to
position 2or start the engine.
X Turn the light switch to L.
The green Lindicator lamp in the instru-
ment cluster lights up.
Rear foglamp
The rear foglamp improves the visibility of
your vehicle in heavy fog for the following
traffic. Please observe the country-specific
laws on the use of rear foglamps.
X To switch on the rear foglamp: turn the
key in the ignition lock to position 2or start
the engine.
X Turn the light switch to LorÃ.
X Press the Rbutton.
The yellow Rindicator lamp in the
instrument cluster lights up.
X To switch off the rear foglamp: press the
R button.
The yellow Rindicator lamp in the
instrument cluster goes out.
Side lamps
! If the battery has been excessively dis-
charged, the side lamps or parking lamps
are automatically switched off to enable
the next engine start. Always park your
vehicle safely and sufficiently lit according
to legal standards. Avoid the continuous
use of the Tside lamps for several
hours. If possible, switch on the Xright
or the Wleft parking lamp.
X To switch on: turn the light switch to T.
The green Tindicator lamp in the instru-
ment cluster lights up. Exterior lighting
125Lights and windscreen wipers Z
Page 132 of 413
Important safety notes
G
WARNING
Adaptive Highbeam Assist Plus does not rec-
ognise road users:
R who have no lights, e.g. pedestrians
R who have poor lighting, e.g. cyclists
R whose lighting is blocked, e.g. by a barrier
In very rare cases, Adaptive Highbeam Assist
Plus may not recognise road users who do
have lights, or may recognise them too late. In this, or in similar situations, the automatic
main-beam headlamps will not be deactivated
or will be activated despite the presence of
other road users. There is a risk of an acci-
dent.
Always carefully observe the traffic conditions and switch off the main-beam headlamps in
good time.
Adaptive Highbeam Assist Plus cannot take
into account road, weather or traffic condi-
tions. Adaptive Highbeam Assist Plus is only
an aid. You are responsible for adjusting the
vehicle's lighting to the prevailing light, visi-
bility and traffic conditions.
In particular, the detection of obstacles can
be restricted if there is:
R poor visibility, e.g. due to fog, heavy rain or
snow
R dirt on the sensors or if the sensors are
obscured Switching Adaptive Highbeam Assist
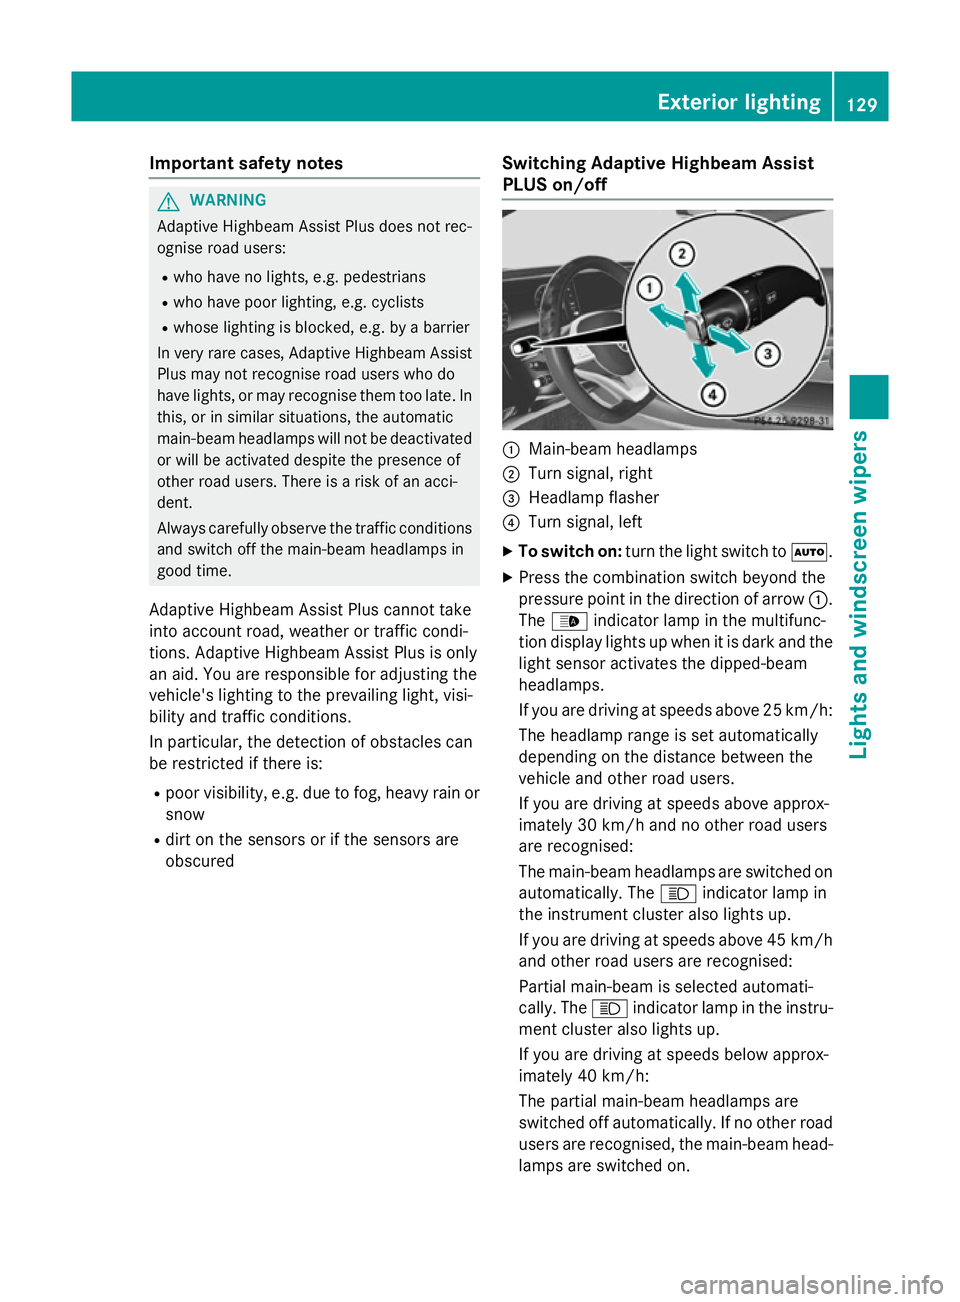
PLUS on/off :
Main-beam headlamps
; Turn signal, right
= Headlamp flasher
? Turn signal, left
X To switch on: turn the light switch to Ã.
X Press the combination switch beyond the
pressure point in the direction of arrow :.
The _ indicator lamp in the multifunc-
tion display lights up when it is dark and the light sensor activates the dipped-beam
headlamps.
If you are driving at speeds above 25 km/h:
The headlamp range is set automatically
depending on the distance between the
vehicle and other road users.
If you are driving at speeds above approx-
imately 30 km/h and no other road users
are recognised:
The main-beam headlamps are switched on
automatically. The Kindicator lamp in
the instrument cluster also lights up.
If you are driving at speeds above 45 km/h and other road users are recognised:
Partial main-beam is selected automati-
cally. The Kindicator lamp in the instru-
ment cluster also lights up.
If you are driving at speeds below approx-
imately 40 km/h:
The partial main-beam headlamps are
switched off automatically. If no other road
users are recognised, the main-beam head- lamps are switched on. Exterior lighting
129Lights and windscreen wipers Z
Page 133 of 413
If you are driving at speeds below approx-
imately 25 km/h or the roads are ade-
quately illuminated:
The main-beam headlamps are switched off
automatically. The Kindicator lamp in
the instrument cluster goes out. The _
indicator lamp in the multifunction display
remains lit.
X To switch off: move the combination
switch back to its normal position or move
the light switch to another position.
The _ indicator lamp in the multifunc-
tion display goes out. Headlamps misted up on the inside
Certain climatic and physical conditions may
cause moisture to form in the headlamp. This
moisture does not affect the functionality of
the headlamp. Interior lighting
Overview of interior lighting
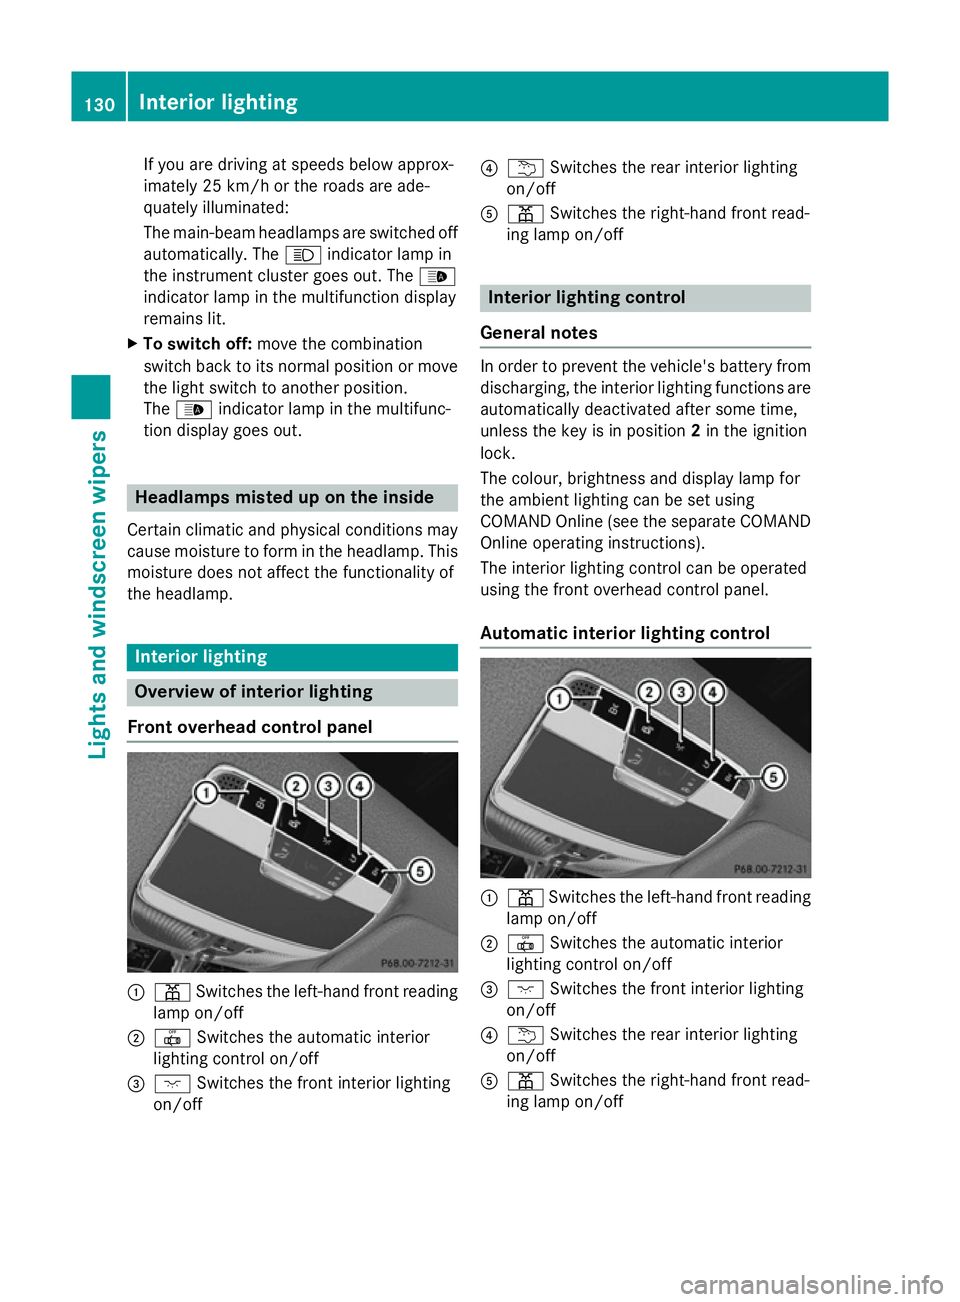
Front overhead control panel :
p Switches the left-hand front reading
lamp on/off
; | Switches the automatic interior
lighting control on/off
= c Switches the front interior lighting
on/off ?
u Switches the rear interior lighting
on/off
A p Switches the right-hand front read-
ing lamp on/off Interior lighting control
General notes In order to prevent the vehicle's battery from
discharging, the interior lighting functions are
automatically deactivated after some time,
unless the key is in position 2in the ignition
lock.
The colour, brightness and display lamp for
the ambient lighting can be set using
COMAND Online (see the separate COMAND
Online operating instructions).
The interior lighting control can be operated
using the front overhead control panel.
Automatic interior lighting control :
p Switches the left-hand front reading
lamp on/off
; | Switches the automatic interior
lighting control on/off
= c Switches the front interior lighting
on/off
? u Switches the rear interior lighting
on/off
A p Switches the right-hand front read-
ing lamp on/off 130
Interior lightingLights and windscreen wipers
Page 163 of 413
If you depress the brake pedal and press the
Start/Stop button, the engine starts immedi-
ately.
A check which periodically establishes a radio
connection between the vehicle and the key
determines whether a valid key is in the vehi- cle. This occurs, for example, when starting
the engine.
To start the vehicle without actively using the
key:
R the Start/Stop button must be inserted in
the ignition lock
R the key must be in the vehicle
R the vehicle must not be locked with the key
or KEYLESS-GO (Y page 85)
Do not keep the key:
R with electronic devices, e.g. a mobile
phone or another key
R with metallic objects, e.g. coins or metal
film
R inside metallic objects, e.g. a metal case
This can affect the key's functionality.
If you lock the vehicle with the key's remote
control or with KEYLESS-GO, after a short
time:
R you will not be able to switch on the ignition
with the Start/Stop button
R you will not be able to start the engine with
the Start/Stop button until the vehicle is
unlocked again
If you lock the vehicle centrally using the but- ton on the front door (Y page 91), you can
continue to start the engine with the Start/
Stop button.
The engine can be switched off while the vehi-
cle is in motion by pressing and holding the
Start/Stop button for three seconds. This
function operates independently of the ECO
start/stop automatic engine switch-off func-
tion. Key positions with the Start/Stop button
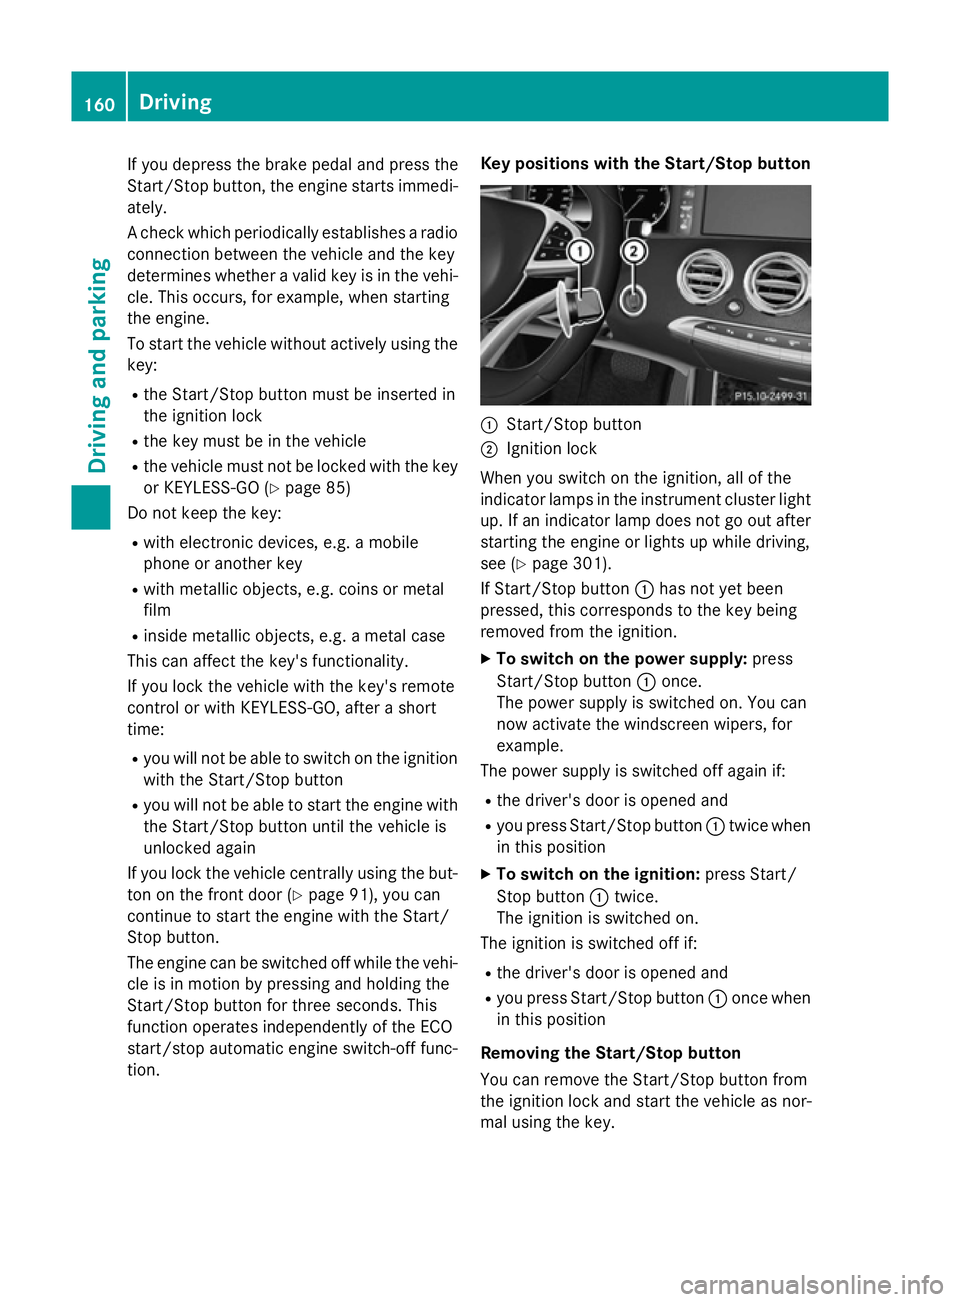
:
Start/Stop button
; Ignition lock
When you switch on the ignition, all of the
indicator lamps in the instrument cluster light up. If an indicator lamp does not go out after
starting the engine or lights up while driving,
see (Y page 301).
If Start/Stop button :has not yet been
pressed, this corresponds to the key being
removed from the ignition.
X To switch on the power supply: press
Start/Stop button :once.
The power supply is switched on. You can
now activate the windscreen wipers, for
example.
The power supply is switched off again if:
R the driver's door is opened and
R you press Start/Stop button :twice when
in this position
X To switch on the ignition: press Start/
Stop button :twice.
The ignition is switched on.
The ignition is switched off if:
R the driver's door is opened and
R you press Start/Stop button :once when
in this position
Removing the Start/Stop button
You can remove the Start/Stop button from
the ignition lock and start the vehicle as nor-
mal using the key. 160
DrivingDriving and parking
Page 169 of 413
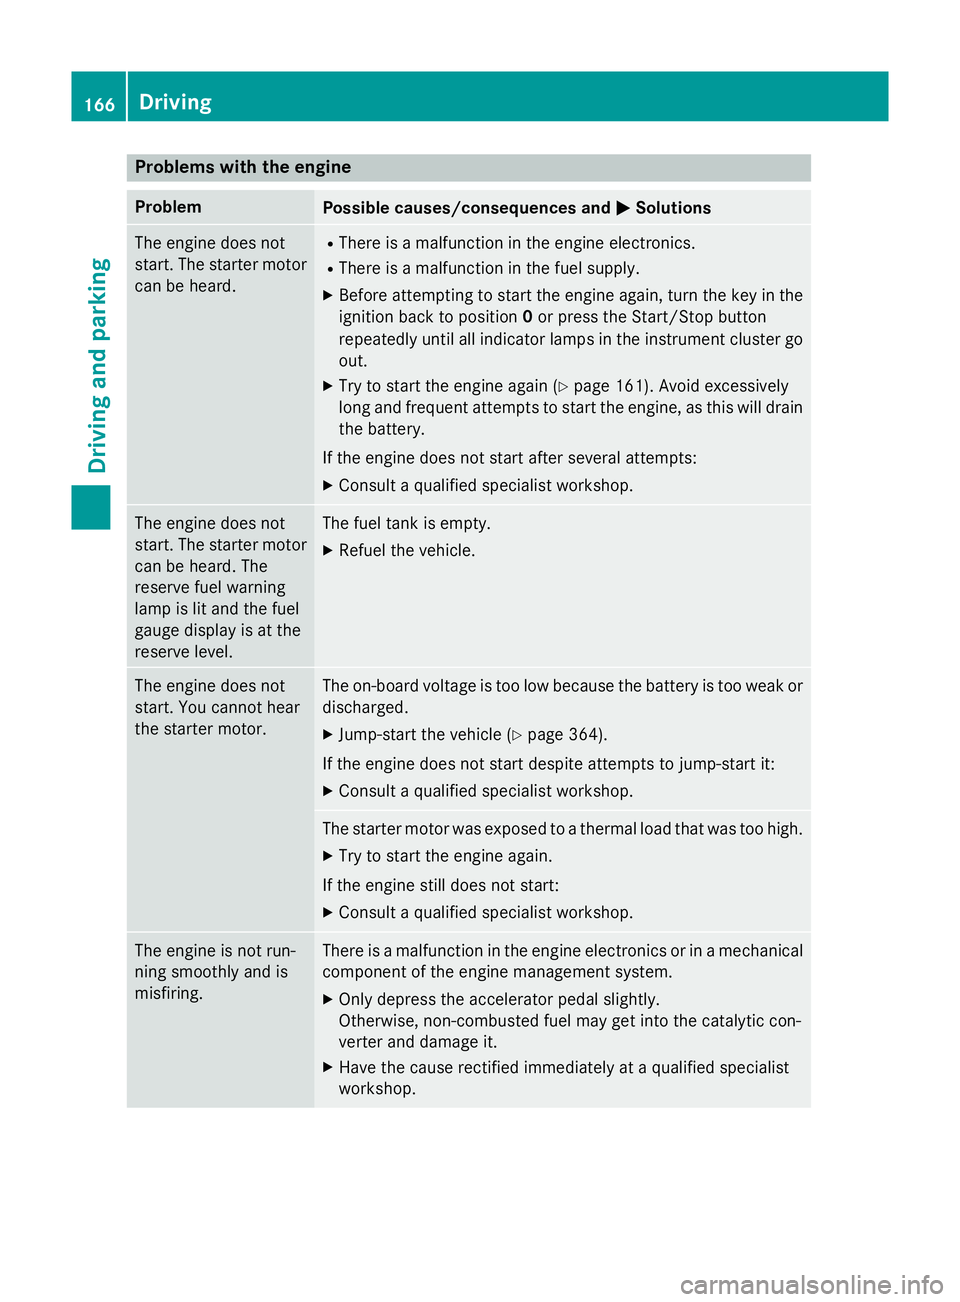
Problems with the engine
Problem
Possible causes/consequences and
M
MSolutions The engine does not
start. The starter motor
can be heard. R
There is a malfunction in the engine electronics.
R There is a malfunction in the fuel supply.
X Before attempting to start the engine again, turn the key in the
ignition back to position 0or press the Start/Stop button
repeatedly until all indicator lamps in the instrument cluster go
out.
X Try to start the engine again (Y page 161). Avoid excessively
long and frequent attempts to start the engine, as this will drain
the battery.
If the engine does not start after several attempts: X Consult a qualified specialist workshop. The engine does not
start. The starter motor
can be heard. The
reserve fuel warning
lamp is lit and the fuel
gauge display is at the
reserve level. The fuel tank is empty.
X Refuel the vehicle. The engine does not
start. You cannot hear
the starter motor. The on-board voltage is too low because the battery is too weak or
discharged.
X Jump-start the vehicle (Y page 364).
If the engine does not start despite attempts to jump-start it:
X Consult a qualified specialist workshop. The starter motor was exposed to a thermal load that was too high.
X Try to start the engine again.
If the engine still does not start:
X Consult a qualified specialist workshop. The engine is not run-
ning smoothly and is
misfiring. There is a malfunction in the engine electronics or in a mechanical
component of the engine management system.
X Only depress the accelerator pedal slightly.
Otherwise, non-combusted fuel may get into the catalytic con-
verter and damage it.
X Have the cause rectified immediately at a qualified specialist
workshop. 166
DrivingDriving and parking