2014 MERCEDES-BENZ S-CLASS COUPE lock
[x] Cancel search: lockPage 17 of 413
Switching on/of
f........................... 126
Matt finish (cleaning instructions) .. 346
MBC
see MAGIC BODY CONTROL
Media Interface
see Separate operating instructions
Memory card (audio) ......................... 253
Memory function
Seats, steering wheel, exterior
mirrors ........................................... 120
Mercedes-Benz Contact
Info call button .............................. 326
Roadside Assistance call button .... 326
Mercedes-Benz emergency call
system
Switch in the overhead control
panel .............................................. 325
Mercedes-Benz Intelligent Drive
360°camera .................................. 221
ABS (Anti-lock Braking System) ....... 70
Active Blind Spot Assist ................. 233
Active Lane Keeping Assist ............ 236
Active Parking Assist ..................... 212
ATTENTION ASSIST ........................ 225
BAS (Brake Assist) ........................... 70
BAS PLUS (Brake Assist PLUS)
with Cross-Traffic Assist .................. 71
Crosswind Assist (vehicles with
MAGIC BODY CONTROL) ............... 204
Crosswind Assist (vehicles with-
out MAGIC BODY CONTROL) ........... 77
Cruise control ................................ 186
DISTRONIC PLUS ........................... 191
DISTRONIC PLUS with Steering
Assist and Stop&Go Pilot ............... 200
ESP ®
(Electronic Stability Pro-
gram) ............................................... 75
General notes ................................ 185
MAGIC BODY CONTROL ................ 204
Night View Assist Plus ................... 230
PARKTRONIC ................................. 209
PRE-SAFE ®
(anticipatory occu-
pant protection) ............................... 59
PRE-SAFE ®
Brake ............................. 77
PRE-SAFE ®
PLUS (anticipatory
occupant protection PLUS) .............. 59
Reversing camera .......................... 217 ROAD SURFACE SCAN .................. 206
SPEEDTRONIC ............................... 189
Traffic Sign Assist .......................... 227
Mercedes-Benz Service Centre
see Qualified specialist workshop
Message memory (on-board com-
puter) .................................................. 265
Messages
see Display messages
see Warning and indicator lamps
Mirror turn signal
Cleaning ......................................... 347
Mirrors
see Exterior mirrors
see Rear-view mirror
see Vanity mirror (in sun visor)
Mobile phone
Frequencies ................................... 400
Installation ..................................... 400
Menu (on-board computer) ............ 254
Notes/placing in the bracket ......... 326
Transmission output (maximum) .... 400
Modifying the programming (key) ..... 86
MOExtended tyres ............................. 356
Motorway mode ................................ 127
MP3
Operating ....................................... 253
Multifunction display
Function/note s............................. 244
Permanent display ......................... 262
Multifunction steering wheel
Operating the on-board compute r..2 43
Overview .......................................... 34 N
Navigation Menu (on-board computer) ............ 249
Night View Assist Plus
Activating/deactivating ................. 231
Cleaning ......................................... 349
Display message ............................ 288
Function/notes ............................ .230
Problem (fault) ............................... 233
Switching automatic activation
on/off ............................................ 257
Notes on running in a new vehicle .. 15814
Index
Page 23 of 413
Tyre pressure loss warning
General notes ................................ 384
Important safety notes .................. 384
Restarting ...................................... 385
Tyre pressure monitor
Checking the tyre pressure elec-
tronically ........................................ 382
Function/note s............................. 381
General notes ................................ 381
Important safety notes .................. 381
Radio type approval for the tyre
pressure monitor ........................... 384
Restarting ...................................... 383
Warning lamp ................................. 310
Warning message .......................... 383
Tyres
Changing a whee l.......................... 385
Checking ........................................ 377
Direction of rotation ...................... 386
Display message ............................ 293
Important safety notes .................. 376
MOExtended tyre s......................... 378
Replacing ....................................... 386
Service life ..................................... 377
Storing ........................................... 386
Summer tyres in winter ................. 378
Tyre size (data ).............................. 391
Tyre tread ...................................... 377
Wheel and tyre combinations ........ 393
see Flat tyre U
Unlocking Emergency unlocking ....................... 93
From inside the vehicle (central
unlocking button) ............................. 91 V
Vanity mirror (in sun visor) .............. 321
Vehicle
Correct use ...................................... 25
Data acquisition ............................... 26
Display message ............................ 295
Electronics ..................................... 400
Equipment ....................................... 23
Implied warranty .............................. 26
Individual settings .......................... 257 Leaving parked up ......................... 181
Locking (in an emergency) ............... 93
Locking (key) ................................... 85
Lowering ........................................ 391
Operating safety .............................. 23
Pulling away ................................... 162
Raising ........................................... 387
Registration ..................................... 25
Securing from rolling away ............ 387
Towing away .................................. 367
Transporting .................................. 370
Unlocking (in an emergency) ........... 93
Unlocking (key) ................................ 85
Vehicle data ................................... 408
Vehicle dimensions ........................... 408
Vehicle emergency locking ................ 93
Vehicle identification number
see VIN
Vehicle identification plate .............. 402
Vehicle level
Active Body Control ABC ............... 204
Display message ............................ 285
Vehicle maintenance
see ASSYST PLUS
Vehicle tool kit .................................. 355
Video
Operating the DVD ......................... 253
VIN ...................................................... 402 W
Warning and indicator lamps ABS ................................................ 302
Brakes ........................................... 301
Distance warning signal ................. 309
ESP ®
.............................................. 304
ESP ®
OFF ....................................... 305
LIM (cruise control )........................ 186
LIM (DISTRONIC PLUS) .................. 193
LIM (variable SPEEDTRONIC) ......... 189
Overview .......................................... 33
Parking brake ................................ 306
PASSENGER AIR BAG ...................... 43
Reserve fuel ................................... 307
Seat belt ........................................ 300
Steering ......................................... 311
Tyre pressure monitor ................... 310
Warning triangle ................................ 35420
Index
Page 28 of 413
G
WARNING
If you connect equipment to a diagnostics
connection in the vehicle, it can affect the
operation of the vehicle systems. This may
affect the operating safety of the vehicle.
There is a risk of an accident.
Do not connect any equipment to a diagnos-
tics connection in the vehicle. G
WARNING
Objects in the driver's footwell may restrict
the clearance around the pedals or block a
depressed pedal. This jeopardises the oper-
ating and road safety of the vehicle. There is a risk of an accident.
Stow all objects securely in the vehicle so that
they do not get into the driver's footwell.
Always fit the floormats securely and as pre-
scribed in order to ensure that there is always sufficient room for the pedals. Do not use
loose floormats and do not place several floor- mats on top of one another.
! If the engine is switched off and equip-
ment on the diagnostics connection is
used, the starter battery may discharge.
Connecting equipment to the diagnostics
connection can lead to emissions monitoring information being reset, for example. This
may lead to the vehicle failing to meet the
requirements of the next emissions test dur-
ing the main inspection. Qualified specialist workshop
A qualified specialist workshop has the nec-
essary special skills, tools and qualifications
to correctly carry out any necessary work on
your vehicle. This particularly applies to work
relevant to safety.
Observe the notes in the Service Booklet.
Always have the following work carried out at a qualified specialist workshop:
R work relevant to safety
R service and maintenance work R
repair work
R modifications, installations and conver-
sions
R work on electronic components
Mercedes-Benz recommends that you use a
Mercedes-Benz Service Centre. Vehicle registration
Mercedes-Benz may ask its Service Centres
to carry out technical inspections on certain
vehicles. The quality or safety of the vehicle is
improved as a result of the inspection.
Mercedes-Benz can only inform you about
vehicle checks if it has your registration data.
It is possible that your vehicle has not yet
been registered in your name in the following
cases:
R if your vehicle was not purchased at an
authorised specialist dealer.
R if your vehicle has not yet been examined at
a Mercedes-Benz Service Centre.
It is advisable to register your vehicle with a
Mercedes-Benz Service Centre.
Inform Mercedes-Benz as soon as possible
about any change in address or vehicle own-
ership. You can do this at a Mercedes-Benz
Service Centre, for example. Correct use
If you remove any warning stickers, you or
others could fail to recognise certain dangers.
Leave warning stickers in position.
Observe the following information when driv- ing your vehicle:
R the safety notes in this manual
R the technical data in this manual
R traffic rules and regulations
R laws and safety standards pertaining to
motor vehicles Introduction
25 Z
Page 33 of 413
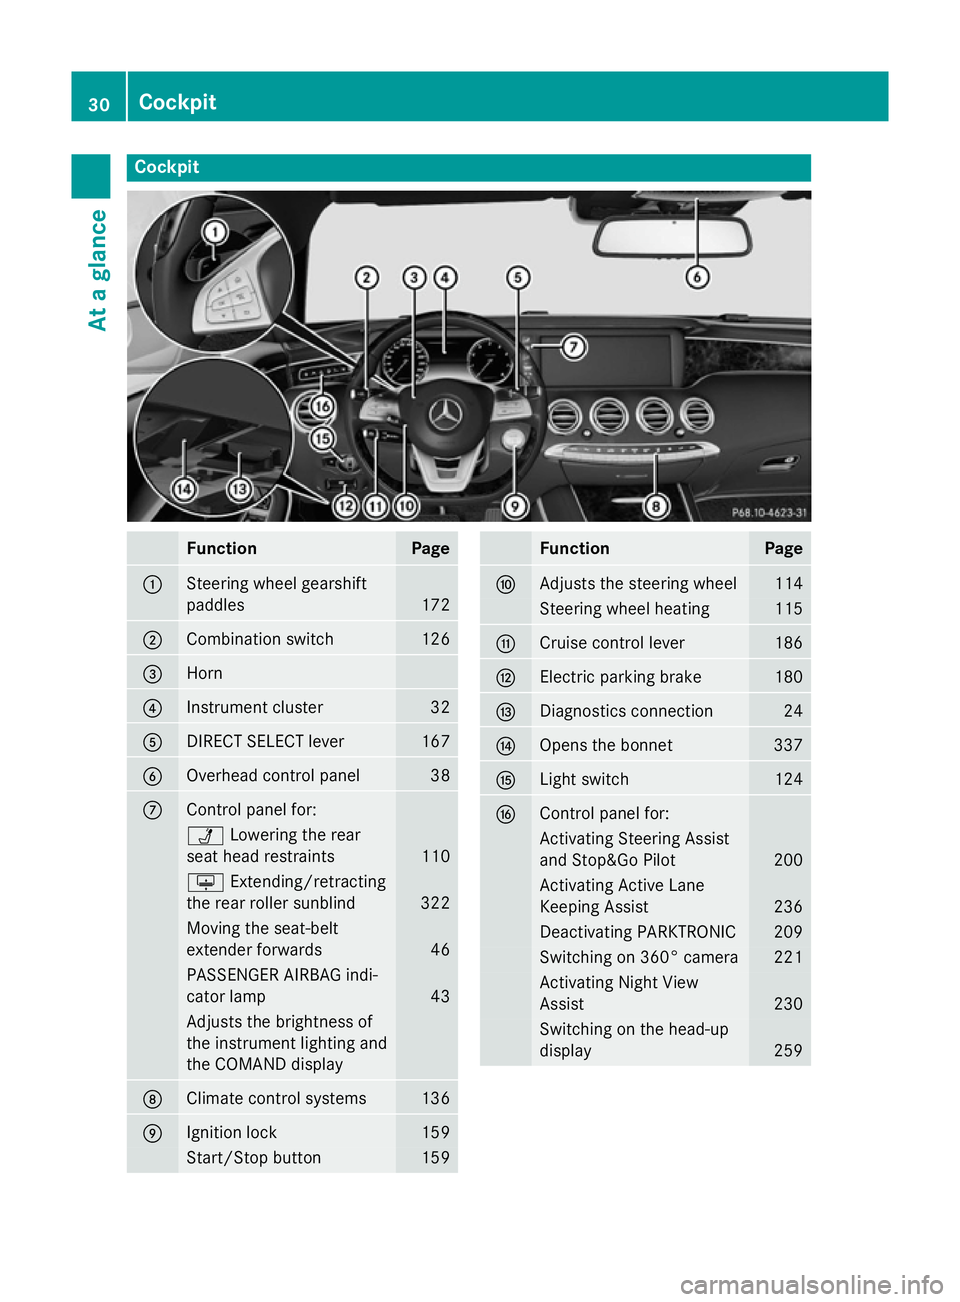
Cockpit
Function Page
:
Steering wheel gearshift
paddles
172
;
Combination switch 126
=
Horn
?
Instrument cluster 32
A
DIRECT SELECT lever 167
B
Overhead control panel 38
C
Control panel for:
Ü
Lowering the rear
seat head restraints 110
u
Extending/retracting
the rear roller sunblind 322
Moving the seat-belt
extender forwards 46
PASSENGER AIRBAG indi-
cator lamp
43
Adjusts the brightness of
the instrument lighting and
the COMAND display
D
Climate control systems 136
E
Ignition lock 159
Start/Stop button 159 Function Page
F
Adjusts the steering wheel 114
Steering wheel heating 115
G
Cruise control lever 186
H
Electric parking brake 180
I
Diagnostics connection 24
J
Opens the bonnet 337
K
Light switch 124
L
Control panel for:
Activating Steering Assist
and Stop&Go Pilot
200
Activating Active Lane
Keeping Assist 236
Deactivating PARKTRONIC 209
Switching on 360° camera 221
Activating Night View
Assist 230
Switching on the head-up
display
25930
CockpitAt a glance
Page 34 of 413
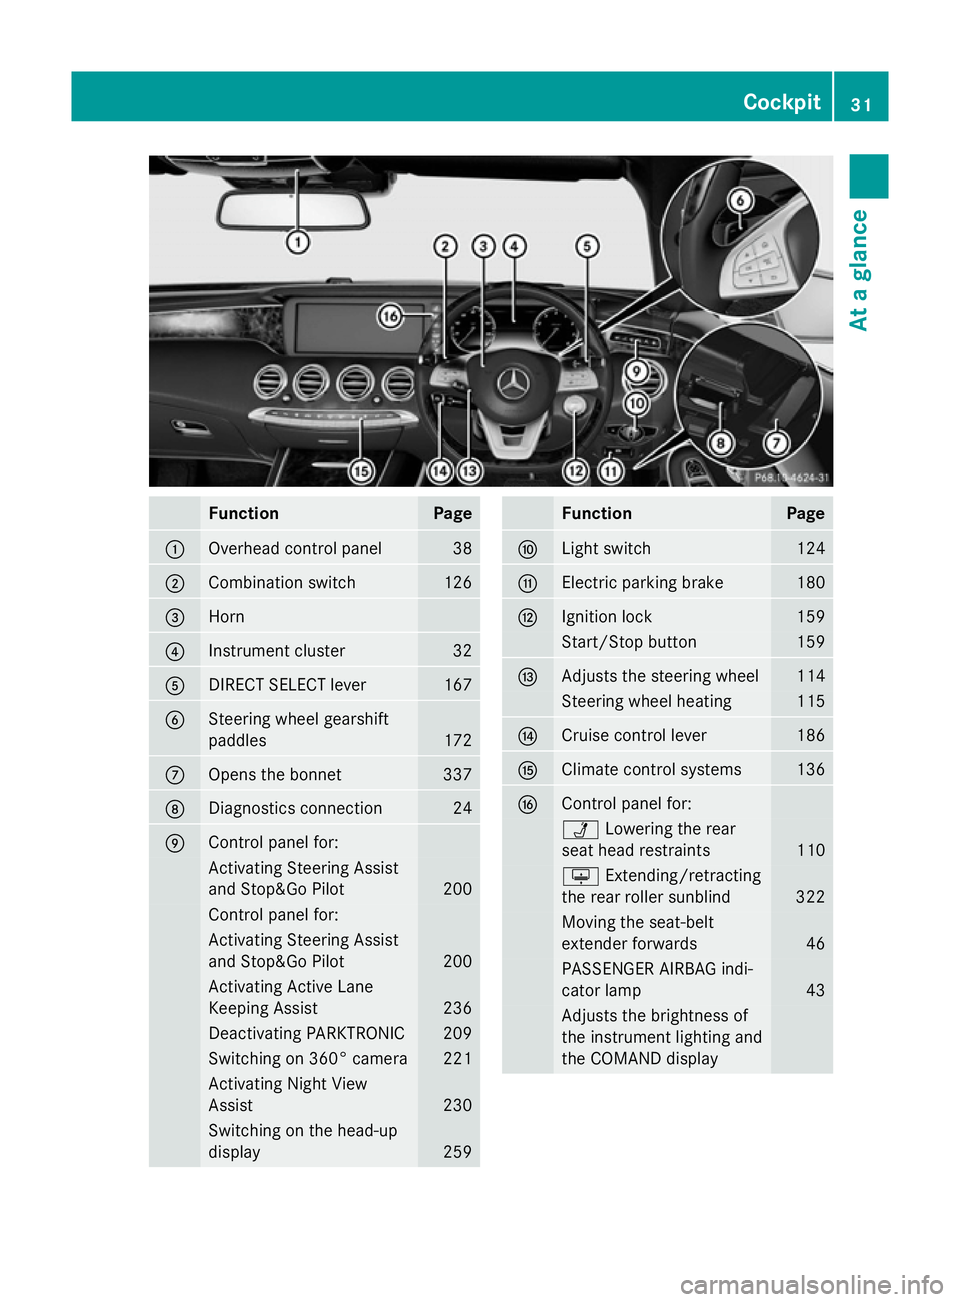
Function Page
:
Overhead control panel 38
;
Combination switch 126
=
Horn
?
Instrument cluster 32
A
DIRECT SELECT lever 167
B
Steering wheel gearshift
paddles
172
C
Opens the bonnet 337
D
Diagnostics connection 24
E
Control panel for:
Activating Steering Assist
and Stop&Go Pilot 200
Control panel for:
Activating Steering Assist
and Stop&Go Pilot
200
Activating Active Lane
Keeping Assist
236
Deactivating PARKTRONIC 209
Switching on 360° camera 221
Activating Night View
Assist
230
Switching on the head-up
display
259 Function Page
F
Light switch 124
G
Electric parking brake 180
H
Ignition lock 159
Start/Stop button 159
I
Adjusts the steering wheel 114
Steering wheel heating 115
J
Cruise control lever 186
K
Climate control systems 136
L
Control panel for:
Ü
Lowering the rear
seat head restraints 110
u
Extending/retracting
the rear roller sunblind 322
Moving the seat-belt
extender forwards
46
PASSENGER AIRBAG indi-
cator lamp
43
Adjusts the brightness of
the instrument lighting and
the COMAND display Cockpit
31At a glance
Page 42 of 413
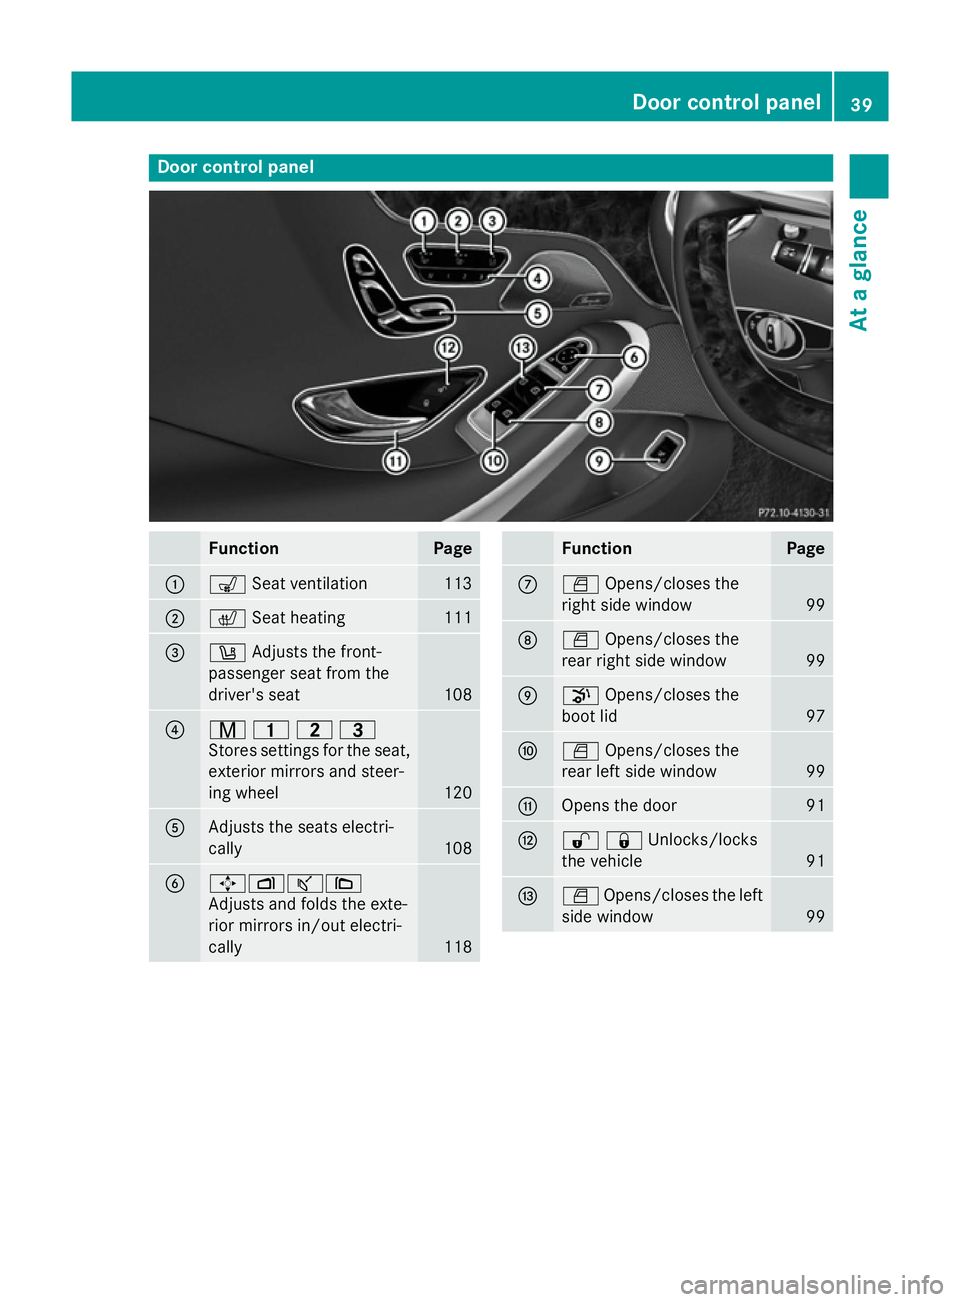
Door control panel
Function Page
:
s
Seat ventilation 113
;
c
Seat heating 111
=
w
Adjusts the front-
passenger seat from the
driver's seat 108
?
r
45=
Stores settings for the seat, exterior mirrors and steer-
ing wheel 120
A
Adjusts the seats electri-
cally
108
B
7Zª\
Adjusts and folds the exte-
rior mirrors in/out electri-
cally 118 Function Page
C
W
Opens/closes the
right side window 99
D
W
Opens/closes the
rear right side window 99
E
p
Opens/closes the
boot lid 97
F
W
Opens/closes the
rear left side window 99
G
Opens the door 91
H
%&Unlocks/locks
the vehicle
91
I
W
Opens/closes the left
side window 99Door control panel
39At a glance
Page 47 of 413
deactivation system" (Y
page 51) and on
"Children in the vehicle" (Y page 60).
R Children in a forward-facing child
restraint system: depending on the instal-
led child restraint system, the age and size of the child the front-passenger front airbag
is either disabled or enabled. Therefore,
always observe the information on the
"Automatic front-passenger front airbag
deactivation system" (Y page 51) and on
"Children in the vehicle" (Y page 60).
R All other persons: the PASSENGER AIR
BAG ON indicator lamp must be lit. The
front-passenger front airbag is enabled.
Depending on the build of the person on the front-passenger seat, the PASSENGER AIR
BAG OFF indicator lamp may light up. The
front-passenger front airbag is disabled. It
will then not be deployed in the event of an
accident. In this case, the front-passenger
seat should not be used.
Always observe the information on the
"Automatic front-passenger front airbag
deactivation system" (Y page 51) as well
as on "Seat belts" (Y page 44) and "Air-
bags" (Y page 48). There you can also find
information on the correct seat position. Seat belts
Introduction A correctly fastened seat belt is the most
effective means of limiting the movement of a
vehicle occupant during a collision or in the
event that the vehicle overturns. This reduces
the risk of vehicle occupants coming into con- tact with parts of the vehicle interior or beingejected from it. Furthermore, the seat belt
helps to keep the vehicle occupant in the best
position in relation to a deployed airbag.
The seat belt system consists of:
R seat belts
R belt tensioners and belt force limiters If the seat belt is pulled quickly or suddenly on
the seat-belt extender, the inertia reel locks.
The belt strap cannot be pulled out further.
In an impact, the belt tensioner tightens the
belt to pull it close to the body. It does not pull
the vehicle occupant back in the direction of
the seat backrest, however.
In addition, the belt tensioner cannot com-
pensate for the seat position being incorrect
or for an incorrectly worn seat belt.
When triggered, seat belt force limiters help
to reduce the peak force exerted by the seat
belt on the vehicle occupant.
The belt force limiters on the front seats are
synchronised with the front airbags, which
take on a part of the deceleration force. This
helps to reduce the forces to which vehicle
occupants are subjected during an accident.
! If the co-driver's seat is not occupied, do
not engage the seat belt tongue in the
buckle on the co-driver's seat. Otherwise,
the belt tensioner could be triggered in the
event of an accident and would have to be
replaced.
Important safety notes G
WARNING
The seat belt cannot perform its intended pro- tective function if it is not fastened correctly. Also, an improperly fastened seat belt can
cause additional injuries in the event of an
accident, sudden braking or abrupt changes
of direction. There is an increased risk of
injury, possibly even fatal.
Always make sure that all vehicle occupants
are wearing their seat belt properly and are
seated correctly. G
WARNING
The seat belt does not offer the intended level of protection if you have not moved the back-
rest to an almost vertical position. When brak-
ing or in the event of an accident, you could
slide underneath the seat belt and sustain
abdomen or neck injuries, for example. This 44
Occupant safetySafety
Page 49 of 413
The lap belt must always be routed across
your hip joints and not across your abdo-
men. This applies particularly to pregnant
women. If necessary, push the lap belt
down to your hip joint and pull it tight using the shoulder section of the belt.
R the seat belt is not routed across sharp,
pointed or fragile objects.
If you have such items located on or in your
clothing, e.g. pens, keys or spectacles,
store these in a suitable place.
R only one person is using a seat belt.
Infants and children must never travel sit-
ting on the lap of a vehicle occupant. In the
event of an accident, they could be crushed between the vehicle occupant and seat
belt.
R objects are never secured with a seat belt if
the seat belt is also being used by one of the
vehicle's occupants.
Seat belts are only intended to secure and
restrain vehicle occupants. Always observe
the "Loading guidelines" for securing objects,
luggage or loads (Y page 314).
Fastening seat belts Observe the safety notes on seat belts
(Y
page 44) and the notes on the correct use
of the seat belt (Y page 45).G
WARNING
If the seat-belt extender extends during the
journey, the seat belt is not sitting correctly
across your body. The seat belt then cannot
perform its intended protective function.
There is an increased risk of injury, possibly
even fatal.
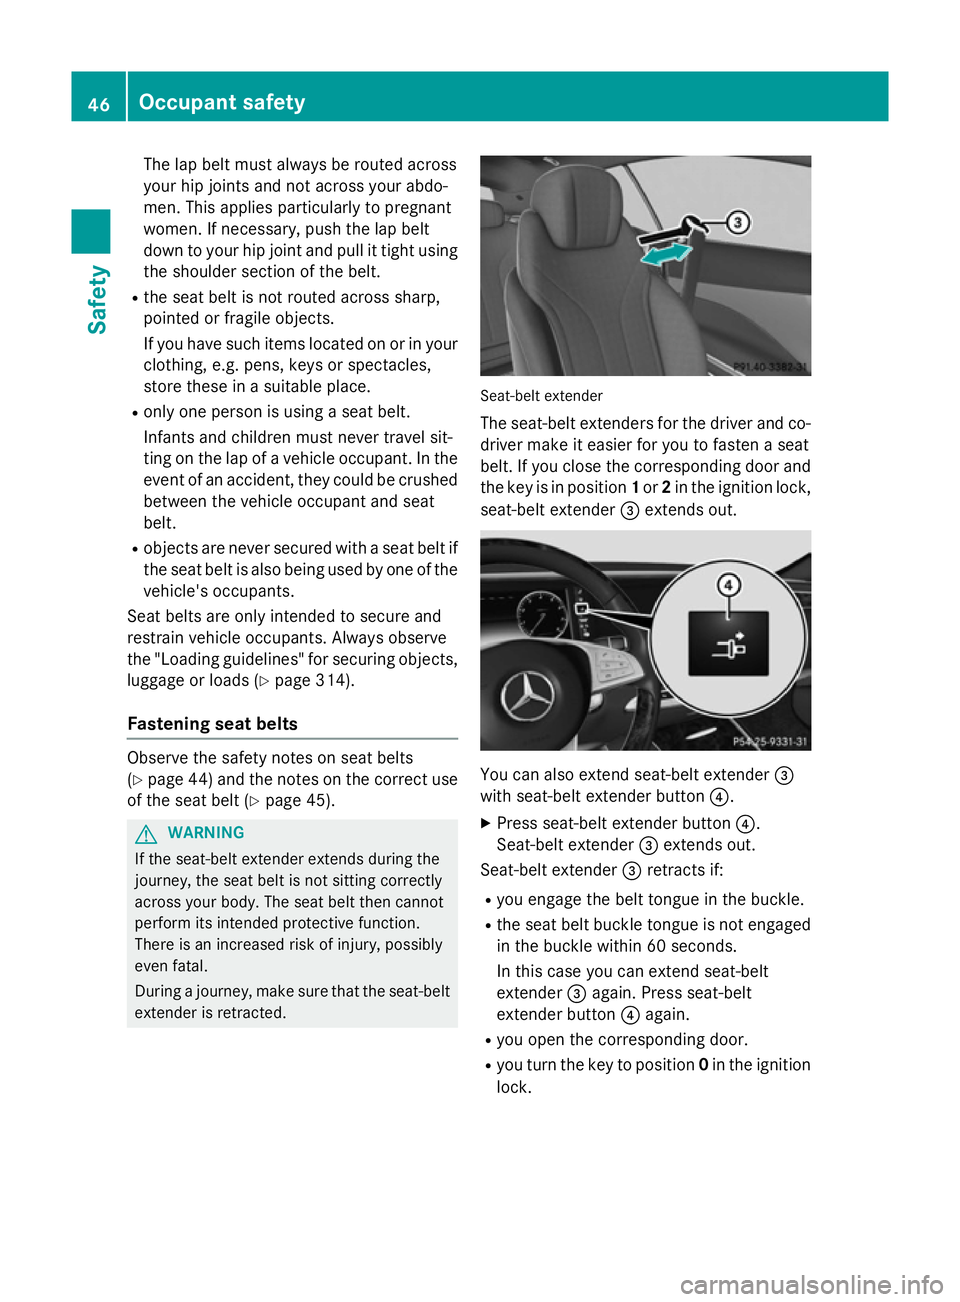
During a journey, make sure that the seat-belt extender is retracted. Seat-belt extender
The seat-belt extenders for the driver and co- driver make it easier for you to fasten a seat
belt. If you close the corresponding door and
the key is in position 1or 2in the ignition lock,
seat-belt extender =extends out. You can also extend seat-belt extender
=
with seat-belt extender button ?.
X Press seat-belt extender button ?.
Seat-belt extender =extends out.
Seat-belt extender =retracts if:
R you engage the belt tongue in the buckle.
R the seat belt buckle tongue is not engaged
in the buckle within 60 seconds.
In this case you can extend seat-belt
extender =again. Press seat-belt
extender button ?again.
R you open the corresponding door.
R you turn the key to position 0in the ignition
lock. 46
Occupant safetySafety