2014 MERCEDES-BENZ S-CLASS COUPE engine
[x] Cancel search: enginePage 210 of 413
R
there is glare, e.g. from the sun or from
oncoming traffic
R the windscreen is dirty, misted up or cov-
ered, for instance by a sticker, in the vicinity of the camera
R the road surface has no texture or is reflec-
tive, e.g. in the case of newly laid asphalt,
concrete slabs or puddles
R the distance to the vehicle in front is too
short
R sections of the route have a very small
radius of curvature
R you accelerate hard or brake sharply AIRMATIC
General notes AIRMATIC is an air suspension system with
variable damping for improved driving com-
fort. All-round level control ensures the best
possible suspension and constant ground
clearance, even with a laden vehicle. When
you drive fast, the vehicle is lowered auto-
matically to improve driving safety and to
reduce fuel consumption. There is also the
option to manually adjust the vehicle level.
AIRMATIC consists of level setting, level con-
trol and the Adaptive Damping System ADS
PLUS.
Important safety notes G
WARNING
People's limbs may become trapped if they
are located underneath the vehicle or
between the vehicle body and the tyres when the vehicle is lowering. There is a danger of
injury.
When lowering the vehicle, make sure no one
is underneath the vehicle or in the immediate vicinity of the wheel arches. Vehicle level Setting the raised vehicle level
It is possible to choose between the "Normal"
and "Raised" vehicle levels. Select the "Nor-
mal" setting for normal road surfaces and
"Raised" for driving with snow chains or on
particularly poor road surfaces. Your selec-
tion remains stored even if you remove the
key from the ignition lock.
X Start the engine.
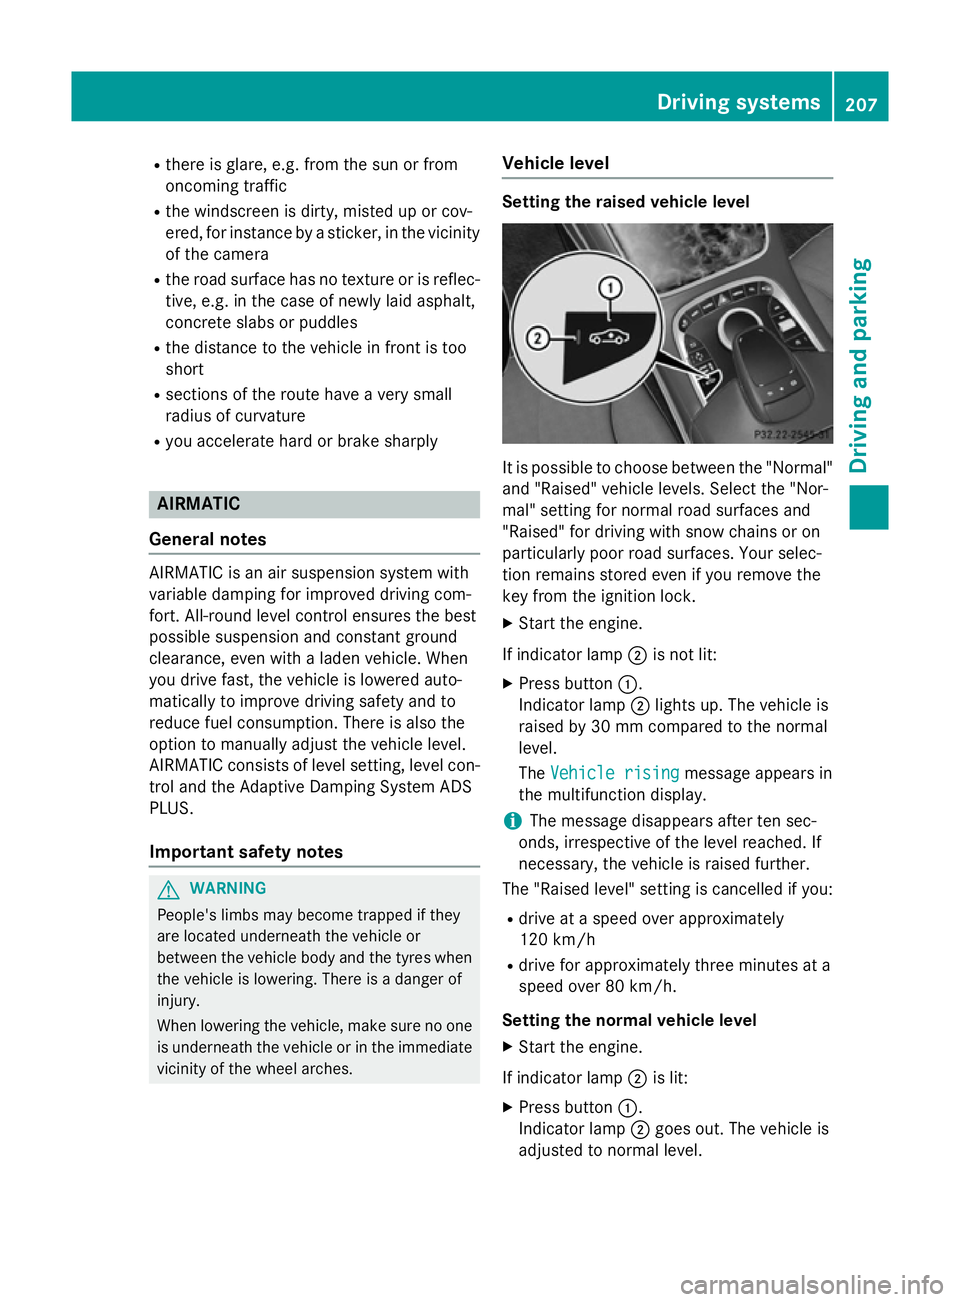
If indicator lamp ;is not lit:
X Press button :.
Indicator lamp ;lights up. The vehicle is
raised by 30 mm compared to the normal
level.
The Vehicle rising
Vehicle rising message appears in
the multifunction display.
i The message disappears after ten sec-
onds, irrespective of the level reached. If
necessary, the vehicle is raised further.
The "Raised level" setting is cancelled if you:
R drive at a speed over approximately
120 km/h
R drive for approximately three minutes at a
speed over 80 km/h.
Setting the normal vehicle level X Start the engine.
If indicator lamp ;is lit:
X Press button :.
Indicator lamp ;goes out. The vehicle is
adjusted to normal level. Driving systems
207Driving and parking Z
Page 213 of 413
:
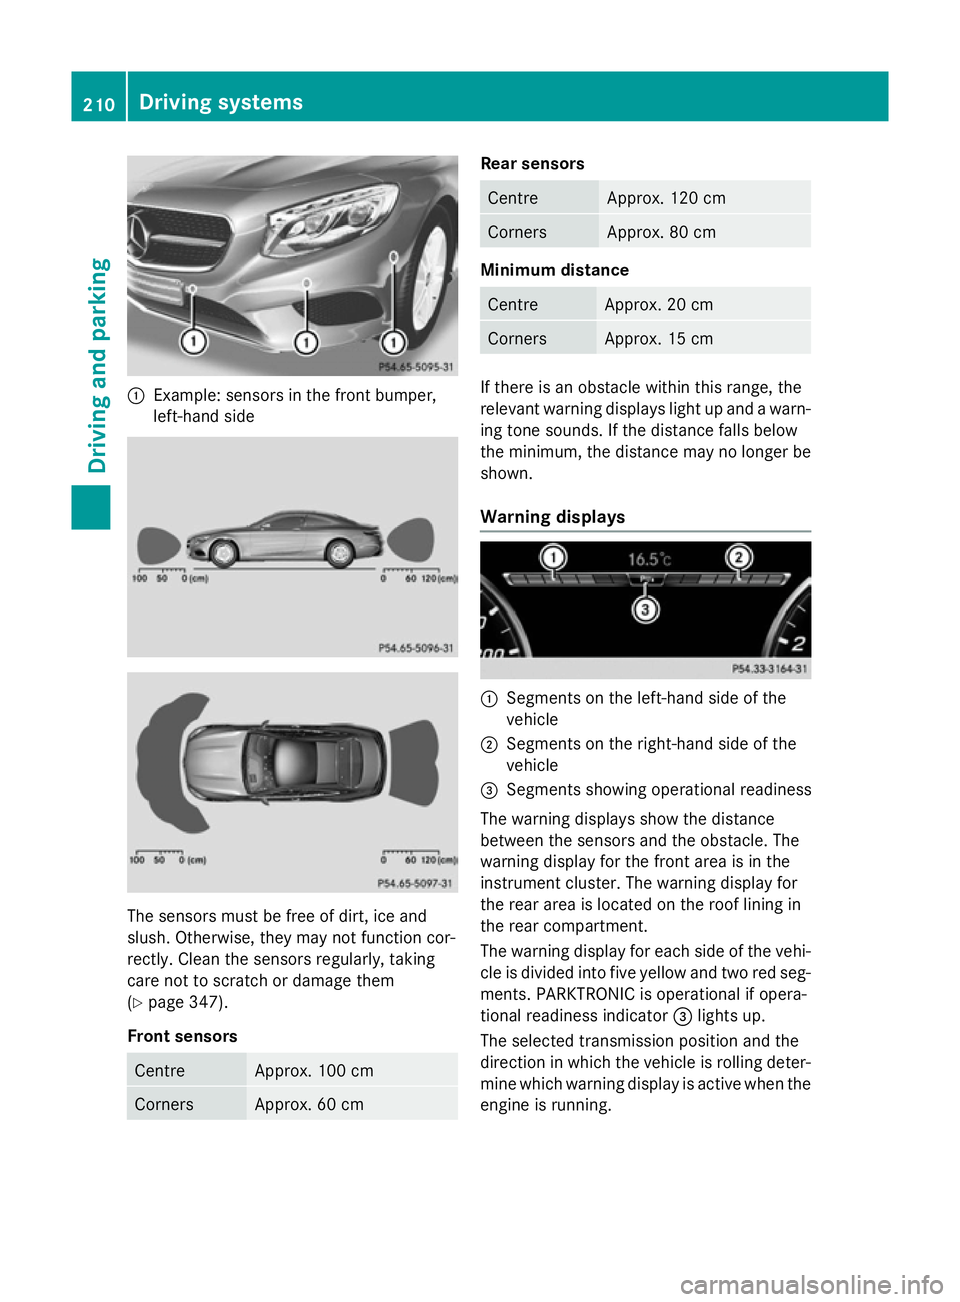
Example: sensors in the front bumper,
left-hand side The sensors must be free of dirt, ice and
slush. Otherwise, they may not function cor-
rectly. Clean the sensors regularly, taking
care not to scratch or damage them
(Y page 347).
Front sensors Centre Approx. 100 cm
Corners Approx. 60 cm Rear sensors
Centre Approx. 120 cm
Corners Approx. 80 cm
Minimum distance
Centre Approx. 20 cm
Corners Approx. 15 cm
If there is an obstacle within this range, the
relevant warning displays light up and a warn- ing tone sounds. If the distance falls below
the minimum, the distance may no longer be
shown.
Warning displays :
Segments on the left-hand side of the
vehicle
; Segments on the right-hand side of the
vehicle
= Segments showing operational readiness
The warning displays show the distance
between the sensors and the obstacle. The
warning display for the front area is in the
instrument cluster. The warning display for
the rear area is located on the roof lining in
the rear compartment.
The warning display for each side of the vehi-
cle is divided into five yellow and two red seg- ments. PARKTRONIC is operational if opera-
tional readiness indicator =lights up.
The selected transmission position and the
direction in which the vehicle is rolling deter- mine which warning display is active when the
engine is running. 210
Driving systemsDriving an
d parking
Page 217 of 413
:
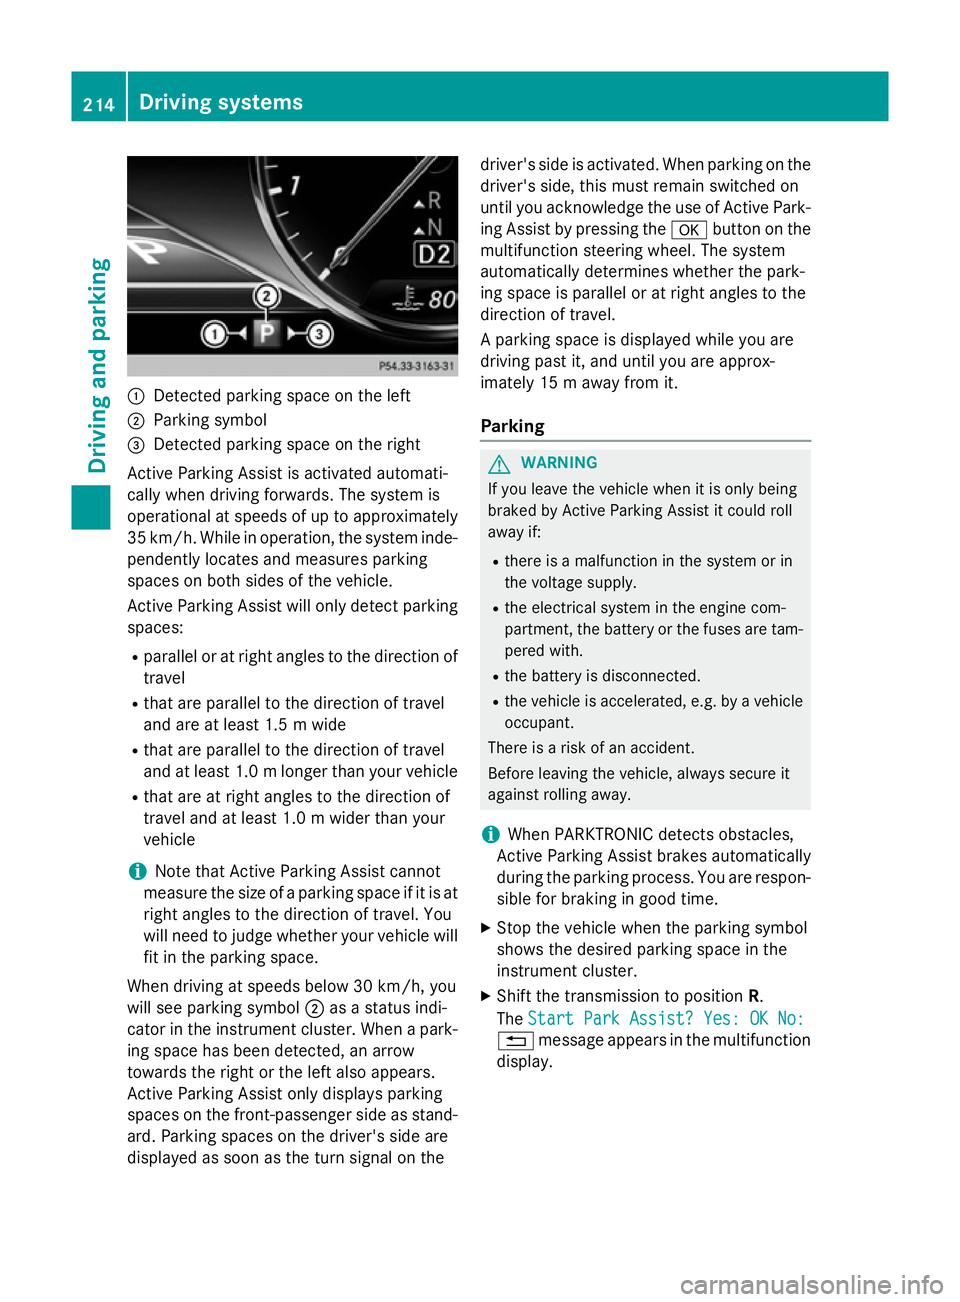
Detected parking space on the left
; Parking symbol
= Detected parking space on the right
Active Parking Assist is activated automati-
cally when driving forwards. The system is
operational at speeds of up to approximately
35 km/h. While in operation, the system inde- pendently locates and measures parking
spaces on both sides of the vehicle.
Active Parking Assist will only detect parkingspaces:
R parallel or at right angles to the direction of
travel
R that are parallel to the direction of travel
and are at least 1.5 m wide
R that are parallel to the direction of travel
and at least 1.0 mlonger than your vehicle
R that are at right angles to the direction of
travel and at least 1.0 m wider than your
vehicle
i Note that Active Parking Assist cannot
measure the size of a parking space if it is at
right angles to the direction of travel. You
will need to judge whether your vehicle will
fit in the parking space.
When driving at speeds below 30 km/h, you
will see parking symbol ;as a status indi-
cator in the instrument cluster. When a park- ing space has been detected, an arrow
towards the right or the left also appears.
Active Parking Assist only displays parking
spaces on the front-passenger side as stand-
ard. Parking spaces on the driver's side are
displayed as soon as the turn signal on the driver's side is activated. When parking on the
driver's side, this must remain switched on
until you acknowledge the use of Active Park- ing Assist by pressing the abutton on the
multifunction steering wheel. The system
automatically determines whether the park-
ing space is parallel or at right angles to the
direction of travel.
A parking space is displayed while you are
driving past it, and until you are approx-
imately 15 m away from it.
Parking G
WARNING
If you leave the vehicle when it is only being
braked by Active Parking Assist it could roll
away if:
R there is a malfunction in the system or in
the voltage supply.
R the electrical system in the engine com-
partment, the battery or the fuses are tam-
pered with.
R the battery is disconnected.
R the vehicle is accelerated, e.g. by a vehicle
occupant.
There is a risk of an accident.
Before leaving the vehicle, always secure it
against rolling away.
i When PARKTRONIC detects obstacles,
Active Parking Assist brakes automatically
during the parking process. You are respon-
sible for braking in good time.
X Stop the vehicle when the parking symbol
shows the desired parking space in the
instrument cluster.
X Shift the transmission to position R.
The Start Park Assist? Yes: OK No:
Start Park Assist? Yes: OK No:
% message appears in the multifunction
display. 214
Driving syste
msDriving and parking
Page 219 of 413
vehicle parallel to the direction of travel using
Active Parking Assist.
i If PARKTRONIC detects obstacles, Active
Parking Assist brakes automatically whilst
the vehicle exits the parking space. You are
responsible for braking in good time.
X Start the engine.
X Switch on the turn signal in the direction
you are pulling away.
X Shift the transmission to position Dor R.
The Start Park Assist? Yes: OK No: Start Park Assist? Yes: OK No:
% message appears in the multifunction
display.
X To cancel the procedure: press the%
button on the multifunction steering wheel
or pull away.
or X To exit a parking space using Active
Parking Assist: press theabutton on
the multifunction steering wheel.
The Park Assist active Accelerate
Park Assist active Accelerate
and and brake
brake Observe
Observe surroundings
surroundings mes-
sage appears in the multifunction display.
X Release the multifunction steering wheel.
X Pull away, being ready to brake at all times.
Do not exceed a maximum speed of
approximately 10 km/h when exiting a
parking space. Otherwise, Active Parking
Assist will be cancelled.
X Shift the transmission to position Dor Ras
required or according to the message while
the vehicle is stationary.
Active Parking Assist immediately steers in
the other direction. The Park Assist
Park Assist
active Accelerate and brake active Accelerate and brake
Observe Observe surroundings
surroundings message appears
in the multifunction display.
i You will achieve the best results by wait-
ing for the steering procedure to complete before pulling away. If you reverse after activation, the steering
wheel is moved to the straight-ahead posi- tion.
X Drive forwards and reverse as prompted by
the PARKTRONIC warning displays, several
times if necessary.
Once you have exited the parking space com- pletely, the steering wheel is moved to the
straight-ahead position. You hear a tone and
the Park Assist switched off Park Assist switched off message
appears in the multifunction display. You will
then have to steer and merge into traffic on
your own. PARKTRONIC is still available. You
can take over the steering before the vehicle has exited the parking space completely. This
is useful, for example when you recognise
that it is already possible to pull out of the
parking space.
Cancelling Active Parking Assist X
Stop the movement of the multifunction
steering wheel or steer yourself.
Active Parking Assist will be cancelled at
once. The Park Assist cancelled Park Assist cancelled mes-
sage appears in the multifunction display.
or
X Press the PARKTRONIC button
(Y page 211).
PARKTRONIC is switched off and Active
Parking Assist is immediately cancelled.
The Park Assist cancelled
Park Assist cancelled message
appears in the multifunction display.
Active Parking Assist is cancelled automati-
cally if:
R the electric parking brake is engaged
R transmission position Pis selected
R parking using Active Parking Assist is no
longer possible
R you are driving faster than 10 km/h
R a wheel spins and ESP ®
intervenes or fails.
The ÷ warning lamp lights up in the
instrument cluster.
A warning tone sounds. The parking symbol
disappears and the multifunction display 216
Driving systemsDriving and parking
Page 220 of 413
shows the
Park Assist cancelled
Park Assist cancelled mes-
sage.
When Active Parking Assist is cancelled, you
must steer and brake again yourself.
If a system malfunction occurs, the vehicle is braked to a standstill. To drive on, depress the
accelerator again. Reversing camera
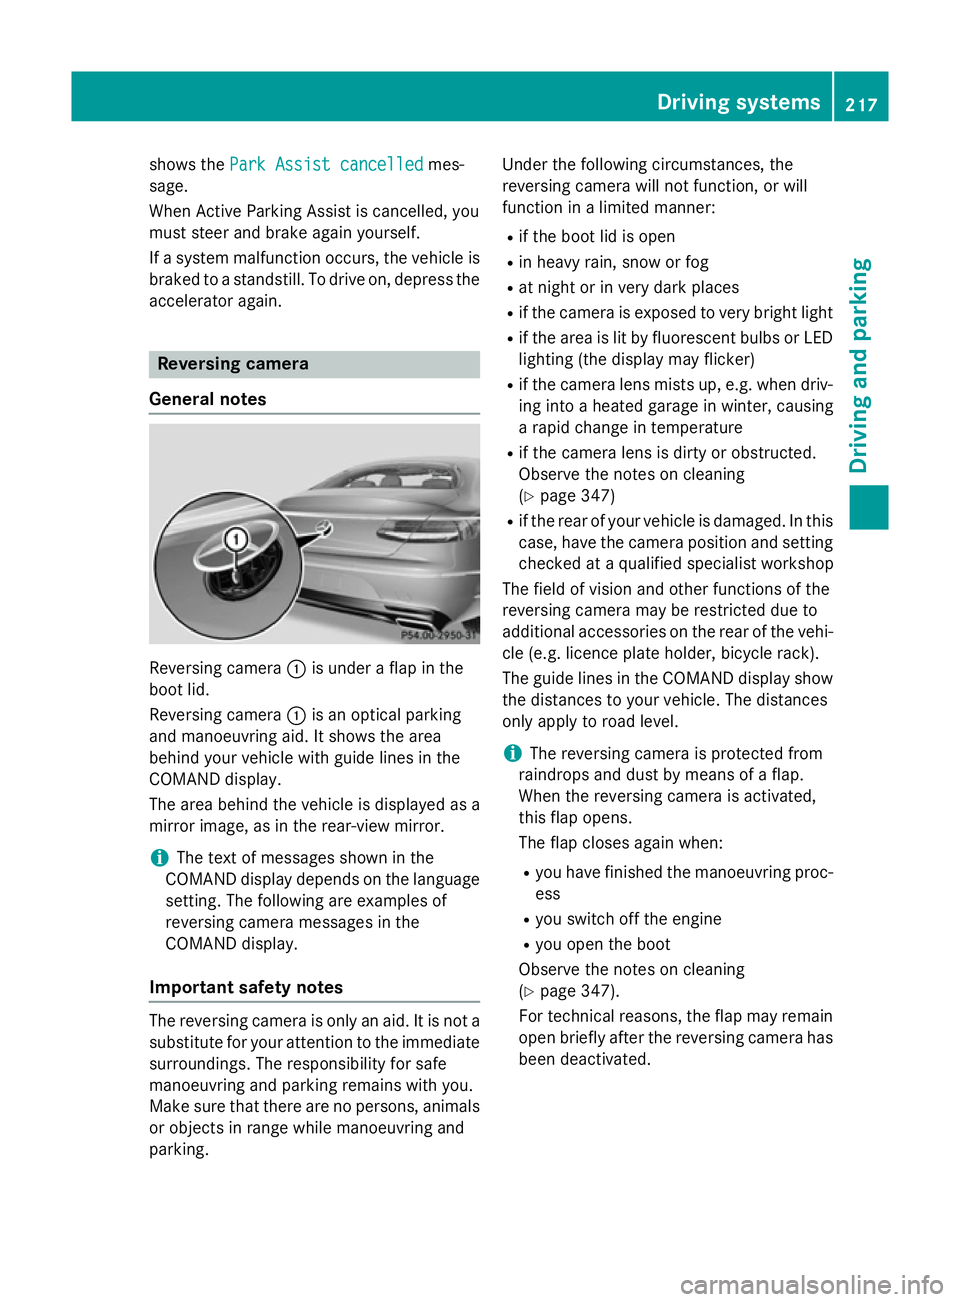
General notes Reversing camera
:is under a flap in the
boot lid.
Reversing camera :is an optical parking
and manoeuvring aid. It shows the area
behind your vehicle with guide lines in the
COMAND display.
The area behind the vehicle is displayed as a
mirror image, as in the rear-view mirror.
i The text of messages shown in the
COMAND display depends on the language setting. The following are examples of
reversing camera messages in the
COMAND display.
Important safety notes The reversing camera is only an aid. It is not a
substitute for your attention to the immediate
surroundings. The responsibility for safe
manoeuvring and parking remains with you.
Make sure that there are no persons, animals
or objects in range while manoeuvring and
parking. Under the following circumstances, the
reversing camera will not function, or will
function in a limited manner:
R if the boot lid is open
R in heavy rain, snow or fog
R at night or in very dark places
R if the camera is exposed to very bright light
R if the area is lit by fluorescent bulbs or LED
lighting (the display may flicker)
R if the camera lens mists up, e.g. when driv-
ing into a heated garage in winter, causing
a rapid change in temperature
R if the camera lens is dirty or obstructed.
Observe the notes on cleaning
(Y page 347)
R if the rear of your vehicle is damaged. In this
case, have the camera position and setting checked at a qualified specialist workshop
The field of vision and other functions of the
reversing camera may be restricted due to
additional accessories on the rear of the vehi-
cle (e.g. licence plate holder, bicycle rack).
The guide lines in the COMAND display show
the distances to your vehicle. The distances
only apply to road level.
i The reversing camera is protected from
raindrops and dust by means of a flap.
When the reversing camera is activated,
this flap opens.
The flap closes again when:
R you have finished the manoeuvring proc-
ess
R you switch off the engine
R you open the boot
Observe the notes on cleaning
(Y page 347).
For technical reasons, the flap may remain
open briefly after the reversing camera has been deactivated. Driving systems
217Driving and parking Z
Page 225 of 413
You are always responsible for safety, and
must always pay attention to your surround-
ings when parking and manoeuvring. This
applies to the areas behind, in front of and
beside the vehicle. You could otherwise
endanger yourself and others.
The 360° camera will not function or will
function only in a limited manner:
R if the doors are open
R if the exterior mirrors are folded in
R if the boot lid is open
R in heavy rain, snow or fog
R at night or in very dark places
R if the cameras are exposed to very bright
light
R if the area is lit by fluorescent bulbs or LED
lighting (the display may flicker)
R if the camera lenses mist up, e.g. when
driving into a heated garage in winter, caus- ing a rapid change in temperature
R if the camera lenses are dirty or covered.
Observe the notes on cleaning
(Y page 347)
R if the vehicle components in which the
cameras are fitted are damaged. In this
event, have the camera position and setting
checked at a qualified specialist workshop.
Do not use the 360° camera in this case. You
could otherwise injure others or damage
objects when parking the vehicle.
The guide lines in the COMAND display show the distances to your vehicle. The distances
only apply to road level.
i The camera in the rear area is protected
from raindrops and dust by means of a flap. This flap opens when the 360° camera is
activated.
The flap closes again when:
R you have finished the manoeuvring proc-
ess
R you switch off the engine
R you open the boot
Observe the notes on cleaning
(Y page 347). For technical reasons, the flap may remain
open briefly after the 360° camera has
been deactivated.
Activation conditions The 360° camera image can be displayed if:
R COMAND Online is switched on (see the
separate operating instructions)
R the 360° camera 360° camera function is switched on.
i If the 360° camera is activated at speeds
above approximately 30 km/h, a warning
message appears.
The warning message disappears if:
R the vehicle's speed falls below approx-
imately 30 km/h. The 360° camera is
then activated.
R the message is confirmed with the %
button.
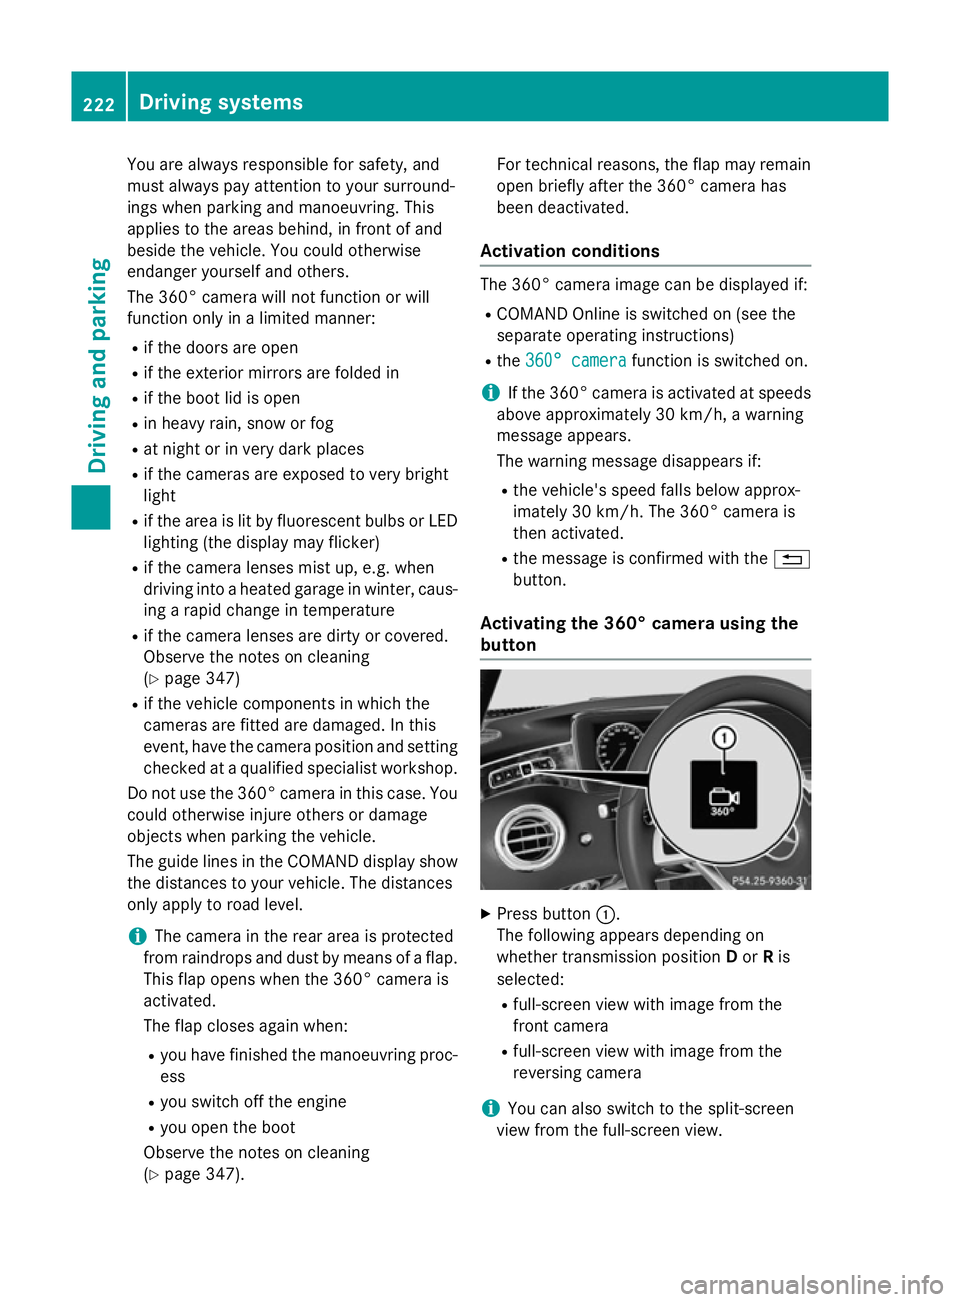
Activating the 360° camera using the
button X
Press button :.
The following appears depending on
whether transmission position Dor Ris
selected:
R full-screen view with image from the
front camera
R full-screen view with image from the
reversing camera
i You can also switch to the split-screen
view from the full-screen view. 222
Driving systemsDriving and parking
Page 229 of 413
Important safety notes
ATTENTION ASSIST is only an aid. It may not
always detect fatigue or lapses in concentra-
tion until too late, or may not detect them at
all. The system is not a substitute for a well-
rested and attentive driver.
The functionality of ATTENTION ASSIST is
restricted, and warnings may be delayed or
not occur at all:
R if the length of the journey is less than
approximately 30 minutes
R if the road condition is poor, e.g. if the sur-
face is uneven or if there are potholes
R if there is a strong side wind
R if you have adopted a sporty driving style
with high cornering speeds or high rates of
acceleration
R if you are predominantly driving at a speed
below 60 km/h or above 200 km/h
R if you are driving with the active Steer
Assist of DISTRONIC PLUS
R if the time has been set incorrectly
R in active driving situations, such as when
you change lanes or change your speed
ATTENTION ASSIST is reset and starts
assessing your tiredness again when you con- tinue your journey if:
R you switch off the engine
R you take off your seat belt and open the
driver's door, e.g. for a change of drivers or
to take a break
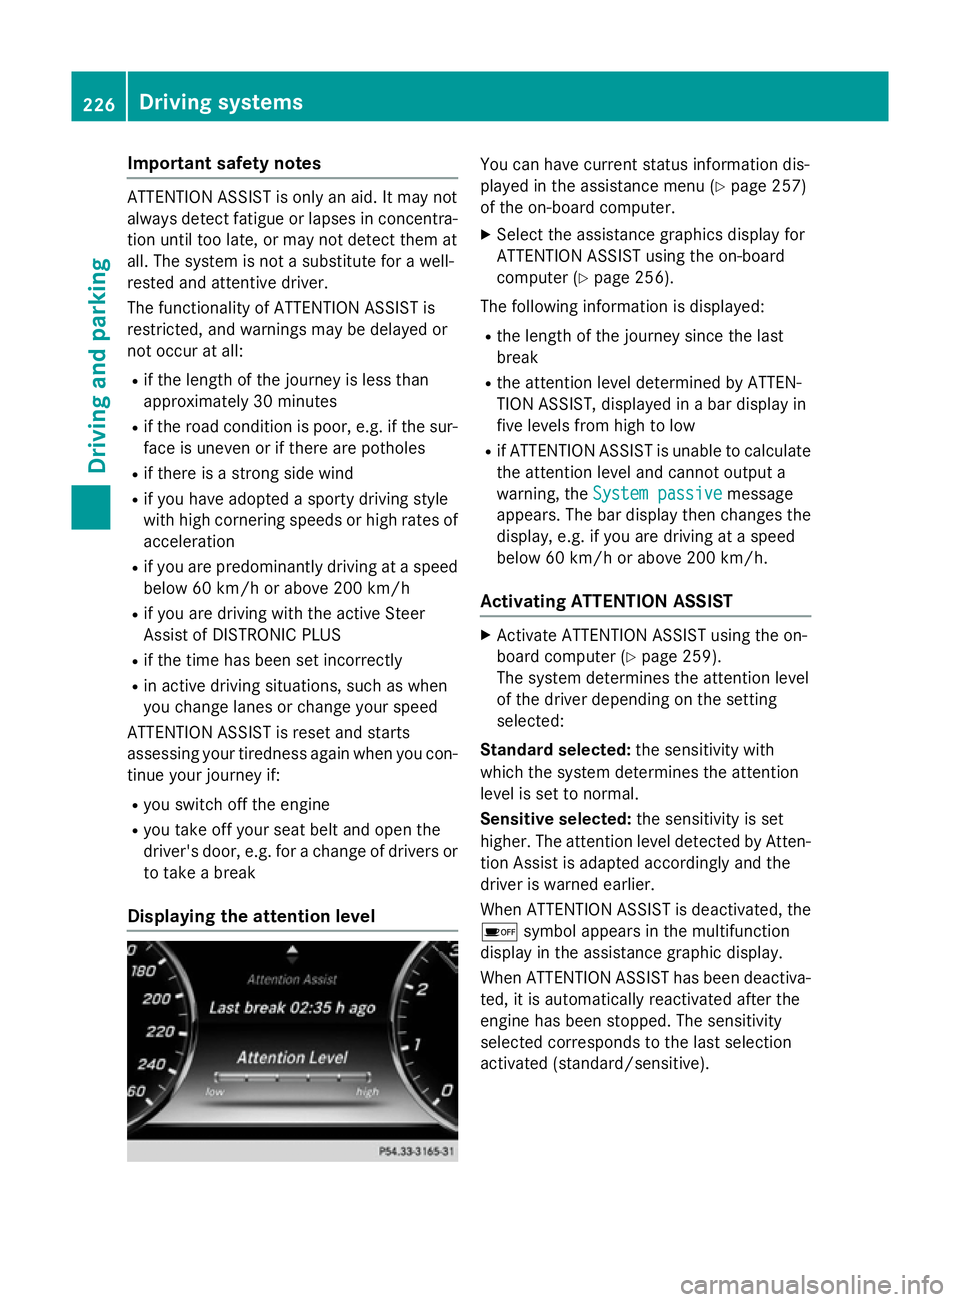
Displaying the attention level You can have current status information dis-
played in the assistance menu (Y
page 257)
of the on-board computer.
X Select the assistance graphics display for
ATTENTION ASSIST using the on-board
computer (Y page 256).
The following information is displayed:
R the length of the journey since the last
break
R the attention level determined by ATTEN-
TION ASSIST, displayed in a bar display in
five levels from high to low
R if ATTENTION ASSIST is unable to calculate
the attention level and cannot output a
warning, the System passive System passive message
appears. The bar display then changes the
display, e.g. if you are driving at a speed
below 60 km/h or above 200 km/h.
Activating ATTENTION ASSIST X
Activate ATTENTION ASSIST using the on-
board computer (Y page 259).
The system determines the attention level
of the driver depending on the setting
selected:
Standard selected: the sensitivity with
which the system determines the attention
level is set to normal.
Sensitive selected: the sensitivity is set
higher. The attention level detected by Atten- tion Assist is adapted accordingly and the
driver is warned earlier.
When ATTENTION ASSIST is deactivated, the é symbol appears in the multifunction
display in the assistance graphic display.
When ATTENTION ASSIST has been deactiva-
ted, it is automatically reactivated after the
engine has been stopped. The sensitivity
selected corresponds to the last selection
activated (standard/sensitive). 226
Driving systemsDriving and pa
rking
Page 234 of 413
Pedestrian recognition
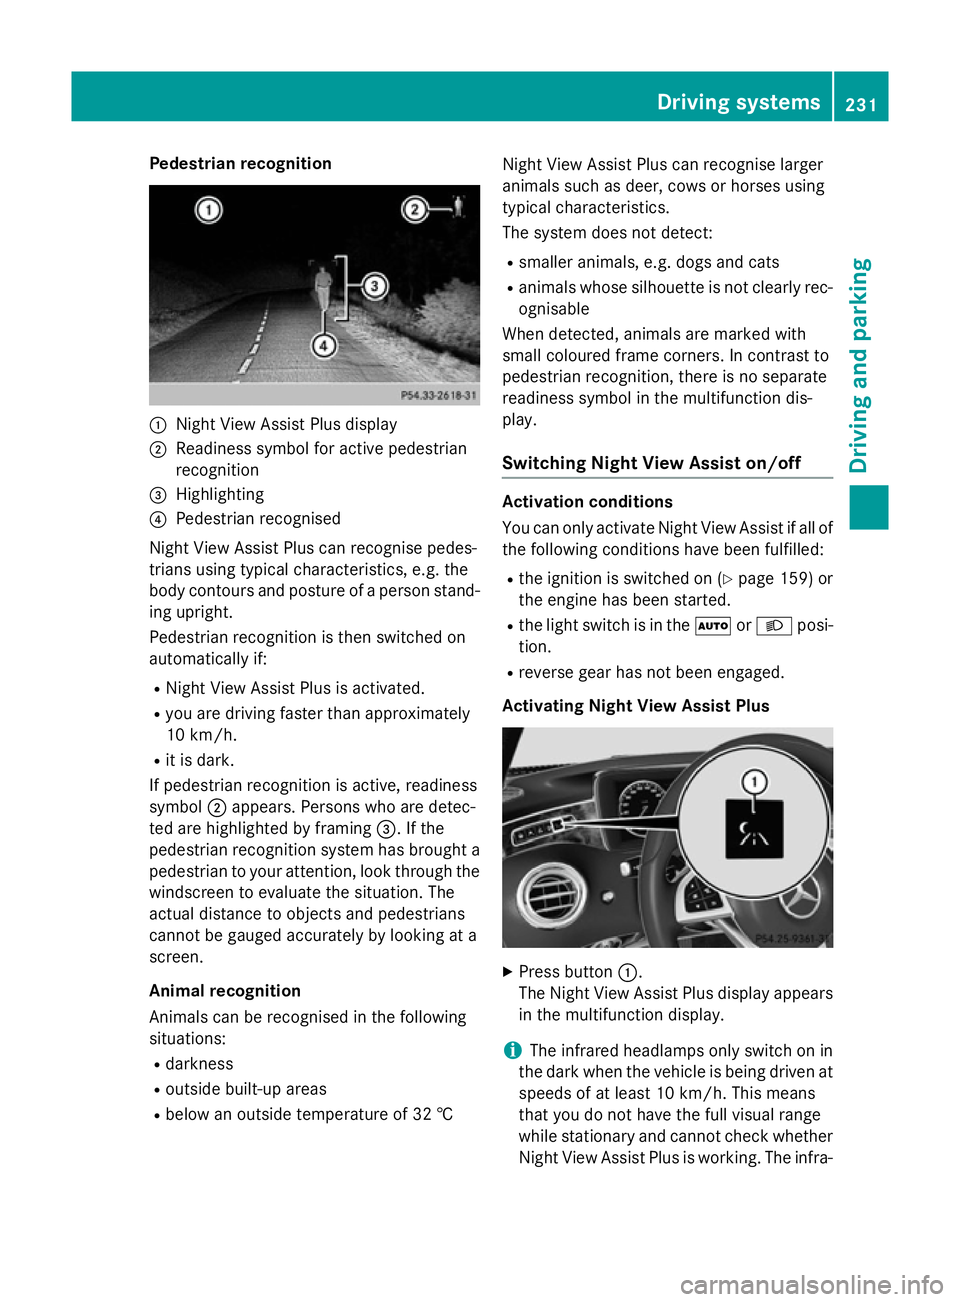
:
Night View Assist Plus display
; Readiness symbol for active pedestrian
recognition
= Highlighting
? Pedestrian recognised
Night View Assist Plus can recognise pedes-
trians using typical characteristics, e.g. the
body contours and posture of a person stand-
ing upright.
Pedestrian recognition is then switched on
automatically if:
R Night View Assist Plus is activated.
R you are driving faster than approximately
10 km/h.
R it is dark.
If pedestrian recognition is active, readiness
symbol ;appears. Persons who are detec-
ted are highlighted by framing =. If the
pedestrian recognition system has brought a
pedestrian to your attention, look through the windscreen to evaluate the situation. The
actual distance to objects and pedestrians
cannot be gauged accurately by looking at a
screen.
Animal recognition
Animals can be recognised in the following
situations:
R darkness
R outside built-up areas
R below an outside temperature of 32 † Night View Assist Plus can recognise larger
animals such as deer, cows or horses using
typical characteristics.
The system does not detect:
R smaller animals, e.g. dogs and cats
R animals whose silhouette is not clearly rec-
ognisable
When detected, animals are marked with
small coloured frame corners. In contrast to
pedestrian recognition, there is no separate
readiness symbol in the multifunction dis-
play.
Switching Night View Assist on/off Activation conditions
You can only activate Night View Assist if all of
the following conditions have been fulfilled:
R the ignition is switched on (Y page 159) or
the engine has been started.
R the light switch is in the ÃorL posi-
tion.
R reverse gear has not been engaged.
Activating Night View Assist Plus X
Press button :.
The Night View Assist Plus display appears in the multifunction display.
i The infrared headlamps only switch on in
the dark when the vehicle is being driven at speeds of at least 10 km/h. This means
that you do not have the full visual range
while stationary and cannot check whether
Night View Assist Plus is working. The infra- Driving systems
231Driving and parking Z