Page 79 of 462

X
To turn the alarm off with the
SmartKey: press the000Cor000B button
on the SmartKey.
The alar mis switched off.
or
X Insert the SmartKey into the ignition lock.
The alarm is switched off.
X To stop the alarm using KEYLESS-GO:
grasp the outside door handle. The
SmartKey must be outside the vehicle.
The alarm is switched off.
or
X Press the Start/Stop button on the
dashboard. The SmartKey must be inside
the vehicle.
The alarm is switched off.
The alarm is not switched off, even if you
close the open door that triggered it, for
example.
i If the alarm stays on for more than
30 seconds, the mbrace emergency call
system automatically notifies the
Customer Assistance Center. This is done
either by text message or data connection.
The emergency call system sends the
message or data provided that:
R you have subscribed to the mbrace
service.
R the mbrace service has been activated
properly.
R the necessary mobile phone network is
available. Theft deterrent locking system
77Safety Z
Page 216 of 462

Range of the sensors
General notes
PARKTRONIC does not take objects into
consideration that are:
R below the detection range, e.g. people,
animals or objects
R above the detection range, e.g.
overhanging loads, truck overhangs or
loading ramps. Side view
Top view
The sensors mus
tbe free from dirt, ice or
slush. They can otherwise not function
correctly. Clean the sensors regularly, taking
care not to scratch or damage them
(Y page 374).
Front sensors Center Approx
.40in (approx.
100cm) Corners Approx. 24in (approx.
60cm) Rea
rsensors Center Approx
.48in (approx.
120cm) Corners Approx. 32in (approx.
80cm)
Minimum distance
Center Approx. 8in (approx. 20cm)
Corners Approx. 6in (approx. 15cm)
If there is an obstacle withi
nthis range, the
relevant warning displays light up and a
warning tone sounds. If the distance falls
below the minimum, the distance may no
longer be shown.
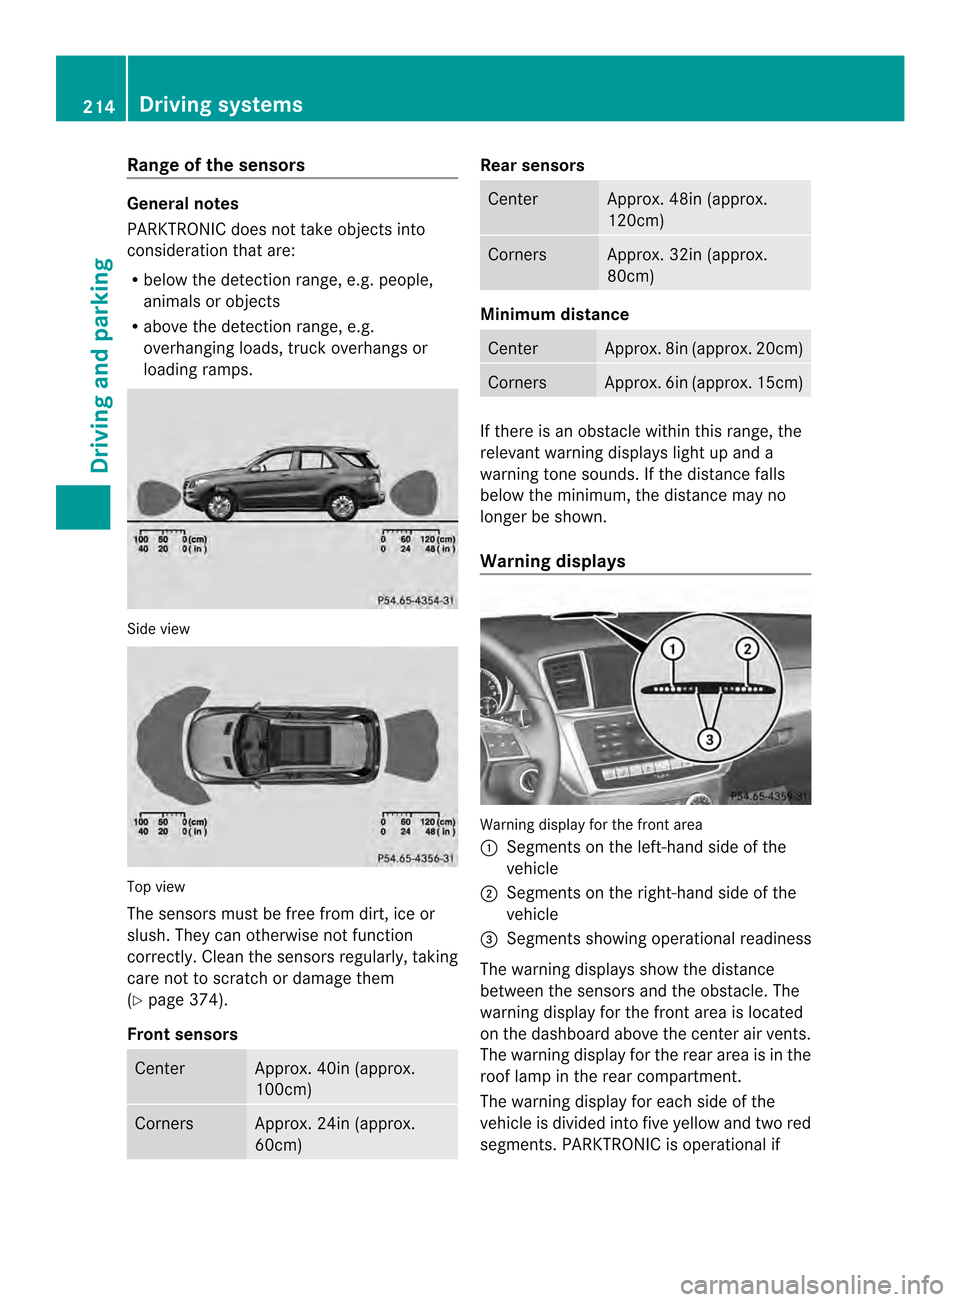
Warning displays Warning display for the front area
0002
Segments on the left-hand side of the
vehicle
0003 Segments on the right-hand side of the
vehicle
0023 Segments showing operational readiness
The warning displays show the distance
between the sensors and the obstacle. The
warning display for the front area is located
on the dashboard above the center air vents.
The warning display for the rear area is in the
roof lamp in the rear compartment.
The warning display for each side of the
vehicle is divided into five yellow and two red
segments. PARKTRONIC is operational if 214
Driving systemsDriving and parking
Page 397 of 462

Blow
nfuses must be replace dwith fuses of
the same rating, which you can recognize by
the color and value. The fuse ratings are listed
in the fuse allocation chart.
If a newly inserted fuse also blows, have the
cause traced and rectified at a qualified
specialist workshop, e.g. an authorized
Mercedes-Ben zCenter. Before changing a fuse
Observe the important safety notes
(Y page 394)
X Secure the vehicle against rolling away
(Y page 179).
X Switch off all electrical consumers.
X Turn the SmartKey to position 0in the
ignition lock and remove it (Y page 157).
On vehicles with KEYLESS-GO, make sure
the ignition is switched off (Y page 158).
All indicator lamps in the instrument cluster
must be off.
The fuses are located in various fuse boxes:
R Fuse box on the front-passenger side of the
dashboard
R Fuse box in the engine compartment on the
right-hand side of the vehicle, when viewed
in the direction of travel
R Fuse box under the rear bench seat
The fuse allocation chart is located in the fuse
box under the rear bench seat (Y page 396).Dashboard fuse box
Observe the important safety notes
(Y page 394)
! Do not use a pointed objec tsuch as a
screwdriver to open the cover in the
dashboard. You could damage the
dashboard or the cover.
! Make sure that no moisture can ente rthe
fuse box when the cover is open. !
When closing the cover, make sure that it
is lying correctly on the fuse box. Moisture
seeping in or dirt could otherwise impair
the operation of the fuses. X
To open: pull cover 0002outwards in the
direction of the arrow and remove it.
X To close: clip in cover 0002on the front of
the dashboard.
X Fold cover 0002inwards until it engages. Fuse box in the engine compartment
Pay attention to the important safety notes
(Y page 394).
! Make sure that no moisture can enter the
fuse box when the cover is open.
! When closing the cover, make sure that it
is lying correctly on the fuse box. Moisture
seeping in or dirt could otherwise impair
the operation of the fuses. Fuses
395Breakdown assistance Z