2014 MERCEDES-BENZ M-Class load capacity
[x] Cancel search: load capacityPage 12 of 462

Exhaus
tcheck ............................... 182
Fuel ................................................ 182
General .......................................... 182
Hydroplaning ................................. 186
Icy road surfaces ........................... 187
Limited braking efficiency on
salted road s................................... 184
Off-road driving .............................. 188
Off-road fording ............................. 186
Snow chains .................................. 401
Symmetrical low bea m.................. 120
Tire ruts ......................................... 190
Towing atrailer .............................. 253
Traveling uphill ............................... 190
Wet road surface ........................... 184
DSR (Downhill Spee dRegulation)
Display message ............................ 304
Function/notes ............................. 246
DVD audio
Operating (on-board computer) .....270
DVD video
Operating (on-board computer) .....270 E
EASY-ENTRY feature Activating/deactivating .................277
Function/notes ............................. 113
EASY-EXIT feature
Crash-responsive ........................... 114
Function/notes ............................. 113
Switching on/off ........................... 277
EASY-PACK load-securing kit ...........340
EBD (electronic brake force
distribution)
Display message ............................ 285
Function/notes ................................ 74
ECO display
Function/notes ............................. 183
On-board computer .......................267
ECO start/stop function
Automatic engine start ..................162
Automatic engine switch-off ..........162
Deactivating/activating .................163
General information .......................161
Important safety notes ..................161
Introduction ................................... 161Electronic Stability Program
see ESP ®
(Electroni cStability Program)
Emergenc yrelease
Driver's door .................................... 88
Vehicle ............................................. 88
Emergency spare wheel
General notes ................................ 436
Important safety notes ..................436
Removing ....................................... 436
Storage location ............................ 436
Technical data ............................... 438
Emergency Tensioning Devices
Function .......................................... .59
Safety guideline s............................. 43
Emergency unlocking
Tailgate ............................................ 93
Emissions control
Service and warranty information ....24
Engine
Check Engine warning lamp ........... 325
Display message ............................ 298
ECO start/stop function ................161
Engine number ............................... 443
Irregularr unning............................ 164
Jump-starting ................................. 389
Starting problems ..........................164
Starting the engine with the
SmartKey ....................................... 159
Starting with KEYLESS-GO .............160
Switching off .................................. 180
Tow-starting (vehicle) ..................... 394
Engine electronics
Problem (malfunction) ...................164
Engine oil
Adding ........................................... 366
Additives ........................................ 449
Checking the oil level ..................... 365
Checking the oil level using the
dipstick .......................................... 365
Display message ............................ 300
Filling capacity ............................... 449
Notes about oil grades ................... 448
Notes on oil level/consumption ....365
Temperature (on-board computer) .278
Viscosity ........................................ 44910
Index
Page 22 of 462

Direction of rotatio
n...................... 422
Display message ............................ 310
Distributio nofthe vehicle
occupants (definition) ....................421
DOT, Tire Identification Number
(TIN) .............................................. .418
DOT (Department of
Transportation) (definition) ............419
GAWR (Gross Axle Weight Rating)
(definition) ..................................... 419
GTW (Gross Trailer Weight)
(definition) ..................................... 419
GVW (Gross Vehicle Weight)
(definition) ..................................... 419
GVWR (Gross Vehicle Weight
Rating) (definition) .........................419
Important safety notes ..................398
Increased vehicle weight due to
optional equipment (definition) ......419
Kilopascal (kPa) (definition) ...........419
Labeling (overview )........................ 415
Load bearing index (definition) ......420
Load index ..................................... 417
Load index (definition) ...................420
M+S tires ....................................... 400
Maximum loaded vehicle weight
(definition) ..................................... 419
Maximum load on a tire (definition) 420
Maximum permissible tire
pressure (definition) ....................... 420
Maximum tire loa d......................... 417
Maximum tire load (definition) .......420
MOExtended tires ..........................400
Optional equipment weight
(definition) ..................................... 420
PSI (pounds per square inch)
(definition) ..................................... 420
Replacing ....................................... 421
Service life ..................................... 400
Sidewall (definition) .......................420
Speed rating (definition) ................419
Storing ........................................... 422
Structure and characteristics
(definition) ..................................... 418
Temperature .................................. 414
TIN (Tire Identification Number)
(definition) ..................................... 420
Tire bea d(definition) ...................... 420Tire pressure (definition)
................420
Tire pressures (recommended )...... 419
Tire size (data) ............................... 426
Tire size designation, load-bearing
capacity, speed rating .................... 415
Tire tread ....................................... 399
Tire tread (definition) .....................420
Total load limit (definition) .............421
Traction ......................................... 414
Traction (definition) .......................421
Trea dwear ..................................... 414
TWR (permissible trailer drawbar
noseweight) (definition) .................421
Uniform Tire Quality Grading
Standard s...................................... 413
Uniform Tire Quality Grading
Standard s(definition) .................... 419
Unladen weight (definition) ............420
Wea rindicato r(definition) .............421
Whee lrim (definition ).................... 419
see Flat tire
Tool
see Vehicle tool kit
Top Tether ............................................ 64
Towing Important safety guidelines ...........391
Installing the towing eye ................392
Removing the towing eye. ..............393
With the rear axle raised ................393
Towing atrailer
Activ eParking Assist ..................... 220
Axle load, permissible ....................456
Cleaning the trailer tow hitch ......... 374
Coupling up atrailer ...................... 256
Decoupling atrailer ....................... 258
Driving tips .................................... 253
ESP ®
(Electronic Stability Program) .73
Important safety notes ..................253
Installing the ball coupling .............255
Mounting dimensions ....................455
Power supply ................................. 259
Pulling away with a trailer ..............160
Removing the ball coupling ............259
Storing the ball coupling ................259
Trailer drive program .....................245
Trailer loads ................................... 456
Towing away
With both axles on the ground .......393 20
Index
Page 338 of 462

forwards, e.g. when braking suddenly or in the
event of an accident.
R
The vehicle occupant would thereby be
pushed into the sea tbelt by the rear bench
seat/rear seat or by the seat backrest. The
seat belt can no longer offer the intended
level of protection and could even cause
injuries.
R Objects or loads in the trunk/cargo
compartment cannot be restrained by the
seat backrest.
There is an increased risk of injury.
Before every trip, make sure that the seat
backrests and the rear bench seat/rear seat
are engaged.
! Fold the seat cushion upwards before
folding the rear bench seat forward.
Otherwise, the backrests may be damaged.
When the backrest is folded forwards, the
fron tseats should not be moved to their
rearmost position .Otherwise, the front
seats and the rea rbench seat could be
damaged.
Observe the loading guidelines (Y page 332).
The left-hand and right-hand rear seat
backrests can be folded forwards separately
to increase the cargo compartment capacity.
Folding the rear bench seat forwards !
The backrest is heavy. Therefore, take
care when folding it down. Make sure that
the head restraints are pushed all the way
in so that the backrests and seat cushions
are not damaged. i
If the driver's or front-passenger seat is
set for a larger person, it may not be
possible to fold the rear bench seat
forwards. In this case, move the fron tseats
as far forward as possible.
X Move the head restraints to the lowest
position (Y page 108).
X Fold seat cushion 0002upwards. X
Pull release handle 0003upwards in the
direction of the arrow until the backrest is
fully released.
X Fold the backrest forwards until it reaches
the cargo compartment position. X
Guide seat belts 0003under respective
clips 0002. 336
Stowage areasStowage and features
Page 345 of 462

cargo compartment floor, fasten it with the
press studs. Roof carrier
Important safety notes G
WARNING
Whe nyou load the roof, the center of gravity
of the vehicle rises and the driving
characteristics change. If you exceed the
maximum roof load, the driving
characteristics, as well as steering and
braking, will be greatly impaired. There is a
risk of an accident.
Never exceed the maximum roof load and
adjust your driving style.
! Mercedes-Benz recommends that you
only use roof carriers that have been tested
and approved for Mercedes-Benz vehicles.
This helps to prevent damage to the
vehicle.
Position the load on the roof carrier in such
a way that the vehicle will not sustain
damage even when it is in motion.
Depending on the vehicle equipment,
ensure that when the roof carrier is
installed you can:
R raise the sliding sunroof fully
R open the panorama roof with power tilt/
sliding panel fully
R open the tailgate fully
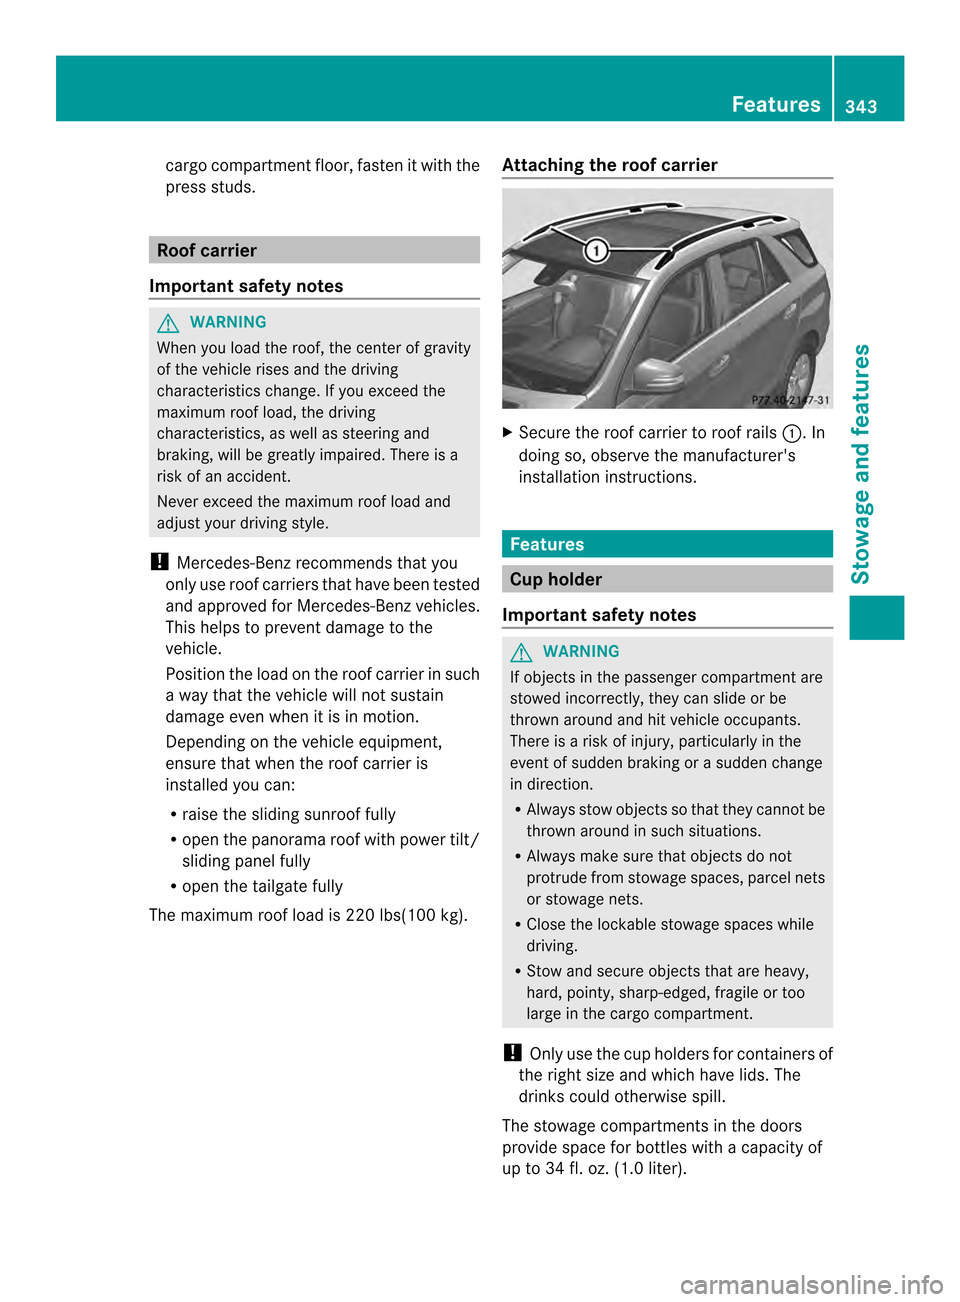
The maximum roof load is 220 lbs(100 kg). Attaching the roof carrier X
Secure the roof carrier to roof rails 0002. In
doing so, observe the manufacturer's
installation instructions. Features
Cup holder
Important safety notes G
WARNING
If objects in the passenger compartment are
stowed incorrectly, they can slide or be
thrown around and hit vehicle occupants.
There is a risk of injury, particularly in the
event of sudden braking or a sudden change
in direction.
R Always stow objects so that they cannot be
thrown around in such situations.
R Always make sure that objects do not
protrude from stowage spaces, parcel nets
or stowage nets.
R Close the lockable stowage spaces while
driving.
R Stow and secure objects that are heavy,
hard, pointy, sharp-edged, fragile or too
large in the cargo compartment.
! Only use the cup holders for containers of
the right size and which have lids. The
drinks could otherwise spill.
The stowage compartments in the doors
provide space for bottles with a capacity of
up to 34 fl. oz. (1.0 liter). Features
343Stowage and features Z
Page 384 of 462

MOExtended tires (tires with run-flat
properties)
General notes With MOExtended tires (tires with run flat
characteristics), you can continue to drive
yourv
ehicle even if there is a total loss of
pressure in one or more tires. The affected
tire must not show any clearly visible damage.
You can recognize MOExtended tires by the
MOExtended marking which appears on the
sidewall of the tire. You will find this marking
nextt o the tire size designation, the load-
bearing capacity and the speed index
(Y page 415).
MOExtended tires may only be used in
conjunction with an active tire pressure loss
warning system or with an active tire pressure
monitor.
If the pressure loss warning message
appears in the multifunction display:
R Observe the instructions in the display
messages (Y page 310).
R Check the tire for damage.
R If driving on, observe the following notes.
The maximum driving distance is
approximately 50 miles (80 km) when the
vehicle is partially laden and approximately
18 miles (30 km) when the vehicle is fully
laden.
In addition to the vehicle load, the driving
distance possible depends upon:
R speed
R road condition
R outside temperature
The driving distance possible in run-flat mode
may be reduced by extreme driving
conditions/maneuvers, or it can be increased
through a moderate style of driving.
The maximum permissible distance which
can be driven in run-flat mode is counted from
the moment the tire pressure loss warning
appears in the multifunction display. You must not exceed a maximum speed of
50 mph (80 km/h).
i
When replacing one or all tires, make sure
that you use only tires:
R of the size specified for the vehicle and
R marked "MOExtended"
If a tire has gone flat and cannot be
replaced with a MOExtended tire, a
standard tire may be used as a temporary
measure. Make sure that you use the
proper size and type (summer or winter
tire).
i Vehicles with MOExtended tires are not
equipped with a TIREFIT kit at the factory.
It is therefore recommended that you
additionally equip your vehicle with a
TIREFIT kit if you mount tires that do not
feature run-flat properties, e.g. winter tires.
A TIREFIT kit may be obtained from a
qualified specialist workshop.
Important safety notes G
WARNING
When driving in emergency mode, the driving
characteristics deteriorate, e.g. when
cornering, accelerating quickly and when
braking. There is a risk of an accident.
Do not exceed the stated maximum speed.
Avoid abrupt steering and driving maneuvers,
and driving over obstacles (curbs, potholes,
off-road). This applies in particular to a laden
vehicle.
Stop driving in emergency mode if:
R you hear banging noises.
R the vehicle starts to shake.
R you see smoke and smell rubber.
R ESP ®
is intervening constantly.
R there are tears in the sidewalls of the tire.
After driving in emergency mode, have the
wheel rims checked at a qualified specialist
workshop with regard to their further use. The
defective tire must be replaced in every case. 382
Flat tireBreakdown assistance
Page 413 of 462

travel in the vehicle. This information can be
found on the Tire and Loading Information
placard.
i The specifications shown on the Tire and
Loading Information placard in the
illustratio nare examples. The number of
seats is vehicle-specific and can differ from
the details shown. The number of seats in
yourv ehicle can be found on the Tire and
Loading Information placard. Determining the correct load limit
Step-by-step instructions The following steps have been developed as
required of all manufacturers under Title 49,
Code of U.S.F ederal Regulations, Part 575
pursuant to the "National Traffic and Motor
Vehicle Safety Act of 1966".
X Step 1: Locate the statement "The
combined weight of occupants and cargo
should never exceed XXX kg or XXX lbs." on
your vehicle’s Tire and Loading Information
placard.
X Step 2: Determine the combined weight of
the driver and passengers that will be riding
in your vehicle.
X Step 3: Subtract the combined weight of
the driver and passengers from XXX
kilograms or XXX lbs.
X Step 4: The resulting figure equals the
available amount of cargo and luggage load
capacity. For example, if the "XXX" amount
equals 1,400 lbs and there will be five
150 lbs passengers in your vehicle, the
amount of available cargo and luggage load
capacity is 650 lbs (1,400 - 750 (5 x 150)
= 650 lbs).
X Step 5: Determine the combined weight of
luggage and cargo being loaded on the
vehicle. That weight may not safely exceed
the available cargo and luggage load
capacity calculated in step 4. Loading the vehicle
411Wheels and tires Z
Page 417 of 462

Tire labeling
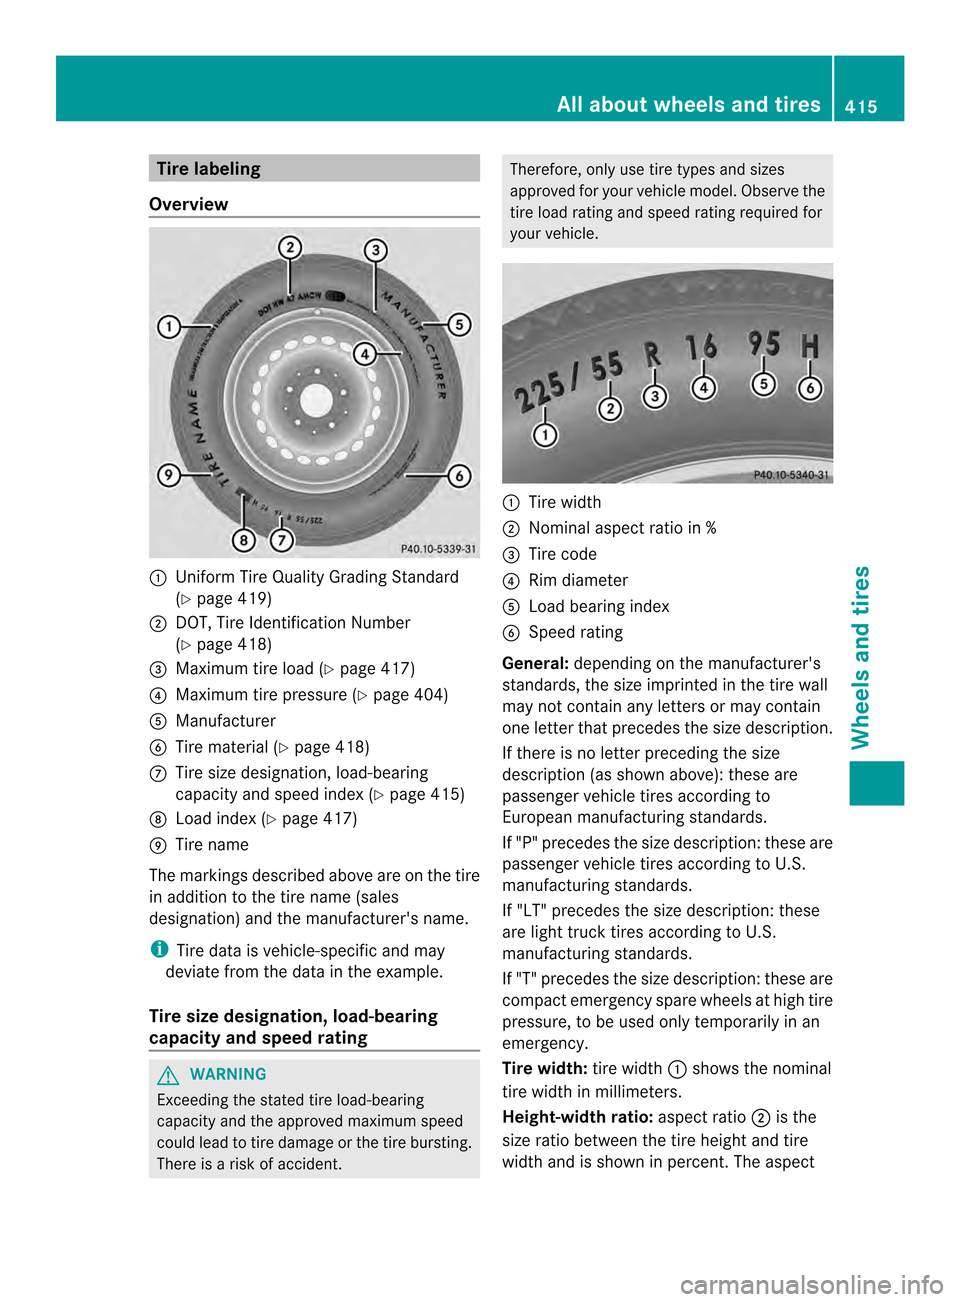
Overview 0002
Unifor mTire Quality Grading Standard
(Y page 419)
0003 DOT, Tire Identification Number
(Ypage 418)
0023 Maximum tire load (Y page 417)
0022 Maximum tire pressure (Y page 404)
0020 Manufacturer
0021 Tire material (Y page 418)
0014 Tire size designation, load-bearing
capacity and speed index (Y page 415)
0015 Load index (Y page 417)
0016 Tire name
The markings described above are on the tire
in additio nto the tire name (sales
designation) and the manufacturer's name.
i Tire data is vehicle-specific and may
deviate from the data in the example.
Tire size designation, load-bearing
capacity and speed rating G
WARNING
Exceeding the stated tire load-bearing
capacity and the approved maximum speed
could lead to tire damage or the tire bursting.
There is a risk of accident. Therefore, only use tire types and sizes
approved for your vehicle model. Observe the
tire load rating and speed rating required for
your vehicle.
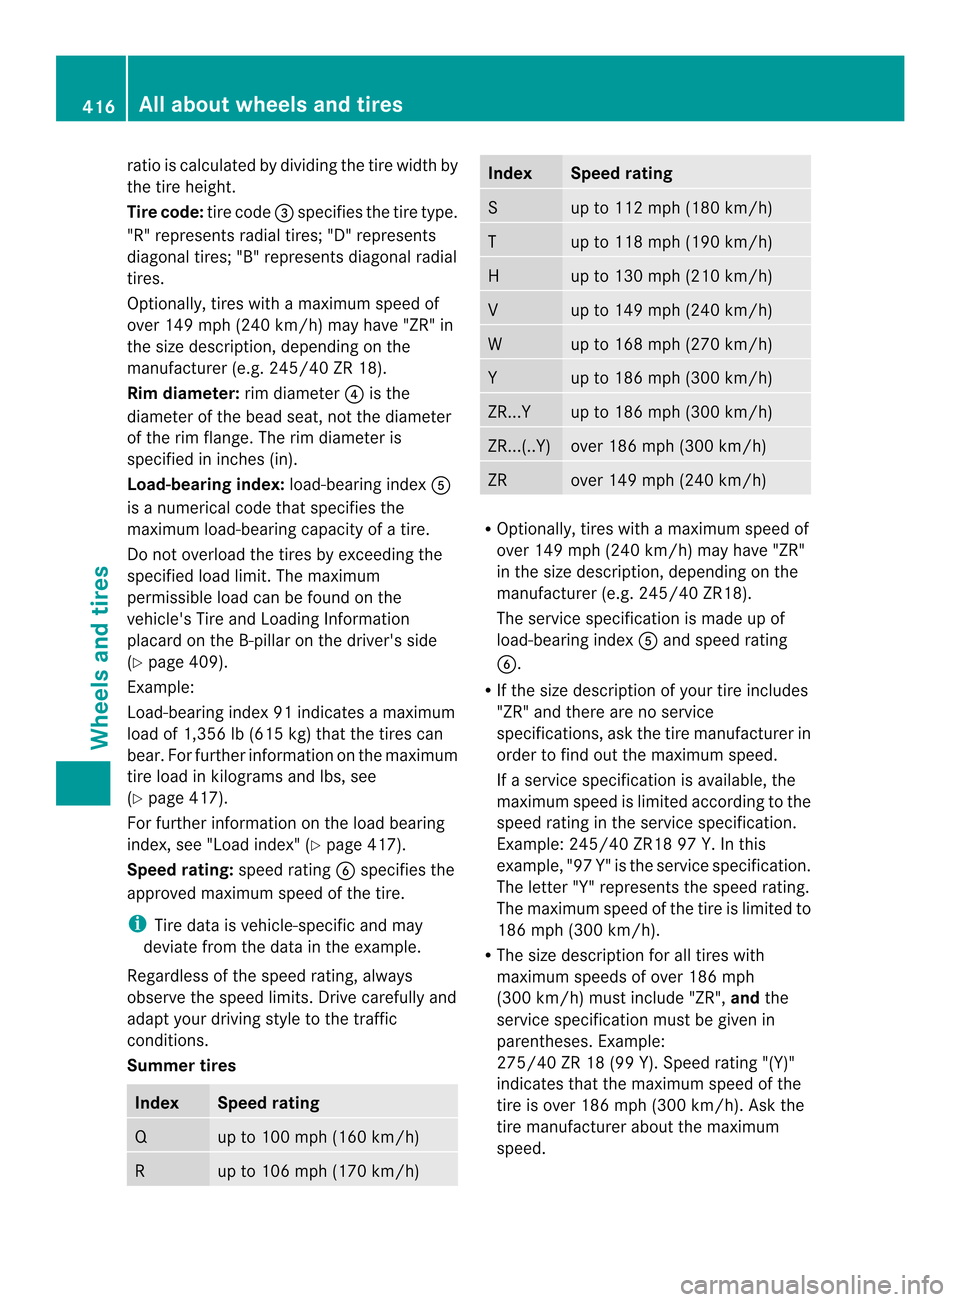
0002
Tire width
0003 Nominal aspect ratio in %
0023 Tire code
0022 Rim diameter
0020 Load bearing index
0021 Speed rating
General: depending on the manufacturer's
standards, the size imprinted in the tire wall
may not contain any letters or may contain
one letter that precedes the size description.
If there is no letter preceding the size
description (as shown above): these are
passenger vehicle tires according to
European manufacturing standards.
If "P" precedes the size description :these are
passenger vehicle tires according to U.S.
manufacturing standards.
If "LT" precedes the size description: these
are light truck tires according to U.S.
manufacturing standards.
If "T" precedes the size description: these are
compact emergency spare wheels at high tire
pressure, to be used only temporarily in an
emergency.
Tire width: tire width0002shows the nominal
tire width in millimeters.
Height-width ratio: aspect ratio0003is the
size ratio between the tire height and tire
width and is shown in percent.T he aspect All about wheels and tires
415Wheels and tires Z
Page 418 of 462

ratio is calculated by dividing the tire width by
the tire height.
Tire code:
tire code0023specifies the tire type.
"R" represents radial tires; "D" represents
diagonal tires; "B" represents diagonal radial
tires.
Optionally, tires with a maximu mspeed of
over 149 mph (240 km/h) may have "ZR" in
the size description, depending on the
manufacturer (e.g. 245/40 ZR 18).
Rim diameter: rim diameter0022is the
diameter of the bead seat, not the diameter
of the rim flange. The rim diameter is
specified in inches (in).
Load-bearing index: load-bearing index0020
is a numerical code that specifies the
maximum load-bearing capacity of a tire.
Do not overload the tires by exceeding the
specified load limit. The maximum
permissible load can be found on the
vehicle's Tire and Loading Information
placard on the B-pillar on the driver's side
(Y page 409).
Example:
Load-bearing index 91 indicates a maximum
load of 1,356 lb (615 kg) that the tires can
bear. For further information on the maximum
tire load in kilograms and lbs, see
(Y page 417).
For further information on the load bearing
index, see "Load index" (Y page 417).
Speed rating: speed rating0021specifies the
approved maximum speed of the tire.
i Tire data is vehicle-specific and may
deviate from the data in the example.
Regardless of the speed rating, always
observe the speed limits. Drive carefully and
adapt your driving style to the traffic
conditions.
Summer tires Index Speed rating
Q up to 100 mph (160 km/h)
R up to 106 mph (170 km/h) Index Speed rating
S up to 112 mph (180 km/h)
T up to 118 mph (190 km/h)
H up to 130 mph (210 km/h)
V up to 149 mph (240 km/h)
W up to 168 mph (270 km/h)
Y up to 186 mph (300 km/h)
ZR...Y up to 186 mph (300 km/h)
ZR...(..Y) over 186 mph (300 km/h)
ZR over 149 mph (240 km/h)
R
Optionally, tires with a maximum speed of
over 149 mph (240 km/h) may have "ZR"
in the size description, depending on the
manufacturer (e.g. 245/40 ZR18).
The service specification is made up of
load-bearing index 0020and speed rating
0021.
R If the size description of your tire includes
"ZR" and there are no service
specifications, ask the tire manufacturer in
order to find out the maximum speed.
If a service specification is available, the
maximum speed is limited according to the
speed rating in the servic especification.
Example: 245/40 ZR18 97 Y.In this
example, "97 Y" is the service specification.
The letter "Y" represents the speed rating.
The maximum speed of the tire is limited to
186 mph (300 km/h).
R The size descriptio nfor all tires with
maximum speeds of over 186 mph
(300 km/h) must include "ZR", andthe
service specification must be given in
parentheses. Example:
275/40 ZR 18 (99 Y). Speed rating "(Y)"
indicates that the maximum speed of the
tire is over 186 mph (300 km/h). Ask the
tire manufacturer about the maximum
speed. 416
All about wheels and tiresWheels and tires