2014 MERCEDES-BENZ M-Class changing wheel
[x] Cancel search: changing wheelPage 132 of 462

Halogen headlamps
0002
Low-beam headlamp: H7 55 W
0003 High-bea mheadlamp: H7 55 W
0023 Parking lamp/standing lamp: W 5 W BV
0022 Side marker lamp: WY 5 W Tail lamp
0002
Brake lamp: P 21 W-L Changing the front bulbs
Removing and installing the cover in the
front wheel housing You must remove the cover from the front
wheel housing before you can change the
fron
tbulbs. X
To remove: switch off the lights.
X Turn the fron twheels inwards.
X Remove securing pin 0003using a suitable
tool.
X Slide cover 0002up and remove it.
X To install: insert cover 0002again and slide
it down until it engages.
X Insert securing pin 0003.
Low-beam headlamps (halogen
headlamps) X
Remove the cover in the front wheel
housing (Y page 130).
X Turn housing cover 0002counter-clockwise
and pull it out.
X Turn bulb holder 0003counter-clockwise and
pull it out.
X Take the bulb out of bulb holder 0003.
X Insert the new bulb into bulb holder 0003.
X Insert bulb holder 0003into the lamp and turn
it clockwise. 130
Replacing bulbsLights and windshield wipers
Page 170 of 462

0003
Neutral
Do not shift the transmission to
N
while driving. Otherwise, the
automatic transmission could be
damaged.
No power is transmitted from the
engine to the drive wheels.
Releasing the brakes will allow you
to move the vehicle freely, e.g .to
push it or tow it.
If ESP ®
is deactivated or faulty:
only shift the transmission to
position Nif the vehicle is in danger
of skidding, e.g. on icy roads.
If you switch off the engine using
the SmartKey or the Start/Stop
button, the automatic transmission
shifts to neutral Nautomatically.
! Rolling in neutral Ncan damage
the drive train. 000B
Drive
The automatic transmission
changes gear automatically. All
forward gears are available.
Changing gear
The automatic transmission shifts to the
individual gears automatically when it is in
transmission position D.This automatic
gearshifting behavior is determined by:
R the position of the accelerator pedal
R the road speed Driving tips
Kickdown Use kickdown for maximum acceleration:
X
Depress the accelerator pedal beyond the
pressure point.
The automatic transmission shifts to a
lower gear depending on the engine speed.
X Ease off the accelerator pedal once the
desired speed is reached.
The automatic transmission shifts back up.
Rocking the vehicle free Shifting the transmission repeatedly between
gears
Dand Rmay help to free the vehicle if
it has become stuck in slush or snow. The
vehicle's engine management system limits
the speed to a maximum of 5 mph (9 km/h)
when shifting back and forth. To shift back
and forth between transmission positions D
and R, move the selector lever up and down
beyond the pressure point.
Towing atrailer X
Drive in the middle of the engine speed
range on uphill gradients.
X Depending on the uphill or downhill
gradient, use left-hand steering wheel
paddle shifter (Y page 169) to select a
lowe rgear, even if cruise control or
DISTRONIC PLUS are activated. 168
Automatic transmissionDriving and parking
Page 191 of 462
R
Do not jump with the vehicle as this will
interrupt the vehicle's propulsion.
R Always keep the engine running and in gear
when driving on a slope.
R Do not shift the automatic transmission to
transmission position N.
i Do not use the HOLD function when
driving off-road, on steep uphill or downhill
gradients or on slippery or loose surfaces.
The HOLD functio ncannot hold the vehicle
on such surfaces.
Checklist before driving off-road !
If the engine oil warning lamp lights up
while the vehicle is in motion, stop the
vehicle in a safe place as soon as possible.
Chec kthe engine oil level. The engine oil
warning lamp warning must not be ignored.
Continuing the journey while the symbol is
displayed could lead to engine damage.
X Engine oil level: check the engine oil level
and add oil if necessary.
When driving on steep gradients, the
engine oil level must be sufficiently high to
ensure a correct oil supply in the vehicle.
X DEF tank (BlueTEC vehicles): check the
level and top up if necessary (Y page 177).
X Tire-changing tool kit: check that the jack
is working and make sure you have the lug
wrench, a robust tow cable and a folding
spade in the vehicle.
X Wheels and tires: check the tire tread
depth and tire pressure.
X Check for damage and remove any foreign
objects, e.g. small stones, from the
wheels/tires.
X Replace any missing valve caps.
X Replace dented or damaged wheels.
X Rims: dented or bent rims can result in a
loss of tire pressure and damage the tire
bead. Therefore, check your rims before
driving off-road and replace them as
required. Checklist after driving off-road !
If you detect damage to the vehicle after
driving off-road, have the vehicle checked
immediately at a qualified specialist
workshop.
X Deactivate DSR (Y page 246).
X Vehicles with the AIRMATIC package:
lower the vehicle to a ride height suitable
for the road conditions, e.g. to the
highway/high-speed level.
X Cleant he headlamps and rear lights and
check for damage.
X Cleant he front and rear license plates.
X Cleant he wheels/tires with a water jet and
remove any foreign objects.
X Cleant he wheels, wheel housings and the
vehicle underside with a water jet; check
for any foreign objects and damage.
X Check whether twigs or other parts of
plants have become trapped. These
increase the risk of fire and can damage
fuel pipes, brake hoses or the rubber
bellows of the axle joints and propeller
shafts.
X After the trip, examine without fail the
entire undercarriage, wheels, tires, brakes,
bodywork structure, steering, chassis and
exhaust system for damage.
X After driving for extended periods across
sand, mud, gravel, water or in similarly dirty
conditions, have the brake discs, wheels,
brake pads/linings and axle joints checked
and cleaned.
X If you detect strong vibrations after off-road
travel, check for foreign objects in the
wheels and drive train and remove them if
necessary. Foreign objects can disturb the
balance and cause vibrations.
Driving over rough terrain places greater
demands on your vehicle than driving on
normal roads. After driving off-road, check
the vehicle. This allows you to detect damage
promptly and reduce the risk of an accident
to yourself and other road users. Driving tips
189Driving and parking Z
Page 248 of 462
X
Selector wheel 0002 engaged:
briefly press
selector wheel 0002.
Selector wheel 0002extends.
X To select: turn selector wheel 0002until
indicator lamp 0003comes on.
Trailer indicator 0023appears in the
multifunction display.
R Highway level is set.
R ADS (Adaptive Damping System) adapts
comfortable damping characteristics to
the current operating and driving
conditions.
R The automatic transmission selects the
automatic drive program for a
comfortable driving style that provides
for optimum fuel consumption, changing
gear at optimum points.
R While pulling away, the differential locks
are engaged. Off-road driving systems
4MATIC (permanent four-wheel drive) If you fail to adapt your driving style, 4MATIC
can neither reduce the risk of accident nor
override the laws of physics. 4MATIC cannot
take account of road, weather and traffic
conditions. 4MATIC is only an aid. You are
responsible for the distance to the vehicle in
front, for vehicle speed, for braking in good
time and for staying in your lane.
! Never tow the vehicle with one axle
raised. This may damage the transfer case.
Damage of this sort is not covered by the
Mercedes-Benz Limited Warranty. All
wheels must remain either on the ground
or be fully raised. Observe the instructions
for towing the vehicle with all wheels in full
contact with the ground.
! A function or performance test should
only be carried out on atwo-axle
dynamometer. Before you operate the
vehicle on such a dynamometer, please
consult a qualified workshop .You could otherwise damage the drive train or the
brake system.
4MATIC ensures that all four wheels are
permanently driven. Together with ESP ®
and
4ETS, it improves the traction of your vehicle
whenever a drive wheel spins due to
insufficien tgrip.
i In wintry driving conditions, the maximum
effect of 4MATIC can only be achieved if
you use winter tires (M+S tires), with snow
chains if necessary.
Further information about "Driving off-road"
(Y page 187).
DSR (Downhill Spee dRegulation) Important safety notes
DSR assists you when driving downhill. It
keeps the speed of travel at the speed set on
the on-board computer. The steeper the
downhill gradient, the greater the DSR
braking effect on the vehicle .When driving on
flat stretches of road or on an uphill gradient,
the DSR braking effect is minimal or
nonexistent.
DSR controls the set speed when it is active
and the automatic transmission is in the D,
R or Nposition. By accelerating or braking,
you can always drive at a higher or a lower
speed than that set on the on-board
computer.
Further information about "Driving off-road"
(Y page 187).
If you fail to adapt your driving style, DSR can
neither reduce the risk of accident nor
override the laws of physics. DSR cannot take
account of road, weather and traffic
conditions. DSR is only an aid. You are
responsible for the distance to the vehicle in
front, for vehicle speed, for braking in good
time and for staying in your lane.
You are always responsible for keeping
control of the vehicle and for assessing
whether the downhill gradient can be
managed. DSR may not always be able to
keep to the set speed, depending on road 246
Driving systemsDriving and parking
Page 249 of 462

surface and tire conditions. Select a set
speed suitable for the prevailing conditions
and when necessary, apply the brakes
manually. G
WARNING
If the speed driven and the set speed deviate
and you activate DSR on a slippery road
surface, the wheels may lose traction.Ift he
wheels lose traction. the vehicle can no longer
be steered. There is an increased danger of
skidding and accidents.
Never activate DSR on slippery road surfaces.
Activating DSR G
WARNING
If you drive faster than the set speed and
activate DSR, the vehicle will decelerate on
downhill gradients. If you do not know the set
speed, the vehicle could decelerate
unexpectedly. There is a risk of an accident.
Decelerate the vehicle to the set speed before
activating DSR. If you do not know what the
stored set speed is, store the desired set
speed again. Example: vehicles with the ON&OFFROAD package
0002 DSR button
0003 DSR indicator lamp
X Press button 0002.
Indicator lamp 0003lights up.
The 0001 DSR symbol appears in the
multifunction display.
You can only activate DSR when driving at
speeds below 25 mph (40 km/h). If the current vehicle speed is too high, the
0001
DSR symbol appears in the
multifunction display with the Max. Speed 25 mph message (Canada:
40 km/h ).
i You cannot activate DSR if the SPORT on-
road program is activated. The 0001DSR
symbol and the Not in Drive Program SPORT message then appearint
he
multifunction display.
Deactivating DSR
X Press button 0002.
Indicator lamp 0003goes out.
The 0001 DSR symbol appears in the
multifunction display with the Off message.
DSR switches off automatically if you drive
faster than 28 mph (Canada: 45 km/h). The
0001 DSR symbol appears in the
multifunction display with the Off message.
The status indicator in the multifunction
display goes out. You also hear a warning. On
vehicles with the ON&OFFROAD package, if
you select a different on-road/off-road
program, DSR is also deactivated.
Changing the set speed Driving systems
247Driving and parking Z
Page 251 of 462
Off-road program 2
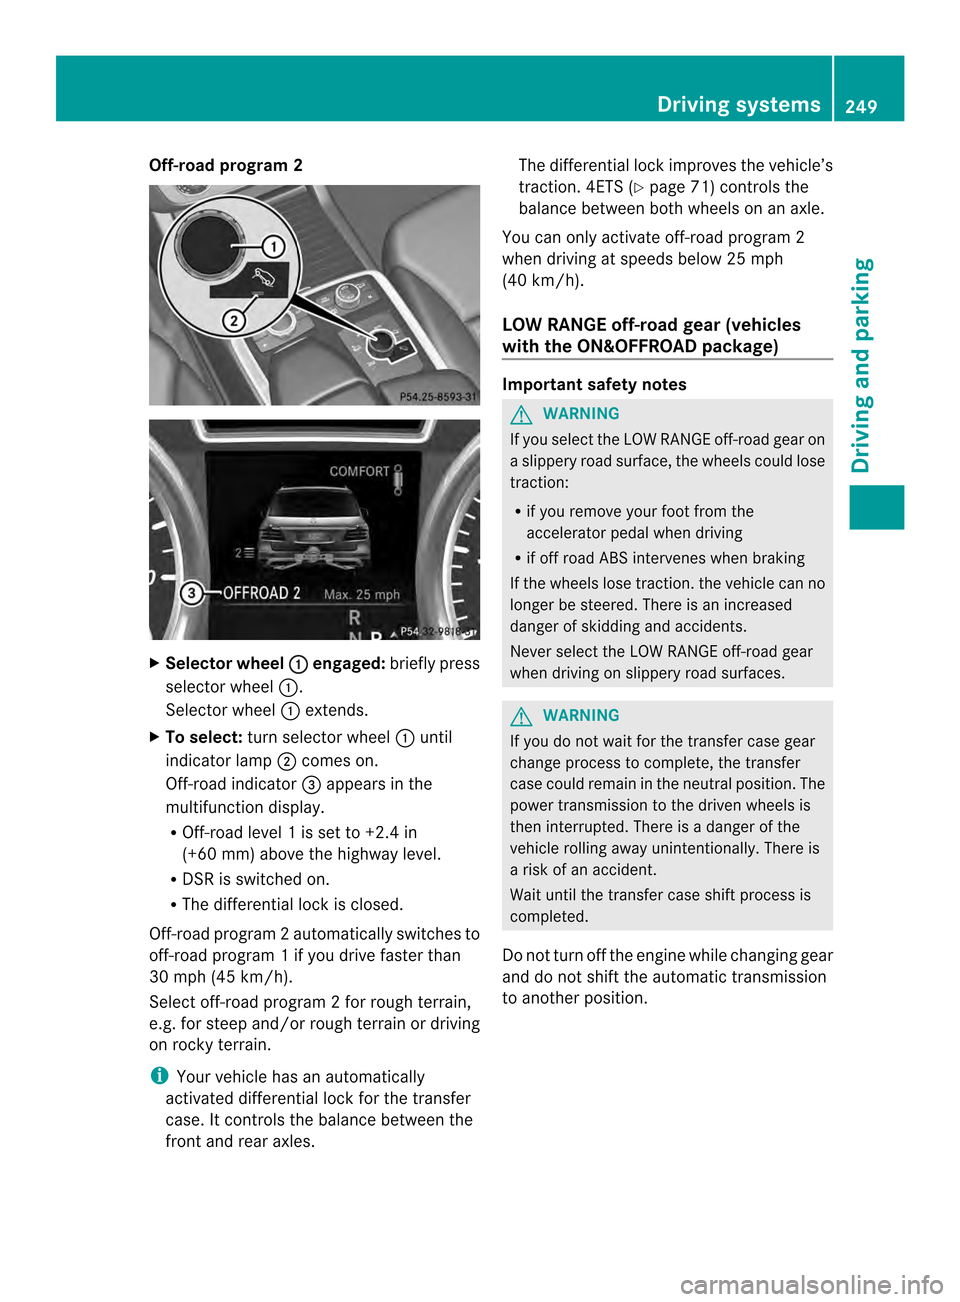
X
Selector wheel 0002 engaged:
briefly press
selector wheel 0002.
Selector wheel 0002extends.
X To select: turn selector wheel 0002until
indicator lamp 0003comes on.
Off-road indicator 0023appears in the
multifunction display.
R Off-road level 1 is set to +2.4 in
(+60 mm) above the highway level.
R DSR is switched on.
R The differential lock is closed.
Off-road program 2automatically switches to
off-road program 1 if you drive faster than
30 mph (45 km/h).
Select off-road program 2 for rough terrain,
e.g. for steep and/o rrough terrain or driving
on rocky terrain.
i Your vehicle has an automatically
activated differential lock for the transfer
case. It controls the balance between the
front and rear axles. The differential lock improves the vehicle’s
traction. 4ETS (Y
page 71) controls the
balance between both wheels on an axle.
You can only activate off-road program 2
when driving at speeds below 25 mph
(40 km/h).
LOW RANGE off-road gear (vehicles
with the ON&OFFROAD package) Important safety notes
G
WARNING
If you select the LOW RANGE off-road gear on
a slippery road surface, the wheels could lose
traction:
R if you remove your foot from the
accelerator pedal when driving
R if off road ABS intervenes when braking
If the wheels lose traction. the vehicle can no
longer be steered. There is an increased
danger of skidding and accidents.
Never select the LOW RANGE off-road gear
when driving on slippery road surfaces. G
WARNING
If you do not wait for the transfer case gear
change process to complete, the transfer
case could remain in the neutral position. The
power transmission to the driven wheels is
then interrupted. There is a danger of the
vehicle rolling away unintentionally. There is
a risk of an accident.
Wait until the transfer case shift process is
completed.
Do not turn off the engine while changing gear
and do not shift the automatic transmission
to another position. Driving systems
249Driving and parking Z
Page 276 of 462
Settings menu
Introduction In the
Sett. menu, you have the following
options:
R Changing the instrumen tcluste rsettings
(Y page 274)
R Changing the light settings (Y page 274)
R Changing the vehicle settings
(Y page 276)
R Changing the convenience settings
(Y page 277)
R Restoring the factory settings
(Y page 278)
Instrument cluster submenu Selecting the unit of measurement for
distance
The
Display Unit Speed-/Odometer: function allows you to choose whether
certain displays appear in kilometers or miles
in the multifunction display.
You can determine whether the multifunction
display shows some messages in miles or
kilometers.
X
Press the 0002or0005 button on the
steering wheel to select the Sett. menu.
X Press the 0004or0003 button to select the
Instrument Cluster submenu.
X Press 000Bto confirm.
X Press the 0004or0003 button to select the
Display Unit Speed-/Odometer: function.
You will see the selected setting:
km or
miles .
X Press the 000Bbutton to save the setting. The selected unit of measuremen
tfor
distance applies to:
R digital speedometer in the Trip menu
R odometer and the trip odometer
R trip computer
R current consumption and the range
R the navigation instructions in the Navi menu
R cruise control
R DISTRONIC PLUS
R ASSYST PLUS service interval display
Selecting the permanent display function
You can determine whether the multifunction
display permanently shows your speed or the
outside temperature.
X Press the 0002or0005 button on the
steering wheel to select the Sett menu.
X Press the 0004or0003 button to select the
Instrument Cluster submenu.
X Press 000Bto confirm.
X Press the 0004or0003 button to select the
Permanent Display: function.
You will see the selected setting Outside Temperature or
Additional Speedometer [km/h] (USA)/
Additional Speedometer [mph] (Canada).
X Press the 000Bbutton to save the setting.
i The speed is shown in km/h( USA)/mph
(Canada).
Light submenu Setting the daytime running lamps
i
This function is not available in Canada.
X Press the 0002or0005 button on the
steering wheel to select the Sett. menu.
X Press the 0004or0003 button to select the
Lights submenu.
X Press 000Bto confirm. 274
Menus and submenusOn-board computer and displays
Page 382 of 462
Useful information
i This Operator's Manual describes all
models and all standard and optional
equipment of your vehicle available at the
time of publication of the Operator's
Manual. Country-specific differences are
possible. Please note that your vehicle may
not be equipped with all features
described. This also applies to safety-
related systems and functions.
i Read the information on qualified
specialist workshops: (Y page 28).Where will I find...?
First-aid kit
X
Open the tailgate.
X Remove first-aid kit 0002from the parcel net.
i Check the expiration date on the first-aid
kit at least once a year. Replace the
contents if necessary, and replace missing
items. Vehicle tool kit
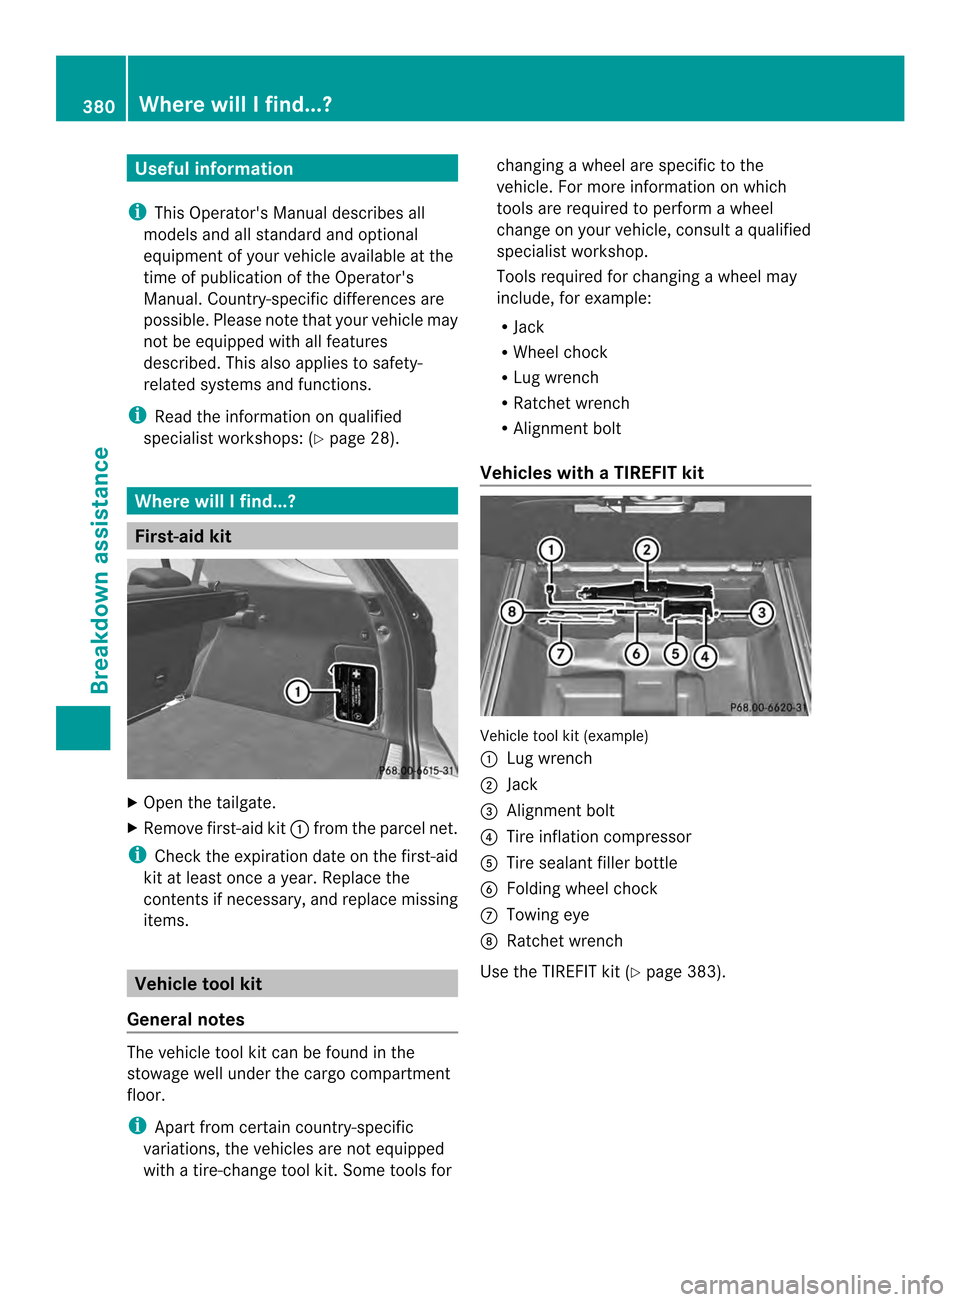
General notes The vehicle tool kit can be found in the
stowage well under the cargo compartment
floor.
i
Apart from certain country-specific
variations, the vehicles are not equipped
with a tire-change tool kit .Some tools for changing a wheel are specific to the
vehicle. For more information on which
tools are required to perform a wheel
change on your vehicle, consult a qualified
specialist workshop.
Tools required for changing
awheel may
include, for example:
R Jack
R Wheel chock
R Lug wrench
R Ratchet wrench
R Alignment bolt
Vehicles with aTIREFIT kit Vehicle tool kit (example)
0002
Lug wrench
0003 Jack
0023 Alignmen tbolt
0022 Tire inflation compressor
0020 Tire sealant filler bottle
0021 Folding wheel chock
0014 Towing eye
0015 Ratchet wrench
Use the TIREFIT kit (Y page 383).380
Where will I find...?Breakdown assistance