2014 MERCEDES-BENZ GL tow bar
[x] Cancel search: tow barPage 393 of 462
If a tire pressure of 180 kPa(1.8 bar/26 psi)
has been attained after five minutes:
XSwitch off the tire inflation compressor.
XUnscrew the filler hose from the valve of
the faulty tire.
XStow the tire sealant bottle and the tire
inflation compressor.
XPull away immediately.
The maximum speed for a tire sealed with
tire sealant is 50 mph (80 km/h). The upper
part of the TIREFIT sticker must be affixed
to the instrument cluster in the driver's
field of vision.
XStop after driving for approximately ten
minutes and check the tire pressure with
the tire inflation compressor.
The tire pressure must now be at least
130 kPa (1.3 bar/19 psi).
GWARNING
If the required tire pressure is not reached
after driving for a short period, the tire is too
badly damaged. The tire sealant cannot repair
the tire in this instance. Damaged tires and a
tire pressure that is too low can significantly
impair the vehicle's braking and driving
characteristics. There is a risk of accident.
Do not continue driving. Contact a qualified
specialist workshop.
iIn cases such as the one mentioned
above, contact an authorized Mercedes-
Benz Center. Or call
1-800-FOR-MERCedes (in the USA) or
1-800-387-0100 (in Canada).
XCorrect the tire pressure if it is still at least
130 kPa(1.3 bar/19 psi). See the Tire and
Loading Information placard on the driver's
side B-pillaror the tire pressure table in the
fuel filler flap for values.
XTo increase the tire pressure:switch on
the tire inflation compressor.
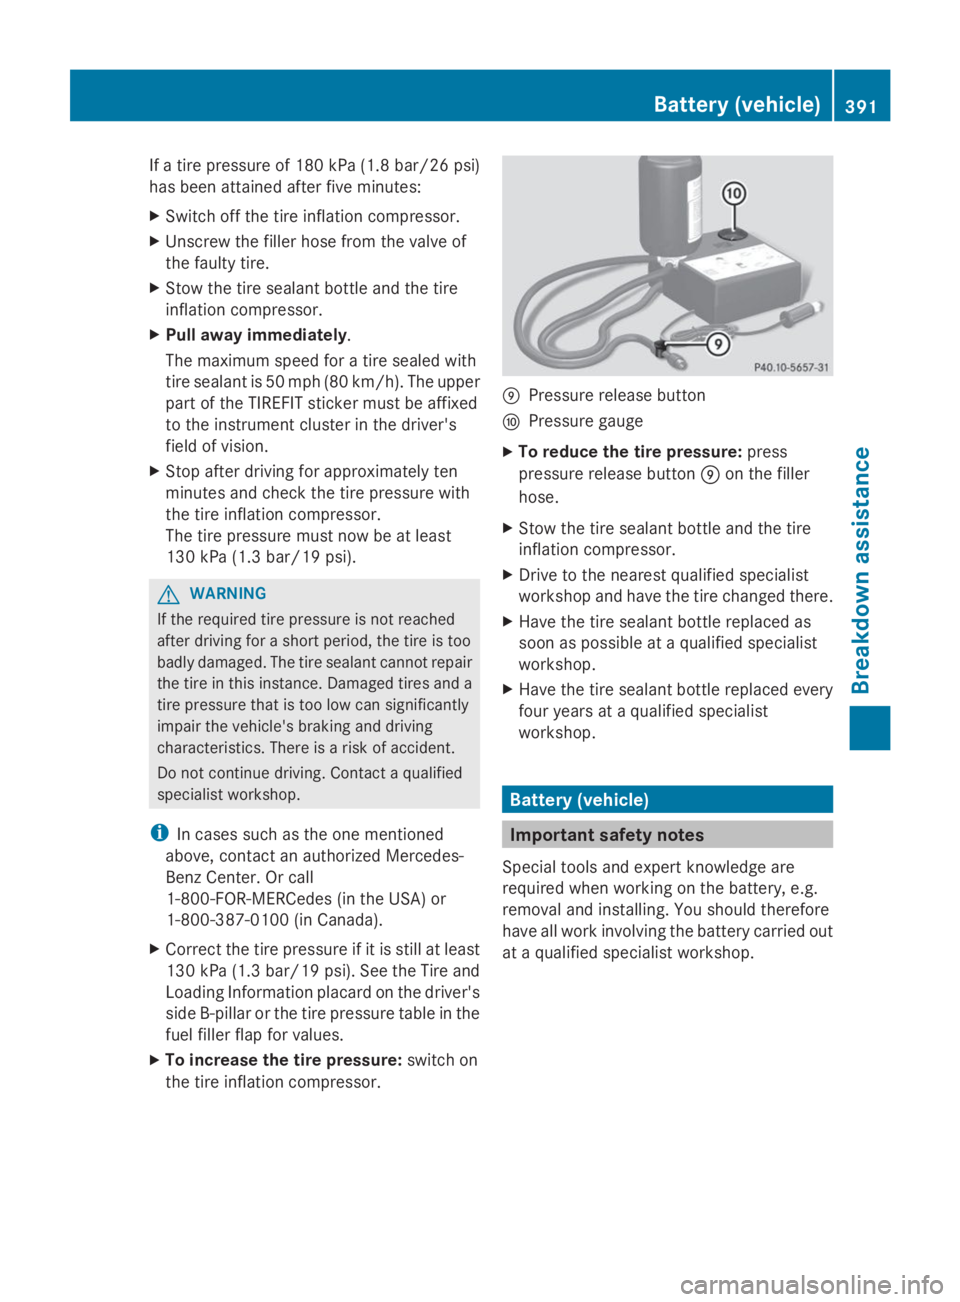
�mPressure release button
�nPressure gauge
XTo reduce the tire pressure:press
pressure release button�mon the filler
hose.
XStow the tire sealant bottle and the tire
inflation compressor.
XDrive to the nearest qualified specialist
workshop and have the tire changed there.
XHave the tire sealant bottle replaced as
soon as possible at a qualified specialist
workshop.
XHave the tire sealant bottle replaced every
four years at a qualified specialist
workshop.
Battery (vehicle)
Important safety notes
Special tools and expert knowledge are
required when working on the battery, e.g.
removal and installing. You should therefore
have all work involving the battery carried out
at a qualified specialist workshop.
Battery (vehicle)391
Breakdown assistance
Z
Page 400 of 462
!Make sure that the electric parking brake
is released. If the electric parking brake is
faulty, visit a qualified specialist workshop.
!Only secure the tow rope or tow bar at the
towing eyes, or the trailer tow hitch, if
available. You could otherwise damage the
vehicle.
!Do not use the towing eye for recovery,
this could damage the vehicle. If in doubt,
recover the vehicle with a crane.
!When towing, pull away slowly and
smoothly. If the tractive power is too high,
the vehicles could be damaged.
!When towing vehicles with KEYLESS-GO,
use the key instead of the Start/Stop
button. Otherwise, the automatic
transmission may shift to positionPwhen
the driver's or front-passenger door are
opened, which could lead to damage to the
transmission.
!Do not tow with sling-type equipment.
This could damage the vehicle.
!Vehicles with differential locks: make
sure the differential locks are in automatic
mode. When towing, the differential locks
must not be switched on. The transmission
may otherwise be damaged.
!The vehicle can be towed a maximum of
30 miles (50km). The towing speed of
30 mph (50 km/h) must not be exceeded.
If the vehicle has to be towed more than
30 miles(50km), the entire vehicle must be
raised and transported.
!If you tow or tow-start another vehicle, its
weight must not exceed the maximum
permissible gross vehicle weight of your
vehicle.
Information on your vehicle's gross vehicle
weight rating can be found on the vehicle
identification plate (Ypage 444).
iInformation on your vehicle's gross
vehicle weight rating can be found on the
vehicle identification plate; see the printed
Operator's Manual.
It is better to have the vehicle transported
than to have it towed.
If the vehicle has suffered transmission
damage, have it transported on a transporter
or trailer.
The automatic transmission must be in
positionNwhen the vehicle is being towed.
The battery must be connected and charged.
Otherwise, you:
Rcannot turn the SmartKey to position2in
the ignition lock
Rcannot release the electric parking brake
Rcannot shift the automatic transmission to
positionN
iDisarm the automatic locking feature
before the vehicle is towed (Ypage 284).
You could otherwise be locked out when
pushing or towing the vehicle.
Installing/removing the towing eye
Installing the towing eye
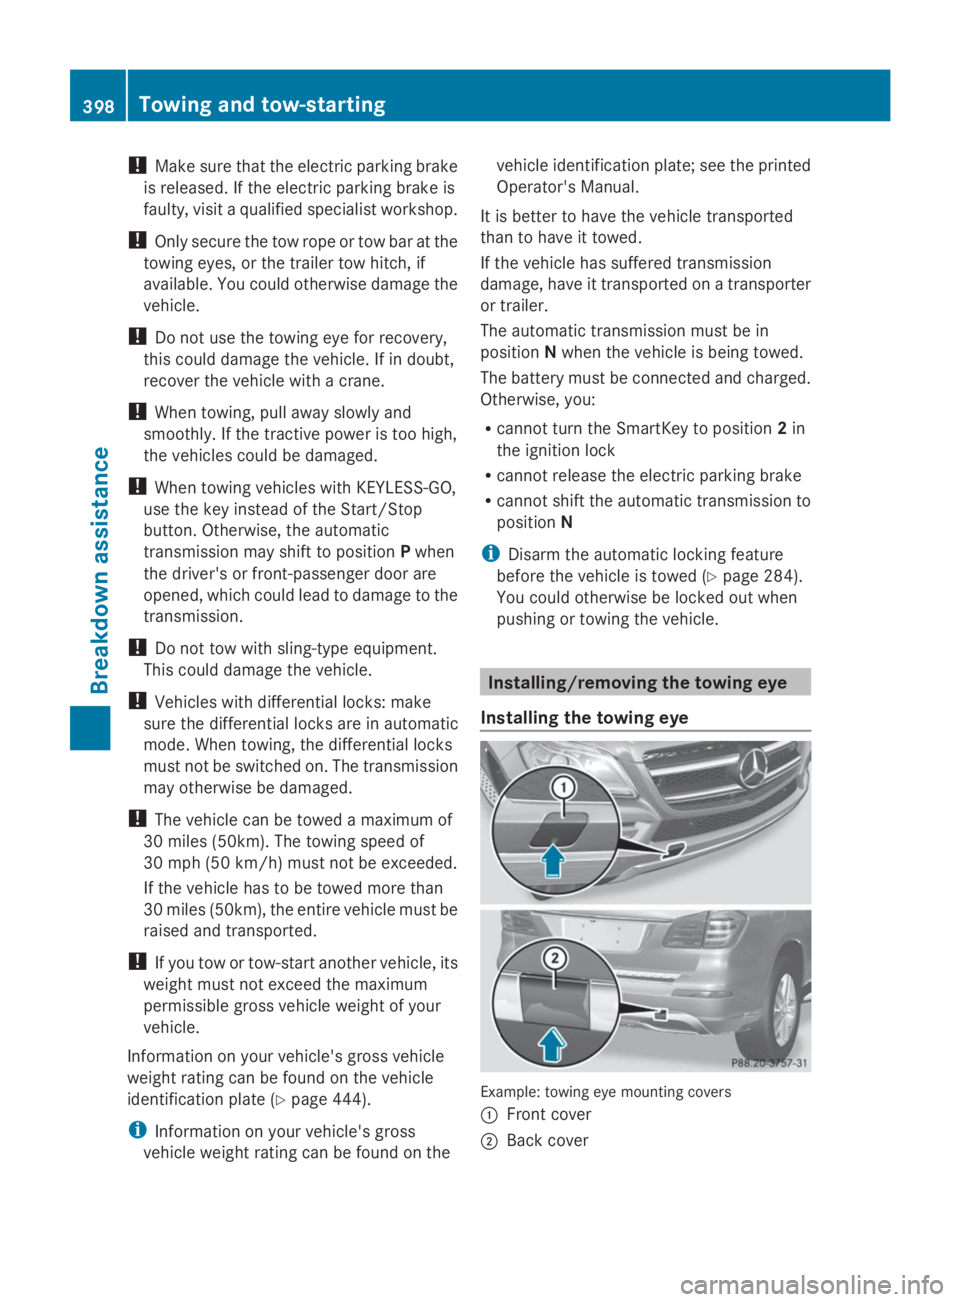
Example: towing eye mounting covers
�CFront cover
�DBack cover
398Towing and tow-starting
Breakdown assistance
Page 401 of 462
Vehicles with a trailer tow hitch: if possible,
connect the towbar to the trailer tow hitch
(Ypage 264).
The brackets for the screw-in towing eyes are
located in the bumpers. They are at the front
and at the rear, behind the covers.
XRemove the towing eye from the vehicle
tool kit (Ypage 386).
XTo open the cover at the front:press the
mark on cover�Cinwards in the direction
of the arrow.
XTo open the cover at the rear:insert a
flat, blunt object into the cutout and lever
cover�Dout of the bumper.
XTake cover�Cor�Doff the opening.
XScrew in and tighten the towing eye
clockwise to the stop.
Removing the towing eye
XUnscrew and remove the towing eye.
XAttach cover�Cor�Dto the bumper and
press until it engages.
XPlace the towing eye in the vehicle tool kit.
Towing a vehicle with both axles on
the ground
It is important that you observe the safety
instructions when towing away your vehicle
(Ypage 397).
The automatic transmission automatically
shifts to positionPwhen you open the driver's
or front-passenger door or when you remove
the SmartKey from the ignition lock.
In order to ensure that the automatic
transmission stays in positionNwhen towing
the vehicle, you must observe the following
points:
XMake sure that the vehicle is stationary and
the SmartKey in the ignition lock is in
position0.
XTurn the SmartKey to position2in the
ignition lock.
On vehicles with KEYLESS-GO, use the
SmartKey instead of the Start/Stop button
(Ypage 167).
XDepress and hold the brake pedal.
XShift the automatic transmission to
positionN.
XRelease the brake pedal.
XRelease the electric parking brake.
XLeave the SmartKey in position2in the
ignition lock.
XSwitch on the hazard warning lamps
(Ypage 132).
iIn order to signal a change of direction
when towing the vehicle with the hazard
warning lamps switched on, use the
combination switch as usual. In this case,
only the indicator lamps for the direction of
travel flash. After resetting the
combination switch, the hazard warning
lamp starts flashing again.
Transporting the vehicle
!You may only secure the vehicle by the
wheels, not by parts of the vehicle such as
axle or steering components. Otherwise,
the vehicle could be damaged.
The towing eyes or trailer tow hitch can be
used to pull the vehicle onto a trailer or
transporter if you wish to transport it.
XTurn the SmartKey to position2in the
ignition lock.
XShift the automatic transmission to
positionN.
As soon as the vehicle has been loaded:
XPrevent the vehicle from rolling away by
applying the electric parking brake.
XShift the automatic transmission to
positionP.
XTurn the SmartKey to position0in the
ignition lock and remove it.
XSecure the vehicle.
Towing and tow-starting399
Breakdown assistance
Z
Page 429 of 462
Traction
Traction is the result of friction between the
tires and the road surface.
TWR (Tongue Weight Rating)
The TWR specifies the maximum permissible
weight that the ball coupling of the trailer tow
hitch can support.
Treadwear indicators
Narrow bars (tread wear bars) that are
distributed over the tire tread. If the tire tread
is level with the bars, the wear limit of�
Page 459 of 462
Trailer loads
Trailer loads, trailer drawbar noseweights and axle loads
Missing values were not available at time of going to print.
All models (except
GL 63 AMG 4MATIC)
Permissible trailer load, unbraked
Permissible trailer load, braked (at a minimum gradient-
climbing capability of 12% from a standstill)
7500 lbs (3402 kg)
Maximum drawbar noseweight (the drawbar
noseweight is not included in the trailer load)
600 lbs (272 kg)
Permissible rear axle load when towing a trailer3970 lbs (1800 kg)
GL 63 AMG 4MATIC
Permissible trailer load, unbraked
Permissible trailer load, braked (at a minimum gradient-
climbing capability of 12% from a standstill)
7165 lbs (3250 kg)
Maximum drawbar noseweight (the drawbar
noseweight is not included in the trailer load)
309 lbs (140 kg)
Permissible rear axle load when towing a trailer4189 lbs (1900 kg)
The actual noseweight may not be higher than the value which is given. The value can be found
on the trailer tow hitch or trailer identification plates. The lowest weight applies.
The maximum permissible trailer drawbar noseweight is the maximum weight with which the
trailer drawbar can be loaded. Limit for Mercedes-Benz-approved trailer couplings.
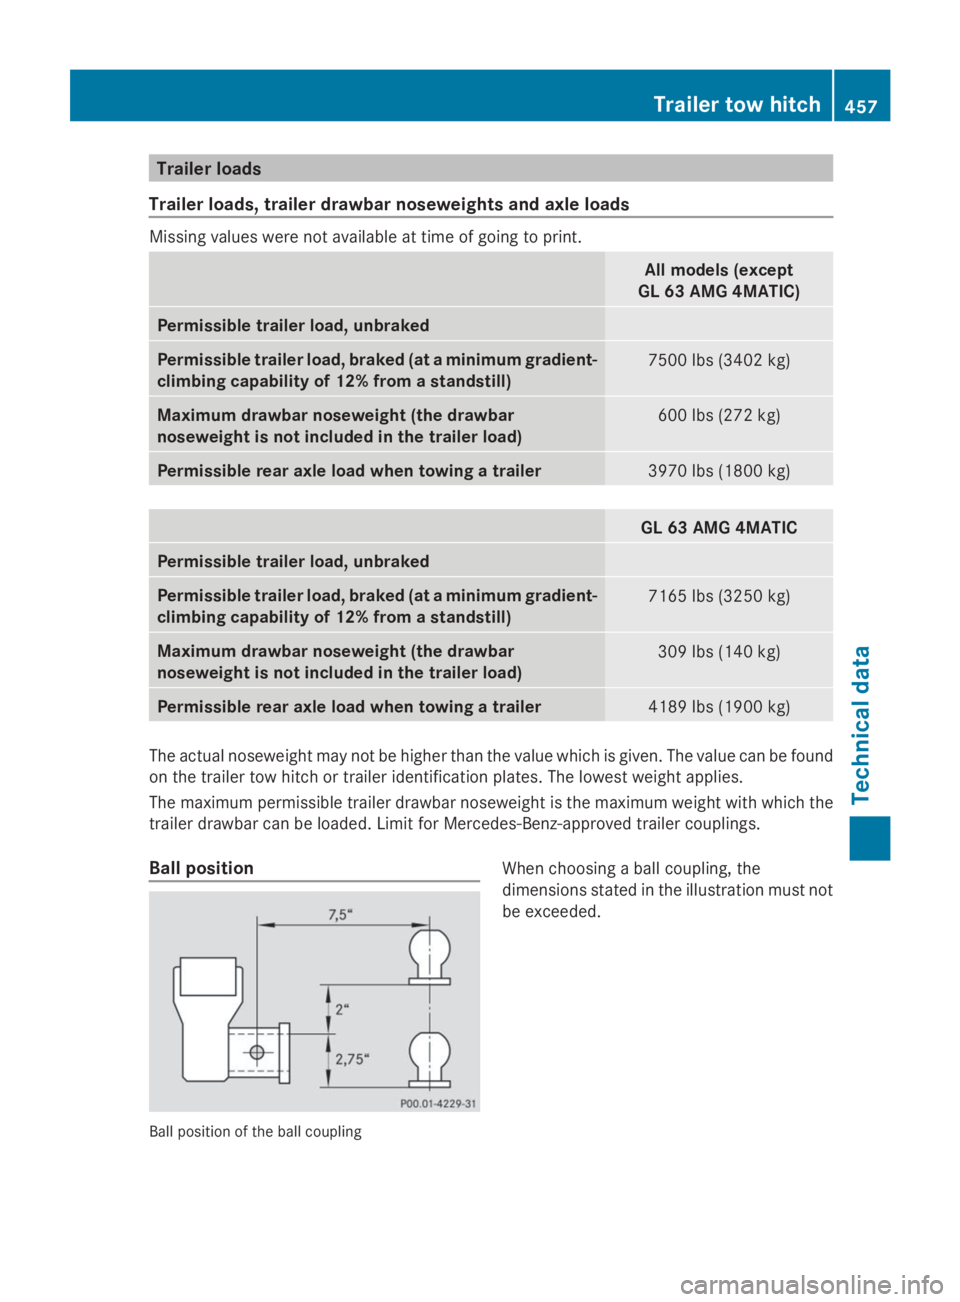
Ball position
Ball position of the ball coupling
When choosing a ball coupling, the
dimensions stated in the illustration must not
be exceeded.
Trailer tow hitch457
Technical data
Z