2014 MERCEDES-BENZ GL-Class battery
[x] Cancel search: batteryPage 272 of 462

Trailer power supply
! You can connect accessories with a
maximum power consumption of 240 Wto
the permanent power supply.
You must not charge a trailer battery using
the power supply.
The trailer socket of your vehicle is equipped
at the factory with a permanent power supply.
The permanent power supply is supplied via
trailer socket pin 4.
The trailer's permanent power supply is
switched off in the event of low vehicle supply
voltage and after six hours at the latest.
A qualified specialist workshop can provide
more information about installing the trailer
electrics. 270
Towing a trailerDriving an
d parking
Page 298 of 462

Display messages Possible causes/consequences and
M
MSolutions The yellow
!warning lamp lights up. If you manually apply or
release the electric parking brake, the red F(USA
only)/ !(Canada only) indicator lamp flashes.
The electric parking brake is malfunctioning. It is not possible to
apply the electric parking brake manually.
X Shift the transmission to P.
X Visit a qualified specialist workshop. F(USA
only)
!(Canada
only)
Parking Brake Parking Brake
Inoperative Inoperative The yellow
!warning lamp lights up. The red F(USA
only)/ !(Canada only) indicator lamp flashes for about ten
seconds after the electric parking brake has been applied or
released. It then goes out or remains lit.
The electric parking brake is malfunctioning, e.g. because of
overvoltage or undervoltage.
X Remove the cause for the overvoltage or undervoltage, e.g. by
charging the battery or restarting the engine.
X Engage or release the electric parking brake.
If it remains impossible to apply or release the electric parking
brake:
X Switch off the ignition and turn it back on.
X Engage or release the electric parking brake.
If the electric parking brake still cannot be released:
X Consult a qualified specialist workshop. The yellow
!warning lamp lights up and the red F(USA
only)/ !(Canada only) indicator lamp flashes.
It is not possible to apply the electric parking brake manually.
X Shift the transmission to P.
X Visit a qualified specialist workshop. F(USA
only)
!(Canada
only)
Turn On the Turn On the
Ignition to Ignition to
Release the Release the
Parking Brake Parking Brake The red
F(USA only)/ !(Canada only) indicator lamp lights
up.
You attempted to release the electric parking brake while the
ignition was switched off.
X SmartKey: turn the SmartKey to position 1in the ignition lock.
X KEYLESS-GO: switch on the ignition.296
Display
messagesOn-board computer and displays
Page 309 of 462

Display messages Possible causes/consequences and
M
MSolutions ?
Coolant Too Hot Coolant Too Hot
Stop Vehicle Turn Stop Vehicle Turn
Engine Off Engine Off The coolant is too hot.
A warning tone also sounds.
G WARNING
Do not drive when your engine is overheated. This can cause some
fluids which may have leaked into the engine compartment to
catch fire.
Steam from the overheated engine can also cause serious burns
which can occur just by opening the hood.
There is a risk of injury.
X Pull over and stop the vehicle safely and switch off the engine,
paying attention to road and traffic conditions.
X Secure the vehicle against rolling away ( Ypage 188).
X Wait until the engine has cooled down.
X Make sure that the air supply to the engine radiator is not
blocked, e.g. by snow, slush or ice.
X Do not start the engine again until the display message goes out
and the coolant temperature is below 248 ‡ (120 †).
Otherwise, the engine could be damaged.
X Pay attention to the coolant temperature display.
X If the temperature increases again, visit a qualified specialist
workshop immediately.
Under normal operating conditions and with the specified coolant
level, the coolant temperature may rise to 248 ‡ (120 †). # The battery is not being charged.
A warning tone also sounds.
Possible causes are:
R
a defective alternator
R a torn poly-V-belt
R a malfunction in the electronics
X Pull over and stop the vehicle safely and switch off the engine,
paying attention to road and traffic conditions.
X Open the hood.
X Check whether the poly-V-belt is torn.
If the poly-V-belt is torn:
! Do not continue driving. The engine could otherwise overheat.
X Consult a qualified specialist workshop.
If the poly-V-belt is not damaged:
X Visit a qualified specialist workshop. Display
messages
307On-board computer and displays Z
Page 322 of 462

Display messages Possible causes/consequences and
M
MSolutions Tire Press.Monitor
Tire Press.Monitor
Currently Currently
Unavailable Unavailable Due to a source of radio interference, no signals can be received
from the wheel sensors. The tire pressure monitor is temporarily
malfunctioning.
X
Drive on.
The tire pressure monitor restarts automatically as soon as the
problem has been solved. TirePress. TirePress.
Sensor(s) Missing Sensor(s) Missing There is no signal from the tire pressure sensor of one or several
wheels. The pressure of the affected tire is not displayed in the
multifunction display.
X
Have the faulty tire pressure sensor replaced at a qualified
specialist workshop. Tire Pressure Tire Pressure
Monitor Monitor
Inoperative No Inoperative No
Wheel Sensors Wheel Sensors The wheels mounted do not have a suitable tire pressure sensor.
The tire pressure monitor is deactivated.
X
Mount wheels with suitable tire pressure sensors.
The tire pressure monitor is activated automatically after driving
for a few minutes. Tire Tire
Press.
Press. Monitor
Monitor
Inoperative
Inoperative The tire pressure monitor is faulty.
X
Visit a qualified specialist workshop. Vehicle
Display messages Possible causes/consequences and
M MSolutions Shift to 'P' or
Shift to 'P' or
'N' 'N'
to
toStart
Start Engine
Engine You have attempted to start the engine with the transmission in
position
Ror D.
X Shift the transmission to position Por N. Auxiliary Battery Auxiliary Battery
Malfunction Malfunction The auxiliary battery for the automatic transmission is no longer
being charged.
X
Visit a qualified specialist workshop at the next opportunity.
X Until then, set the automatic transmission to position Pbefore
you switch off the engine.
X Before leaving the vehicle, apply the electric parking brake.
X Secure the vehicle against rolling away ( Ypage 188). Apply Brake to Apply Brake to
Shift from 'P' Shift from 'P' You have attempted to move the transmission selector lever to
position
D,Ror Nwithout depressing the brake pedal.
X Depress the brake pedal. 320
Display
messagesOn-board computer and displays
Page 325 of 462

SmartKey
Display messages Possible causes/consequences and
M
MSolutions Â
Key Does Not Key Does Not
Belong to Vehicle Belong to Vehicle You have put the wrong SmartKey in the ignition lock.
X
Use the correct SmartKey. Â
Take Take
Your
YourKey
Keyfrom
from
Ignition
Ignition The SmartKey is in the ignition lock.
X
Remove the SmartKey. Â
Obtain a New Key Obtain a New Key The SmartKey needs to be replaced.
X
Visit a qualified specialist workshop. Â
Replace Replace
Key
KeyBattery
Battery The batteries of the KEYLESS-GO key are discharged.
X
Change the batteries (Y page 83).Â
Don't Forget Your Don't Forget Your
Key Key This display message is displayed for a maximum of 60 seconds
and is simply a reminder.
You have opened the driver's door with the engine switched off.
The KEYLESS-GO key is not in the ignition lock.
X
Remember to take the KEYLESS-GO key with you when you
leave the vehicle. Â
Key Not Detected Key Not Detected
(red display message) The KEYLESS-GO key is not in the vehicle.
A warning tone also sounds.
If the engine is switched off, you can no longer lock the vehicle
centrally or start the engine.
X
Pull over and stop the vehicle safely as soon as possible, paying
attention to road and traffic conditions.
X Secure the vehicle against rolling away (Y page 188).
X Locate the KEYLESS-GO key. The KEYLESS-GO key is not detected while the engine is running
because there is interference from a strong source of radio waves.
A warning tone also sounds.
X
Pull over and stop the vehicle safely as soon as possible, paying
attention to road and traffic conditions.
X Secure the vehicle against rolling away (Y page 188).
X Operate the vehicle with the SmartKey in the ignition lock. Display messages
323On-board computer and displays Z
Page 354 of 462

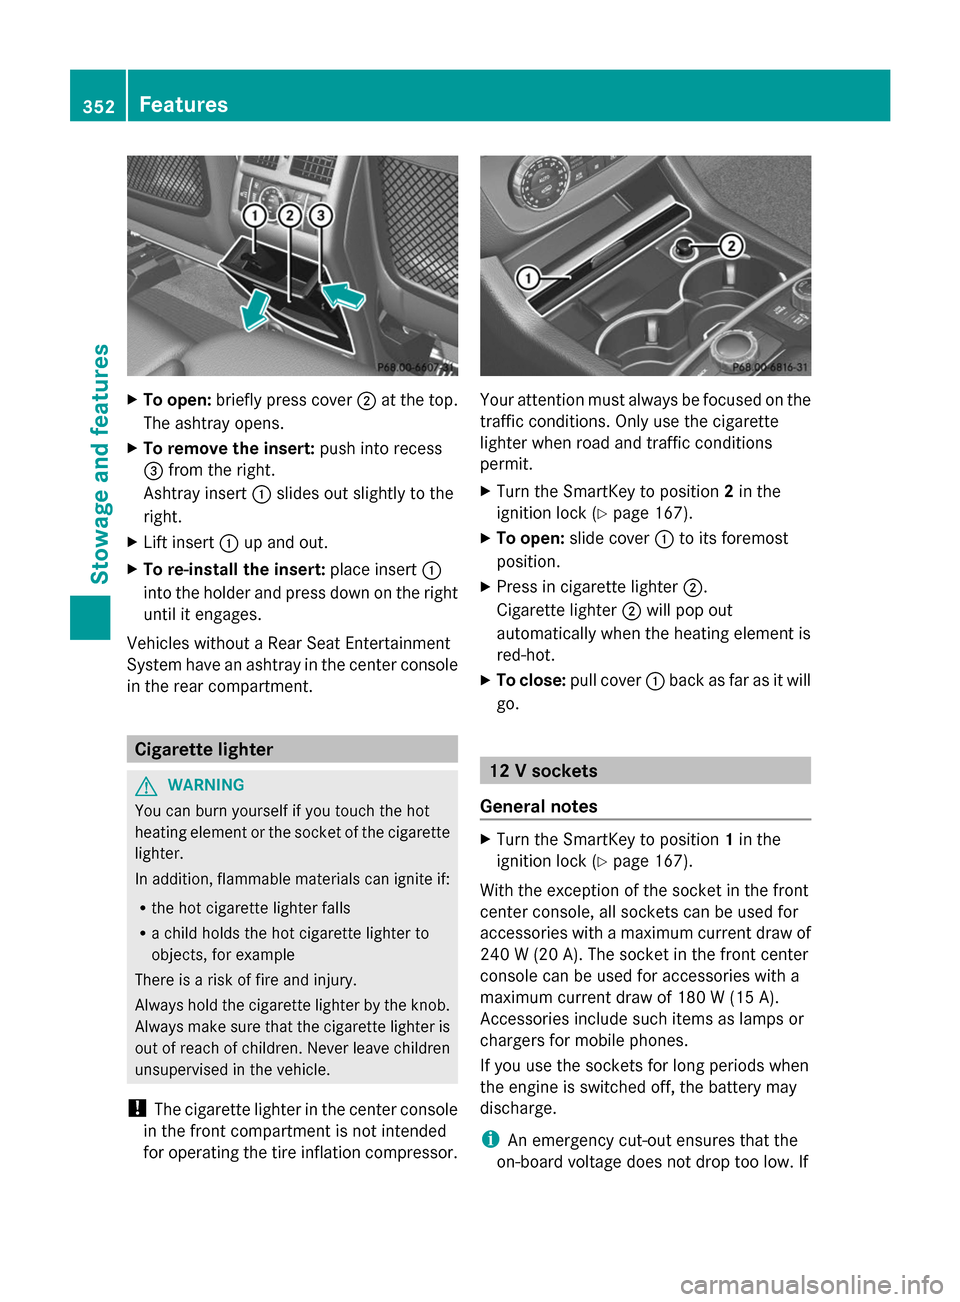
X
To open: briefly press cover ;at the top.
The ashtray opens.
X To remove the insert: push into recess
= from the right.
Ashtray insert :slides out slightly to the
right.
X Lift insert :up and out.
X To re-install the insert: place insert:
into the holder and press down on the right
until it engages.
Vehicles without a Rear Seat Entertainment
System have an ashtray in the center console
in the rear compartment. Cigarette lighter
G
WARNING
You can burn yourself if you touch the hot
heating element or the socket of the cigarette
lighter.
In addition, flammable materials can ignite if:
R the hot cigarette lighter falls
R a child holds the hot cigarette lighter to
objects, for example
There is a risk of fire and injury.
Always hold the cigarette lighter by the knob.
Always make sure that the cigarette lighter is
out of reach of children. Never leave children
unsupervised in the vehicle.
! The cigarette lighter in the center console
in the front compartment is not intended
for operating the tire inflation compressor. Your attention must always be focused on the
traffic conditions. Only use the cigarette
lighter when road and traffic conditions
permit.
X
Turn the SmartKey to position 2in the
ignition lock (Y page 167).
X To open: slide cover :to its foremost
position.
X Press in cigarette lighter ;.
Cigarette lighter ;will pop out
automatically when the heating element is
red-hot.
X To close: pull cover :back as far as it will
go. 12 V sockets
General notes X
Turn the SmartKey to position 1in the
ignition lock (Y page 167).
With the exception of the socket in the front
center console, all sockets can be used for
accessories with a maximum current draw of
240 W (20 A). The socket in the front center
console can be used for accessories with a
maximum current draw of 180 W (15 A).
Accessories include such items as lamps or
chargers for mobile phones.
If you use the sockets for long periods when
the engine is switched off, the battery may
discharge.
i An emergency cut-out ensures that the
on-board voltage does not drop too low. If 352
FeaturesSto
wage an d features
Page 357 of 462

Problems with the 115 V power socket
Problem Possible causes/consequences and
M
MSolutions The warning lamp on
the 115 V power socket
is not lit. The on-board voltage is too low because the battery is too weak.
X
Start the engine.
or
X Charge the battery (Y page 394).
If the indicator lamp still does not light up:
X Visit a qualified specialist workshop. The temperature of the DC/AC converter is temporarily too high.
X
Remove the electronic device connector from the 115 V socket.
X Let the DC/AC converter cool down.
If the indicator lamp still does not light up after cooling down the
converter:
X Visit a qualified specialist workshop. You have connected an electronic device that has a constant
nominal power of less than 150 watts, but a very high switch-on
current. This device will not work. If you connect such a device,
the 115 V power socket will not supply it with power.
X
Connect a suitable device. mbrace
General notes You must have a license agreement to
activate the mbrace service. Make sure that
your system is activated and operational. To
log in, press the ïMB Info call button. If
any of the steps mentioned are not carried
out, the system may not be activated.
If you have questions about the activation,
contact one of the following telephone
hotlines:
R USA: Mercedes-Benz Customer Assistance
Center at
1-800-FOR-MERCedes (1-800-367-6372)
or 1-866-990-9007
R Canada: Customer Service at
1-888-923-8367 Shortly after successfully registering with the
service, a user ID and password will be sent
to you by post.
USA only: you can use this password to log
onto the mbrace area under "Owners Online"
at
http://www.mbusa.com.
The system is available if:
R it has been activated and is operational
R the corresponding mobile phone network
is available for transmitting data to the
Customer Center
R a service subscription is available
R the starter battery is sufficiently charged
i Determining the location of the vehicle on
a map is only possible if:
R GPS reception is available.
R the vehicle position can be forwarded to
the Customer Assistance Center. Features
355Stowage and features Z
Page 377 of 462

You can obtain further information from an
authorized Mercedes-Benz Center or at
http://www.mbusa.com (USA only).
i The ASSYST PLUS service interval display
does not show any information on the
engine oil level. Observe the notes on the
engine oil level (Y page 371).
The multifunction display shows a service
message for several seconds, e.g.:
R Service A in .. Days
Service A in .. Days
R Service A Due Service A Due
R Service A Exceeded by .. Days
Service A Exceeded by .. Days
Depending on the operating conditions of the
vehicle, the remaining time or distance until
the next service due date is displayed.
The letter A Aor B
B, possibly in connection with
a number or another letter, shows the type of
service. A
A stands for a minor service and B
Bfor
a major service.
You can obtain further information from an
authorized Mercedes-Benz Center.
The ASSYST PLUS service interval display
does not take into account any periods of
time during which the battery is
disconnected.
Maintaining the time-dependent service
schedule:
X Note down the service due date displayed
in the multifunction display before
disconnecting the battery.
or
X After reconnecting the battery, subtract
the battery disconnection periods from the
service date shown on the display. Hiding a service message
X Press the %ora button on the
steering wheel. Displaying service messages
X Switch on the ignition.
X Press the =or; button on the
steering wheel to select the Serv.
Serv. menu.
X Press the 9or: button to select the
ASSYST PLUS ASSYST PLUS submenu and confirm by
pressing the abutton.
The service due date appears in the
multifunction display. Information about Service
Resetting the ASSYST PLUS service
interval display !
If the ASSYST PLUS service interval
display has been inadvertently reset, this
setting can be corrected at a qualified
specialist workshop.
Have service work carried out as described
in the Maintenance Booklet. This may
otherwise lead to increased wear and
damage to the major assemblies or the
vehicle.
A qualified specialist workshop, e.g. an
authorized Mercedes-Benz Center, will reset
the ASSYST PLUS service interval display
after the service work has been carried out.
You can also obtain further information on
maintenance work, for example.
Special service requirements The specified maintenance interval takes only
the normal operation of the vehicle into
account. Under arduous operating conditions
or increased load on the vehicle,
maintenance work must be carried out more
frequently, for example:
R
regular city driving with frequent
intermediate stops
R if the vehicle is primarily used to travel
short distances ASSYST PLUS
375Maintenance and care Z