2014 MERCEDES-BENZ GL-Class height
[x] Cancel search: heightPage 112 of 462

Rear seat head restraints
Adjusting the rear seat head restraint
height X
Once the head restraint is fully lowered,
press release catch :.
X To raise: pull the head restraint up to the
desired position.
X To lower: press release catch :and push
the head restraint down until it is in the
desired position.
Removing and installing the rear seat
head restraints X
To remove: pull the head restraint up to
the stop.
X Press release catch :and pull the head
restraint out of the guides.
X To re-install: insert the head restraint so
that the notches on the bar are on the left
when viewed in the direction of travel.
X Push the head restraint down until you hear
it engage in position. Rear seats (second and third row of
seats)
Important safety notes G
WARNING
If the seat and backrest are not engaged, they
can fold forwards, e.g. in the event of sudden
braking or an accident.
R This will cause the vehicle occupants to be
forced into the seat belt by a seat or
backrest which is not engaged. The seat
belt can no longer offer the intended level
of protection and could even cause injuries.
R A child restraint system would no longer be
anchored or positioned correctly and would
not be able to perform its required function.
R The seat backrests cannot restrain objects
or loads in the cargo compartment.
There is an increased risk of injury.
Always make sure that the seat and backrest
are engaged as described:
R before traveling with a passenger on a seat
with the EASY-ENTRY/EXIT feature
R after you have adjusted the seat
R after the EASY-ENTRY/EXIT feature has
been used
R after the cargo compartment enlargement
has been folded forwards G
WARNING
The seat does not engage in the entry/exit
position. The seat could fold back suddenly,
e.g. when accelerating, braking, changing
direction suddenly or in the event of an
accident. Persons in the sweep of the seat
could become trapped. There is a risk of
injury.
Always fold back a seat which has been folded
forwards before you pull away. Make sure that
the seat and backrest engage fully. 110
SeatsSeats, steering wheel and mirrors
Page 121 of 462

Problems with the seat ventilation
Problem Possible causes/consequences and
M
MSolutions The seat ventilation has
switched off
prematurely or cannot
be switched on. The on-board voltage is too low because too many electrical
consumers are switched on.
X
Switch off electrical consumers that you do not need, such as
the rear window defroster or interior lighting.
Once the battery is sufficiently charged, the seat ventilation will
switch back on automatically. Steering wheel
Important safety notes
G
WARNING
You could lose control of your vehicle if you
do the following while driving:
R adjust the driver's seat, head restraint,
steering wheel or mirrors
R fasten the seat belt
There is a risk of an accident.
Adjust the driver's seat, head restraint,
steering wheel and mirror and fasten your
seat belt before starting the engine. G
WARNING
Children could injure themselves if they
adjust the steering wheel. There is a risk of
injury.
When leaving the vehicle, always take the
SmartKey with you and lock the vehicle. Never
leave children unsupervised in the vehicle. Adjusting the steering wheel
manually
G
WARNING
If the steering wheel is unlocked while the
vehicle is in motion, it could change position
unexpectedly. This could cause you to lose
control of the vehicle. There is a risk of an
accident. Before starting off, make sure the steering
wheel is locked. Never unlock the steering
wheel while the vehicle is in motion.
:
Release lever
; To adjust the steering wheel height
= To adjust the steering wheel position
(fore-and-aft adjustment)
X Push release lever :down completely.
The steering column is unlocked.
X Adjust the steering wheel to the desired
position.
X Push release lever :up completely.
The steering column is locked.
X Check if the steering column is locked.
When doing so, try to push the steering
wheel up or down or try to move it in the
fore-and-aft direction. Steering wheel
119Seats, steering wheel and mirrors Z
Page 122 of 462

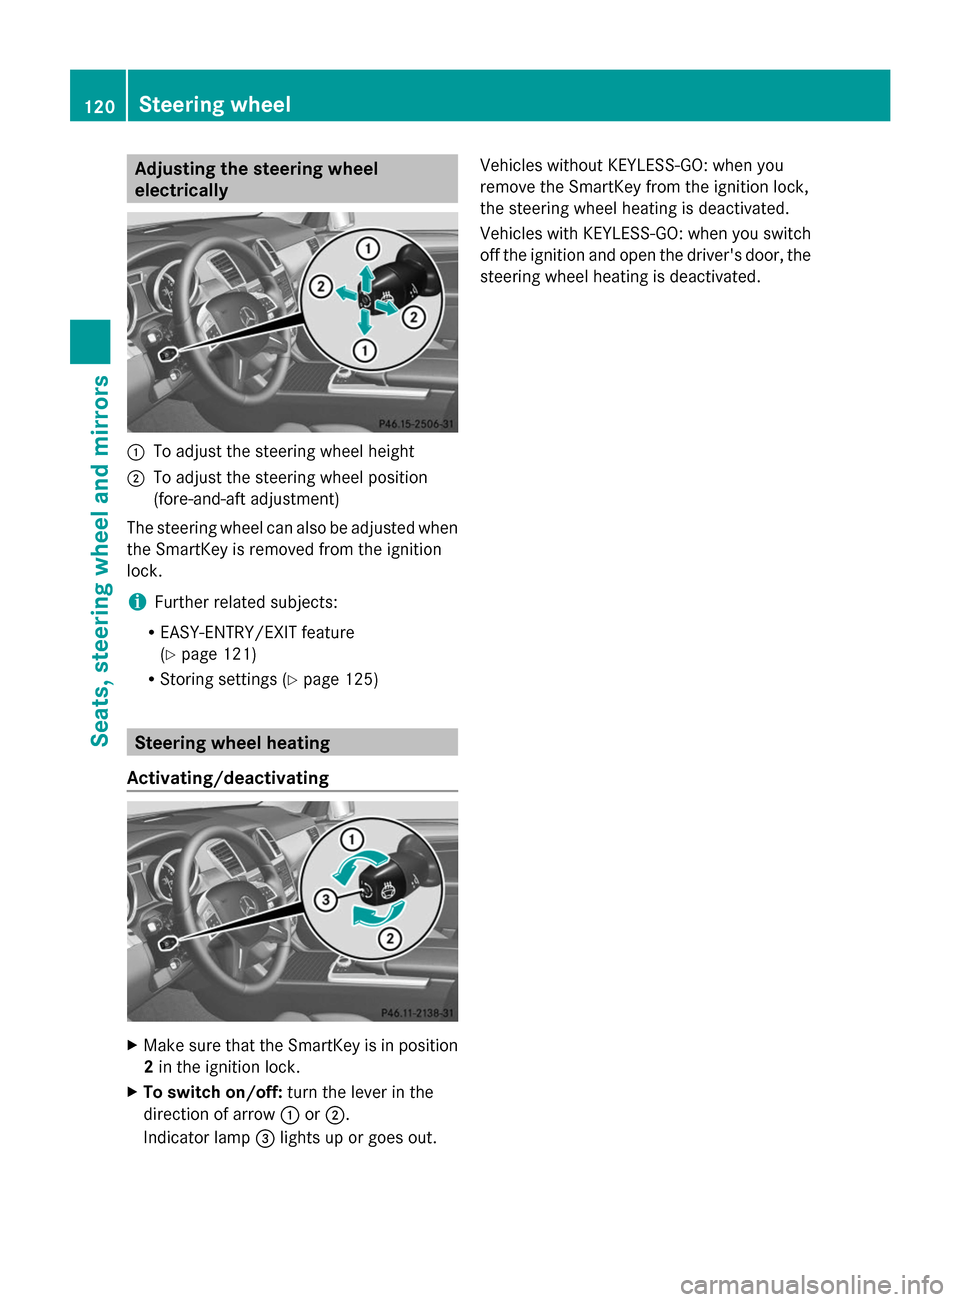
Adjusting the steering wheel
electrically
:
To adjust the steering wheel height
; To adjust the steering wheel position
(fore-and-aft adjustment)
The steering wheel can also be adjusted when
the SmartKey is removed from the ignition
lock.
i Further related subjects:
R EASY-ENTRY/EXIT feature
(Y page 121)
R Storing settings (Y page 125)Steering wheel heating
Activating/deactivating X
Make sure that the SmartKey is in position
2 in the ignition lock.
X To switch on/off: turn the lever in the
direction of arrow :or;.
Indicator lamp =lights up or goes out. Vehicles without KEYLESS-GO: when you
remove the SmartKey from the ignition lock,
the steering wheel heating is deactivated.
Vehicles with KEYLESS-GO: when you switch
off the ignition and open the driver's door, the
steering wheel heating is deactivated.120
Steering wheelSeats
, steering wheel and mirrors
Page 200 of 462

R
Always keep the engine running and in gear
when driving on a downhill gradient.
Activate DSR (Y page 256).
R Always keep the doors, tailgate, windows
and sliding sunroof closed while driving.
R Adapt your speed to the terrain. The
rougher, steeper or more ruts on the
terrain, the slower your speed should be.
R Drive slowly and at an even speed through
the water. Ensure that a bow wave does not
form as you drive.
R Drive with extreme care on unfamiliar off-
road routes where visibility is poor. For
safety reasons, get out of the vehicle first
and survey the off-road route.
R Look out for obstacles, such as rocks,
holes, tree stumps and furrows.
R Check the depth of water before fording
rivers and streams.
R When fording, do not stop and do not
switch off the engine.
R On sand, drive quickly to overcome the
rolling resistance. Otherwise the vehicle's
wheels could become stuck in loose
ground.
R Do not jump with the vehicle as this will
interrupt the vehicle's propulsion.
R Always keep the engine running and in gear
when driving on a slope.
R Do not shift the automatic transmission to
transmission position N.
i Do not use the HOLD function when
driving off-road, on steep uphill or downhill
gradients or on slippery or loose surfaces.
The HOLD function cannot hold the vehicle
on such surfaces.
Checklist before driving off-road !
If the engine oil warning lamp lights up
while the vehicle is in motion, stop the
vehicle in a safe place as soon as possible.
Check the engine oil level. The engine oil
warning lamp warning must not be ignored.
Continuing the journey while the symbol is
displayed could lead to engine damage. X
Engine oil level: check the engine oil level
and add oil if necessary.
When driving on steep gradients, the
engine oil level must be sufficiently high to
ensure a correct oil supply in the vehicle.
X DEF tank (BlueTEC vehicles): check the
level and top up if necessary (Y page 186).
X Tire-changing tool kit: check that the jack
is working and make sure you have the lug
wrench, a robust tow cable and a folding
spade in the vehicle.
X Wheels and tires: check the tire tread
depth and tire pressure.
X Check for damage and remove any foreign
objects, e.g. small stones, from the
wheels/tires.
X Replace any missing valve caps.
X Replace dented or damaged wheels.
X Rims: dented or bent rims can result in a
loss of tire pressure and damage the tire
bead. Therefore, check your rims before
driving off-road and replace them as
required.
Checklist after driving off-road !
If you detect damage to the vehicle after
driving off-road, have the vehicle checked
immediately at a qualified specialist
workshop.
X Vehicles with the ON&OFFROAD
package: activate the on-road program
(Y page 258).
X Deactivate the LOW RANGE off-road gear
(Y page 259).
X Deactivate DSR ( Ypage 256).
X Vehicles with the AIRMATIC package:
lower the vehicle to a ride height suitable
for the road conditions, e.g. to the
highway/high-speed level.
X Clean the headlamps and rear lights and
check for damage.
X Clean the front and rear license plates.
X Clean the wheels/tires with a water jet and
remove any foreign objects. 198
Driving tipsDriving an
d parking
Page 215 of 462

height if the chassis is raised. There is a risk
of an accident.
Adjust the vehicle level before pulling away. G
WARNING
Due to the high center of gravity, the vehicle
may start to skid and roll over in the event of
an abrupt steering maneuver and/or when
the vehicle's speed is not adapted to the road
conditions. There is a risk of an accident.
Always adapt your speed and driving style to
the vehicle's driving characteristics and to the
prevailing road and weather conditions.
! When driving on extremely rough terrain,
select a high vehicle level in good time.
Make sure there is always sufficient ground
clearance. You will otherwise damage the
vehicle.
R Utility vehicles have a significantly higher
rollover rate than other types of vehicles.
Failure to operate this vehicle safely may
result in an accident, rollover of the vehicle,
and severe or fatal injury.
R In a rollover crash, an unbelted person is
significantly more likely to die than a
person wearing a seat belt.
You and all vehicle occupants should
always wear your seat belts.
Basic settings The extent to which the vehicle is raised or
lowered depends on the basic setting
selected.
Select:
R
highway/high-speed level for driving on
normal roads
R off-road level 1 for driving on easily
negotiable off-road terrain
R off-road level 2 for driving on normal off-
road terrain
R off-road level 3 for freeing the vehicle in
particularly rough terrain at low speeds
only The individual vehicle levels differ from
highway level as follows:
R
highway level: +/–0 in (+/–0 mm)
R high-speed level: –0.6 in (–15 mm)
R off-road level 1: + 1.2 in (+ 30 mm)
R off-road level 2: + 2.3 in (+ 60 mm)
R off-road level 3: + 3.6 in (+ 90 mm)
Highway/high-speed level !
Make sure that there is enough ground
clearance when the vehicle is being
lowered. It could otherwise hit the ground,
damaging the underbody. :
Selector wheel
; To raise the level
= Indicator lamps
? To lower the level
X Start the engine.
X Selector wheel :
: engaged: briefly press
selector wheel :.
Selector wheel :extends.
If one or more indicator lamps =are on:
X Turn selector wheel :counter-
clockwise ?until all indicator lamps =
that are lit start to flash.
The vehicle is lowered to highway level. As
soon as the next lowest level is reached,
the indicator lamp stops flashing and goes
out. Driving systems
213Driving and parking Z
Page 220 of 462

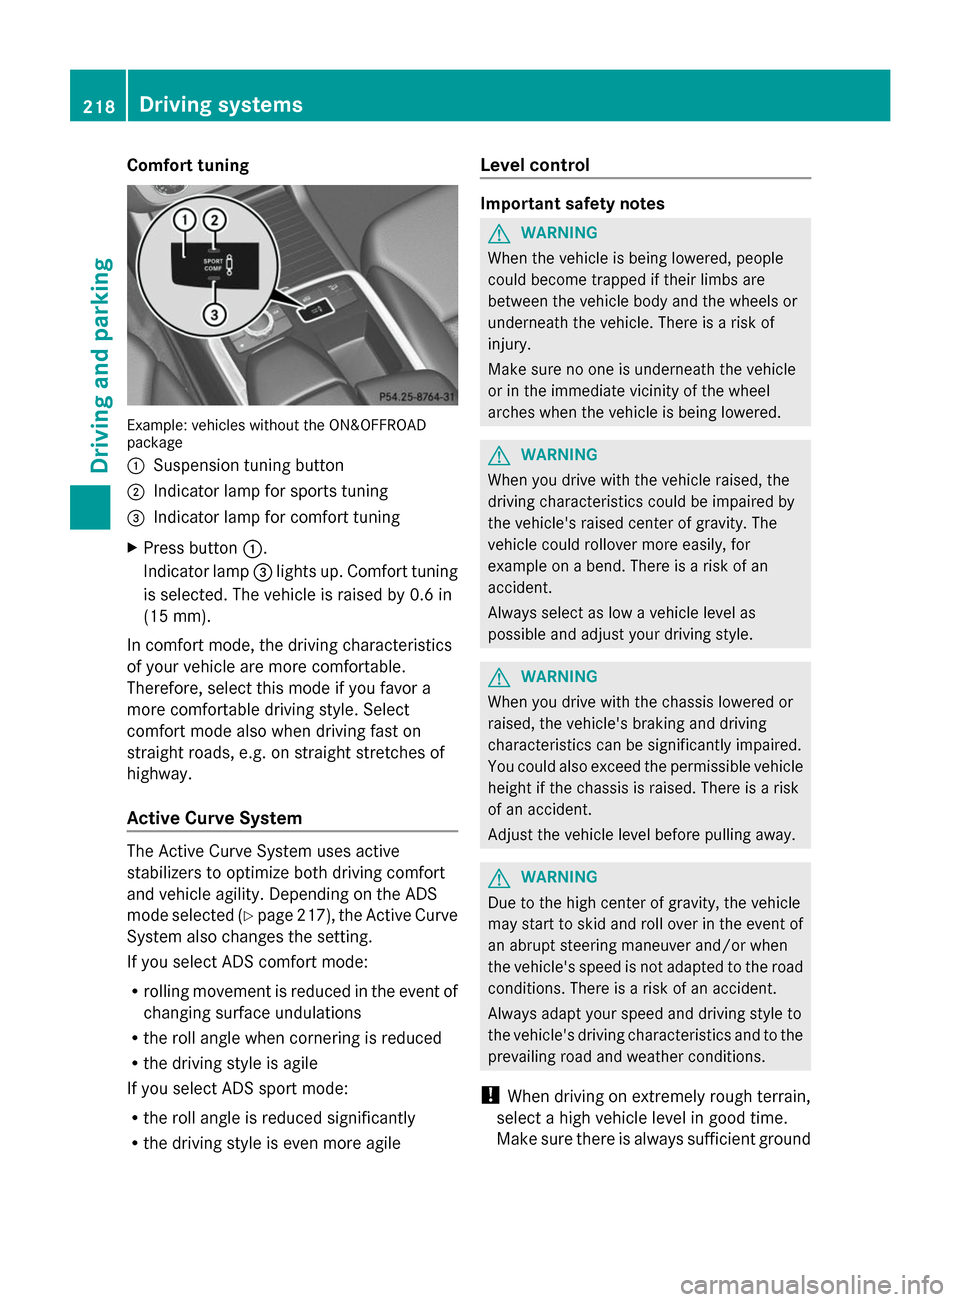
Comfort tuning
Example: vehicles without the ON&OFFROAD
package
: Suspension tuning button
; Indicator lamp for sports tuning
= Indicator lamp for comfort tuning
X Press button :.
Indicator lamp =lights up. Comfort tuning
is selected. The vehicle is raised by 0.6 in
(15 mm).
In comfort mode, the driving characteristics
of your vehicle are more comfortable.
Therefore, select this mode if you favor a
more comfortable driving style. Select
comfort mode also when driving fast on
straight roads, e.g. on straight stretches of
highway.
Active Curve System The Active Curve System uses active
stabilizers to optimize both driving comfort
and vehicle agility. Depending on the ADS
mode selected (Y page 217), the Active Curve
System also changes the setting.
If you select ADS comfort mode:
R rolling movement is reduced in the event of
changing surface undulations
R the roll angle when cornering is reduced
R the driving style is agile
If you select ADS sport mode:
R the roll angle is reduced significantly
R the driving style is even more agile Level control Important safety notes
G
WARNING
When the vehicle is being lowered, people
could become trapped if their limbs are
between the vehicle body and the wheels or
underneath the vehicle. There is a risk of
injury.
Make sure no one is underneath the vehicle
or in the immediate vicinity of the wheel
arches when the vehicle is being lowered. G
WARNING
When you drive with the vehicle raised, the
driving characteristics could be impaired by
the vehicle's raised center of gravity. The
vehicle could rollover more easily, for
example on a bend. There is a risk of an
accident.
Always select as low a vehicle level as
possible and adjust your driving style. G
WARNING
When you drive with the chassis lowered or
raised, the vehicle's braking and driving
characteristics can be significantly impaired.
You could also exceed the permissible vehicle
height if the chassis is raised. There is a risk
of an accident.
Adjust the vehicle level before pulling away. G
WARNING
Due to the high center of gravity, the vehicle
may start to skid and roll over in the event of
an abrupt steering maneuver and/or when
the vehicle's speed is not adapted to the road
conditions. There is a risk of an accident.
Always adapt your speed and driving style to
the vehicle's driving characteristics and to the
prevailing road and weather conditions.
! When driving on extremely rough terrain,
select a high vehicle level in good time.
Make sure there is always sufficient ground 218
Driving systemsDriving and parking
Page 229 of 462

Active Parking Assist may possibly indicate
parking spaces which are not suitable for
parking, for example:
R where parking or stopping is prohibited
R in front of driveways or entrances and exits
R on unsuitable surfaces
Parking tips:
R On narrow roads, drive as close to the
parking space as possible.
R Parking spaces that are littered or
overgrown might be identified or measured
incorrectly.
R Parking spaces that are partially occupied
by trailer drawbars might not be identified
as such or be measured incorrectly.
R Snowfall or heavy rain may lead to a parking
space being measured inaccurately.
R Pay attention to the PARKTRONIC
(Y page 224) warning messages during the
parking procedure.
R At any time, you can intervene in the
steering procedure to correct it. Active
Parking Assist will then be canceled.
R When transporting a load which protrudes
from your vehicle, you should not use
Active Parking Assist.
R Never use Active Parking Assist when snow
chains are installed.
R Make sure that the tire pressures are
always correct. This has a direct influence
on the parking characteristics of the
vehicle.
Use Active Parking Assist for parking spaces:
R that are parallel to the direction of travel
R that are on straight roads, not bends
R that are on the same level as the road, e.g.
not on the pavement
Detecting parking spaces Objects located above the height range of
Active Parking Assist will not be detected
when the parking space is measured. These
are not taken into account when the parking procedure is calculated, e.g. overhanging
loads, tail sections or loading ramps of goods
vehicles. G
WARNING
If there are objects above the detection range,
Active Parking Assist may turn prematurely.
You may cause a collision as a result. There is
a risk of an accident.
If there are objects above the detection range,
stop and deactivate Active Parking Assist.
For further information on the detection
range (Y page 223).
Active Parking Assist does not support you
with parking spaces parallel to the direction
of travel if:
R the parking space is on a curb
R the system reads the parking space as
being blocked, for example by foliage or
grass paving blocks
R the area is too small for the vehicle to
maneuver into
R the parking space is bordered by an
obstacle, e.g. a tree, a post or a trailer :
Detected parking space on the left
; Parking symbol
= Detected parking space on the right
Active Parking Assist is switched on
automatically when driving forwards. The
system is operational at speeds of up to
approximately 22 mph (35 km/h). While in
operation, the system independently locates
and measures parking spaces on both sides
of the vehicle. Driving systems
227Driving and parking Z
Page 236 of 462

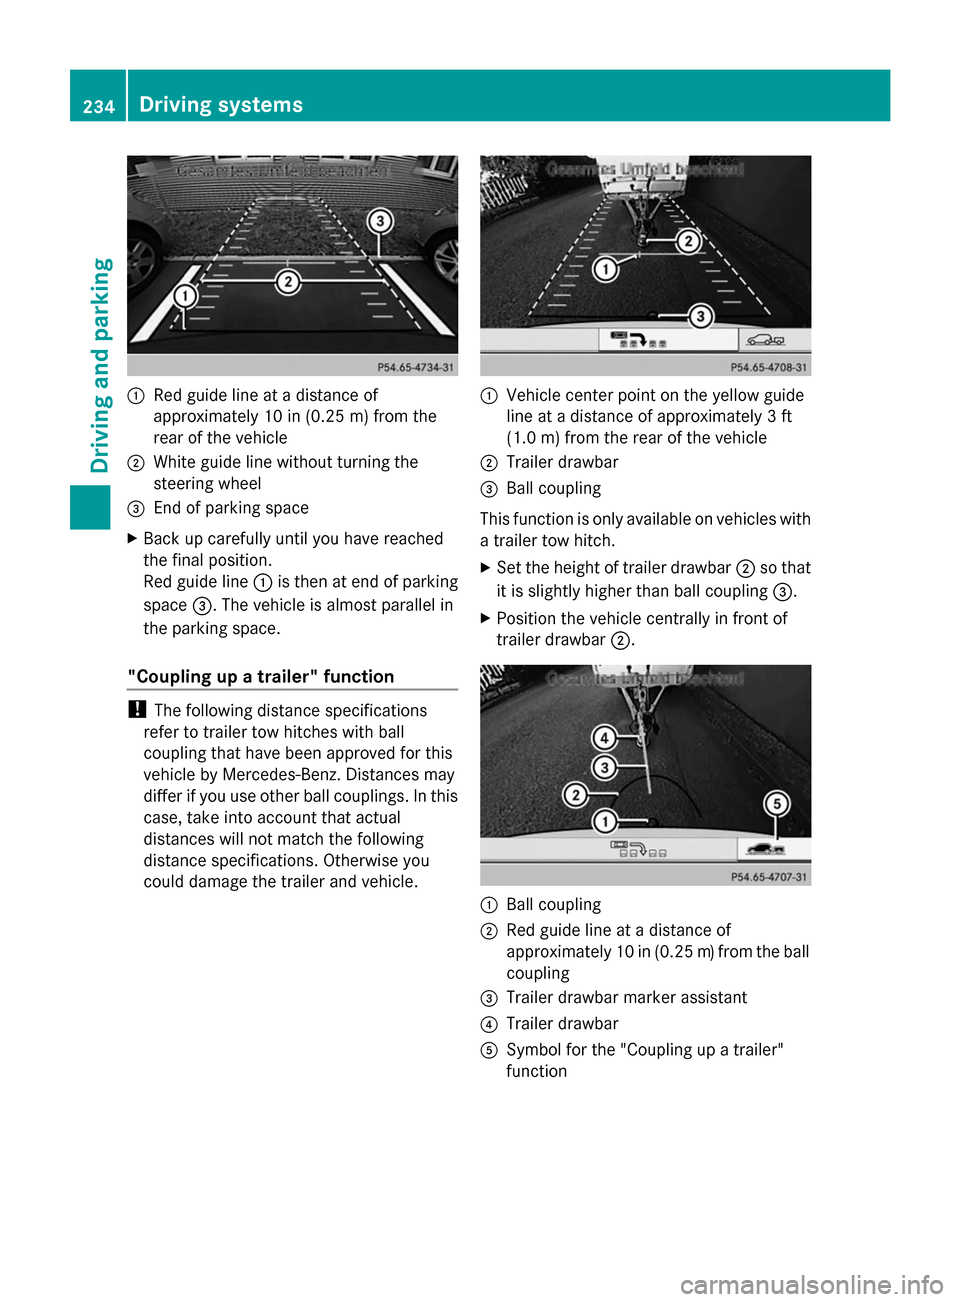
:
Red guide line at a distance of
approximately 10 in (0.25 m) from the
rear of the vehicle
; White guide line without turning the
steering wheel
= End of parking space
X Back up carefully until you have reached
the final position.
Red guide line :is then at end of parking
space =. The vehicle is almost parallel in
the parking space.
"Coupling up a trailer" function !
The following distance specifications
refer to trailer tow hitches with ball
coupling that have been approved for this
vehicle by Mercedes-Benz. Distances may
differ if you use other ball couplings. In this
case, take into account that actual
distances will not match the following
distance specifications. Otherwise you
could damage the trailer and vehicle. :
Vehicle center point on the yellow guide
line at a distance of approximately 3 ft
(1.0 m) from the rear of the vehicle
; Trailer drawbar
= Ball coupling
This function is only available on vehicles with
a trailer tow hitch.
X Set the height of trailer drawbar ;so that
it is slightly higher than ball coupling =.
X Position the vehicle centrally in front of
trailer drawbar ;. :
Ball coupling
; Red guide line at a distance of
approximately 10 in (0.25 m)from the ball
coupling
= Trailer drawbar marker assistant
? Trailer drawbar
A Symbol for the "Coupling up a trailer"
function 234
Driving systemsDriving and parking