2014 MERCEDES-BENZ G-CLASS SUV door lock
[x] Cancel search: door lockPage 74 of 272

!
The weather can change abruptly. It could
start to rain or snow. Make sure that the
sliding sunroof is closed when you leave the
vehicle. The vehicle electronics can be
damaged if water enters the vehicle
interior.
i Resonance noises can occur in addition
to the usual airflow noises when the sliding
sunroof is open. They are caused by minor
pressure fluctuations in the vehicle interior.
Change the position of the sliding sunroof
or open a side window slightly to reduce or
eliminate these noises. Opening and closing the sliding
sunroof
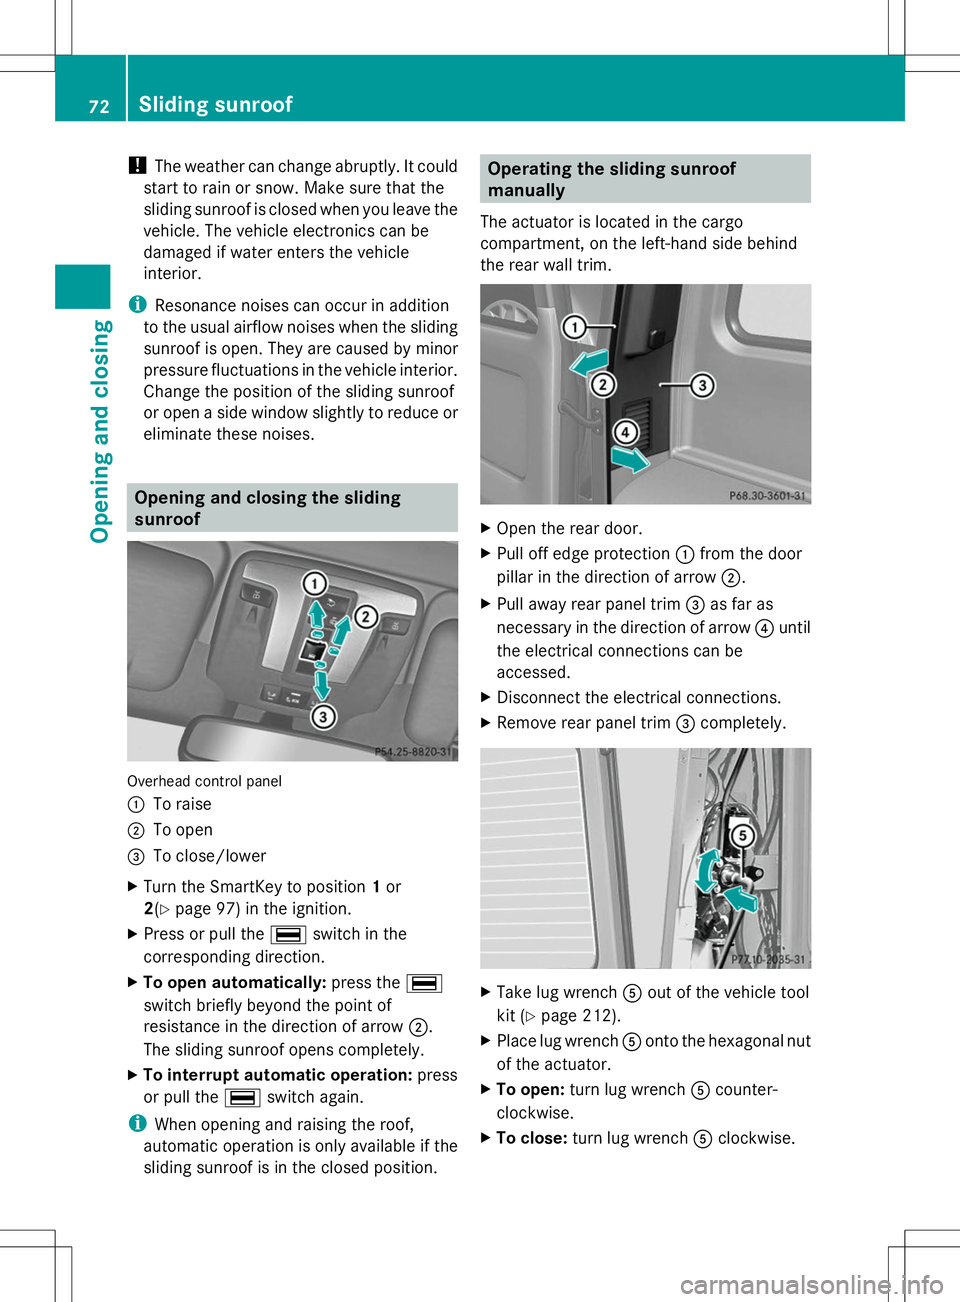
Overhead control panel
:
To raise
; To open
= To close/lower
X Turn the SmartKey to position 1or
2(Y page 97) in the ignition.
X Press or pull the ¡switch in the
corresponding direction.
X To open automatically: press the¡
switch briefly beyond the point of
resistance in the direction of arrow ;.
The sliding sunroof opens completely.
X To interrupt automatic operation: press
or pull the ¡switch again.
i When opening and raising the roof,
automatic operation is only available if the
sliding sunroof is in the closed position. Operating the sliding sunroof
manually
The actuator is located in the cargo
compartment, on the left-hand side behind
the rear wall trim. X
Open the rear door.
X Pull off edge protection :from the door
pillar in the direction of arrow ;.
X Pull away rear panel trim =as far as
necessary in the direction of arrow ?until
the electrical connections can be
accessed.
X Disconnect the electrical connections.
X Remove rear panel trim =completely. X
Take lug wrench Aout of the vehicle tool
kit (Y page 212).
X Place lug wrench Aonto the hexagonal nut
of the actuator.
X To open: turn lug wrench Acounter-
clockwise.
X To close: turn lug wrench Aclockwise. 72
Sliding sunroofOpening and closing
Page 84 of 272

Useful information
i This Operator's Manual describes all
models and all standard and optional
equipment of your vehicle available at the
time of publication of the Operator's
Manual. Country-specific differences are
possible. Please note that your vehicle may
not be equipped with all features
described. This also applies to safety-
related systems and functions.
i Read the information on qualified
specialist workshops: (Y page 27).Exterior lighting
Important safety notes
For reasons of safety, Mercedes-Benz
recommends that you drive with the lights
switched on even during the daytime. In some
countries, operation of the headlamps varies
due to legal requirements and self-imposed
obligations. Driving abroad
Conversion to symmetrical low beam Switch the headlamps to symmetrical low
beam in countries in which traffic drives on
the opposite side of the road from the country
where the vehicle is registered. This prevents
glare to oncoming traffic. When using
symmetrical lights, the edge of the road is not
lit as widely and as far ahead as normal.
Have the headlamps converted at a qualified
specialist workshop as close to the border as
possible before driving in these countries.
Conversion to asymmetrical low beam
after returning Have the headlamps converted back to
asymmetrical low-beam headlamps at a
qualified specialist workshop as soon as
possible after crossing the border again. Information in the Digital Operator's
Manual
In the Digital Operator's Manual you will find
information on the following topics:
R Hazard warning lamps
R Headlamp cleaning system
R Headlamps fogged up on the inside Light switch
Operation !
Switch off the parking lamps and low-
beam headlamps when you leave the
vehicle. This prevents the battery from
discharging.
! If the battery has been excessively
discharged, the parking lamps or standing
lamps are automatically switched off to
enable the next engine start. Always park
your vehicle safely and sufficiently lit
according to legal standards. Avoid the
continuous use of the Tparking lamps
for several hours. If possible, switch on the
X right or the Wleft standing lamp.
If you hear a warning tone when you leave the
vehicle, the lights may still be switched on.
X Turn the light switch to Ã.
The turn signals, high-beam headlamps and
the high-beam flasher are operated using the
combination switch (Y page 83).
The exterior lighting (except the parking/
standing lamps) switches off automatically if
you:
R remove the SmartKey from the ignition lock
R open the driver's door with the SmartKey
in position 0. 82
Exterior lightingLights and windshield wipers
Page 86 of 272

In the Digital Operator's Manual you will find
information on the following topics:
R Turn signals
R High-beam headlamps
R High-beam flasher Hazard warning lamps
X
To switch on the hazard warning lamps:
press button :.
All turn signals flash. If you now switch on
a turn signal using the combination switch,
only the turn signal lamp on the
corresponding side of the vehicle will flash.
X To switch off the hazard warning
lamps: press button :.
The hazard warning lamps automatically
switch on if:
R an air bag is deployed
R the Emergency Tensioning Devices are
triggered, or
R the vehicle is slowed down rapidly from a
speed of over 45 mph (70 km/h) and
comes to a halt
The hazard warning lamps switch on
automatically if an air bag or the Emergency
Tensioning Devices are triggered and the
SmartKey is in position 1in the ignition lock.
The hazard warning lamps switch off
automatically if the vehicle reaches a speed
of over 6mph (10km/h) again after a full
brake application. i
The hazard warning lamps still operate if
the ignition is switched off. Cornering light function
The cornering light function improves the
illumination of the road over a wide angle in
the direction you are turning, enabling better
visibility in tight bends, for example. The
cornering light function can only be activated
if the low-beam headlamps are switched on
and the fog lamps are switched off.
Active:
if you are driving at speeds below
25 mph (40 km/h) and switch on the turn
signal or turn the steering wheel
Not active: if you are driving at speeds above
25 mph (40 km/h) or switch off the turn
signal or turn the steering wheel to the
straight-ahead position
The cornering light function may remain lit for
a short time, but is automatically switched off
after no more than three minutes. Interior lighting
An overview of the interior lighting and the
overhead control panel can be found in the
"At a glance" section.
In the Digital Operator's Manual you will find
information on the following topics:
R Automatic interior lighting control
R Manual interior lighting control
R Courtesy lighting in the front doors 84
Interior lightingLights and windshield wipers
Page 101 of 272

!
If a warning tone sounds and the
Release Park. Brake
Release Park. Brake message appears
in the multifunction display, the parking
brake is still applied. Release the parking
brake.
X Depress the brake pedal and keep it
depressed.
X Shift the automatic transmission to
position Dor R.
i Before driving off, wait until the gear
change is fully completed.
X Release the parking brake (Y page 105).
X Release the brake pedal.
X Carefully depress the accelerator pedal.
i It is only possible to shift the automatic
transmission from position Pto a different
position if you depress the brake pedal.
Only then is the selector lever lock
released.
i The vehicle locks centrally once you have
pulled away. The locking knobs in the doors
drop down.
You can open the doors from the inside at
any time.
You can also deactivate the automatic
locking feature (Y page 144).
i Upshifts take place at higher engine
speeds after a cold start. This helps the
catalytic converter to reach its operating
temperature more quickly.
Hill start assist G
WARNING
After a short time, hill start assist will no
longer brake your vehicle and it could roll
away. There is a risk of an accident and injury.
Therefore, quickly move your foot from the
brake pedal to the accelerator pedal. Never
leave the vehicle when it is held by hill start
assist.
Hill start assist helps you when pulling away
forwards or in reverse on an uphill gradient. It holds the vehicle for a short time after you
have removed your foot from the brake pedal.
This gives you enough time to move your foot
from the brake pedal to the accelerator pedal
and to depress it before the vehicle begins to
roll.
X
Take your foot off the brake pedal.
i Once you have taken your foot off the
brake pedal, the vehicle is held for around
one second.
X Pull away.
Hill start assist will not function if:
R you are pulling away on a level road or on
a downhill gradient.
R the transmission is in position N.
R the parking brake is applied.
R ESP ®
is malfunctioning. ECO start/stop function (AMG
vehicles)
In the Digital Operator's Manual, you will find
general notes on and information about:
R Deactivating/activating the ECO start/
stop function
R Automatic engine switch-off/engine start Automatic transmission
Important safety notes
G
WARNING
If the engine speed is above the idling speed
and you engage transmission position Dor
R, the vehicle could pull away suddenly. There
is a risk of an accident.
When engaging transmission position Dor R,
always firmly depress the brake pedal and do
not simultaneously accelerate. G
WARNING
The automatic transmission switches to
neutral position Nwhen you switch off the Automatic transmission
99Driving and parking
Z
Page 102 of 272

engine. The vehicle may roll away. There is a
risk of an accident.
After switching off the engine, always switch
to parking position P. Prevent the parked
vehicle from rolling away by applying the
parking brake.
i Bear in mind that the power transmission
between the engine and the transmission
is interrupted when the engine is switched
off. For this reason, shift the automatic
transmission to Pwhen the engine is
switched off and the vehicle is at a
standstill. Apply the parking brake to
prevent the vehicle from rolling away. Selector lever
Overview of transmission positions !
If the engine speed is too high or if the
vehicle is rolling, do not shift the
transmission directly from Dto R, from R
to Dor directly to P.
Do not open the driver's door while the
vehicle is in motion. At low speeds in
transmission position Dor R, park position
P is otherwise engaged automatically.
The transmission could be damaged. Selector lever
j
Park position
k Reverse gear
i Neutral
h Drive In the Digital Operator's Manual you will find
information on the following topics:
R
Engaging parking position P
R Engaging reverse gear R
R Engaging neutral N
R Neutral Nin the ECO start/stop function
(AMG vehicles)
R Shifting to transmission position D
R Transmission position Din the ECO start/
stop function (AMG vehicles)
Transmission position and drive
program display !
If the transmission position display in the
multifunction display is not working, you
should pull away carefully to check whether
the desired transmission position is
engaged. Select transmission position D.
Do not restrict the shift range. :
Transmission position
; Drive program
Current transmission position :and current
drive program ;appear in the multifunction
display.
The current position of the selector lever is
shown by the indicators next to the selector
lever.
The indicators light up when the SmartKey is
inserted into the ignition lock. The indicators
go out when the SmartKey is removed from
the ignition lock.
When the selector lever is in position D, you
can influence the gearshifts made by the
automatic transmission by:
R restricting the shift range
R changing gear yourself 100
Automatic transmissionDriving and parking
Page 105 of 272

X
Remove the SmartKey from the ignition
lock.
X Turn the fuel filler cap counterclockwise
and remove it.
X Insert the fuel filler cap into the holder
bracket on the inside of filler flap ?.
Refueling X
Completely insert the filler neck of the fuel
pump nozzle into the tank and refuel.
i Do not add any more fuel after the pump
stops filling for the first time. Otherwise,
fuel may leak out.
Closing X
Replace the fuel filler cap and turn it
clockwise. The fuel filler cap audibly
engages.
X Close the fuel filler flap.
i Close the fuel filler flap before locking the
vehicle. A locking pin otherwise prevents
the fuel filler flap from closing after the
vehicle has been locked. Fuel filler flap emergency release
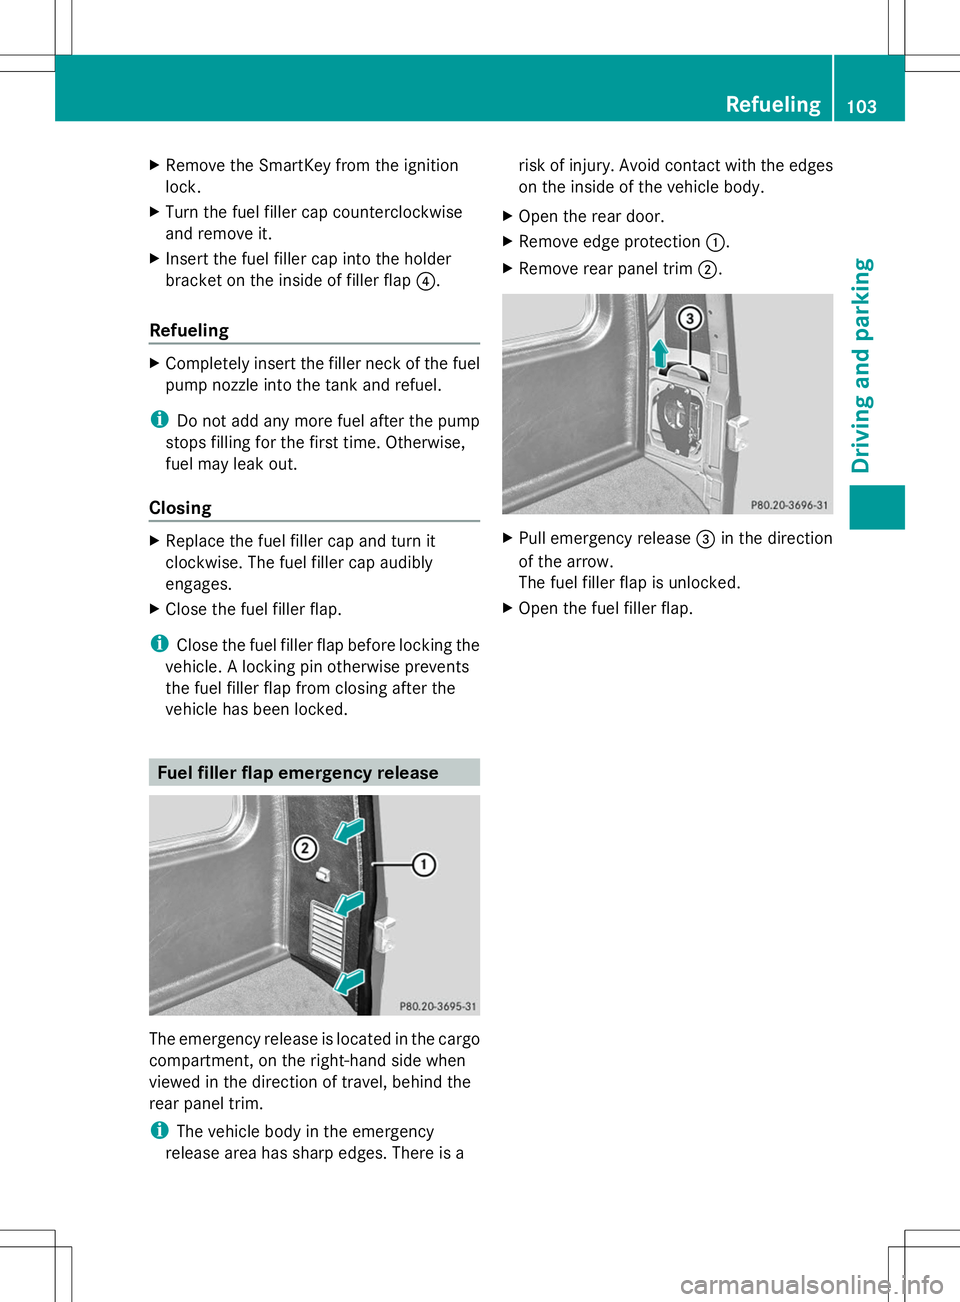
The emergency release is located in the cargo
compartment, on the right-hand side when
viewed in the direction of travel, behind the
rear panel trim.
i The vehicle body in the emergency
release area has sharp edges. There is a risk of injury. Avoid contact with the edges
on the inside of the vehicle body.
X Open the rear door.
X Remove edge protection :.
X Remove rear panel trim ;. X
Pull emergency release =in the direction
of the arrow.
The fuel filler flap is unlocked.
X Open the fuel filler flap. Refueling
103Driving and pa rking Z
Page 106 of 272

Problems with the fuel and fuel tank
Problem Possible causes/consequences and
M
MSolutions Fuel is leaking from the
vehicle.
G
Risk of explosion or fire
The fuel line or the fuel tank is defective.
X Turn the SmartKey to position 0(Ypage 97) in the ignition lock
immediately and remove it.
X Do not restart the engine under any circumstances.
X Consult a qualified specialist workshop. The fuel filler flap
cannot be opened. The fuel filler flap is not unlocked.
or
The SmartKey batteries are discharged.
X
Unlock the vehicle (Y page 66).
or
X Unlock the vehicle using the mechanical key (Y page 67).
X Open the rear door.
X Manually unlock the fuel filler flap using the emergency release
(Y page 103). The fuel filler flap is unlocked, but the opening mechanism is
jammed.
X
Manually unlock the fuel filler flap using the emergency release
(Y page 103).
X Consult a qualified specialist workshop. Parking
Important safety notes
G
WARNING
If you leave children unsupervised in the
vehicle, they could set it in motion by, for
example:
R release the parking brake.
R shift the automatic transmission out of the
parking position P.
R start the engine.
In addition, they may operate vehicle
equipment and become trapped. There is a
risk of an accident and injury. When leaving the vehicle, always take the
SmartKey with you and lock the vehicle. Never
leave children unsupervised in the vehicle.
G
WARNING
Flammable material such as leaves, grass or
twigs may ignite if they come into contact with
hot parts of the exhaust system or exhaust
gas flow. There is a risk of fire.
Park the vehicle so that no flammable
materials come into contact with parts of the
vehicle which are hot. Take particular care not
to park on dry grassland or harvested grain
fields. 104
ParkingDriving and parking
Page 109 of 272

For this reason, in the event of heavy rain or
in conditions in which hydroplaning may
occur, you must drive in the following
manner:
R lower your speed.
R avoid ruts.
R brake carefully.
Driving on flooded roads !
Do not drive through flooded areas.
Check the depth of any water before driving
through it. Drive slowly through standing
water. Otherwise, water may enter the
vehicle interior or the engine compartment.
This can damage the electronic
components in the engine or the automatic
transmission. Water can also be drawn in
by the engine's air suction nozzles and this
can cause engine damage.
If you have to drive on stretches of road on
which water has collected, please bear in
mind that:
R the maximum permissible still water depth
depends on the vehicle equipment
R you should drive no faster than at walking
pace
Off-road fording !
Under no circumstances should you
accelerate before entering the water. The
bow wave could cause water to enter and
damage the engine and other assemblies.
! Do not open any of the vehicle's doors
while fording. Otherwise, water could get
into the vehicle interior and damage the
vehicle's electronics and interior
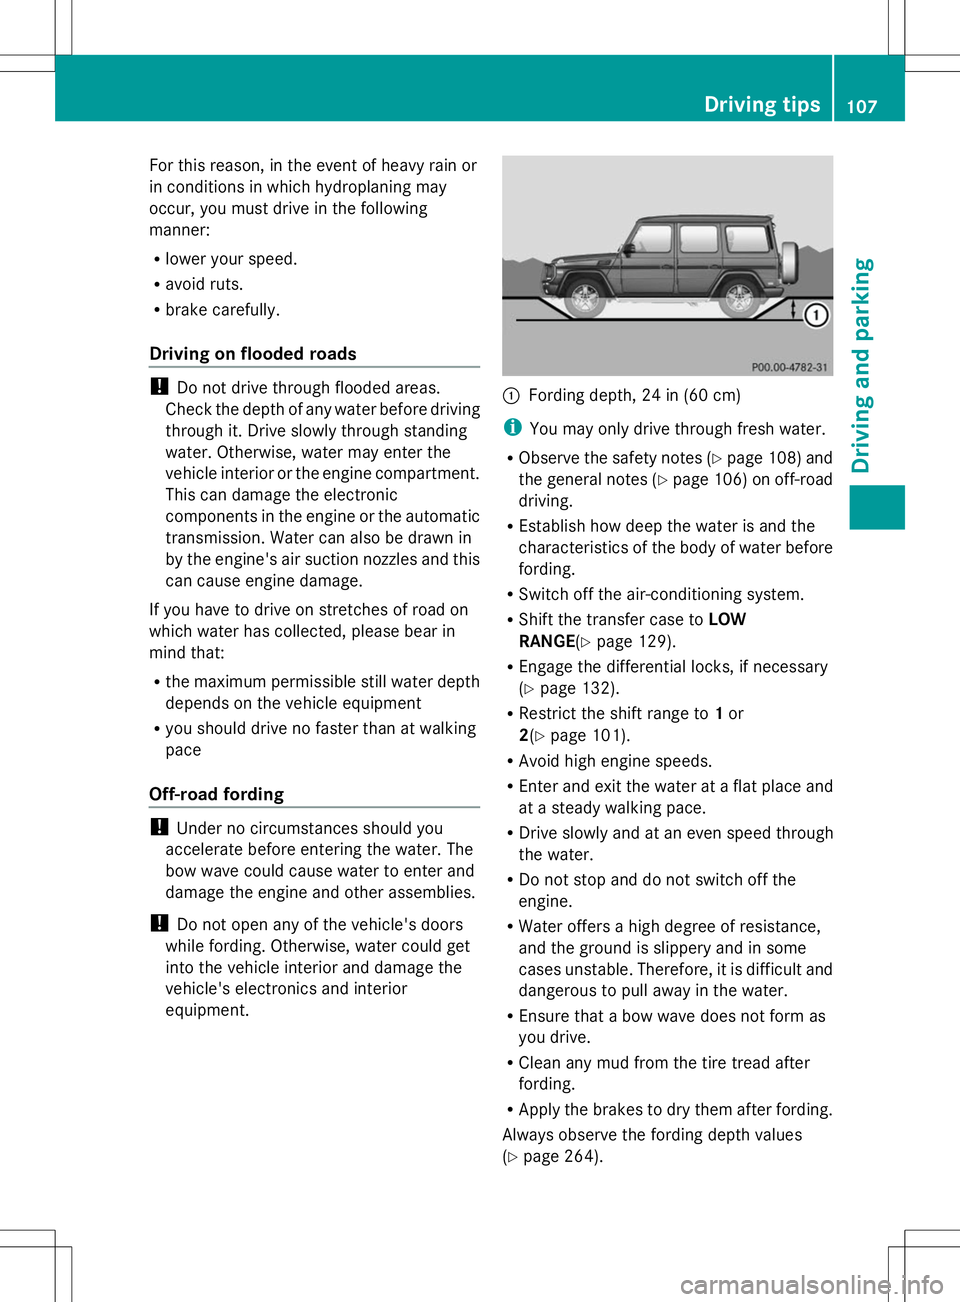
equipment. :
Fording depth, 24 in (60 cm)
i You may only drive through fresh water.
R Observe the safety notes (Y page 108) and
the general notes (Y page 106) on off-road
driving.
R Establish how deep the water is and the
characteristics of the body of water before
fording.
R Switch off the air-conditioning system.
R Shift the transfer case to LOW
RANGE (Ypage 129).
R Engage the differential locks, if necessary
(Y page 132).
R Restrict the shift range to 1or
2(Y page 101).
R Avoid high engine speeds.
R Enter and exit the water at a flat place and
at a steady walking pace.
R Drive slowly and at an even speed through
the water.
R Do not stop and do not switch off the
engine.
R Water offers a high degree of resistance,
and the ground is slippery and in some
cases unstable. Therefore, it is difficult and
dangerous to pull away in the water.
R Ensure that a bow wave does not form as
you drive.
R Clean any mud from the tire tread after
fording.
R Apply the brakes to dry them after fording.
Always observe the fording depth values
(Y page 264). Driving tips
107Driving and parking Z