2014 MERCEDES-BENZ G-CLASS SUV lock
[x] Cancel search: lockPage 231 of 272

Information on the dimensions and types of
wheels and tires for your vehicle can be found
in the "Wheel/tire combinations" section
(Y page 253).
Information on air pressure for the tires on
your vehicle can be found:
R on the tire pressure label on the fuel filler
flap
R in the "Tire pressure" section
i Further information on wheels and tires
can be obtained at any qualified specialist
workshop. Operation
Notes on driving
If the vehicle is heavily loaded, check the tire
pressures and correct them if necessary.
When parking your vehicle, make sure that
the tires do not get deformed by the curb or
other obstacles. If it is necessary to drive over
curbs, speed humps or similar elevations, try
to do so slowly and at an obtuse angle.
Otherwise, the tires, particularly the
sidewalls, may be damaged. Regular checking of wheels and tires
G
WARNING
Regularly check the tires for damage.
Damaged tires can cause tire inflation
pressure loss. As a result, you could lose
control of your vehicle.
Worn, old tires can cause accidents. If the tire
tread is worn to minimum tread depth, or if
the tires have sustained damage, replace
them.
R Regularly check the wheels and tires of
your vehicle for damage at least once a
month, as well as after driving off-road or
on rough roads. Damage includes bulges
and deformation on tires, cuts, punctures,
cracks or severe corrosion on wheels, for example. Damaged wheels can cause a
loss of tire pressure.
R Regularly check the tire tread depth and
the condition of the tread across the whole
width of the tire (Y page 229). In order to
inspect the inner side of the tire surface,
turn the steering wheel to full lock.
R All wheels must have a valve cap to protect
the valve against dirt and moisture. Do not
install anything onto the valve other than
the standard valve cap or a valve cap
approved by Mercedes-Benz for your
vehicle.
Do not install anything onto the valve, such
as tire pressure monitoring systems.
R You should regularly check the pressure of
all your tires including the spare wheel,
particularly prior to long trips. Adjust the
tire pressure as necessary (Y page 236).
The service life of tires depends, among other
things, on the following factors:
R driving style
R tire pressure
R distance covered Tire tread
G
WARNING
Although the applicable federal motor vehicle
safety laws consider a tire to be worn when
the treadwear indicators (TWI) become visible
at approximately áinches (1.6 mm), we
recommend that you do not allow your tires
to wear down to that level. As tread depth
approaches âinches (3 mm) the adhesion
properties on a wet road are sharply reduced.
Depending upon the weather and/or road
surface (conditions), the tire traction varies
widely. Operation
229Wheels and tires Z
Page 238 of 272

i
Canada only:
This device complies with RSS-210 of
Industry Canada. Operation is subject to
the following two conditions:
1. This device may not cause interference,
and
2. this device must accept any interference
received, including interference that may
cause undesired operation.
Any unauthorized modification to this
device could void the user's authority to
operate the equipment.
Checking tire pressure electronically X
Make sure that the SmartKey is in
position 2(Y page 97) in the ignition lock.
X Press the =or; button on the
steering wheel to select the Serv.
Serv. menu.
X Press the 9or: button to select
Tire Pressure
Tire Pressure.
X Press button a.
The current tire pressure for each wheel will
be displayed in the multifunction display.
If the vehicle has been parked for over
20 minutes, the message Tire pressure Tire pressure
will be displayed after driving a
will be displayed after driving a
few minutes
few minutes appears.
After a teach-in period, the tire pressure
monitor automatically recognizes new wheels
or new sensors. As long as a clear allocation
of the tire pressure values to the individual
wheels is not possible, the Tire Pressure
Tire Pressure
Monitor Active
Monitor Active display message is shown
instead of the tire pressure display. The tire
pressures are already being monitored.
i If a spare wheel is mounted, the system
may continue to show the tire pressure of
the wheel that has been removed for a few
minutes. If this occurs, note that the value
displayed for the position where the spare
wheel is mounted is not the same as the
spare wheel's current tire pressure. Tire pressure monitor warning
messages If the tire pressure monitor detects a
significant pressure loss on one or more tires,
a warning message is shown in the
multifunction display. A warning tone also
sounds and the tire pressure warning lamp
lights up in the instrument cluster.
Each tire that is affected by a significant loss
of pressure is highlighted in the pressure
display.
X If the Correct Tire PressureCorrect Correct Tire PressureCorrect
Tire Pressure
Tire Pressure message appears in the
multifunction display, check the tire
pressure on all four wheels and correct it if
necessary.
i If the wheel positions on the vehicle are
interchanged, the tire pressures may be
displayed for the wrong positions for a
short time. This is rectified after a few
minutes of driving, and the tire pressures
are displayed for the correct positions.
Restarting the tire pressure monitor When you restart the tire pressure monitor,
all existing warning messages are deleted and
the warning lamps go out. The monitor uses
the currently set tire pressures as the
reference values for monitoring. In most
cases, the tire pressure monitor will
automatically detect the new reference
values after you have changed the tire
pressure. However, you can also define
reference values manually as described here.
X Set the tire pressure to the value
recommended for the corresponding
driving situation on the Tire and Loading
Information placard on the driver's side
B-pillar (Y page 230).
Additional tire pressure values for different
loads can also be found on the tire pressure
table on the inside of the fuel filler flap
(Y page 230).
X Make sure that the tire pressure is correct
on all four wheels. 236
Tire pressureWheels and ti
res
Page 239 of 272

X
Make sure that the SmartKey is in
position 2(Y page 97) in the ignition lock.
X Press the =or; button on the
steering wheel to select the Serv. Serv.menu.
X Press the 9or: button to select
Tire Pressure
Tire Pressure.
X Press the abutton.
The multifunction display shows the
current tire pressure for the individual tires
or the Tire pressure will be
Tire pressure will be
displayed after driving a few displayed after driving a few
minutes minutes message.
X Press the :button.
The Use Current Pressures as New
Use Current Pressures as New
Reference Values
Reference Values message appears in
the multifunction display.
If you wish to confirm the restart:
X Press the abutton.
The Tire Press. Monitor Restarted
Tire Press. Monitor Restarted
message appears in the multifunction
display.
After driving for a few minutes, the system
checks whether the current tire pressures
are within the specified range. The new tire
pressures are then accepted as reference
values and monitored.
If you wish to cancel the restart:
X Press the %button.
The tire pressure values stored at the last
restart will continue to be monitored. Loading the vehicle
Instruction labels for tires and loads
G
WARNING
Overloaded tires can overheat, causing a
blowout. Overloaded tires can also impair the
steering and driving characteristics and lead
to brake failure. There is a risk of accident.
Observe the load rating of the tires. The load
rating must be at least half of the GAWR of
your vehicle. Never overload the tires by
exceeding the maximum load. :
B-pillar, driver's side
Two instruction labels on your vehicle show
the maximum possible load.
(1) The Tire and Loading Information placard is on the B-pillar on the driver's side. The
Tire and Loading Information placard
shows the maximum permissible number
of occupants and the maximum
permissible vehicle load. It also contains
details of the tire sizes and
corresponding pressures for tires
mounted at the factory.
(2) The vehicle identification plate is on the B-pillar on the driver's side. The vehicle
identification plate informs you of the
gross vehicle weight rating. It is made up
of the vehicle weight, all vehicle
occupants, the fuel and the cargo. You
can also find information about the
maximum gross axle weight rating on the
front and rear axle.
The maximum gross axle weight rating is
the maximum weight that can be carried
by one axle (front or rear axle). Never
exceed the maximum load or the
maximum gross axle weight rating for the
front or rear axle. Loading the vehicle
237Wheels and tires Z
Page 253 of 272
Securing the vehicle to prevent it from
rolling away X
On level ground: place chocks or other
suitable items under the front and rear of
the wheel that is diagonally opposite the
wheel you wish to change.
X On downhill gradients: place chocks or
other suitable items in front of the wheels
of the front and rear axle.
Raising the vehicle G
WARNING
If you do not position the jack correctly at the
appropriate jacking point of the vehicle, the
jack could tip over with the vehicle raised.
There is a risk of injury.
Only position the jack at the appropriate
jacking point of the vehicle. The base of the
jack must be positioned vertically, directly
under the jacking point of the vehicle.
! The jack is designed exclusively for
jacking up the vehicle at the jacking points.
Otherwise, your vehicle could be damaged.
The following must be observed when raising
the vehicle:
R to raise the vehicle, only use the vehicle-
specific jack that has been tested and
approved by Mercedes-Benz. If used
incorrectly, the jack could tip over with the
vehicle raised.
R the jack is designed only to raise and hold
the vehicle for a short time while a wheel
is being changed. It is not suited for
performing maintenance work under the
vehicle.
R avoid changing the wheel on uphill and
downhill slopes.
R before raising the vehicle, secure it from
rolling away by applying the parking brake
and inserting wheel chocks. Never
disengage the parking brake while the
vehicle is raised. R
the jack must be placed on a firm, flat and
non-slip surface. On a loose surface, a
large, load-bearing underlay must be used.
On a slippery surface, a non-slip underlay
must be used, e.g. rubber mats.
R do not use wooden blocks or similar
objects as a jack underlay. Otherwise, the
jack will not be able to achieve its load-
bearing capacity due to the restricted
height.
R make sure that the distance between the
underside of the tires and the ground does
not exceed 1.2 in (3 cm).
R never place your hands and feet under the
raised vehicle.
R never lie under the raised vehicle.
R never start the engine when the vehicle is
raised.
R never open or close a door or the tailgate
when the vehicle is raised.
R make sure that no persons are present in
the vehicle when the vehicle is raised. X
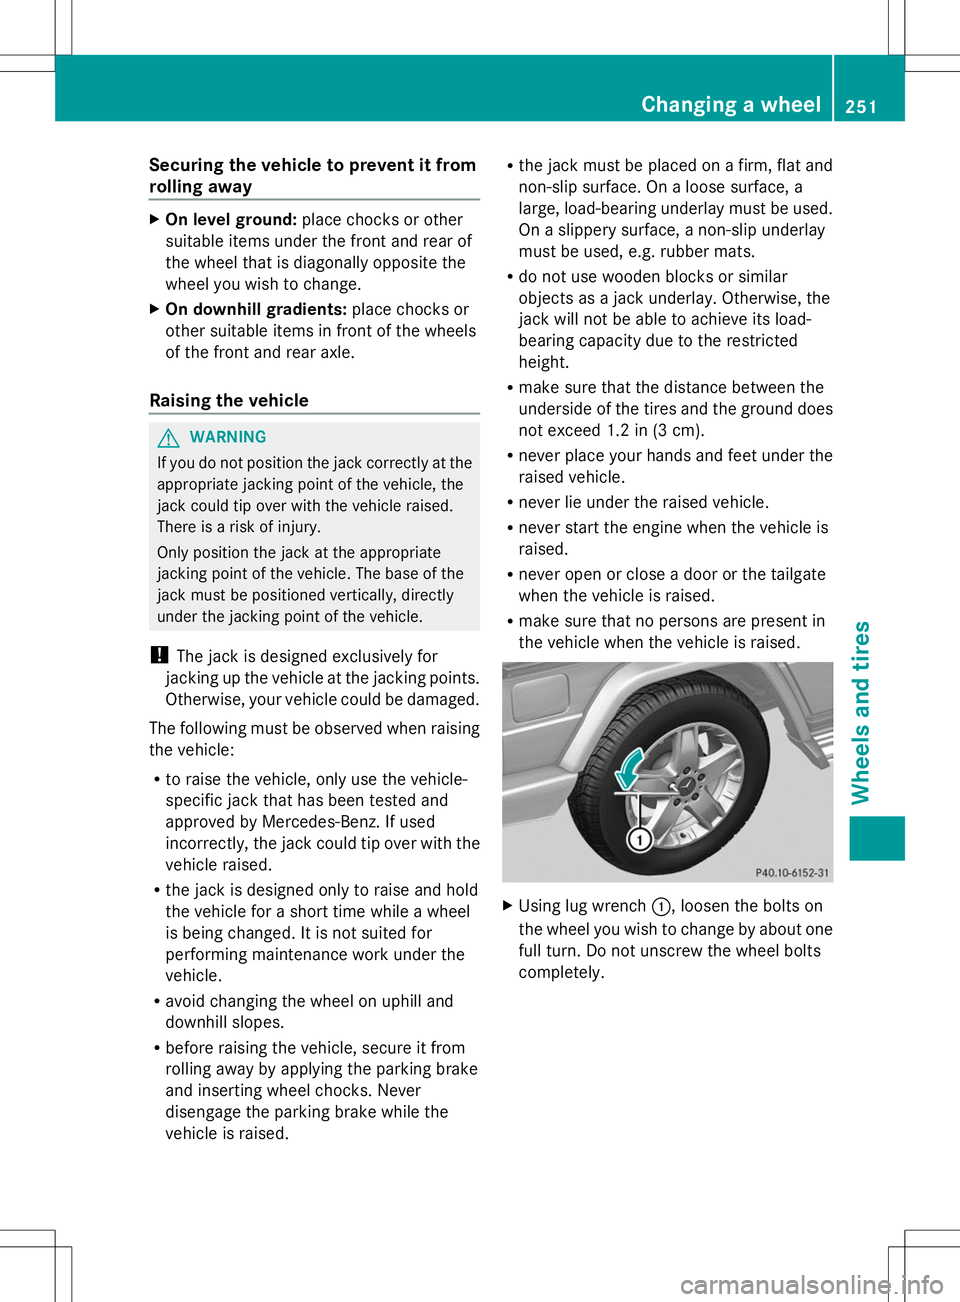
Using lug wrench :, loosen the bolts on
the wheel you wish to change by about one
full turn. Do not unscrew the wheel bolts
completely. Changing a wheel
251Wheels and tires Z
Page 254 of 272

Pump lever
;
X Assemble the pump lever for the jack. It can
be found with the vehicle tool kit
(Y page 212). X
Turn pressure release screw =clockwise
as far as it will go using notch ;on the
pump lever.
Pressure release screw =is closed.
i Do not turn pressure release screw =by
more than one to two revolutions.
Otherwise, hydraulic fluid could escape. X
Set jack :on solid ground.
X Position jack :on the axle carrier
tube ;of the front or rear axle. Jack :
must always stand vertically, even on
slopes.
Make sure that jack :is correctly
positioned under axle carrier tube ;. The
front or rear axle must sit securely in the
recess of jack :.
X Raise the vehicle by pumping in the
direction of the arrow until the tire is
1.2 in (3 cm) off the ground at the most.
Removing a wheel !
Do not place wheel bolts in sand or on a
dirty surface. The bolt and wheel hub
threads could otherwise be damaged when
you screw them in.
X Unscrew the wheel bolts.
X Remove the wheel.
Mounting a new wheel G
WARNING
Always replace wheel bolts that are damaged
or rusted.
Never oil or grease wheel bolts. This could
cause the bolts to loosen in the wheel hub. G
WARNING
Always replace wheel bolts that are damaged
or rusted.
Never apply oil or grease to wheel bolts.
Damaged wheel hub threads should be
repaired immediately. Do not continue to
drive under these circumstances! Contact an
authorized Mercedes-Benz Center or call
Roadside Assistance.
Incorrect wheel bolts or improperly tightened
wheel bolts can cause the wheel to come off.
This could cause an accident. Make sure to
use the correct wheel bolts. 252
Changing a wheelWheels and tires
Page 261 of 272

Fuel
Important safety notes G
WARNING
Fuel is highly flammable. If you handle fuel
incorrectly, there is a risk of fire and
explosion.
You must avoid fire, open flames, creating
sparks and smoking. Switch off the engine
and, if applicable, the auxiliary heating before
refueling. G
WARNING
Fuel is poisonous and hazardous to health.
There is a risk of injury.
You must make sure that fuel does not come
into contact with your skin, eyes or clothing
and that it is not swallowed. Do not inhale fuel
vapors. Keep fuel away from children.
If you or others come into contact with fuel,
observe the following:
R Wash away fuel from skin immediately
using soap and water.
R If fuel comes into contact with your eyes,
immediately rinse them thoroughly with
clean water. Seek medical assistance
without delay.
R If fuel is swallowed, seek medical
assistance without delay. Do not induce
vomiting.
R Immediately change out of clothing which
has come into contact with fuel.
Tank capacity Total capacity
All models
25.4 US gal
(96.0 l) Of which reserve
All models
Approx.
3.7 US gal (14.0 l) Gasoline (EN 228)
Fuel grade
!
Do not use diesel to refuel vehicles with a
gasoline engine. Even small amounts of the
wrong fuel result in damage to the fuel
system and engine.
! You should only refuel with unleaded
premium-grade gasoline as this avoids
damaging the catalytic converter.
If engine running problems are apparent,
have the cause checked immediately and
repaired. Excess unburned fuel can
otherwise enter the catalytic converter,
leading to overheating and possibly
causing a fire.
! To ensure the longevity and full
performance of the engine, only premium-
grade unleaded gasoline may be used.
If there is no premium-grade unleaded
gasoline available and regular unleaded
gasoline must be used, please observe the
following precautions:
R only fill the fuel tank to half full with
regular unleaded gasoline and fill the rest
with premium-grade unleaded gasoline
as soon as possible.
R do not drive at the maximum speed.
R avoid sudden acceleration.
R if the vehicle is carrying a light load, e.g.
two passengers without luggage, do not
allow the engine to rev above 3000 rpm.
R if the vehicle is fully loaded or is being
operated in mountainous terrain, do not
depress the accelerator pedal further
than Ôof the pedal travel.
! Use a filter when refueling from a fuel can.
Otherwise, the fuel lines and/or injection
system could be blocked by particles from
the fuel can.
Only refuel using premium-grade unleaded
gasoline with a minimum octane rating of 91. Service products and filling capacities
259Technical data Z
Page 265 of 272

design. The renewal interval in the
Maintenance Booklet is only valid if the
coolant is renewed or added to with
Mercedes-Benz approved products.
Therefore, only use MB 326.0 antifreeze/
corrosion inhibitor or another Mercedes-Benz
approved product of the same specification.
Information on other products with the same
specifications that are approved by
Mercedes-Benz can be obtained at an
authorized Mercedes-Benz Center or on the
Internet at
http://bevo.mercedes-benz.com.
If the coolant level is too low, MB 325.0
antifreeze/corrosion inhibitor should be
added. Have the engine cooling system
checked for possible leaks.
Capacity Model Capacity
G 550
Approx. 11.1 US qt
(10.5 l)
G 63 AMG
Approx. 14.6 US qt
(13.8 l)
Low-temperature
circuit:
approximately
3.1 US qt (2.9 l)
i
Use MB 325.0 or MB 326.0 corrosion
inhibitor/antifreeze. Washer fluid
Important safety notes G
WARNING
Windshield washer concentrate is highly
flammable. If it comes into contact with hot
engine components or the exhaust system it
could ignite. There is a risk of fire and injury.
Make sure that no windshield washer
concentrate is spilled next to the filler neck. !
Only use washer fluid that is suitable for
plastic lamp lenses, e.g. MB SummerFit or
MB WinterFit. Unsuitable washer fluid
could damage the plastic lenses of the
headlamps.
! Do not add distilled or de-ionized water to
the washer fluid container. Otherwise, the
level sensor may be damaged.
! Only MB SummerFit and MB WinterFit
washer fluid should be mixed together. The
spray nozzles may otherwise become
blocked.
At temperatures above freezing:
X Fill the washer fluid reservoir with a mixture
of water and windshield washer fluid, e.g.
MB SummerFit.
X Add 1 part MB SummerFit to 100 parts
water.
At temperatures below freezing:
X Fill the washer fluid reservoir with a mixture
of water and washer fluid, e.g. MB
WinterFit.
Adapt the mixing ratio to the outside
temperature.
X Down to 14 ‡ (Ò10 †): mix 1 part MB
WinterFit to 2 parts water.
X Down to Ò4 ‡ (Ò20 †): mix 1 part MB
WinterFit to 1 part water.
X Down to Ò20.2 ‡ (Ò29 †): mix 2 parts MB
WinterFit to 1 part water.
i Add washer fluid concentrate, e.g. MB
SummerFit or MB WinterFit, to the washer
fluid all year round.
Filling capacities Model Capacity
All models (except
for AMG vehicles)
7.4 US qt (7.0 l)
AMG vehicles
3.6 US qt (3.4 l)Service products and filling capacities
263Technical data Z