2014 MERCEDES-BENZ CLS SHOOTING BRAKE sensor
[x] Cancel search: sensorPage 230 of 417

The warning vibration occurs later if:
R the road has narrow lanes
R you cut the corner on a bend Active Driving Assistance package
General notes The Active Driving Assistance package con-
sists of DISTRONIC PLUS (Y page 191), Active
Blind Spot Assist (Y page 227) and Active
Lane Keeping Assist (Y page 229).
Active Blind Spot Assist General notes
Active Blind Spot Assist monitors the areas
on either side of the vehicle that are not visi-
ble to the driver with two lateral, rear-facing
radar sensors. A warning display in the exte-
rior mirrors draws your attention to vehicles
detected in the monitored area. If you then
switch on the corresponding turn signal to
change lanes, you will also receive a visual
and audible collision warning. If a risk of side impact is detected, corrective braking may
help you avoid a collision. Active Blind Spot
Assist evaluates the free space in the direc-
tion of travel and to the side before making a course-correcting brake application. For this,Active Blind Spot Assist uses the forward-
facing radar sensors.
Active Blind Spot Assist supports you from a
speed of approximately 30 km/h.
Important safety notes
Active Blind Spot Assist is only an aid and is
not a substitute for attentive driving. G
WARNING
Active Blind Spot Assist does not react to
vehicles:
R overtaking too closely on the side, placing
them in the blind spot area
R if the difference in the speed of approach
and overtaking is too great As a result, Active Blind Spot Assist may nei-
ther give warnings nor intervene in such sit-
uations. There is a risk of an accident.
Always pay careful attention to the traffic sit-
uation and maintain a safe distance at the sideof the vehicle.
Radar sensors
The Active Blind Spot Assist radar sensors are integrated into the front and rear bumpers
and behind a cover in the radiator grille. Make
sure that the bumpers and the cover in the
radiator grille are free of dirt, ice or slush. The rear sensors must not be covered, e.g. by
bicycle racks or overhanging loads. Following
a severe impact or in the event of damage to the bumpers, have the function of the radar
sensors checked at a qualified specialist
workshop. Active Blind Spot Assist may oth-
erwise no longer function properly.
Monitoring range G
WARNING
Active Blind Spot Assist does not detect all
traffic situations and road users. There is a
risk of an accident.
Always make sure that there is sufficient dis-
tance to the side for other traffic or obstacles. Example: CLS Coupé Driving systems
227Driving and parking Z
Page 231 of 417
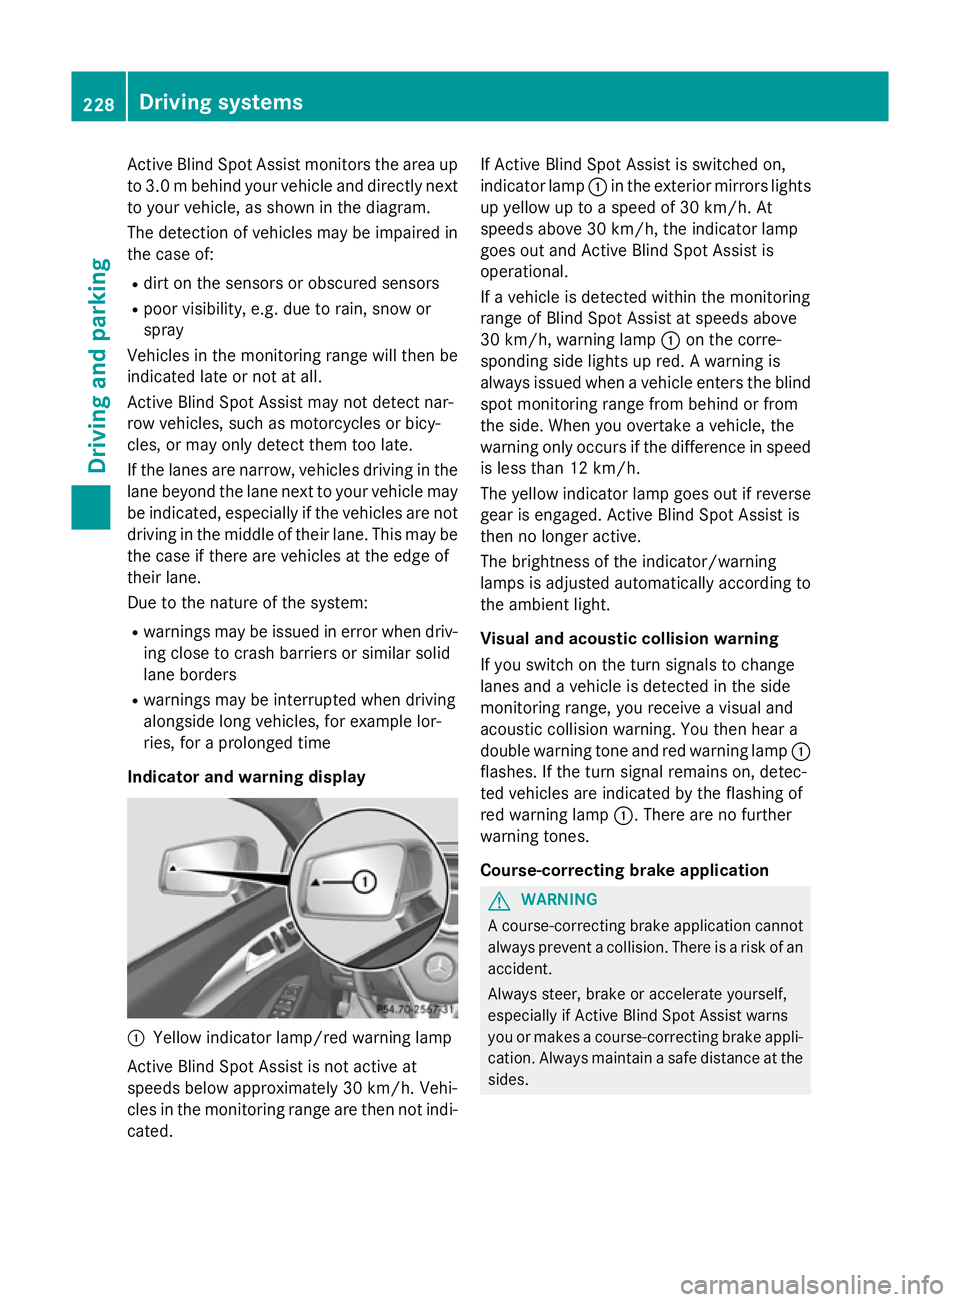
Active Blind Spot Assist monitors the area up
to 3.0 mbehind your vehicle and directly next
to your vehicle, as shown in the diagram.
The detection of vehicles may be impaired in the case of:
R dirt on the sensors or obscured sensors
R poor visibility, e.g. due to rain, snow or
spray
Vehicles in the monitoring range will then be
indicated late or not at all.
Active Blind Spot Assist may not detect nar-
row vehicles, such as motorcycles or bicy-
cles, or may only detect them too late.
If the lanes are narrow, vehicles driving in the
lane beyond the lane next to your vehicle may
be indicated, especially if the vehicles are not
driving in the middle of their lane. This may be the case if there are vehicles at the edge of
their lane.
Due to the nature of the system:
R warnings may be issued in error when driv-
ing close to crash barriers or similar solid
lane borders
R warnings may be interrupted when driving
alongside long vehicles, for example lor-
ries, for a prolonged time
Indicator and warning display :
Yellow indicator lamp/red warning lamp
Active Blind Spot Assist is not active at
speeds below approximately 30 km/h. Vehi-
cles in the monitoring range are then not indi-
cated. If Active Blind Spot Assist is switched on,
indicator lamp :in the exterior mirrors lights
up yellow up to a speed of 30 km/h. At
speeds above 30 km/h, the indicator lamp
goes out and Active Blind Spot Assist is
operational.
If a vehicle is detected within the monitoring
range of Blind Spot Assist at speeds above
30 km/h, warning lamp :on the corre-
sponding side lights up red. A warning is
always issued when a vehicle enters the blind
spot monitoring range from behind or from
the side. When you overtake a vehicle, the
warning only occurs if the difference in speed is less than 12 km/h.
The yellow indicator lamp goes out if reverse
gear is engaged. Active Blind Spot Assist is
then no longer active.
The brightness of the indicator/warning
lamps is adjusted automatically according to
the ambient light.
Visual and acoustic collision warning
If you switch on the turn signals to change
lanes and a vehicle is detected in the side
monitoring range, you receive a visual and
acoustic collision warning. You then hear a
double warning tone and red warning lamp :
flashes. If the turn signal remains on, detec-
ted vehicles are indicated by the flashing of
red warning lamp :. There are no further
warning tones.
Course-correcting brake application G
WARNING
A course-correcting brake application cannot always prevent a collision. There is a risk of an
accident.
Always steer, brake or accelerate yourself,
especially if Active Blind Spot Assist warns
you or makes a course-correcting brake appli-
cation. Always maintain a safe distance at the sides. 228
Driving systemsDriving an
d parking
Page 233 of 417
lane unintentionally. If you do not react to the
warning, a lane-correcting application of the
brakes can bring the vehicle back into the
original lane.
This function is available in the range between
60 km/h and 200 km/h.
For Active Lane Keeping Assist to assist you
when driving, the radar sensor system must
be operational.
Important safety notes
If you fail to adapt your driving style, Active
Lane Keeping Assist can neither reduce the
risk of an accident nor override the laws of
physics. Active Lane Keeping Assist cannot
take into account road, weather or traffic con-
ditions. It may not recognise traffic situations. Active Lane Keeping Assist is only an aid. Youare responsible for the distance to the vehicle in front, for vehicle speed, for braking in good
time and for staying in lane.
Active Lane Keeping Assist cannot continu-
ously keep your vehicle in its lane. G
WARNING
Active Lane Keeping Assist cannot always
clearly detect lane markings.
In such cases, Active Lane Keeping Assist
can:
R give an unnecessary warning and then
make a course-correcting brake application
to the vehicle
R neither give a warning nor intervene
There is a risk of an accident.
Always pay particular attention to the traffic
situation and keep within the lane, especially
if Active Lane Keeping Assist alerts you. Ter-
minate the intervention in a non-critical driv-
ing situation. The system may be impaired or may not func-
tion if:
R there is poor visibility, e.g. due to insuffi-
cient illumination of the road, or due to
snow, rain, fog or spray
R there is glare, e.g. from oncoming traffic,
the sun or reflection from other vehicles
(e.g. if the road surface is wet)
R the windscreen is dirty, misted up, dam-
aged or covered, for instance by a sticker,
in the vicinity of the camera
R the radar sensors in the front or rear bump-
ers or the radiator trim are dirty, e.g.
obscured by snow
R no, or several, unclear lane markings are
present for one lane, e.g. in a construction
area
R the lane markings are worn away, dark or
covered up, e.g. by dirt or snow
R the distance to the vehicle in front is too
small and the lane markings thus cannot be
detected
R the lane markings change quickly, e.g.
lanes branch off, cross one another or
merge
R the road is narrow and winding
R there are highly variable shade conditions
on the road
If no vehicle is detected in the adjacent lane
and broken lane markings are detected, no
lane-correcting brake application is made.
Warning vibration through the steering
wheel
A warning may be given if a front wheel
passes over a lane marking. It will warn you by means of intermittent vibration in the steer-
ing wheel for up to 1.5 seconds.
Lane-correcting brake application G
WARNING
A lane-correcting brake application cannot
always bring the vehicle back into the original lane. There is a risk of an accident. 230
Driving systemsDriving and parking
Page 254 of 417
X
Press the abutton.
The current selection is displayed.
X To activate/deactivate: press thea
button again.
If the Blind Spot Assist Sensors deac‐
Blind Spot Assist Sensors deac‐
tivated
tivated orAct. B. Spot Assist Sen‐
Act. B. Spot Assist Sen‐
sors deactivated
sors deactivated message appears, the
radar sensor system is deactivated.
X Switch on the radar sensor system
(Y page 255).
Further information about Blind Spot Assist
(Y page 223).
Further information about Active Blind Spot
Assist (Y page 227).
Activating/deactivating Lane Keeping
Assist X
Press the =or; button on the steer-
ing wheel to select the Assist. Assist.menu.
X Press the 9or: button to select
Lane Keep. Assist
Lane Keep. Assist
X Press the abutton.
The current selection is displayed.
X Press ato confirm.
X Press the :or9 button to set Off
Off,
Standard
Standard orAdaptive
Adaptive.
X Press the abutton to save the setting.
When Lane Keeping Assist or Active Lane
Keeping Assist is activated, the multifunc-
tion display shows the lane markings as
bright lines in the assistance graphic.
For further information about Lane Keeping
Assist, see (Y page 225).
For further information about Active Lane
Keeping Assist, see (Y page 229). Service menu
In the
Serv. Serv. menu, you have the following
options:
R Calling up display messages in the mes-
sage memory (Y page 261)
R Restarting the tyre pressure loss warning
system (Y page 369)
R Checking the tyre pressure electronically
(Y page 370)
R Calling up the service due date
(Y page 333) Settings menu
Introduction In the
Settings Settings menu, you have the following
options:
R Changing the instrument cluster settings
(Y page 252)
R Changing the light settings (Y page 252)
R Changing the vehicle settings
(Y page 255)
R Changing the auxiliary heating settings
(Y page 256)
R Changing the convenience settings
(Y page 257)
R Restoring the factory settings
(Y page 258) Menus and submenus
251On-board computer and displays Z
Page 255 of 417
Instrument cluster
Selecting the unit of measurement for dis-
tance
The Display unit Speed-/odometer: Display unit Speed-/odometer:
function allows you to choose whether cer-
tain displays appear in kilometres or miles in the multifunction display.
You can determine whether the multifunction display shows some messages in miles or kil-
ometres.
X Press the =or; button on the steer-
ing wheel to select the Settings
Settings menu.
X Press the :or9 button to select the
Inst. cluster
Inst. cluster submenu.
X Press ato confirm.
X Press the :or9 button to select the
Display unit Speed-/odometer
Display unit Speed-/odometer func-
tion.
You will see the selected setting: km kmor
miles
miles.
X Press the abutton to save the setting.
The selected unit of measurement for dis-
tance applies to: R digital speedometer in the Trip Tripmenu
R total distance recorder and the trip meter
R trip computer
R current consumption and the range
R navigation instructions in the Navi
Navi menu
R cruise control
R SPEEDTRONIC
R DISTRONIC PLUS
R ASSYST PLUS service interval display
Selecting the permanent display function
Vehicles for the United Kingdom: this func-
tion is unavailable. You can determine whether the multifunction
display permanently shows your speed or the
outside temperature.
X Press the =or; button on the steer-
ing wheel to select the Settings Settingsmenu.
X Press the :or9 button to select the
Inst. cluster
Inst. cluster submenu.
X Press ato confirm.
X Press the :or9 button to select the
Permanent display:
Permanent display: function.
You will see the selected setting: outside
outside
temperature
temperature orAddit. speedo [mph]
Addit. speedo [mph].
X Press the abutton to save the setting.
i The speed is displayed in mph.
Lights Setting the brightness for the instrument
cluster lighting and switches
The lighting in the instrument cluster, in the
displays and the controls in the vehicle inte-
rior can be adjusted with the Brightness Brightness
Display/switches:
Display/switches: function.
X Press the =or; button on the steer-
ing wheel to select the Settings
Settingsmenu.
X Press the :or9 button to select the
Lights
Lights submenu.
X Press ato confirm.
X Press the :or9 button to select the
Brightness Display/switches:
Brightness Display/switches: func-
tion.
You will see the selected setting.
X Press ato confirm.
X Press the :or9 button to adjust the
brightness to any level from Level 1
Level 1 to
Level 5 Level 5 (bright).
X Press the aor% button to save the
setting.
If the light switch is set to Ã,Tor
L, the brightness is dependent upon
the brightness of the ambient light.
i The light sensor in the instrument cluster
automatically controls the brightness of
the multifunction display. 252
Menus and submenusOn-board computer and displays
Page 258 of 417
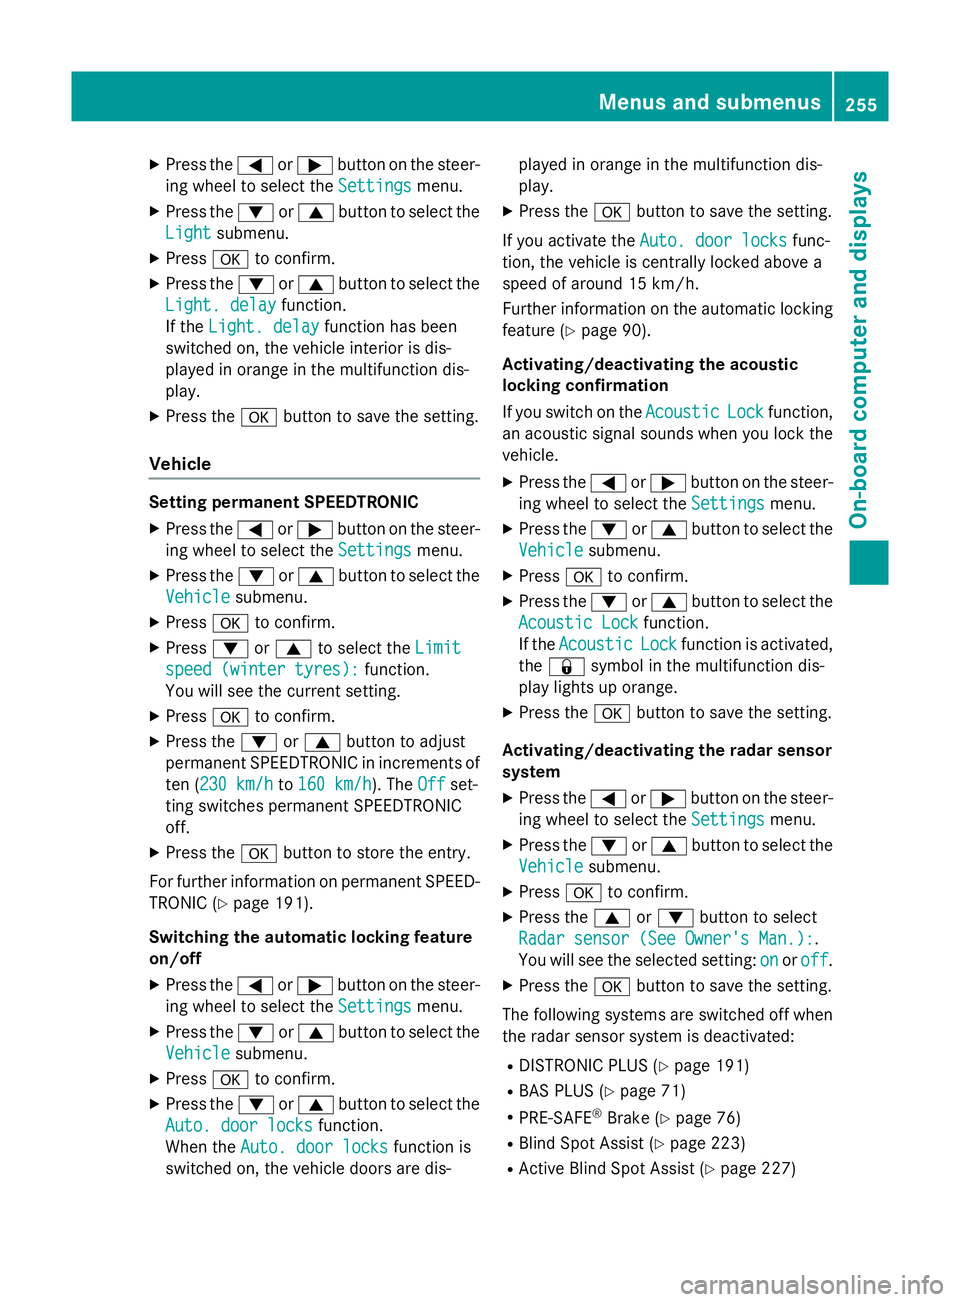
X
Press the =or; button on the steer-
ing wheel to select the Settings Settingsmenu.
X Press the :or9 button to select the
Light
Light submenu.
X Press ato confirm.
X Press the :or9 button to select the
Light. delay Light. delay function.
If the Light. delay
Light. delay function has been
switched on, the vehicle interior is dis-
played in orange in the multifunction dis-
play.
X Press the abutton to save the setting.
Vehicle Setting permanent SPEEDTRONIC
X Press the =or; button on the steer-
ing wheel to select the Settings Settingsmenu.
X Press the :or9 button to select the
Vehicle
Vehicle submenu.
X Press ato confirm.
X Press :or9 to select the Limit
Limit
speed (winter tyres):
speed (winter tyres): function.
You will see the current setting.
X Press ato confirm.
X Press the :or9 button to adjust
permanent SPEEDTRONIC in increments of
ten (230 km/h 230 km/h to160 km/h
160 km/h). The Off
Offset-
ting switches permanent SPEEDTRONIC
off.
X Press the abutton to store the entry.
For further information on permanent SPEED- TRONIC (Y page 191).
Switching the automatic locking feature
on/off
X Press the =or; button on the steer-
ing wheel to select the Settings Settingsmenu.
X Press the :or9 button to select the
Vehicle
Vehicle submenu.
X Press ato confirm.
X Press the :or9 button to select the
Auto. door locks
Auto. door locks function.
When the Auto. door locks
Auto. door locks function is
switched on, the vehicle doors are dis- played in orange in the multifunction dis-
play.
X Press the abutton to save the setting.
If you activate the Auto. door locks Auto. door locks func-
tion, the vehicle is centrally locked above a
speed of around 15 km/h.
Further information on the automatic locking feature (Y page 90).
Activating/deactivating the acoustic
locking confirmation
If you switch on the Acoustic AcousticLock
Lockfunction,
an acoustic signal sounds when you lock the
vehicle.
X Press the =or; button on the steer-
ing wheel to select the Settings
Settingsmenu.
X Press the :or9 button to select the
Vehicle
Vehicle submenu.
X Press ato confirm.
X Press the :or9 button to select the
Acoustic Lock
Acoustic Lock function.
If the Acoustic
Acoustic Lock
Lockfunction is activated,
the & symbol in the multifunction dis-
play lights up orange.
X Press the abutton to save the setting.
Activating/deactivating the radar sensor
system X Press the =or; button on the steer-
ing wheel to select the Settings Settingsmenu.
X Press the :or9 button to select the
Vehicle
Vehicle submenu.
X Press ato confirm.
X Press the 9or: button to select
Radar sensor (See Owner's Man.):
Radar sensor (See Owner's Man.):.
You will see the selected setting: on onoroff
off.
X Press the abutton to save the setting.
The following systems are switched off when
the radar sensor system is deactivated:
R DISTRONIC PLUS (Y page 191)
R BAS PLUS (Y page 71)
R PRE-SAFE ®
Brake (Y page 76)
R Blind Spot Assist (Y page 223)
R Active Blind Spot Assist (Y page 227) Menus and submenus
255On-board computer and displays Z
Page 268 of 417
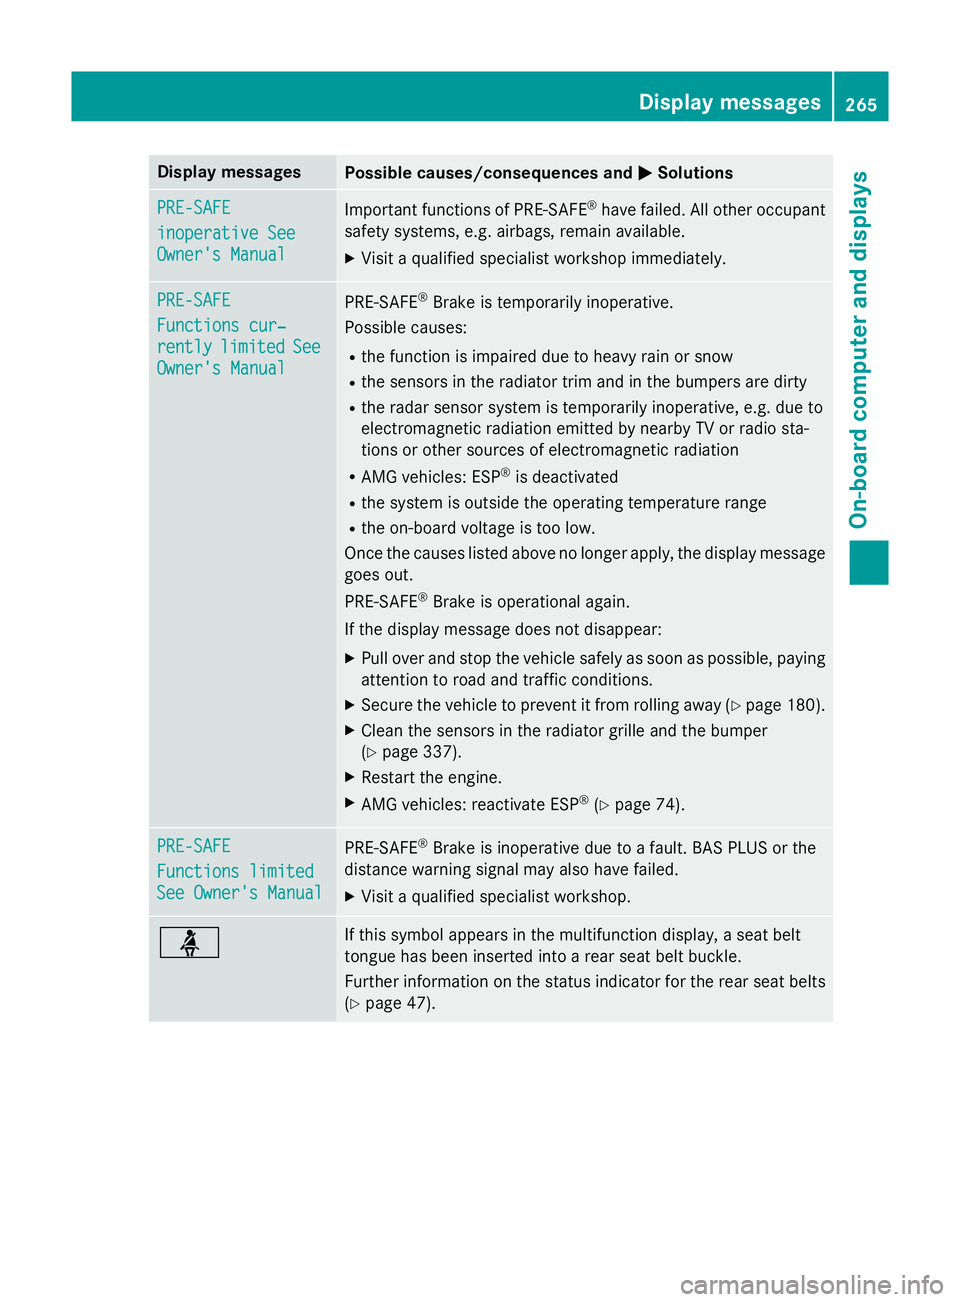
Display messages
Possible causes/consequences and
M
MSolutions PRE-SAFE
PRE-SAFE
inoperative See inoperative See
Owner's Manual Owner's Manual
Important functions of PRE-SAFE
®
have failed. All other occupant
safety systems, e.g. airbags, remain available.
X Visit a qualified specialist workshop immediately. PRE-SAFE
PRE-SAFE
Functions cur‐ Functions cur‐
rently rently
limited
limited See
See
Owner's Manual
Owner's Manual PRE-SAFE
®
Brake is temporarily inoperative.
Possible causes:
R the function is impaired due to heavy rain or snow
R the sensors in the radiator trim and in the bumpers are dirty
R the radar sensor system is temporarily inoperative, e.g. due to
electromagnetic radiation emitted by nearby TV or radio sta-
tions or other sources of electromagnetic radiation
R AMG vehicles: ESP ®
is deactivated
R the system is outside the operating temperature range
R the on-board voltage is too low.
Once the causes listed above no longer apply, the display message goes out.
PRE ‑SAFE ®
Brake is operational again.
If the display message does not disappear:
X Pull over and stop the vehicle safely as soon as possible, paying
attention to road and traffic conditions.
X Secure the vehicle to prevent it from rolling away (Y page 180).
X Clean the sensors in the radiator grille and the bumper
(Y page 337).
X Restart the engine.
X AMG vehicles: reactivate ESP ®
(Y page 74). PRE-SAFE PRE-SAFE
Functions limited Functions limited
See Owner's Manual See Owner's Manual
PRE-SAFE
®
Brake is inoperative due to a fault. BAS PLUS or the
distance warning signal may also have failed.
X Visit a qualified specialist workshop. ü If this symbol appears in the multifunction display, a seat belt
tongue has been inserted into a rear seat belt buckle.
Further information on the status indicator for the rear seat belts
(Y page 47). Display
messages
265On-board computer and displays Z
Page 272 of 417
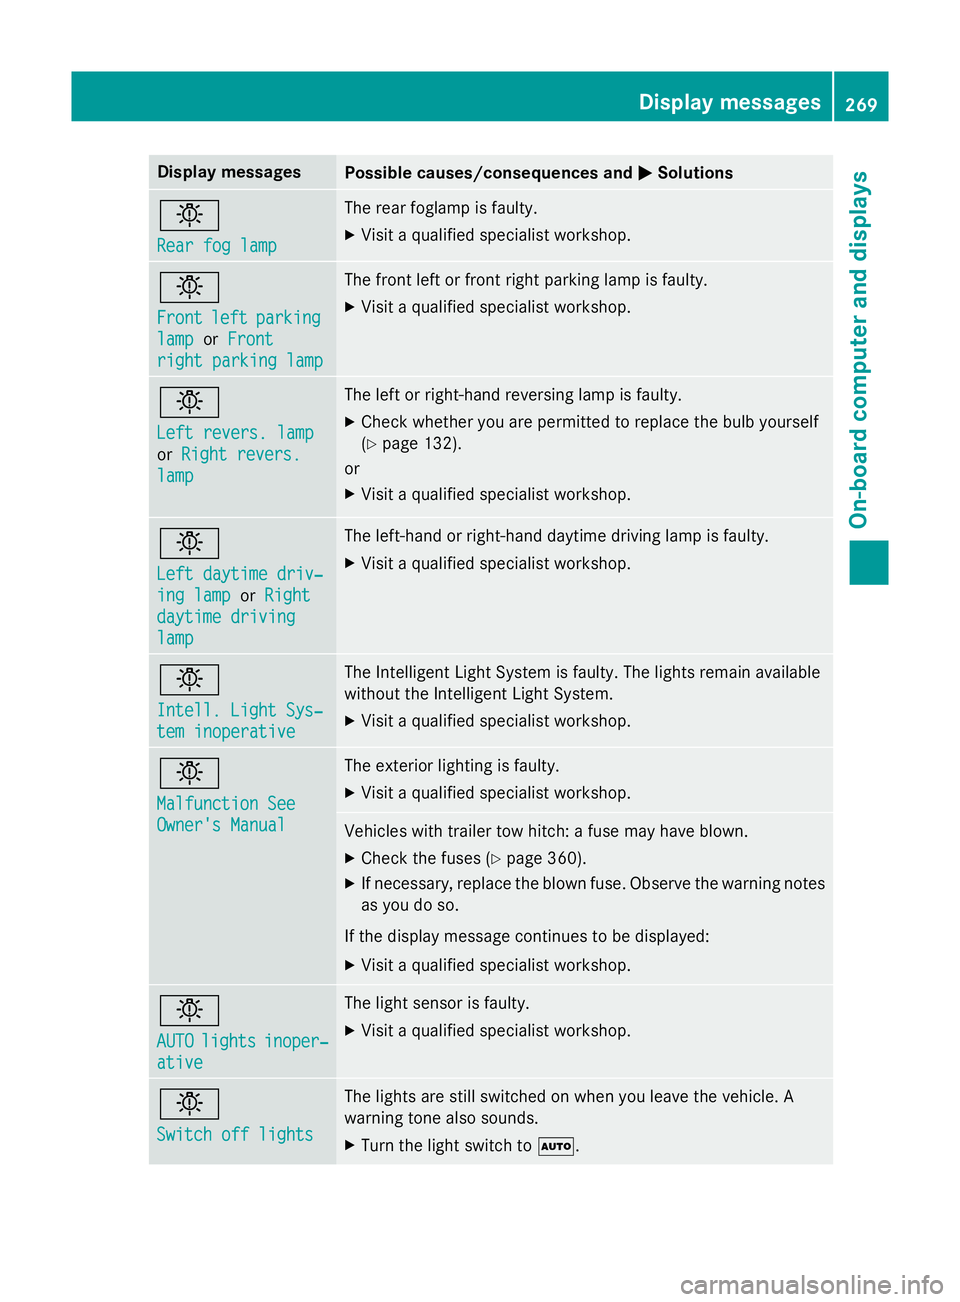
Display messages
Possible causes/consequences and
M
MSolutions b
Rear fog lamp Rear fog lamp The rear foglamp is faulty.
X Visit a qualified specialist workshop. b
Front Front
left
leftparking
parking
lamp
lamp orFront
Front
right parking lamp
right parking lamp The front left or front right parking lamp is faulty.
X Visit a qualified specialist workshop. b
Left revers. lamp Left revers. lamp
or
Right revers. Right revers.
lamp
lamp The left or right-hand reversing lamp is faulty.
X Check whether you are permitted to replace the bulb yourself
(Y page 132).
or
X Visit a qualified specialist workshop. b
Left daytime driv‐ Left daytime driv‐
ing lamp ing lamp
orRight
Right
daytime driving
daytime driving
lamp lamp The left-hand or right-hand daytime driving lamp is faulty.
X Visit a qualified specialist workshop. b
Intell. Light Sys‐ Intell. Light Sys‐
tem inoperative tem inoperative The Intelligent Light System is faulty. The lights remain available
without the Intelligent Light System.
X Visit a qualified specialist workshop. b
Malfunction See Malfunction See
Owner's Manual Owner's Manual The exterior lighting is faulty.
X Visit a qualified specialist workshop. Vehicles with trailer tow hitch: a fuse may have blown.
X Check the fuses (Y page 360).
X If necessary, replace the blown fuse. Observe the warning notes
as you do so.
If the display message continues to be displayed: X Visit a qualified specialist workshop. b
AUTO AUTO
lights
lights inoper‐
inoper‐
ative
ative The light sensor is faulty.
X Visit a qualified specialist workshop. b
Switch off lights Switch off lights The lights are still switched on when you leave the vehicle. A
warning tone also sounds.
X Turn the light switch to Ã. Display
messages
269On-board computer and displays Z