2014 MERCEDES-BENZ CLS SHOOTING BRAKE window
[x] Cancel search: windowPage 120 of 417
rear window heating is switched on and the
outside temperature is low. Heating takes a
maximum of ten minutes.
i The exterior mirrors can also be heated
manually by switching on the rear window
heating.
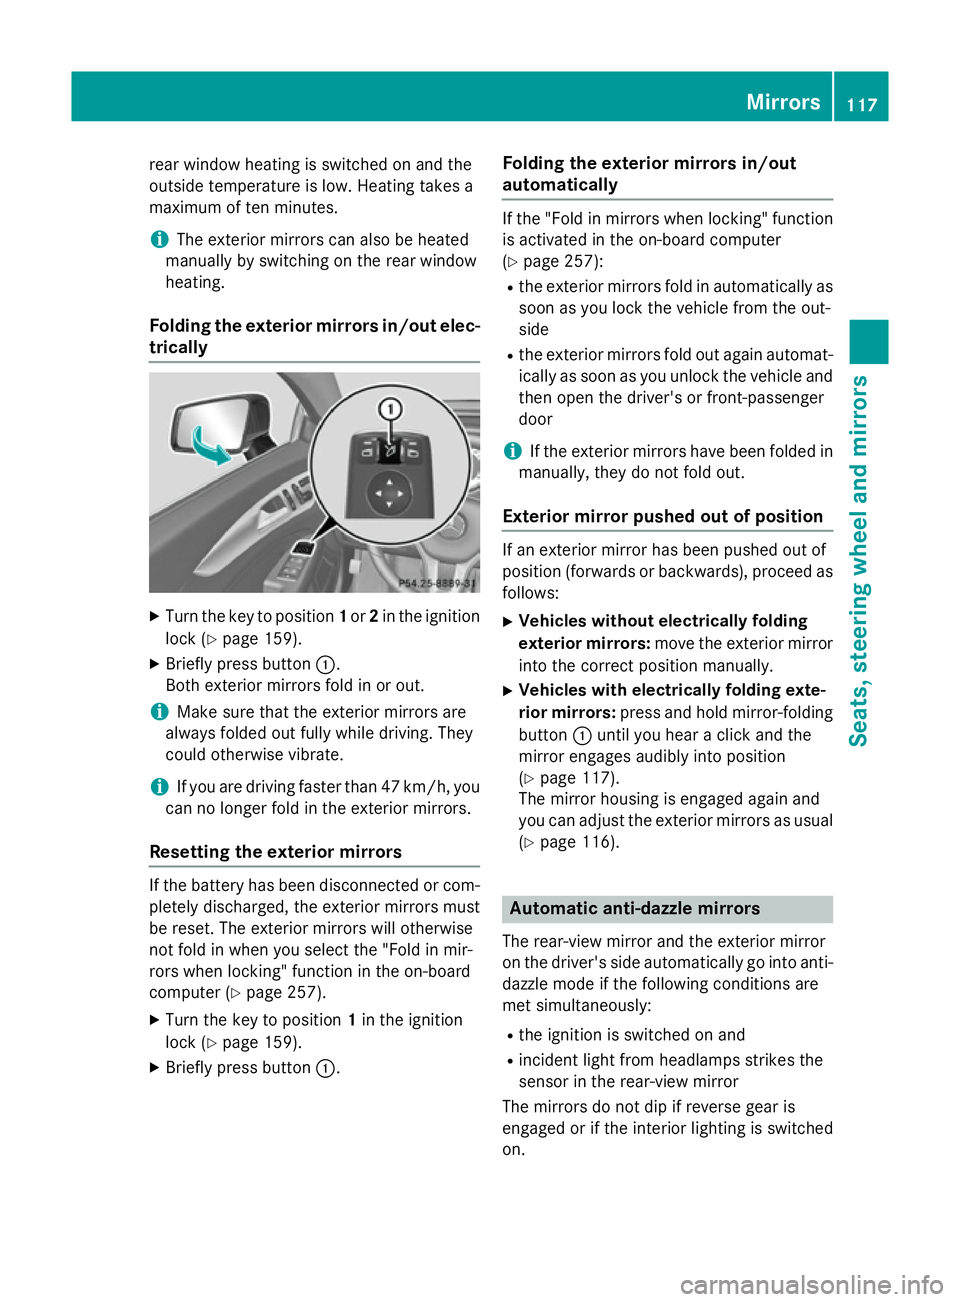
Folding the exterior mirrors in/out elec- trically X
Turn the key to position 1or 2in the ignition
lock (Y page 159).
X Briefly press button :.
Both exterior mirrors fold in or out.
i Make sure that the exterior mirrors are
always folded out fully while driving. They
could otherwise vibrate.
i If you are driving faster than 47 km/h, you
can no longer fold in the exterior mirrors.
Resetting the exterior mirrors If the battery has been disconnected or com-
pletely discharged, the exterior mirrors must
be reset. The exterior mirrors will otherwise
not fold in when you select the "Fold in mir-
rors when locking" function in the on-board
computer (Y page 257).
X Turn the key to position 1in the ignition
lock (Y page 159).
X Briefly press button :. Folding the exterior mirrors in/out
automatically If the "Fold in mirrors when locking" function
is activated in the on-board computer
(Y page 257):
R the exterior mirrors fold in automatically as
soon as you lock the vehicle from the out-
side
R the exterior mirrors fold out again automat-
ically as soon as you unlock the vehicle and
then open the driver's or front-passenger
door
i If the exterior mirrors have been folded in
manually, they do not fold out.
Exterior mirror pushed out of position If an exterior mirror has been pushed out of
position (forwards or backwards), proceed as
follows:
X Vehicles without electrically folding
exterior mirrors: move the exterior mirror
into the correct position manually.
X Vehicles with electrically folding exte-
rior mirrors: press and hold mirror-folding
button :until you hear a click and the
mirror engages audibly into position
(Y page 117).
The mirror housing is engaged again and
you can adjust the exterior mirrors as usual
(Y page 116). Automatic anti-dazzle mirrors
The rear-view mirror and the exterior mirror
on the driver's side automatically go into anti- dazzle mode if the following conditions are
met simultaneously:
R the ignition is switched on and
R incident light from headlamps strikes the
sensor in the rear-view mirror
The mirrors do not dip if reverse gear is
engaged or if the interior lighting is switched
on. Mirrors
117Seats, steering wheel and mirrors Z
Page 137 of 417
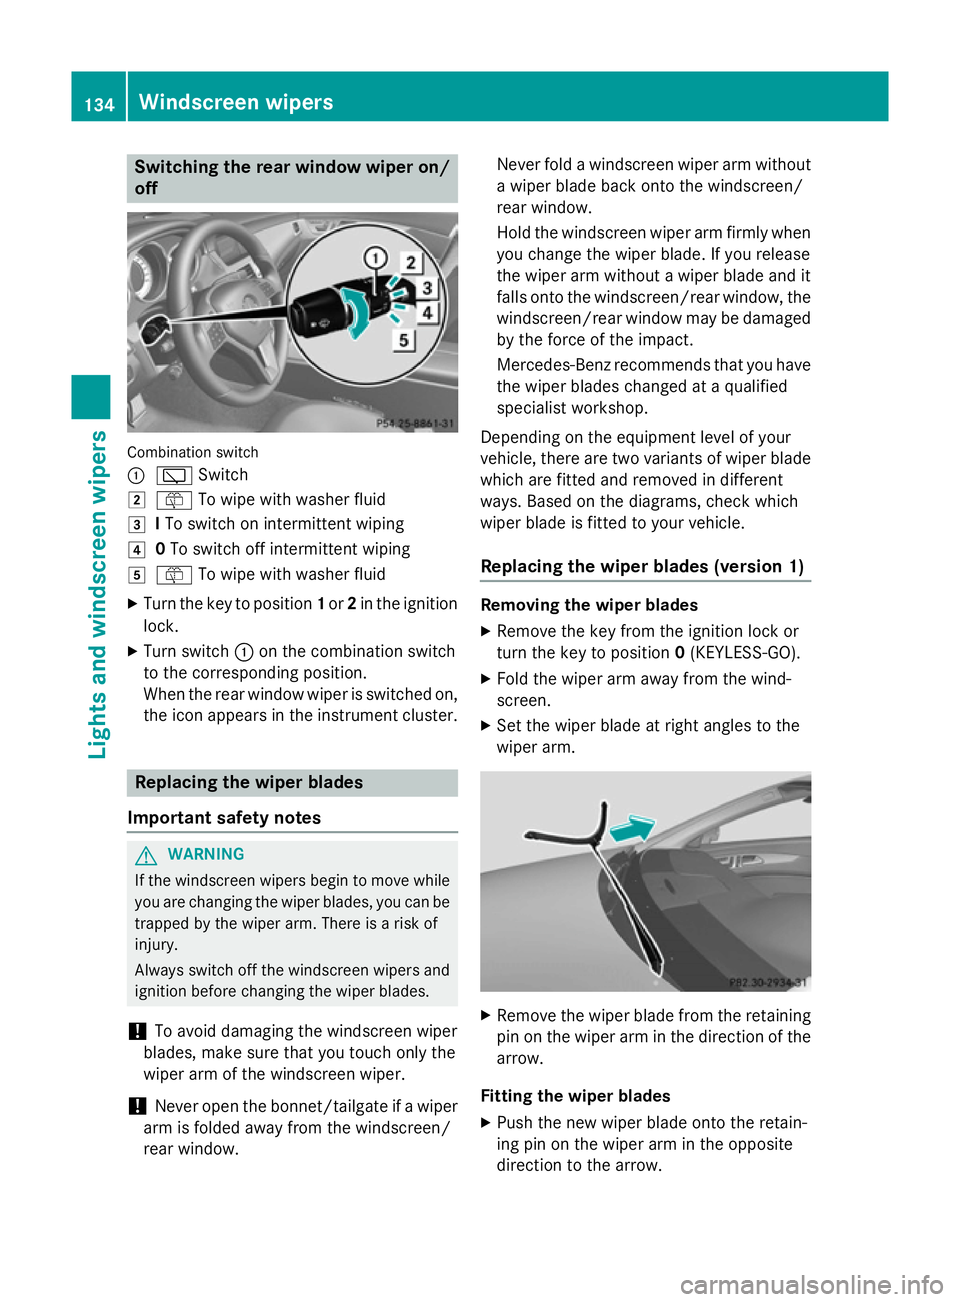
Switching the rear window wiper on/
off Combination switch
:
è Switch
2 ô To wipe with washer fluid
3 ITo switch on intermittent wiping
4 0To switch off intermittent wiping
5 ô To wipe with washer fluid
X Turn the key to position 1or 2in the ignition
lock.
X Turn switch :on the combination switch
to the corresponding position.
When the rear window wiper is switched on,
the icon appears in the instrument cluster. Replacing the wiper blades
Important safety notes G
WARNING
If the windscreen wipers begin to move while
you are changing the wiper blades, you can be trapped by the wiper arm. There is a risk of
injury.
Always switch off the windscreen wipers and
ignition before changing the wiper blades.
! To avoid damaging the windscreen wiper
blades, make sure that you touch only the
wiper arm of the windscreen wiper.
! Never open the bonnet/tailgate if a wiper
arm is folded away from the windscreen/
rear window. Never fold a windscreen wiper arm without
a wiper blade back onto the windscreen/
rear window.
Hold the windscreen wiper arm firmly when
you change the wiper blade. If you release
the wiper arm without a wiper blade and it
falls onto the windscreen/rear window, the windscreen/rear window may be damaged
by the force of the impact.
Mercedes-Benz recommends that you have
the wiper blades changed at a qualified
specialist workshop.
Depending on the equipment level of your
vehicle, there are two variants of wiper blade which are fitted and removed in different
ways. Based on the diagrams, check which
wiper blade is fitted to your vehicle.
Replacing the wiper blades (version 1) Removing the wiper blades
X Remove the key from the ignition lock or
turn the key to position 0(KEYLESS-GO).
X Fold the wiper arm away from the wind-
screen.
X Set the wiper blade at right angles to the
wiper arm. X
Remove the wiper blade from the retaining
pin on the wiper arm in the direction of thearrow.
Fitting the wiper blades
X Push the new wiper blade onto the retain-
ing pin on the wiper arm in the opposite
direction to the arrow. 134
Windscreen wipersLights and windscreen wipers
Page 138 of 417
Make sure that the wiper blade slides fully
onto the retaining pin on the wiper arm.
X Turn the wiper blade parallel to the wiper
arm.
X Fold the wiper arm back onto the wind-
screen.
Replacing the wiper blades (version 2) Removing the wiper blades
X Remove the key from the ignition lock or
turn the key to position 0(KEYLESS-GO).
X Fold the wiper arm away from the wind-
screen. X
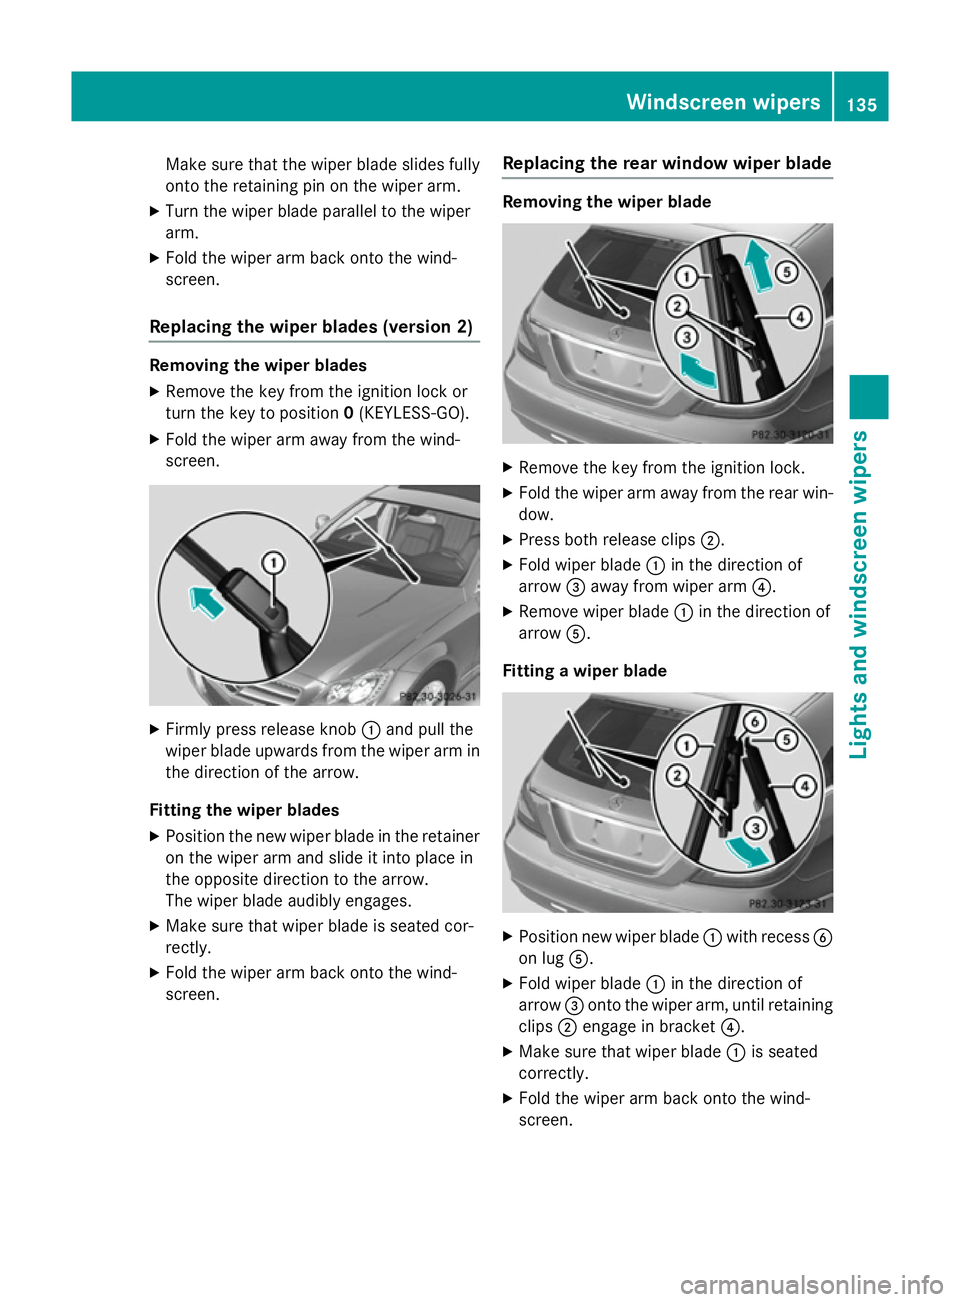
Firmly press release knob :and pull the
wiper blade upwards from the wiper arm in the direction of the arrow.
Fitting the wiper blades
X Position the new wiper blade in the retainer
on the wiper arm and slide it into place in
the opposite direction to the arrow.
The wiper blade audibly engages.
X Make sure that wiper blade is seated cor-
rectly.
X Fold the wiper arm back onto the wind-
screen. Replacing the rear window wiper blade Removing the wiper blade
X
Remove the key from the ignition lock.
X Fold the wiper arm away from the rear win-
dow.
X Press both release clips ;.
X Fold wiper blade :in the direction of
arrow =away from wiper arm ?.
X Remove wiper blade :in the direction of
arrow A.
Fitting a wiper blade X
Position new wiper blade :with recess B
on lug A.
X Fold wiper blade :in the direction of
arrow =onto the wiper arm, until retaining
clips ;engage in bracket ?.
X Make sure that wiper blade :is seated
correctly.
X Fold the wiper arm back onto the wind-
screen. Windscreen wipers
135Lights and windscreen wipers Z
Page 141 of 417
Useful information
i This Owner's Manual describes all mod-
els, series and optional equipment for your
vehicle that were available at the time of
going to press. National variations are pos- sible. Note that your vehicle may not be
equipped with all of the functions descri-
bed. This is also the case for systems and
functions relevant to safety.
i Read the information on qualified special-
ist workshops: (Y page 26). Overview of climate control systems
Important safety notes
Observe the settings recommended on the
following pages. The windows could other-
wise mist up.
To prevent the windows from misting up:
R switch off climate control only briefly
R switch on air-recirculation mode only
briefly
R switch on the cooling with air dehumidifi-
cation function
R switch on the "demist windscreen" function
briefly, if required
Climate control regulates the temperature
and the humidity in the vehicle interior and
filters undesirable substances out of the air.
Climate control is only operational when the
engine is running. Optimum operation is only achieved when the side windows and the roof
are closed.
The residual heat function can only be acti-
vated or deactivated with the ignition
switched off (Y page 149).
i Ventilate the vehicle for a brief period
during warm weather, e.g. using the con-
venience opening feature (Y page 97). This
will speed up the cooling process and the
desired vehicle interior temperature will be
reached more quickly. i
The integrated filter filters out most par-
ticles of dust and soot and completely fil-
ters out pollen. It also reduces gaseous pol-
lutants and odours. A clogged filter reduces the amount of air supplied to the vehicle
interior. For this reason, you should alwaysobserve the interval for replacing the filter,
which is specified in the Service Booklet. As this depends on environmental conditions,
e.g. heavy air pollution, the interval may be shorter than stated in the Service Booklet. 138
Overview of climate control systemsClimate control
Page 142 of 417
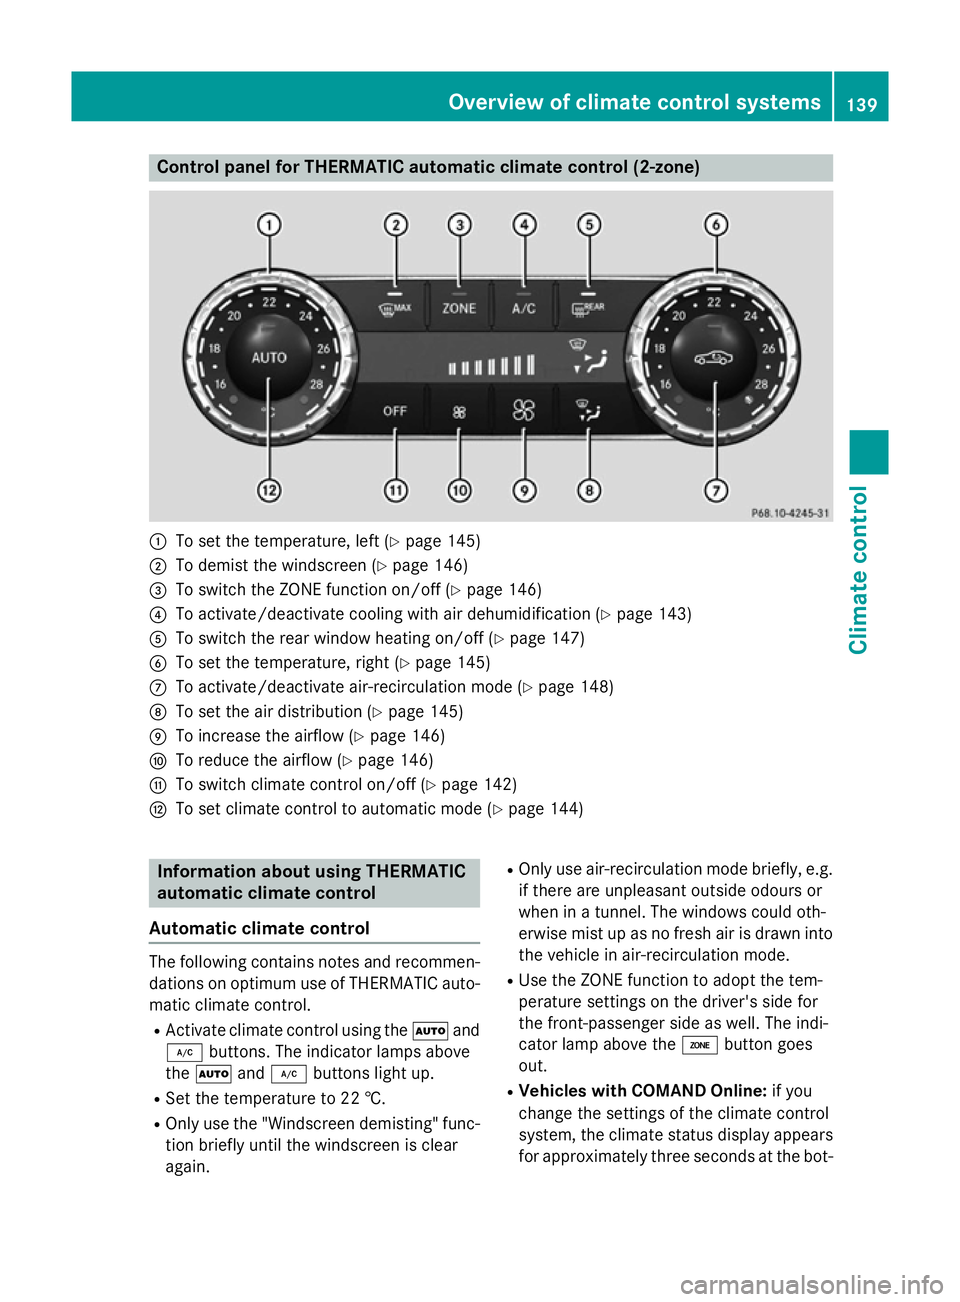
Control panel for THERMATIC automatic climate control (2-zone)
:
To set the temperature, left (Y page 145)
; To demist the windscreen (Y page 146)
= To switch the ZONE function on/off (Y page 146)
? To activate/deactivate cooling with air dehumidification (Y page 143)
A To switch the rear window heating on/off (Y page 147)
B To set the temperature, right (Y page 145)
C To activate/deactivate air-recirculation mode (Y page 148)
D To set the air distribution (Y page 145)
E To increase the airflow (Y page 146)
F To reduce the airflow (Y page 146)
G To switch climate control on/off (Y page 142)
H To set climate control to automatic mode (Y page 144)Information about using THERMATIC
automatic climate control
Automatic climate control The following contains notes and recommen-
dations on optimum use of THERMATIC auto- matic climate control.
R Activate climate control using the Ãand
¿ buttons. The indicator lamps above
the à and¿ buttons light up.
R Set the temperature to 22 †.
R Only use the "Windscreen demisting" func-
tion briefly until the windscreen is clear
again. R
Only use air-recirculation mode briefly, e.g.
if there are unpleasant outside odours or
when in a tunnel. The windows could oth-
erwise mist up as no fresh air is drawn into
the vehicle in air-recirculation mode.
R Use the ZONE function to adopt the tem-
perature settings on the driver's side for
the front-passenger side as well. The indi-
cator lamp above the ábutton goes
out.
R Vehicles with COMAND Online: if you
change the settings of the climate control
system, the climate status display appears for approximately three seconds at the bot- Overview of climate control systems
139Climate control
Page 144 of 417
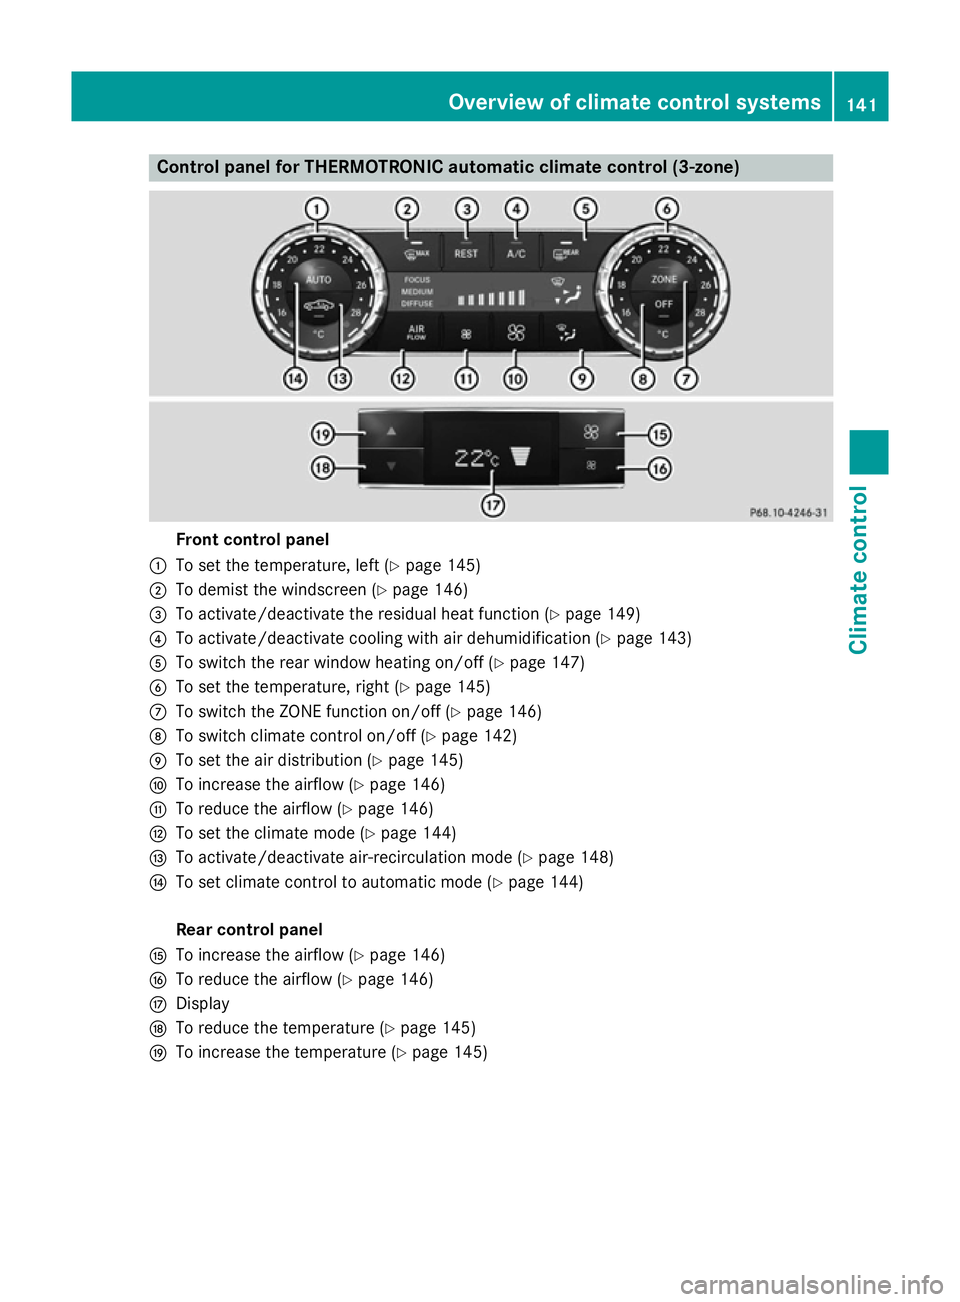
Control panel for THERMOTRONIC automatic climate control (3-zone)
Front control panel
: To set the temperature, left (Y page 145)
; To demist the windscreen (Y page 146)
= To activate/deactivate the residual heat function (Y page 149)
? To activate/deactivate cooling with air dehumidification (Y page 143)
A To switch the rear window heating on/off (Y page 147)
B To set the temperature, right (Y page 145)
C To switch the ZONE function on/off (Y page 146)
D To switch climate control on/off (Y page 142)
E To set the air distribution (Y page 145)
F To increase the airflow (Y page 146)
G To reduce the airflow (Y page 146)
H To set the climate mode (Y page 144)
I To activate/deactivate air-recirculation mode (Y page 148)
J To set climate control to automatic mode (Y page 144)
Rear control panel
K To increase the airflow (Y page 146)
L To reduce the airflow (Y page 146)
M Display
N To reduce the temperature (Y page 145)
O To increase the temperature (Y page 145) Overview of climate control systems
141Climate control
Page 145 of 417
Information about using
THERMOTRONIC automatic climate
control
Automatic climate control The following contains instructions and rec-
ommendations to enable you to get the most
out of your THERMOTRONIC automatic cli-
mate control.
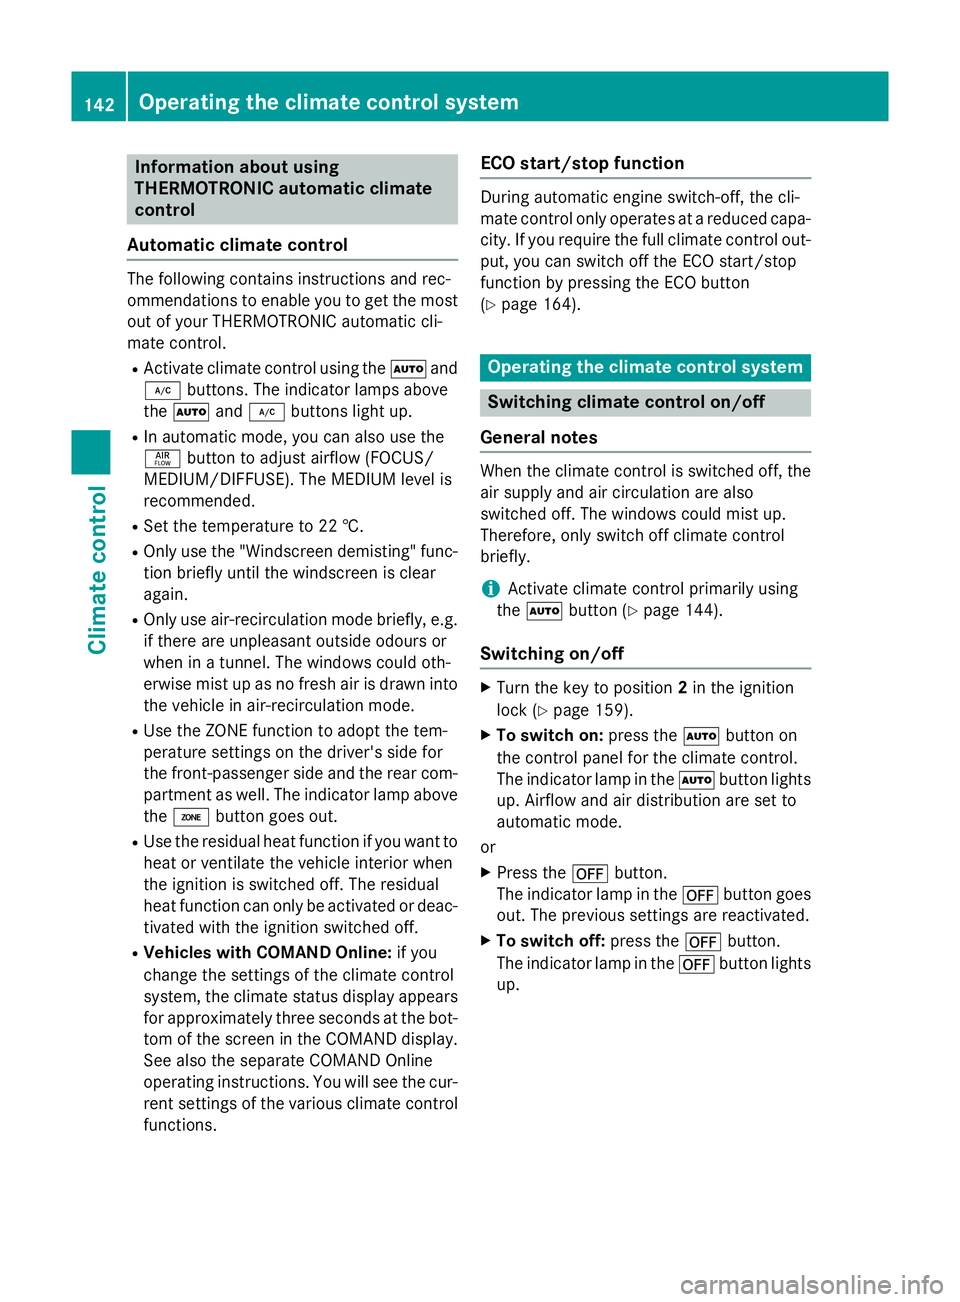
R Activate climate control using the Ãand
¿ buttons. The indicator lamps above
the à and¿ buttons light up.
R In automatic mode, you can also use the
ñ button to adjust airflow (FOCUS/
MEDIUM/DIFFUSE). The MEDIUM level is
recommended.
R Set the temperature to 22 †.
R Only use the "Windscreen demisting" func-
tion briefly until the windscreen is clear
again.
R Only use air-recirculation mode briefly, e.g.
if there are unpleasant outside odours or
when in a tunnel. The windows could oth-
erwise mist up as no fresh air is drawn into
the vehicle in air-recirculation mode.
R Use the ZONE function to adopt the tem-
perature settings on the driver's side for
the front-passenger side and the rear com-
partment as well. The indicator lamp above
the á button goes out.
R Use the residual heat function if you want to
heat or ventilate the vehicle interior when
the ignition is switched off. The residual
heat function can only be activated or deac- tivated with the ignition switched off.
R Vehicles with COMAND Online: if you
change the settings of the climate control
system, the climate status display appears for approximately three seconds at the bot-
tom of the screen in the COMAND display. See also the separate COMAND Online
operating instructions. You will see the cur- rent settings of the various climate controlfunctions. ECO start/stop function During automatic engine switch-off, the cli-
mate control only operates at a reduced capa-
city. If you require the full climate control out-
put, you can switch off the ECO start/stop
function by pressing the ECO button
(Y page 164). Operating the climate control system
Switching climate control on/off
General notes When the climate control is switched off, the
air supply and air circulation are also
switched off. The windows could mist up.
Therefore, only switch off climate control
briefly.
i Activate climate control primarily using
the à button (Y page 144).
Switching on/off X
Turn the key to position 2in the ignition
lock (Y page 159).
X To switch on: press theÃbutton on
the control panel for the climate control.
The indicator lamp in the Ãbutton lights
up. Airflow and air distribution are set to
automatic mode.
or X Press the ^button.
The indicator lamp in the ^button goes
out. The previous settings are reactivated.
X To switch off: press the^button.
The indicator lamp in the ^button lights
up. 142
Operating the climate control systemClimate cont
rol
Page 149 of 417
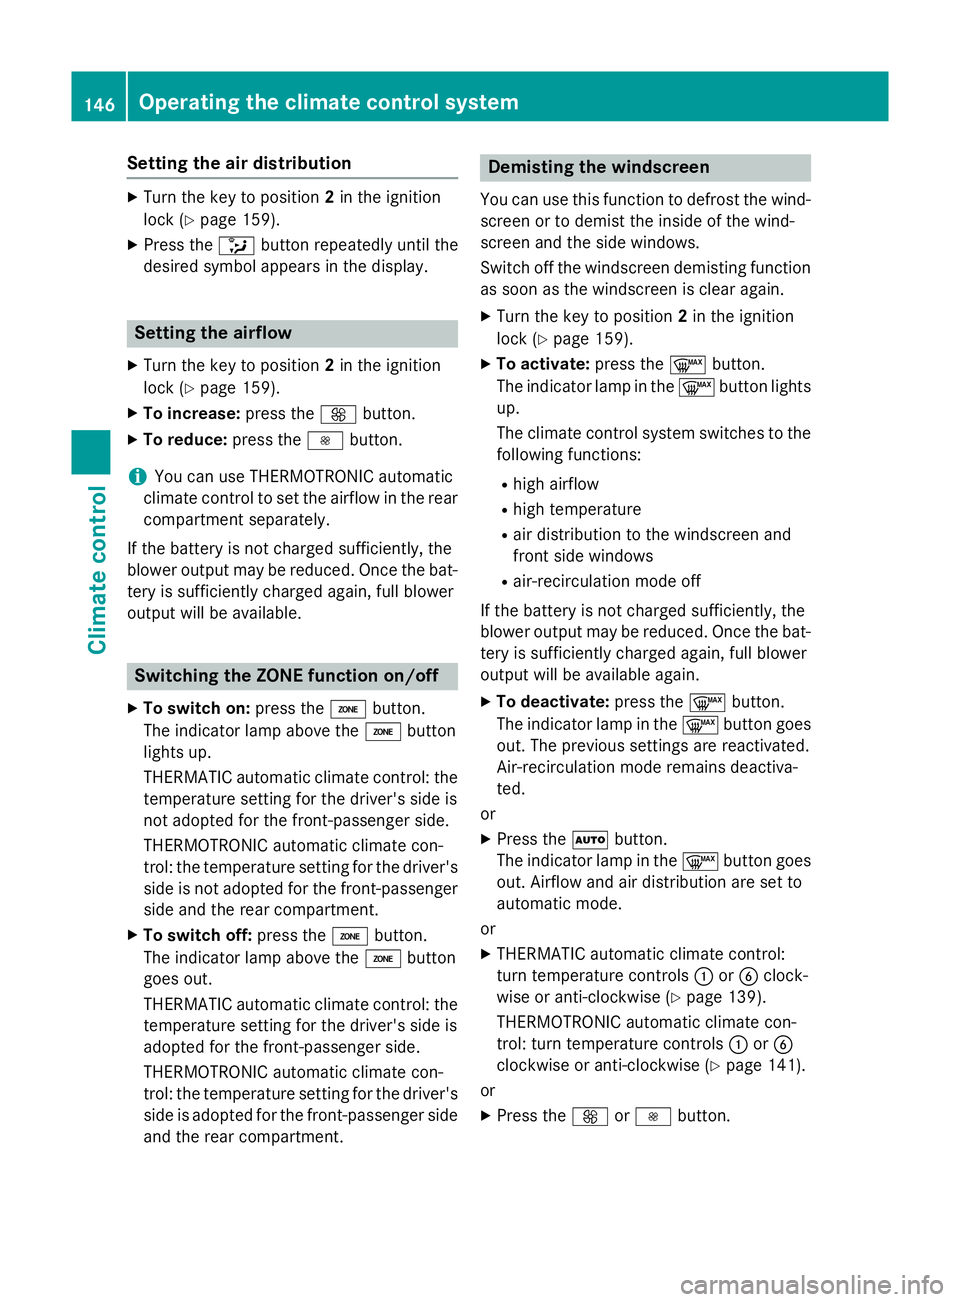
Setting the air distribution
X
Turn the key to position 2in the ignition
lock (Y page 159).
X Press the _button repeatedly until the
desired symbol appears in the display. Setting the airflow
X Turn the key to position 2in the ignition
lock (Y page 159).
X To increase: press theKbutton.
X To reduce: press theIbutton.
i You can use THERMOTRONIC automatic
climate control to set the airflow in the rear compartment separately.
If the battery is not charged sufficiently, the
blower output may be reduced. Once the bat-
tery is sufficiently charged again, full blower
output will be available. Switching the ZONE function on/off
X To switch on: press theábutton.
The indicator lamp above the ábutton
lights up.
THERMATIC automatic climate control: the temperature setting for the driver's side is
not adopted for the front-passenger side.
THERMOTRONIC automatic climate con-
trol: the temperature setting for the driver's
side is not adopted for the front-passenger
side and the rear compartment.
X To switch off: press theábutton.
The indicator lamp above the ábutton
goes out.
THERMATIC automatic climate control: the
temperature setting for the driver's side is
adopted for the front-passenger side.
THERMOTRONIC automatic climate con-
trol: the temperature setting for the driver's
side is adopted for the front-passenger side and the rear compartment. Demisting the windscreen
You can use this function to defrost the wind-
screen or to demist the inside of the wind-
screen and the side windows.
Switch off the windscreen demisting function
as soon as the windscreen is clear again.
X Turn the key to position 2in the ignition
lock (Y page 159).
X To activate: press the¬button.
The indicator lamp in the ¬button lights
up.
The climate control system switches to the
following functions:
R high airflow
R high temperature
R air distribution to the windscreen and
front side windows
R air-recirculation mode off
If the battery is not charged sufficiently, the
blower output may be reduced. Once the bat- tery is sufficiently charged again, full blower
output will be available again.
X To deactivate: press the¬button.
The indicator lamp in the ¬button goes
out. The previous settings are reactivated.
Air-recirculation mode remains deactiva-
ted.
or
X Press the Ãbutton.
The indicator lamp in the ¬button goes
out. Airflow and air distribution are set to
automatic mode.
or
X THERMATIC automatic climate control:
turn temperature controls :orB clock-
wise or anti-clockwise (Y page 139).
THERMOTRONIC automatic climate con-
trol: turn temperature controls :orB
clockwise or anti-clockwise (Y page 141).
or X Press the KorI button. 146
Operating the climate control systemClimate control