2014 MERCEDES-BENZ CLS SHOOTING BRAKE weight
[x] Cancel search: weightPage 70 of 417
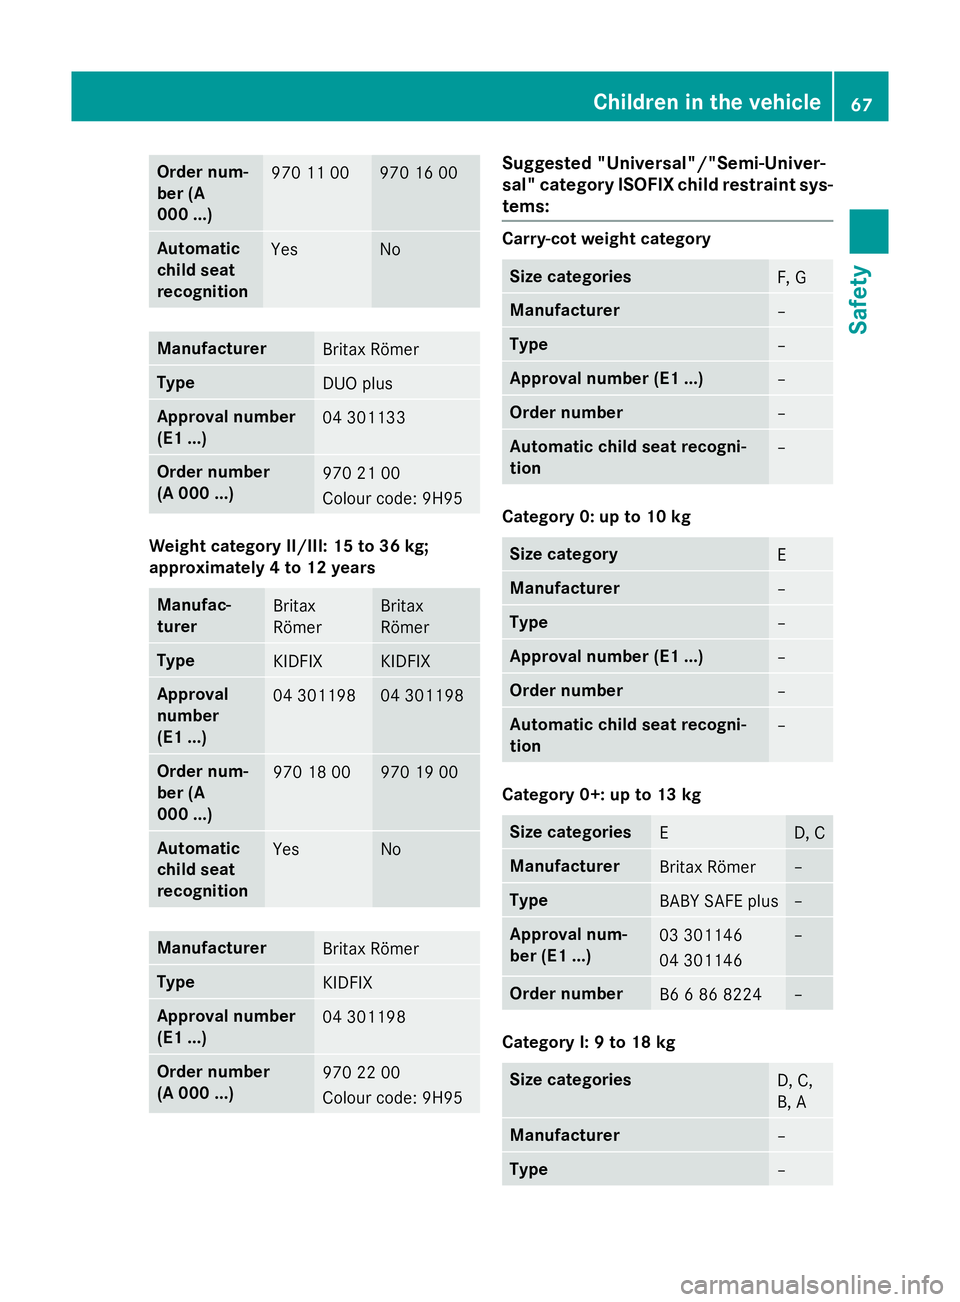
Order num-
ber (A
000 ...)
970 11 00 970 16 00
Automatic
child seat
recognition
Yes No
Manufacturer
Britax Römer
Type
DUO plus
Approval number
(E1 ...)
04 301133
Order number
(A 000 ...) 970 21 00
Colour code: 9H95
Weight category II/III: 15 to 36 kg;
approximately 4 to 12 years Manufac-
turer
Britax
Römer Britax
Römer
Type
KIDFIX KIDFIX
Approval
number
(E1 ...)
04 301198 04 301198
Order num-
ber (A
000 ...) 970 18 00 970 19 00
Automatic
child seat
recognition
Yes No
Manufacturer
Britax Römer
Type
KIDFIX
Approval number
(E1 ...)
04 301198
Order number
(A 000 ...) 970 22 00
Colour code: 9H95 Suggested "Universal"/"Semi-Univer-
sal" category ISOFIX child restraint sys-
tems: Carry-cot weight category
Size categories
F, G
Manufacturer
–
Type
–
Approval number (E1 ...)
–
Order number
–
Automatic child seat recogni-
tion
–
Category 0: up to 10 kg
Size category
E
Manufacturer
–
Type
–
Approval number (E1 ...)
–
Order number
–
Automatic child seat recogni-
tion
–
Category 0+: up to 13 kg
Size categories
E D, C
Manufacturer
Britax Römer –
Type
BABY SAFE plus –
Approval num-
ber (E1 ...)
03 301146
04 301146 –
Order number
B6 6 86 8224 –
Category I: 9 to 18 kg
Size categories
D, C,
B, A
Manufacturer
–
Type
–Children in the vehicle
67Safety Z
Page 235 of 417
are shown in green. Active Lane Keeping
Assist is ready for use.
If Standard Standard is selected, no warning vibra-
tion occurs if:
R you have switched on the turn signals. In
this case, the warnings are suppressed
for a certain period of time.
R a driving safety system intervenes, such
as ABS, BAS or ESP ®
.
When Adaptive
Adaptive is selected, no warning
vibration occurs if:
R you have switched on the turn signals. In
this case, the warnings are suppressed
for a certain period of time.
R a driving safety system intervenes, such
as ABS, BAS or ESP ®
.
R you accelerate hard, e.g. kickdown.
R you brake hard.
R you steer actively, e.g. swerve to avoid an
obstacle or change lane quickly.
R you cut the corner on a sharp bend.
In order that you are warned only when nec-
essary and in good time if you cross the lane marking, the system recognises certain con-
ditions and warns you accordingly.
The warning vibration occurs earlier if:
R you approach the outer lane marking on a
bend
R the road has very wide lanes, e.g. a motor-
way
R the system recognises solid lane markings
The warning vibration occurs later if:
R the road has narrow lanes
R you cut the corner on a bend
Towing a trailer
If you attach a trailer, make sure that you have
correctly established the electrical connec-
tion. This can be accomplished by checking
the trailer lighting. Towing a trailer
Important safety notes
G
WARNING
The braking system can overheat if you leave your foot on the brake pedal while driving.
This increases the braking distance and could
even cause the braking system to fail. There is
a risk of an accident.
Never use the brake pedal as a footrest. Do
not simultaneously depress both the brake
pedal and the accelerator pedal while driving. G
WARNING
You could lose control of the vehicle/trailer
combination if it begins to swerve. The vehi-
cle/trailer combination could even overturn.
There is a risk of an accident.
On no account should you attempt to
straighten out the vehicle/trailer combina-
tion by increasing speed. Decrease your
speed and do not countersteer. Brake if nec-
essary. G
WARNING
If the maximum the permissible load for a car- rier system is exceeded, the carrier could
come loose from the vehicle and endanger
other road users. There is a risk of an accidentand injury.
Never exceed the permissible noseweight
when using a carrier.
! Depressing the brake pedal constantly
results in excessive and premature wear to
the brake pads.
If you exceed the maximum permissible nose- weight of the trailer drawbar on the ball cou-
pling, the following may become damaged:
R your vehicle
R the trailer
R the ball coupling
R Trailer tow hitch
The vehicle/trailer combination could
become unstable. 232
Towing a trailerDriving and parking
Page 236 of 417
If the noseweight used is lower than the min-
imum permissible noseweight, the vehicle/
trailer combination could also become unsta-
ble.
To avoid hazardous situations:
R make sure to check the noseweight before
each journey.
R use a drawbar noseweight as close as pos-
sible to the maximum noseweight.
R do not exceed the maximum permissible
noseweight.
R do not use a noseweight lower than the
minimum permissible trailer drawbar nose-
weight.
When reversing the vehicle towards the
trailer, make sure there is nobody between
the trailer and the vehicle.
Couple and uncouple the trailer carefully. If
you do not couple the trailer to the towing
vehicle correctly, the trailer could become
detached.
Make sure that the following values are not
exceeded:
R the permissible trailer drawbar noseweight
R the permissible trailer load
R the permissible rear axle load of the towing
vehicle
R the maximum permissible gross vehicle
weight of both the towing vehicle and the
trailer
You will find the applicable permissible val-
ues, which must not be exceeded, in the vehi- cle documents.
You will find the values approved by the man-
ufacturer on the vehicle identification plates
and those for the towing vehicle under "Tech- nical data" (Y page 410).
When towing a trailer, your vehicle's handling
characteristics will be different in comparison to when driving without a trailer.
The vehicle/trailer combination:
R is heavier
R is restricted in its acceleration and gradi-
ent-climbing capability R
has an increased braking distance
R is affected more by strong crosswinds
R demands more sensitive steering
R has a larger turning circle
This can impair the vehicle's handling char-
acteristics. Adapt your style of driving accord-
ingly. Maintain a safe distance. Drive care-
fully.
When towing a trailer, always adjust your
speed to the current road and weather con-
ditions. Do not exceed the maximum permis- sible speed for your vehicle/trailer combina-
tion. Notes on towing a trailer
General notes i
When towing a trailer, set the tyre pres-
sure on the rear axle of the towing vehicle
for a maximum load; see the tyre pressure
table in the fuel filler flap (Y page 367).
Please note that when towing a trailer, PARK-
TRONIC (Y page 207), Active Parking Assist
(Y page 210) and Blind Spot Assist
(Y page 223) are only available with limita-
tions, or not at all.
i On vehicles without level control, the
height of the ball coupling will alter accord-
ing to the load placed on the vehicle. If nec- essary, use a trailer with a height-adjusta-
ble drawbar.
You will find fitting dimensions and loads
under "Technical data" (Y page 409).
Driving tips i
Observe the notes on ESP ®
trailer stabi-
lisation (Y page 75).
The maximum permissible speed for vehicle/
trailer combinations depends on the type of
trailer. Before beginning the journey, check
the trailer's documents to see what the max- imum permitted speed is. Observe the legally Towing a trailer
233Driving and parking Z
Page 303 of 417
Useful information
i This Owner's Manual describes all mod-
els, series and optional equipment for your
vehicle that were available at the time of
going to press. National variations are pos- sible. Note that your vehicle may not be
equipped with all of the functions descri-
bed. This is also the case for systems and
functions relevant to safety.
i Read the information on qualified special-
ist workshops: (Y page 26). Stowage areas
Loading guidelines
G
WARNING
If objects, luggage or loads are not secured or not secured sufficiently, they could slip, tip
over or be flung around and thereby hit vehicle
occupants. There is a risk of injury, especially when braking or abruptly changing directions.
Always store objects so that they cannot be
flung around. Secure objects, luggage or
loads against slipping or tipping before the
journey. G
WARNING
Combustion engines emit poisonous exhaust
gases such as carbon monoxide. Exhaust
gases can enter the vehicle interior if the boot
lid/tailgate is open when the engine is run-
ning, especially if the vehicle is in motion.
There is a risk of poisoning.
Always switch off the engine before opening
the boot lid/tailgate. Never drive with the
boot lid/tailgate open. The handling characteristics of a laden vehi-
cle are dependent on the distribution of the
load within the vehicle. For this reason, you
should observe the following notes when
transporting a load:
R never exceed the maximum permissible
gross vehicle weight or the permissible axle
loads for the vehicle (including occupants).
R the boot/luggage compartment is the pre-
ferred place to store objects.
R position heavy loads as far forwards as pos-
sible and as low down in the boot/luggagecompartment as possible.
R the load must not protrude above the upper
edge of the seat backrests.
R always place the load against the rear or
front seat backrests. Make sure that the
seat backrests are securely locked into
place.
R always place the load behind unoccupied
seats if possible.
R use the lashing eyelets and the luggage
nets to transport loads and luggage.
R only use lashing eyelets and fastening com-
ponents that are suitable for the weight and
size of the load.
R when transporting objects in the luggage
compartment, the combined luggage cover
and net must always be installed (luggage
compartment cover and safety net).
R secure the load with sufficiently strong and
wear-resistant lashing material. Pad sharp
edges for protection.
i Load restraints are available at any quali-
fied specialist workshop, e.g. a Mercedes-
Benz Service Centre. Stowage spaces
Important safety notes G
WARNING
If objects in the passenger compartment are
stowed incorrectly, they can slide or be 300
Stowage areasStowing and features
Page 313 of 417
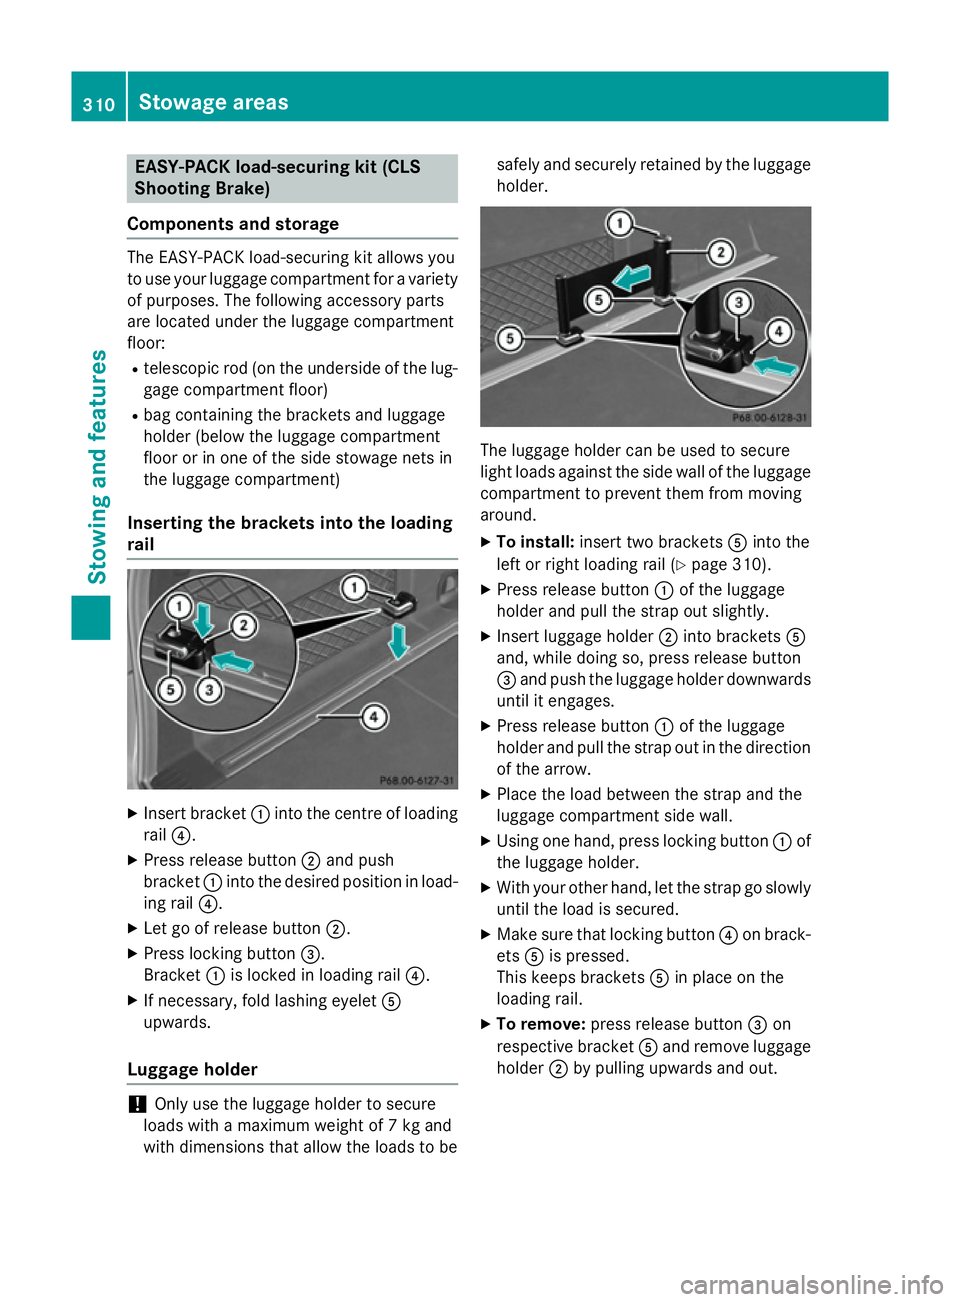
EASY-PACK load-securing kit (CLS
Shooting Brake)
Components and storage The EASY-PACK load-securing kit allows you
to use your luggage compartment for a variety of purposes. The following accessory parts
are located under the luggage compartment
floor:
R telescopic rod (on the underside of the lug-
gage compartment floor)
R bag containing the brackets and luggage
holder (below the luggage compartment
floor or in one of the side stowage nets in
the luggage compartment)
Inserting the brackets into the loading
rail X
Insert bracket :into the centre of loading
rail ?.
X Press release button ;and push
bracket :into the desired position in load-
ing rail ?.
X Let go of release button ;.
X Press locking button =.
Bracket :is locked in loading rail ?.
X If necessary, fold lashing eyelet A
upwards.
Luggage holder !
Only use the luggage holder to secure
loads with a maximum weight of 7 kg and
with dimensions that allow the loads to be safely and securely retained by the luggage
holder. The luggage holder can be used to secure
light loads against the side wall of the luggage
compartment to prevent them from moving
around.
X To install: insert two brackets Ainto the
left or right loading rail (Y page 310).
X Press release button :of the luggage
holder and pull the strap out slightly.
X Insert luggage holder ;into brackets A
and, while doing so, press release button
= and push the luggage holder downwards
until it engages.
X Press release button :of the luggage
holder and pull the strap out in the direction
of the arrow.
X Place the load between the strap and the
luggage compartment side wall.
X Using one hand, press locking button :of
the luggage holder.
X With your other hand, let the strap go slowly
until the load is secured.
X Make sure that locking button ?on brack-
ets Ais pressed.
This keeps brackets Ain place on the
loading rail.
X To remove: press release button =on
respective bracket Aand remove luggage
holder ;by pulling upwards and out. 310
Stowage areasStowing and features
Page 316 of 417
Features
Cup holders
Important safety notes !
Only use the cup holders for containers of
the right size and which have lids. The
drinks could otherwise spill.
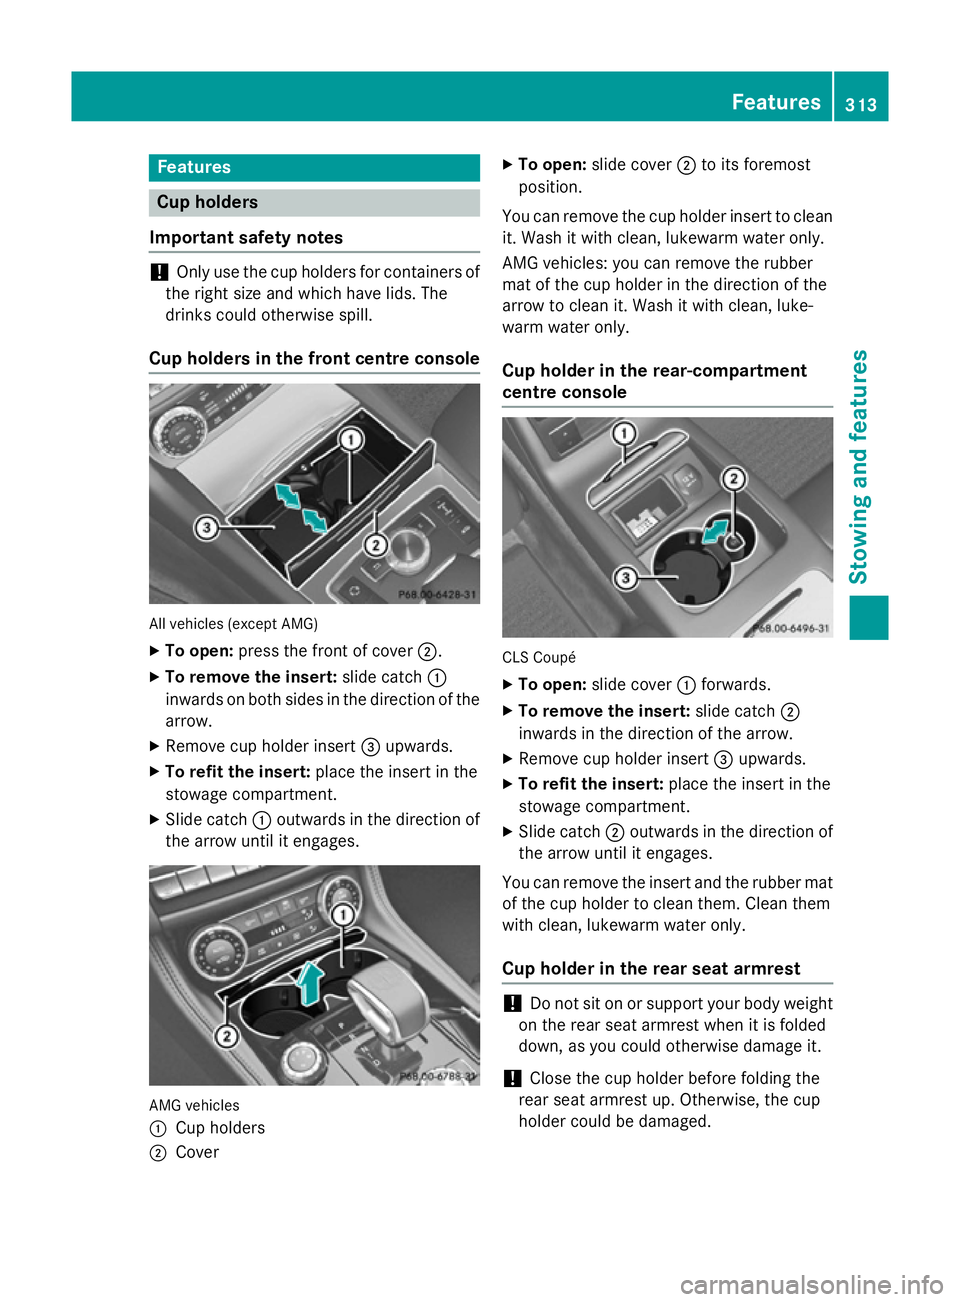
Cup holders in the front centre console All vehicles (except AMG)
X To open: press the front of cover ;.
X To remove the insert: slide catch:
inwards on both sides in the direction of the arrow.
X Remove cup holder insert =upwards.
X To refit the insert: place the insert in the
stowage compartment.
X Slide catch :outwards in the direction of
the arrow until it engages. AMG vehicles
:
Cup holders
; Cover X
To open: slide cover ;to its foremost
position.
You can remove the cup holder insert to clean
it. Wash it with clean, lukewarm water only.
AMG vehicles: you can remove the rubber
mat of the cup holder in the direction of the
arrow to clean it. Wash it with clean, luke-
warm water only.
Cup holder in the rear-compartment
centre console CLS Coupé
X To open: slide cover :forwards.
X To remove the insert: slide catch;
inwards in the direction of the arrow.
X Remove cup holder insert =upwards.
X To refit the insert: place the insert in the
stowage compartment.
X Slide catch ;outwards in the direction of
the arrow until it engages.
You can remove the insert and the rubber mat
of the cup holder to clean them. Clean them
with clean, lukewarm water only.
Cup holder in the rear seat armrest !
Do not sit on or support your body weight
on the rear seat armrest when it is folded
down, as you could otherwise damage it.
! Close the cup holder before folding the
rear seat armrest up. Otherwise, the cup
holder could be damaged. Features
313Stowing and featu res Z
Page 360 of 417
X
First, remove the jump leads from earth point Aand negative terminal ?, then from pos-
itive clamp ;and positive terminal =. Begin each time at the contacts on your own vehicle
first.
X Close cover :of positive clamp ;after removing the jump leads.
X Have the battery checked at a qualified specialist workshop.
i Jump-starting is not considered to be a normal operating condition.
i Jump-starting cables and further information regarding jump starting can be obtained at
any qualified specialist workshop. Towing and tow-starting
Important safety notes
G
WARNING
Safety-relevant functions are restricted or not
available if:
R the engine is not running.
R the brake system or the power steering is
malfunctioning
R the voltage supply or the vehicle's electrical
system is malfunctioning.
If your vehicle is towed, significantly greater
force may be required to steer the vehicle or
to brake. There is a risk of an accident.
In such circumstances, use a towing bar.
Make sure that the steering is moving freely
before towing. G
WARNING
If the weight of the vehicle to be towed or tow- started is greater than the permissible gross
weight of your vehicle:
R the towing eye could detach itself
R the vehicle/trailer combination could over-
turn.
There is a risk of an accident.
When towing or tow-starting another vehicle,
its weight should not be greater than the per-
missible gross weight of your vehicle.
i Information on your vehicle's gross vehi-
cle weight rating can be found on the vehi-
cle identification plate (Y page 398).!
If DISTRONIC PLUS or the HOLD function
is activated, the vehicle brakes automati-
cally in certain situations. To prevent dam-
age to the vehicle, deactivate DISTRONIC
PLUS and the HOLD function in the follow-
ing or other similar situations:
R when towing the vehicle
R in the car wash
! Only secure the tow cable or tow bar to
the towing eyes or, if available, to the trailer
tow hitch. You could otherwise damage the
vehicle.
! Observe the following points when towing
with a tow rope:
R Secure the tow rope on the same side on
both vehicles.
R Make sure that the tow rope is not longer
than legally permitted. Mark the tow rope
in the middle, e.g. with a white cloth
(30 x 30 cm). This will make other road
users aware that a vehicle is being
towed.
R Only secure the tow cable to the towing
eyes or, if available, to the trailer tow
hitch.
R Observe the brake lamps of the towing
vehicle while driving. Always maintain a
distance a distance so that the tow rope
does not sag.
R Do not use steel cables or chains to tow
your vehicle. You could otherwise dam-
age the vehicle. Towing and tow-starting
357Breakdown assistance Z
Page 361 of 417
!
Do not use the towing eye for recovery,
this could damage the vehicle. If in doubt,
recover the vehicle with a crane.
! When towing, pull away slowly and
smoothly. If the tractive power is too high,
the vehicles could be damaged.
! To tow vehicles with KEYLESS-GO, use
the key instead of the Start/Stop button.
The automatic transmission may otherwise switch to position Pwhen you open the
driver's or front-passenger door which
could damage the transmission.
! You may tow the vehicle for a maximum of
50km. A towing speed of 50 km/h must not be exceeded.
For towing distances over 50 km, the entire
vehicle must be lifted up and transported.
! If you tow or tow-start another vehicle, its
weight must not exceed the maximum per- missible gross vehicle weight of your vehi-
cle.
Observe the legal requirements for the rele-
vant countries when towing.
It is better to have the vehicle transported
than to have it towed.
If the vehicle has suffered transmission dam-
age, have it transported on a transporter or
trailer.
The automatic transmission must be in posi-
tion Nwhen the vehicle is being towed.
The battery must be connected and charged. Otherwise, you:
R cannot turn the key in the ignition lock to
position 2
R cannot shift the automatic transmission to
position N
i Deactivate the automatic locking feature
before the vehicle is towed away
(Y page 90). You could otherwise be locked
out when pushing or towing the vehicle.
i Deactivate tow-away protection before
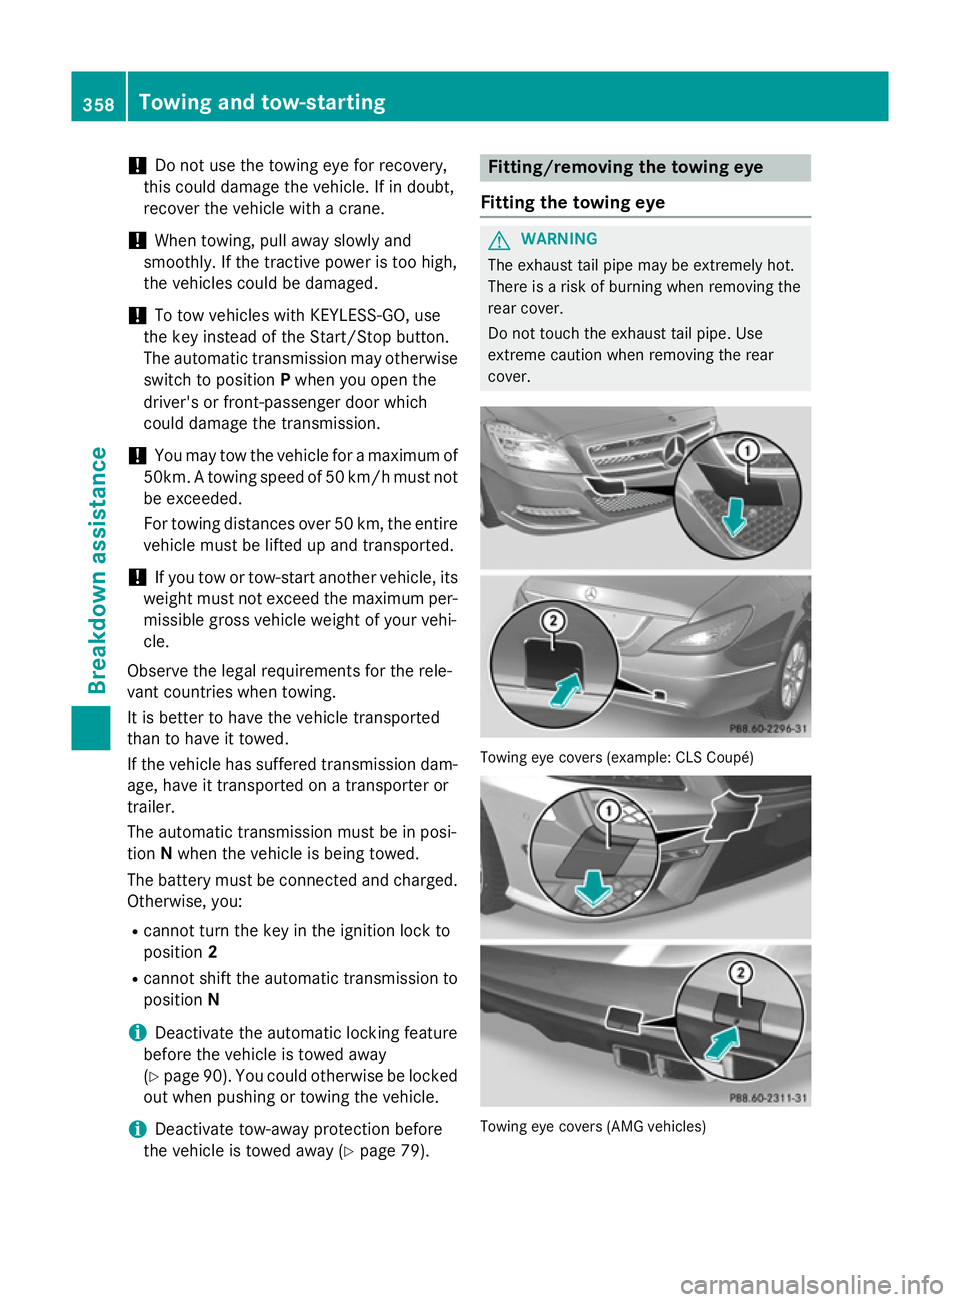
the vehicle is towed away (Y page 79). Fitting/removing the towing eye
Fitting the towing eye G
WARNING
The exhaust tail pipe may be extremely hot.
There is a risk of burning when removing the
rear cover.
Do not touch the exhaust tail pipe. Use
extreme caution when removing the rear
cover. Towing eye covers (example: CLS Coupé)
Towing eye covers (AMG vehicles)358
Towing and tow-startingBreakdown assistance