2014 MERCEDES-BENZ CLS SHOOTING BRAKE fuel type
[x] Cancel search: fuel typePage 20 of 417
Refuelling
Fuel gaug e....................................... 32
Important safety notes .................. 177
Notes for AMG vehicles ................. 401
Refuelling process ......................... 178
see Fuel
Remote control
Auxiliary heating/ventilation .......... 151
Changing the batteries (auxiliary
heating) ......................................... 152
Garage door opener ....................... 320
Programming (garage door
opener) .......................................... 320
Replacing bulbs
Important safety notes .................. 131
Overview of bulb types .................. 132
Replacing the battery (auxiliary
heating remote control) .................... 152
Reserve (fuel tank)
see Fuel
Reserve fuel
Display message ............................ 272
Warning lamp ................................. 295
Residual heat (climate control) ........ 149
Restraint system
Display message ............................ 266
Introduction ..................................... 42
Warning lamp ................................. 294
Warning lamp (function) ................... 43
Rev counter ........................................ 240
Reverse gear (selector lever) ........... 168
Reversing camera
Cleaning instructions ..................... 338
Function/note s............................. 214
Switching on/of f........................... 214
Reversing feature
Side windows ................................... 96
Sliding sunroof ............................... 100
Reversing function
Boot lid/tailgate .............................. 92
Reversing lamp
Changing bulb s.............................. 132
Reversing lamp (display message) .. 269
Roller sunblind
Rear window .................................. 315
Roof carrier ........................................ 312 Roof lining and carpets (cleaning
instructions)
...................................... 341
Roof load (maximum) ........................ 407 S
Safety Child restraint systems .................... 56
Children in the vehicle ..................... 55
Safety net
Attaching ....................................... 308
Important safety information ......... 307
Safety system
see Driving safety systems
Seat
Adjusting the active multicontour
seat ............................................... 110
Adjusting the multicontour seat ..... 109
Folding the backrest (rear com-
partment) forwards/back .............. 305
Massage function .......................... 110
Seat backrest display message ..... 284
Seat belt
Centre rear-compartment sea t........ 46
Correct usage .................................. 45
Switching belt adjustment on/off
(on-board computer) ...................... 257
Seat belts
Adjusting the driver's and front-
passenger seat belt ......................... 47
Adjusting the height ......................... 46
Cleaning ......................................... 340
Display message ............................ 265
Fastening ......................................... 46
Important safety guidelines ............. 44
Introduction ..................................... 44
Rear seat belt status indicator ......... 47
Releasing ......................................... 46
Warning lamp ................................. 287
Warning lamp (function) ................... 47
Seats
Adjusting (electrically) ................... 106
Adjusting lumbar support .............. 111
Adjusting the 4-way lumbar sup-
port ................................................ 111
Adjusting the head restraint .......... 107
Cleaning the cover ......................... 340
Correct driver's seat position ........ 104 Index
17
Page 176 of 417
Steering wheel gearshift paddles
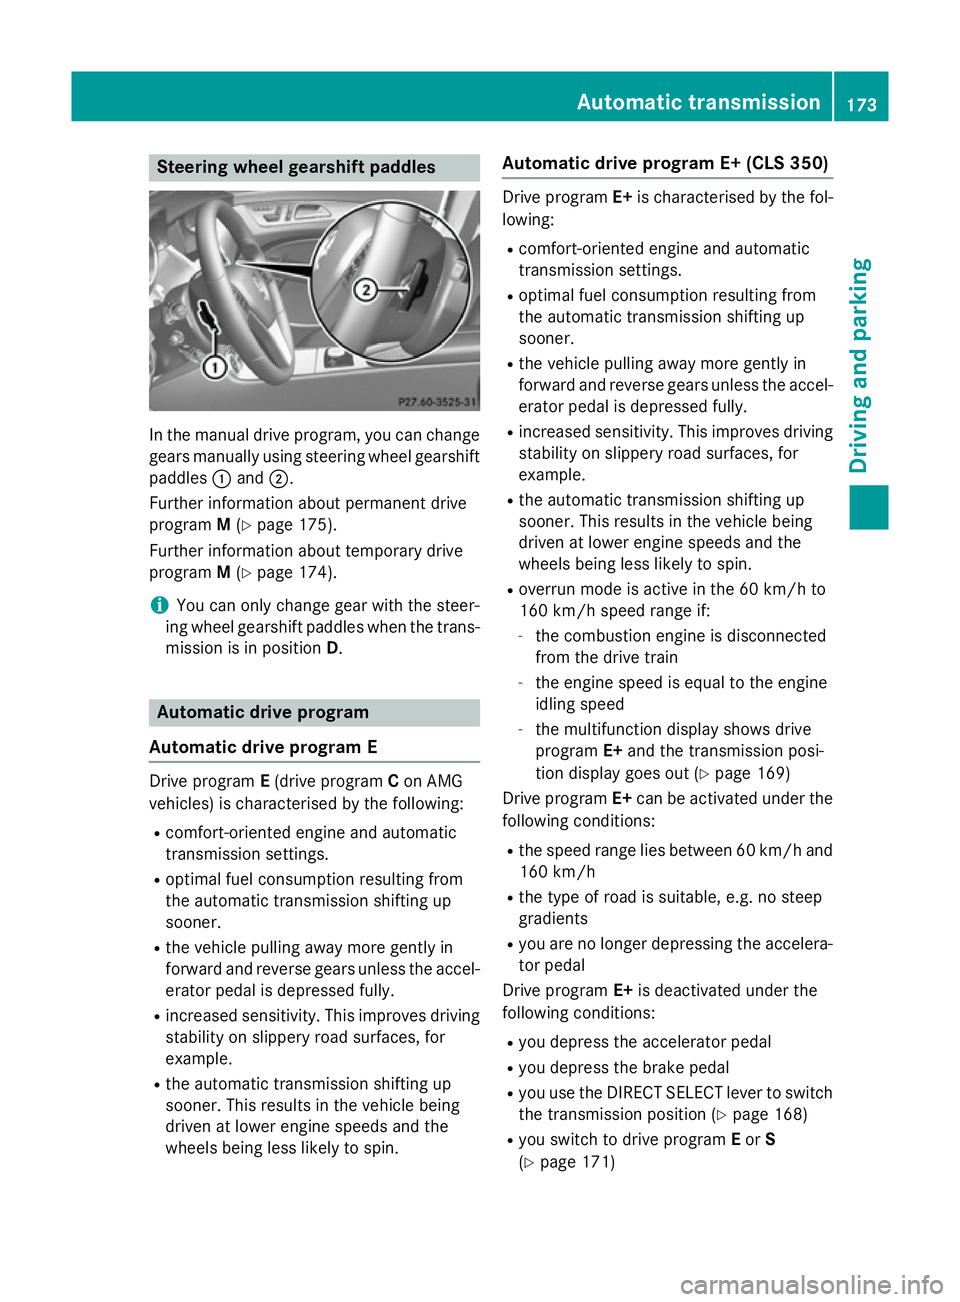
In the manual drive program, you can change
gears manually using steering wheel gearshift
paddles :and ;.
Further information about permanent drive
program M(Y page 175).
Further information about temporary drive
program M(Y page 174).
i You can only change gear with the steer-
ing wheel gearshift paddles when the trans- mission is in position D.Automatic drive program
Automatic drive program E Drive program
E(drive program Con AMG
vehicles) is characterised by the following:
R comfort-oriented engine and automatic
transmission settings.
R optimal fuel consumption resulting from
the automatic transmission shifting up
sooner.
R the vehicle pulling away more gently in
forward and reverse gears unless the accel- erator pedal is depressed fully.
R increased sensitivity. This improves driving
stability on slippery road surfaces, for
example.
R the automatic transmission shifting up
sooner. This results in the vehicle being
driven at lower engine speeds and the
wheels being less likely to spin. Automatic drive program E+ (CLS 350) Drive program
E+is characterised by the fol-
lowing:
R comfort-oriented engine and automatic
transmission settings.
R optimal fuel consumption resulting from
the automatic transmission shifting up
sooner.
R the vehicle pulling away more gently in
forward and reverse gears unless the accel-
erator pedal is depressed fully.
R increased sensitivity. This improves driving
stability on slippery road surfaces, for
example.
R the automatic transmission shifting up
sooner. This results in the vehicle being
driven at lower engine speeds and the
wheels being less likely to spin.
R overrun mode is active in the 60 km/h to
160 km/h speed range if:
- the combustion engine is disconnected
from the drive train
- the engine speed is equal to the engine
idling speed
- the multifunction display shows drive
program E+and the transmission posi-
tion display goes out (Y page 169)
Drive program E+can be activated under the
following conditions:
R the speed range lies between 60 km/h and
160 km/h
R the type of road is suitable, e.g. no steep
gradients
R you are no longer depressing the accelera-
tor pedal
Drive program E+is deactivated under the
following conditions:
R you depress the accelerator pedal
R you depress the brake pedal
R you use the DIRECT SELECT lever to switch
the transmission position (Y page 168)
R you switch to drive program Eor S
(Y page 171) Automatic transmission
173Driving and parking Z
Page 181 of 417
If you mix diesel fuel with petrol, the flash
point of this fuel mixture is lower than that of pure diesel fuel. When the engine is running,
components in the exhaust system may over-
heat unnoticed. There is a risk of fire.
Never refuel with petrol. Never add petrol to
diesel fuel.
! Do not use petrol to refuel vehicles with a
diesel engine. Do not use diesel to refuel
vehicles with a petrol engine. Do not switch on the ignition if you accidentally refuel
with the wrong fuel. Otherwise, the fuel will enter the fuel system. Even small amounts
of the wrong fuel could result in damage to the fuel system and the engine. The repair
costs are high. Notify a qualified specialist
workshop and have the fuel tank and fuel
lines drained completely.
! Overfilling the fuel tank could damage the
fuel system.
! Take care not to spill any fuel on painted
surfaces. You could otherwise damage the
paintwork.
! Use a filter when adding fuel from a fuel
can. The fuel lines and/or the diesel injec-
tion system could otherwise be blocked by
particles from the fuel can.
Do not get into the vehicle again during the
refuelling process. Otherwise, electrostatic
charge could build up again.
If you overfill the fuel tank, some fuel may
spray out when you remove the fuel pump
nozzle.
For further information on fuel and fuel quality (Y page 399). Refuelling
General notes Observe the important safety notes
(Y
page 177). The fuel filler flap is unlocked or locked auto-
matically when you open or close the vehicle
with the key or using KEYLESS-GO.
The position of the 8fuel filler cap is dis-
played in the instrument cluster. The arrow
next to the filling pump indicates the side of
the vehicle.
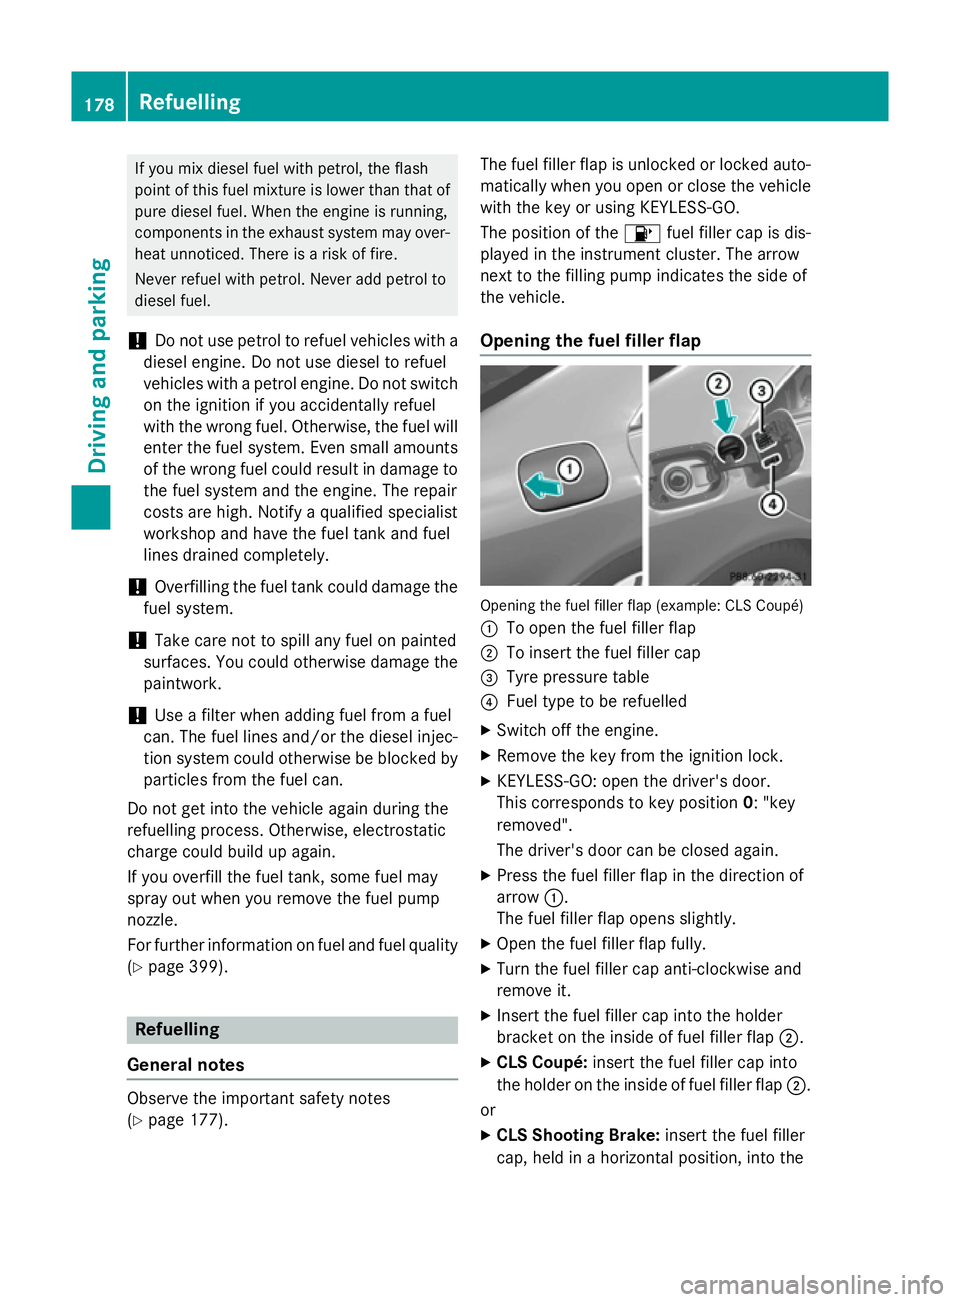
Opening the fuel filler flap Opening the fuel filler flap (example: CLS Coupé)
:
To open the fuel filler flap
; To insert the fuel filler cap
= Tyre pressure table
? Fuel type to be refuelled
X Switch off the engine.
X Remove the key from the ignition lock.
X KEYLESS-GO: open the driver's door.
This corresponds to key position 0: "key
removed".
The driver's door can be closed again.
X Press the fuel filler flap in the direction of
arrow :.
The fuel filler flap opens slightly.
X Open the fuel filler flap fully.
X Turn the fuel filler cap anti-clockwise and
remove it.
X Insert the fuel filler cap into the holder
bracket on the inside of fuel filler flap ;.
X CLS Coupé: insert the fuel filler cap into
the holder on the inside of fuel filler flap ;.
or
X CLS Shooting Brake: insert the fuel filler
cap, held in a horizontal position, into the 178
RefuellingDriving and parking
Page 236 of 417
If the noseweight used is lower than the min-
imum permissible noseweight, the vehicle/
trailer combination could also become unsta-
ble.
To avoid hazardous situations:
R make sure to check the noseweight before
each journey.
R use a drawbar noseweight as close as pos-
sible to the maximum noseweight.
R do not exceed the maximum permissible
noseweight.
R do not use a noseweight lower than the
minimum permissible trailer drawbar nose-
weight.
When reversing the vehicle towards the
trailer, make sure there is nobody between
the trailer and the vehicle.
Couple and uncouple the trailer carefully. If
you do not couple the trailer to the towing
vehicle correctly, the trailer could become
detached.
Make sure that the following values are not
exceeded:
R the permissible trailer drawbar noseweight
R the permissible trailer load
R the permissible rear axle load of the towing
vehicle
R the maximum permissible gross vehicle
weight of both the towing vehicle and the
trailer
You will find the applicable permissible val-
ues, which must not be exceeded, in the vehi- cle documents.
You will find the values approved by the man-
ufacturer on the vehicle identification plates
and those for the towing vehicle under "Tech- nical data" (Y page 410).
When towing a trailer, your vehicle's handling
characteristics will be different in comparison to when driving without a trailer.
The vehicle/trailer combination:
R is heavier
R is restricted in its acceleration and gradi-
ent-climbing capability R
has an increased braking distance
R is affected more by strong crosswinds
R demands more sensitive steering
R has a larger turning circle
This can impair the vehicle's handling char-
acteristics. Adapt your style of driving accord-
ingly. Maintain a safe distance. Drive care-
fully.
When towing a trailer, always adjust your
speed to the current road and weather con-
ditions. Do not exceed the maximum permis- sible speed for your vehicle/trailer combina-
tion. Notes on towing a trailer
General notes i
When towing a trailer, set the tyre pres-
sure on the rear axle of the towing vehicle
for a maximum load; see the tyre pressure
table in the fuel filler flap (Y page 367).
Please note that when towing a trailer, PARK-
TRONIC (Y page 207), Active Parking Assist
(Y page 210) and Blind Spot Assist
(Y page 223) are only available with limita-
tions, or not at all.
i On vehicles without level control, the
height of the ball coupling will alter accord-
ing to the load placed on the vehicle. If nec- essary, use a trailer with a height-adjusta-
ble drawbar.
You will find fitting dimensions and loads
under "Technical data" (Y page 409).
Driving tips i
Observe the notes on ESP ®
trailer stabi-
lisation (Y page 75).
The maximum permissible speed for vehicle/
trailer combinations depends on the type of
trailer. Before beginning the journey, check
the trailer's documents to see what the max- imum permitted speed is. Observe the legally Towing a trailer
233Driving and parking Z
Page 367 of 417
Useful information
i This Owner's Manual describes all mod-
els, series and optional equipment for your
vehicle that were available at the time of
going to press. National variations are pos- sible. Note that your vehicle may not be
equipped with all of the functions descri-
bed. This is also the case for systems and
functions relevant to safety.
i Read the information on qualified special-
ist workshops: (Y page 26). Important safety notes
G
WARNING
If wheels and tyres of the wrong size are used, the wheel brakes or suspension components
may be damaged. There is a risk of an acci-
dent.
Always replace wheels and tyres with those
that fulfil the specifications of the original
part.
When replacing wheels, make sure to fit the
correct:
R designation
R type
When replacing tyres, make sure to fit the
correct:
R designation
R manufacturer
R type G
WARNING
A flat tyre severely impairs the driving, steer-
ing and braking characteristics of the vehicle.
There is a risk of accident.
Tyres without run-flat characteristics:
R do not drive with a flat tyre.
R immediately replace the flat tyre with your
emergency spare wheel or spare wheel, or
consult a qualified specialist workshop. Tyres with run-flat characteristics:
R pay attention to the information and warn-
ing notices on MOExtended tyres (tyres
with run-flat characteristics).
Accessories that are not approved for your
vehicle by Mercedes-Benz or are not being
used correctly can impair the operating
safety.
Before purchasing and using non-approved
accessories, visit a qualified specialist work-
shop and enquire about:
R suitability
R legal stipulations
R factory recommendations
Information on the dimensions and types of
wheels and tyres for your vehicle can be
found under "Wheel/tyre combinations"
(Y page 378)(Y page 380).
Information on air pressure for the tyres on
your vehicle can be found:
R on the tyre pressure label on the fuel filler
flap (Y page 178)
R under "Tyre pressure" (Y page 367)
Modification work on the brake system and
wheels is not permitted. The use of wheel
spacers or brake dust shields is not permit-
ted. This invalidates the general operating
permit for the vehicle.
i Further information on wheels and tyres
can be obtained at any qualified specialist
workshop. Operation
Information on driving
Check the tyre pressures when the vehicle is
heavily laden and, if necessary, adjust.
While driving, pay attention to vibrations,
noises and unusual handling characteristics,
e.g. pulling to one side. This may indicate that the wheels or tyres are damaged. If you sus-
pect that a tyre is defective, reduce your
speed immediately. Stop the vehicle as soon 364
OperationWheels and tyres
Page 382 of 417
Further information about wheels, tyres
and approved combinations can be
obtained from any qualified specialist
workshop.
! Retreaded tyres are neither tested nor
recommended by Mercedes-Benz, since
previous damage cannot always be detec-
ted on retreaded tyres. As a result,
Mercedes-Benz cannot guarantee vehicle
safety if retreaded tyres are fitted. Do not fit
used tyres if you have no information about their previous usage.
! Large wheels: the lower the section width
for a certain wheel size, the lower the ride
comfort is on poor road surfaces. Roll com-
fort and suspension comfort are reduced
and the risk of damage to the wheels and
tyres as a result of driving over obstacles
increases.
Overview of abbreviations used in the follow- ing tyre tables:
R BA: both axles
R FA: front axle
R RA: rear axle
You will find a table with recommended tyre
pressures for various operating conditions on
the inside of your vehicle's fuel filler flap. For
further information on tyre pressure, see
(Y page 367). Check tyre pressures regularly
and only when the tyres are cold.
Notes on the vehicle equipment – always fit
the vehicle:
R with tyres of the same size on a given axle
(left/right)
R with the same type of tyres at a given time
(summer tyres, winter tyres, MOExtended
tyres)
i Vehicles with MOExtended tyres are not
equipped with a TIREFIT kit at the factory. It
is therefore recommended that you addi-
tionally equip your vehicle with a TIREFIT kit
if you fit tyres that do not feature run-flat
characteristics, e.g. winter tyres. A TIREFIT kit can be obtained from a qualified spe-
cialist workshop.
i Not all wheel/tyre combinations can be
fitted at the factory in all countries. Wheel and tyre combinations
379Wheels and tyres Z
Page 405 of 417
only be mixed with additives recommended
by Mercedes-Benz. Observe the instruc-
tions for use in the product description.
More information about recommended
additives can be obtained from any
Mercedes-Benz Service Centre.
Mercedes-Benz recommends that you use
fuel brands that have additives.
The quality of the fuel available in some coun- tries may not be sufficient. Residue could
build up in the injection system as a result. In
this case, in consultation with a Mercedes-
Benz Service Centre, the petrol may be mixed with the cleaning additive recommended by
Mercedes-Benz. Always observe the notes
and mixing ratios specified on the container.
Diesel (EN 590) Fuel grade
G
WARNING
If you mix diesel fuel with petrol, the flash
point of this fuel mixture is lower than that of pure diesel fuel. When the engine is running,
components in the exhaust system may over-
heat unnoticed. There is a risk of fire.
Never refuel with petrol. Never add petrol to
diesel fuel.
! When refuelling, only use diesel fuel that
conforms to the European standard EN 590
or is of equivalent quality. Fuel that does
not conform to EN 590 can lead to
increased wear as well as damage to the
engine and exhaust system.
! Do not use the following:
R marine diesel
R heating oil
R bio-diesel
R vegetable oil
R petrol
R paraffin
R kerosene Do not mix such fuels with diesel fuel and
do not use any special additives. This can
otherwise lead to engine damage.
! Vehicles with diesel particle filters:
in
countries outside the EU, only use low sul-
phur Euro diesel with a sulphur content of
under 50 ppm. Otherwise, the emission
control system could be damaged.
! Vehicles without a diesel particle fil-
ter: in countries where only diesel fuel with
a high sulphur content is available, you will need to carry out your vehicle's oil change
at shorter intervals. More information
about the interval for oil change can be
obtained from any qualified specialist
workshop.
Usually you will find information about the
fuel grade on the pump. If you cannot find the
label on the petrol pump, ask the filling sta-
tion staff.
Information on refuelling (Y page 178).
Low outside temperatures
In winter months, diesel fuel with an improved cold flow quality is available. In Europe, the
EN 590 standard defines various climate-
dependent temperature categories. Malfunc- tions can be avoided by refuelling with diesel
fuel that corresponds to the climatic specifi-
cations outlined in EN 590. At unusually low
outside temperatures, it is possible that the
flow characteristics of the diesel fuel could be
insufficient. Accordingly, diesel fuel from
warmer areas may not be suitable for opera-
tion in colder climatic conditions.
i Further information on country-specific
fuel properties and fuel types with low-tem-
perature resistance can be obtained from
oil companies, e.g. at filling stations.
Fuel consumption information H
Environmental note
CO 2(carbon dioxide) is the gas which scien-
tists believe to be principally responsible for 402
Service products and capacitiesTechnical data