2014 MERCEDES-BENZ CLS SHOOTING BRAKE technical data
[x] Cancel search: technical dataPage 315 of 417
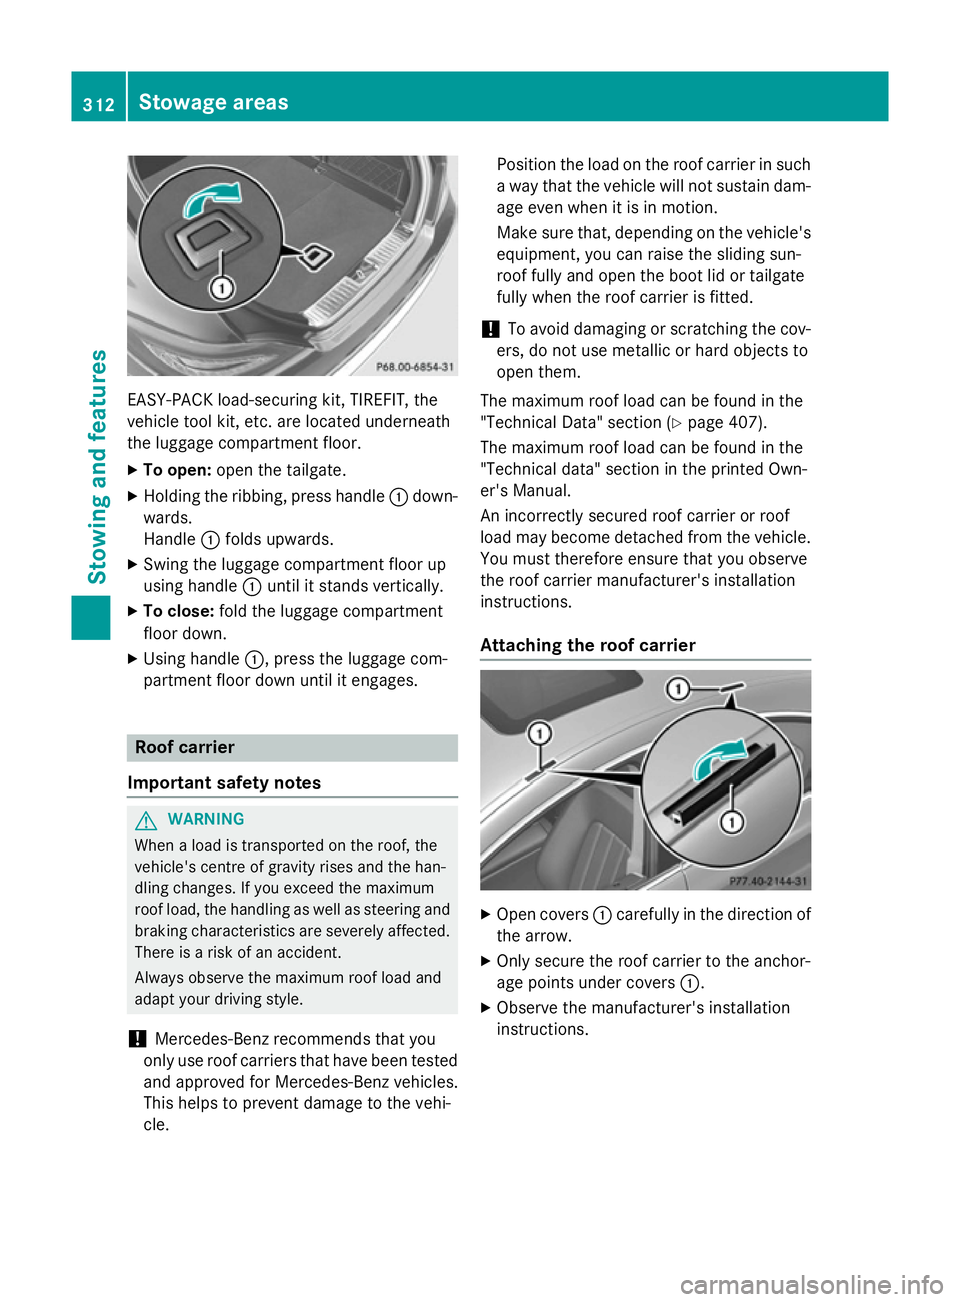
EASY-PACK load-securing kit, TIREFIT, the
vehicle tool kit, etc. are located underneath
the luggage compartment floor.
X To open: open the tailgate.
X Holding the ribbing, press handle :down-
wards.
Handle :folds upwards.
X Swing the luggage compartment floor up
using handle :until it stands vertically.
X To close: fold the luggage compartment
floor down.
X Using handle :, press the luggage com-
partment floor down until it engages. Roof carrier
Important safety notes G
WARNING
When a load is transported on the roof, the
vehicle's centre of gravity rises and the han-
dling changes. If you exceed the maximum
roof load, the handling as well as steering and braking characteristics are severely affected.
There is a risk of an accident.
Always observe the maximum roof load and
adapt your driving style.
! Mercedes-Benz recommends that you
only use roof carriers that have been tested and approved for Mercedes-Benz vehicles.
This helps to prevent damage to the vehi-
cle. Position the load on the roof carrier in such
a way that the vehicle will not sustain dam-
age even when it is in motion.
Make sure that, depending on the vehicle's equipment, you can raise the sliding sun-
roof fully and open the boot lid or tailgate
fully when the roof carrier is fitted.
! To avoid damaging or scratching the cov-
ers, do not use metallic or hard objects to
open them.
The maximum roof load can be found in the
"Technical Data" section (Y page 407).
The maximum roof load can be found in the
"Technical data" section in the printed Own-
er's Manual.
An incorrectly secured roof carrier or roof
load may become detached from the vehicle.
You must therefore ensure that you observe
the roof carrier manufacturer's installation
instructions.
Attaching the roof carrier X
Open covers :carefully in the direction of
the arrow.
X Only secure the roof carrier to the anchor-
age points under covers :.
X Observe the manufacturer's installation
instructions. 312
Sto
wage areasStowing an d features
Page 394 of 417
R
Do not switch off ESP ®
.
R Have the spare wheel/emergency spare
wheel in question replaced at the nearest
qualified specialist workshop. Make sure
that the wheel/tyre dimensions and tyre
type are correct.
When using an emergency spare wheel or
spare wheel of a different size, you must not
exceed the maximum speed of 80 km/h.
Snow chains must not be fitted to emergency spare wheels. General notes
You should regularly check the pressure of all your tyres, including the emergency spare
wheel, particularly prior to long trips, and cor-
rect the pressure as necessary (Y page 367).
The value on the wheel is valid. In addition, the
emergency spare wheel tyre pressure can be found under "Technical data" (Y page 394).
An emergency spare wheel may also be fitted against the direction of rotation. Observe the
time restriction on use as well as the speed
limitation specified on the emergency spare
wheel.
Replace the tyres after six years at the latest,
regardless of wear. This also applies to the
emergency spare wheel.
i If you are driving with the collapsible
emergency spare wheel fitted, the tyre
pressure loss warning system or the tyre
pressure monitor cannot function reliably.
Only restart the tyre pressure loss warning
system/tyre pressure monitor when the
defective wheel has been replaced with a
new wheel.
Vehicles with tyre pressure monitor: after
mounting an emergency spare wheel, the
system may still display the tyre pressure of the removed wheel for a few minutes. The
value displayed for the mounted emer-
gency spare wheel is not the same as the
current tyre pressure of the emergency
spare wheel. Removing the "Minispare" emer-
gency spare wheel/collapsible emer-
gency spare wheel
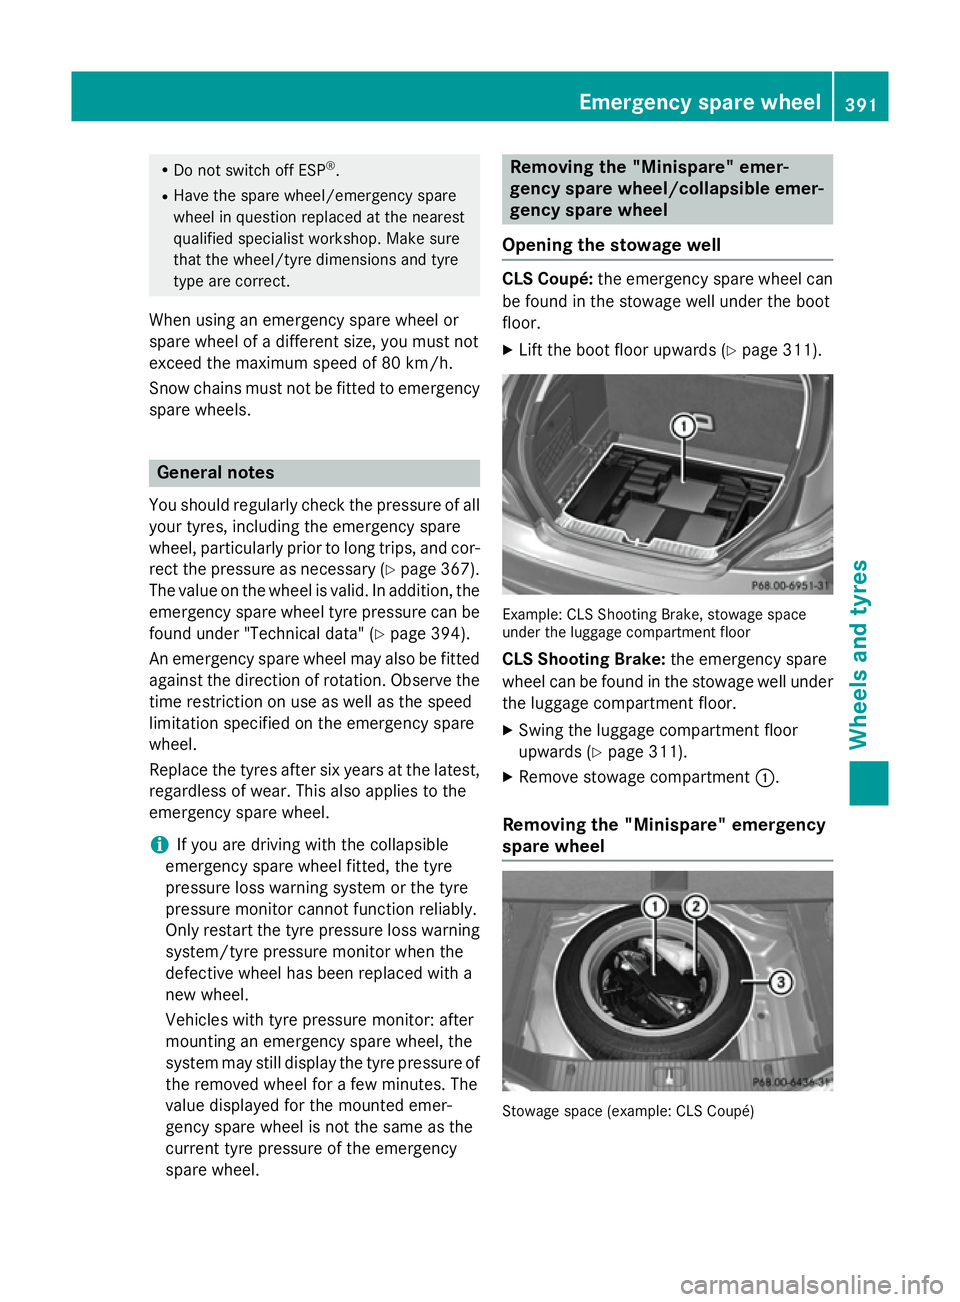
Opening the stowage well CLS Coupé:
the emergency spare wheel can
be found in the stowage well under the boot
floor.
X Lift the boot floor upwards (Y page 311). Example: CLS Shooting Brake, stowage space
under the luggage compartment floor
CLS Shooting Brake: the emergency spare
wheel can be found in the stowage well under
the luggage compartment floor.
X Swing the luggage compartment floor
upwards (Y page 311).
X Remove stowage compartment :.
Removing the "Minispare" emergency
spare wheel Stowage space (example: CLS Coupé) Emergency spare
wheel
391Wheels an d tyres Z
Page 397 of 417
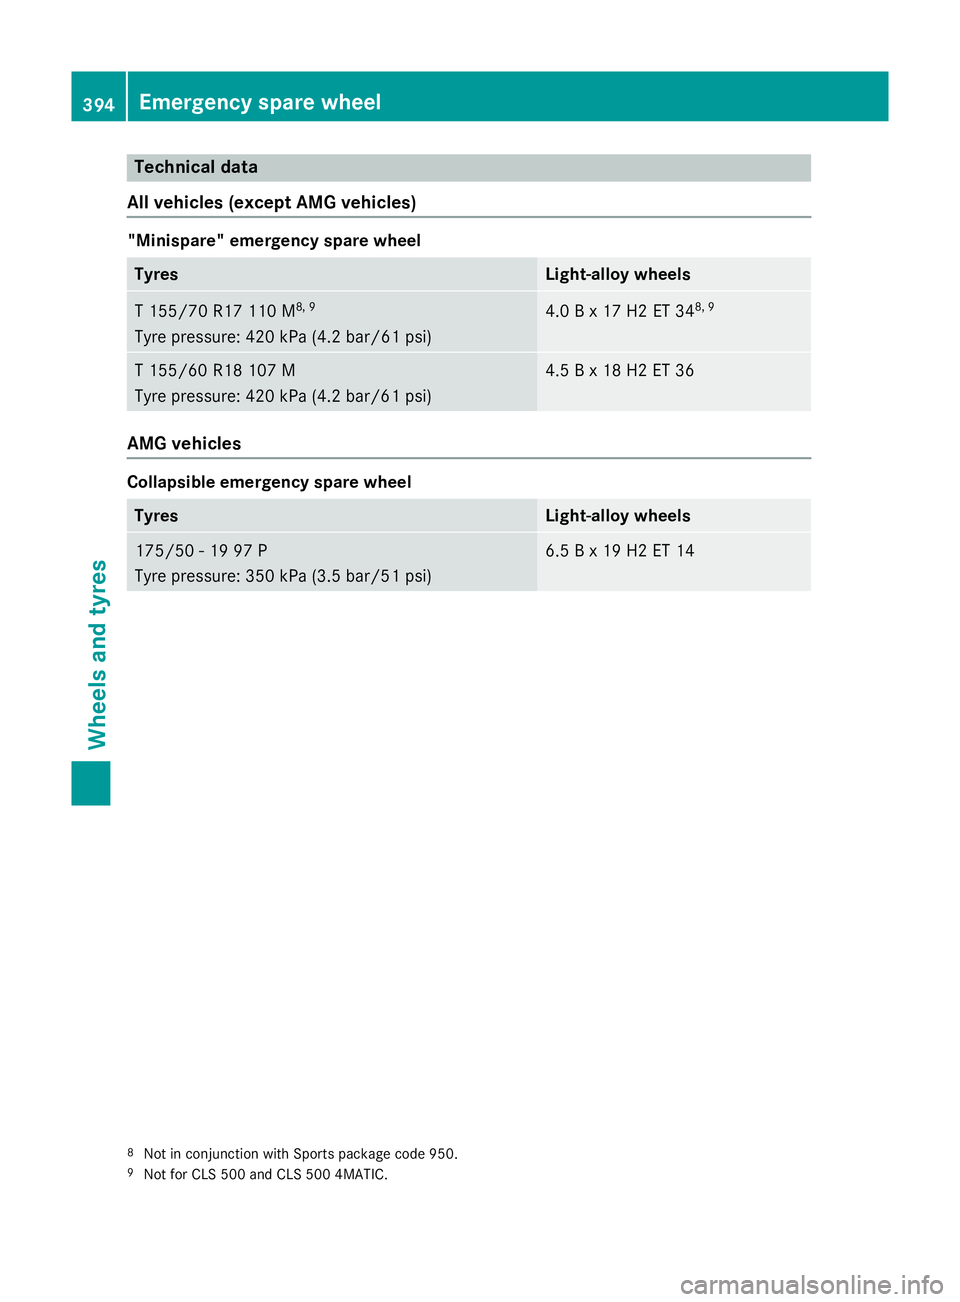
Technical data
All vehicles (except AMG vehicles) "Minispare" emergency spare wheel
Tyres Light-alloy wheels
T 155/7
0 R17 110 M 8, 9
Tyre pressure : 420 kPa (4.2 bar/61 psi) 4.0 B x 17 H2 ET 34
8, 9T 155/60 R18 107 M
Tyre pressure: 420 kPa (4.2 ba
r/61 psi) 4.5 B x 18 H2 ET 36
AMG vehicles
Collapsible emergency spare wheel
Tyres Light-alloy wheels
175/50 - 19 97 P
Tyre pressure: 350 kPa (3.5 bar/51 psi) 6.5 B x 19 H2 ET 14
8
Not in conjunction with Sports package code 950.
9 Not for CLS 500 and CLS 500 4MATIC. 394
Emergency spare wheelWheels and tyres
Page 398 of 417
Useful information
............................396
Information on technical data .........396
Vehicle electronics ...........................396
Identification plates .........................398
Service products and capacities .....399
Vehicle data ...................................... 407
Trailer tow hitch ................................ 409 395Technical data
Page 399 of 417
Useful information
i This Owner's Manual describes all mod-
els, series and optional equipment for your
vehicle that were available at the time of
going to press. National variations are pos- sible. Note that your vehicle may not be
equipped with all of the functions descri-
bed. This is also the case for systems and
functions relevant to safety.
i Read the information on qualified special-
ist workshops: (Y page 26). Information on technical data
You can find current technical data on the
Internet on our Mercedes ‑Benz homepage.
i The technical data was determined in
accordance with EU Directives. All data
applies to the vehicle's standard equip-
ment. The data may therefore differ for
vehicles with optional equipment. You can
obtain further information from a
Mercedes-Benz Service Centre. Vehicle electronics
Tampering with the engine electron-
ics
! Only have work carried out on the engine
electronics and its associated parts, such
as control units, sensors, actuating com-
ponents and connector leads, at a qualified specialist workshop. Vehicle components
may otherwise wear more quickly and the
vehicle's operating permit may be invalida- ted. Retrofitting two-way radios and
mobile phones (RF transmitters)
G
WARNING
If RF transmitters are tampered with or not
properly retrofitted, the electromagnetic radi- ation they emit can interfere with the vehicle
electronics. This may jeopardise the opera-
tional safety of the vehicle. There is a risk of an
accident.
You should have all work on electrical and
electronic components carried out at a quali-
fied specialist workshop. G
WARNING
If you use the RF transmitter in the vehicle in
an improper way, its electromagnetic radia-
tion can disrupt vehicle electronics, e.g. if:
R the RF transmitter is not connected to an
exterior aerial
R the exterior aerial is fitted incorrectly or is
not a low-reflection aerial
This can jeopardise the operating safety of the vehicle. There is a risk of an accident.
Have the low-reflection exterior aerial fitted at
a qualified specialist workshop. When oper-
ating in the vehicle, always connect the RF
transmitter to the low-reflection exterior aer-
ial.
! The operating permit may be invalidated if
the instructions for installation and use of
RF transmitters are not observed.
In particular, the following conditions must be complied with:
R only approved wavebands may be used.
R observe the maximum permissible out-
put in these wavebands.
R only approved aerial positions may be
used.
Excessive levels of electromagnetic radiation
may cause damage to your health and to the
health of others. The use of an exterior aerial
takes into consideration the scientific discus- 396
Vehicle electronicsTechnical data
Page 400 of 417
sion surrounding the possible health risk
posed by electromagnetic fields.
Observe the notes on operating mobile
phones (Y page 319).
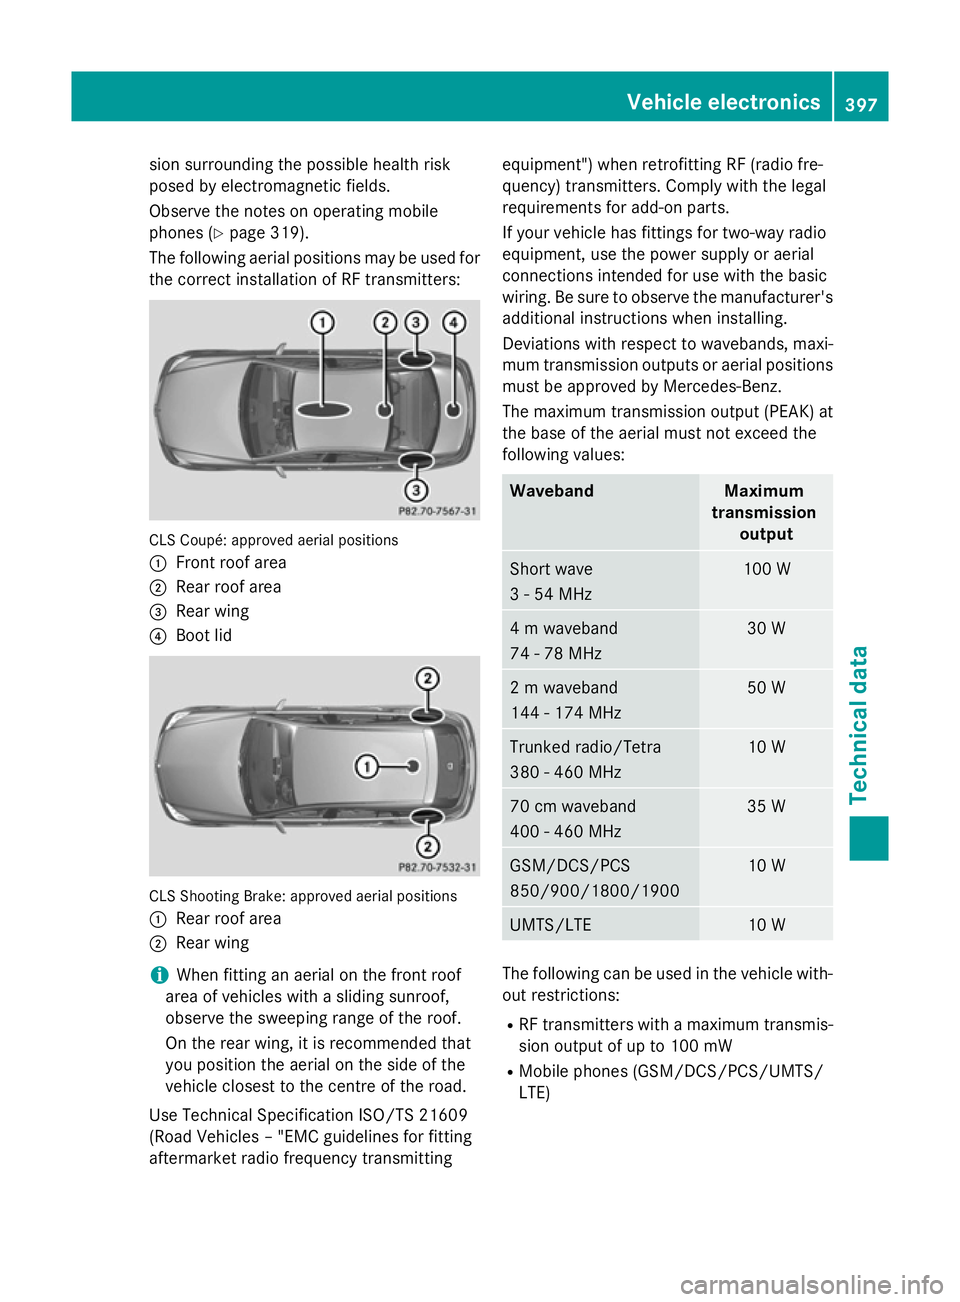
The following aerial positions may be used for the correct installation of RF transmitters: CLS Coupé: approved aerial positions
:
Front roof area
; Rear roof area
= Rear wing
? Boot lid CLS Shooting Brake: approved aerial positions
:
Rear roof area
; Rear wing
i When fitting an aerial on the front roof
area of vehicles with a sliding sunroof,
observe the sweeping range of the roof.
On the rear wing, it is recommended that
you position the aerial on the side of the
vehicle closest to the centre of the road.
Use Technical Specification ISO/TS 21609
(Road Vehicles – "EMC guidelines for fitting
aftermarket radio frequency transmitting equipment") when retrofitting RF (radio fre-
quency) transmitters. Comply with the legal
requirements for add-on parts.
If your vehicle has fittings for two-way radio
equipment, use the power supply or aerial
connections intended for use with the basic
wiring. Be sure to observe the manufacturer's
additional instructions when installing.
Deviations with respect to wavebands, maxi-
mum transmission outputs or aerial positions must be approved by Mercedes-Benz.
The maximum transmission output (PEAK) at
the base of the aerial must not exceed the
following values: Waveband Maximum
transmission output Short wave
3 - 54 MHz 100 W
4 m waveband
74 - 78 MHz 30 W
2 m waveband
144 - 174 MHz 50 W
Trunked radio/Tetra
380 - 460 MHz 10 W
70 cm waveband
400 - 460 MHz 35 W
GSM/DCS/PCS
850/900/1800/1900 10 W
UMTS/LTE 10 W
The following can be used in the vehicle with-
out restrictions:
R RF transmitters with a maximum transmis-
sion output of up to 100 mW
R Mobile phones (GSM/DCS/PCS/UMTS/
LTE) Vehicle electronics
397Technical data Z
Page 401 of 417
There are no restrictions when positioning the
aerial on the outside of the vehicle for the fol-
lowing wavebands:
R Trunked radio/Tetra
R 70 cm waveband
R GSM/DCS/PCS
R UMTS/LTE Identification plates
Vehicle identification plate with vehi-
cle identification number (VIN)
X
Open the front right-hand door.
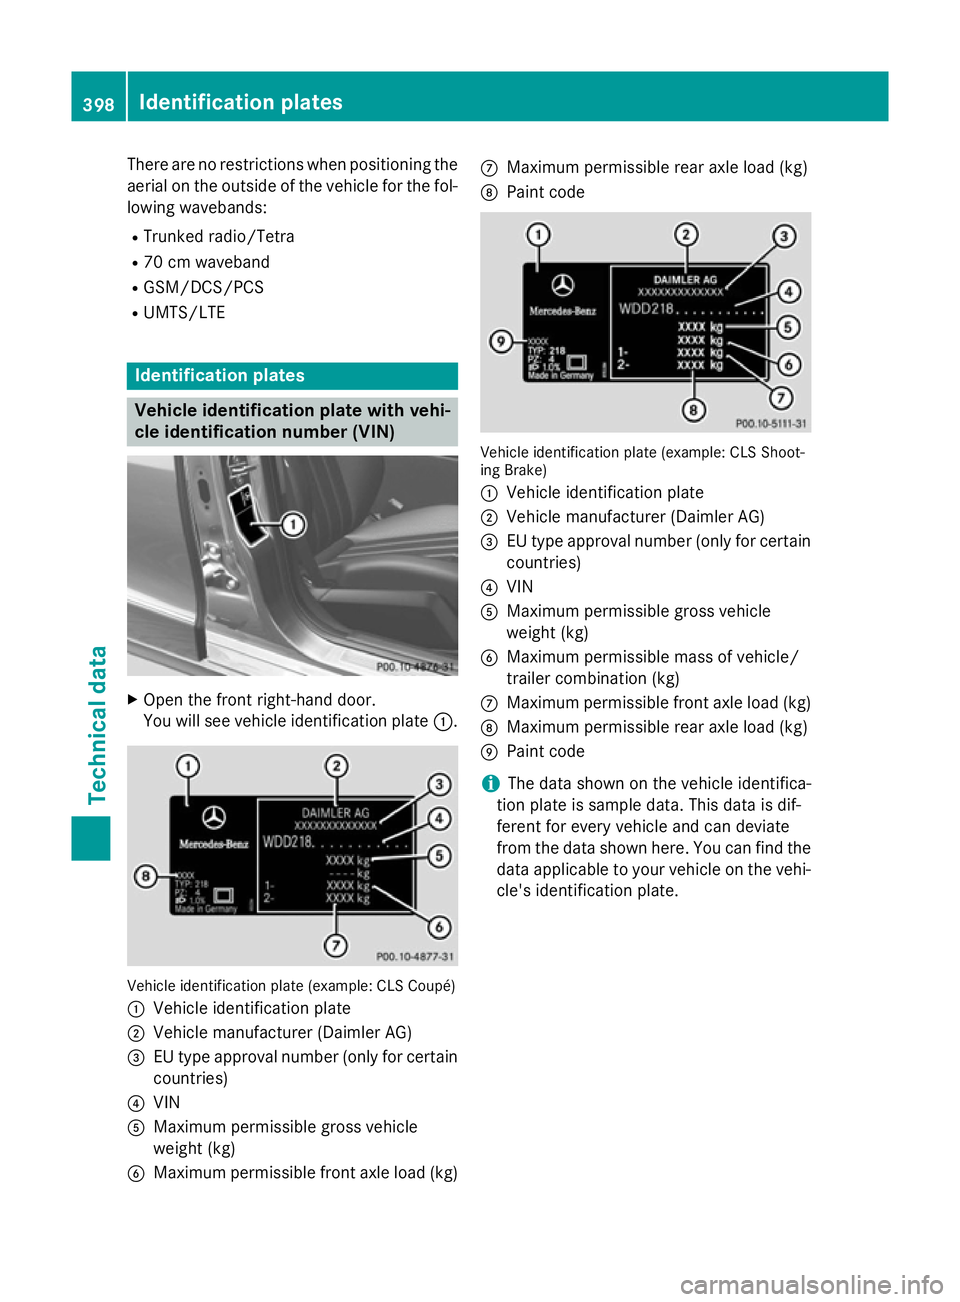
You will see vehicle identification plate :.Vehicle identification plate (example: CLS Coupé)
: Vehicle identification plate
; Vehicle manufacturer (Daimler AG)
= EU type approval number (only for certain
countries)
? VIN
A Maximum permissible gross vehicle
weight (kg)
B Maximum permissible front axle load (kg) C
Maximum permissible rear axle load (kg)
D Paint code Vehicle identification plate (example: CLS Shoot-
ing Brake)
: Vehicle identification plate
; Vehicle manufacturer (Daimler AG)
= EU type approval number (only for certain
countries)
? VIN
A Maximum permissible gross vehicle
weight (kg)
B Maximum permissible mass of vehicle/
trailer combination (kg)
C Maximum permissible front axle load (kg)
D Maximum permissible rear axle load (kg)
E Paint code
i The data shown on the vehicle identifica-
tion plate is sample data. This data is dif-
ferent for every vehicle and can deviate
from the data shown here. You can find the
data applicable to your vehicle on the vehi- cle's identification plate. 398
Identification platesTechnical data
Page 402 of 417
VIN
X
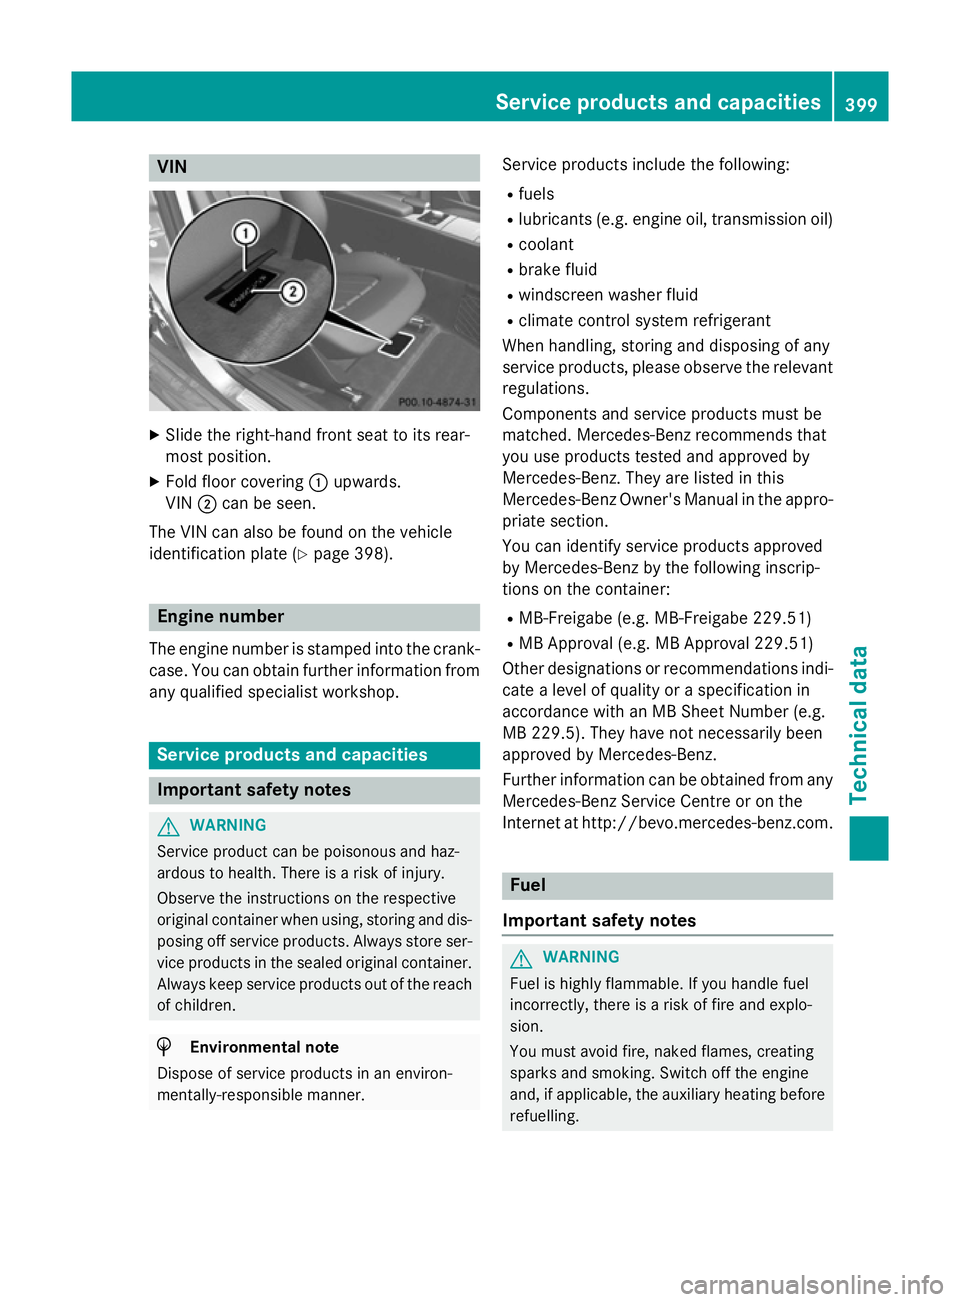
Slide the right-hand front seat to its rear-
most position.
X Fold floor covering :upwards.
VIN ;can be seen.
The VIN can also be found on the vehicle
identification plate (Y page 398).Engine number
The engine number is stamped into the crank- case. You can obtain further information from
any qualified specialist workshop. Service products and capacities
Important safety notes
G
WARNING
Service product can be poisonous and haz-
ardous to health. There is a risk of injury.
Observe the instructions on the respective
original container when using, storing and dis- posing off service products. Always store ser-
vice products in the sealed original container. Always keep service products out of the reach
of children. H
Environmental note
Dispose of service products in an environ-
mentally-responsible manner. Service products include the following:
R fuels
R lubricants (e.g. engine oil, transmission oil)
R coolant
R brake fluid
R windscreen washer fluid
R climate control system refrigerant
When handling, storing and disposing of any
service products, please observe the relevant regulations.
Components and service products must be
matched. Mercedes-Benz recommends that
you use products tested and approved by
Mercedes-Benz. They are listed in this
Mercedes-Benz Owner's Manual in the appro-
priate section.
You can identify service products approved
by Mercedes-Benz by the following inscrip-
tions on the container:
R MB-Freigabe (e.g. MB-Freigabe 229.51)
R MB Approval (e.g. MB Approval 229.51)
Other designations or recommendations indi- cate a level of quality or a specification in
accordance with an MB Sheet Number (e.g.
MB 229.5). They have not necessarily been
approved by Mercedes-Benz.
Further information can be obtained from any
Mercedes-Benz Service Centre or on the
Internet at http://bevo.mercedes-benz.com. Fuel
Important safety notes G
WARNING
Fuel is highly flammable. If you handle fuel
incorrectly, there is a risk of fire and explo-
sion.
You must avoid fire, naked flames, creating
sparks and smoking. Switch off the engine
and, if applicable, the auxiliary heating before refuelling. Service products and capacities
399Technical data Z