2014 MERCEDES-BENZ CLS COUPE belt
[x] Cancel search: beltPage 66 of 417
Problems with automatic child seat recognition
Problem
Possible causes/consequences and
M
MSolutions The PASSENGER AIR
BAG OFF indicator
lamp on the centre con-
sole is lit. A special Mercedes-Benz child restraint system with a trans-
ponder for automatic child seat recognition has been fitted to the
front-passenger seat. The front-passenger front airbag has there- fore been disabled as desired. There is no child restraint system fitted to the front-passenger
seat. Automatic child seat recognition is malfunctioning, for exam-
ple due to electronic devices on the front-passenger seat.
X Remove electronic equipment from the front-passenger seat,
e.g.:
R laptop
R mobile phone
R a card with a transponder, such as a ski pass or access pass
If the PASSENGER AIR BAG OFF indicator lamp remains lit, the
front-passenger seat may not be used. X Visit a qualified specialist workshop. The
6 restraint sys-
tem warning lamp
lights up and/or the
PASSENGER AIR BAG
OFF indicator lamp
does not light up briefly
when you switch the
ignition on. G
WARNING
Automatic child seat recognition is malfunctioning.
Do not install a child restraint system on the front-passenger seat.
It is recommended that you fit the restraint system to a suitable
rear seat.
X Visit a qualified specialist workshop.
X Please also refer to the notes about the restraint system warning
lamp (Y page 266). Suitable positioning of the child
restraint system
Introduction Only child restraint systems which are
approved in accordance with the ECE stand-
ard ECE R44 are permitted for use in the vehi-
cle. Child restraint system on the front-
passenger seat –
if it is absolutely necessary
to secure a child in a child restraint system on the front-passenger seat:
X Always pay attention to the instructions
under "Child restraint system on the front-
passenger seat" (Y page 61).
There you will find instructions on how to
correctly route the shoulder belt strap from the vehicle belt outlet to the shoulder belt
guide on the child restraint system
(Y page 62).
X Move the front-passenger seat as far back
as possible. Children in the vehicle
63Safety Z
Page 67 of 417
X
Move the belt height adjustment to the low-
est position.
X Move the backrest to an almost vertical
position.
The bottom and back of a forward-facing
child restraint system must make full con-
tact with the front-passenger seat cushion
and backrest. The child restraint system
must not touch the roof. Adjust the back-
rest angle accordingly. Also observe the
child restraint system manufacturer's
installation instructions.
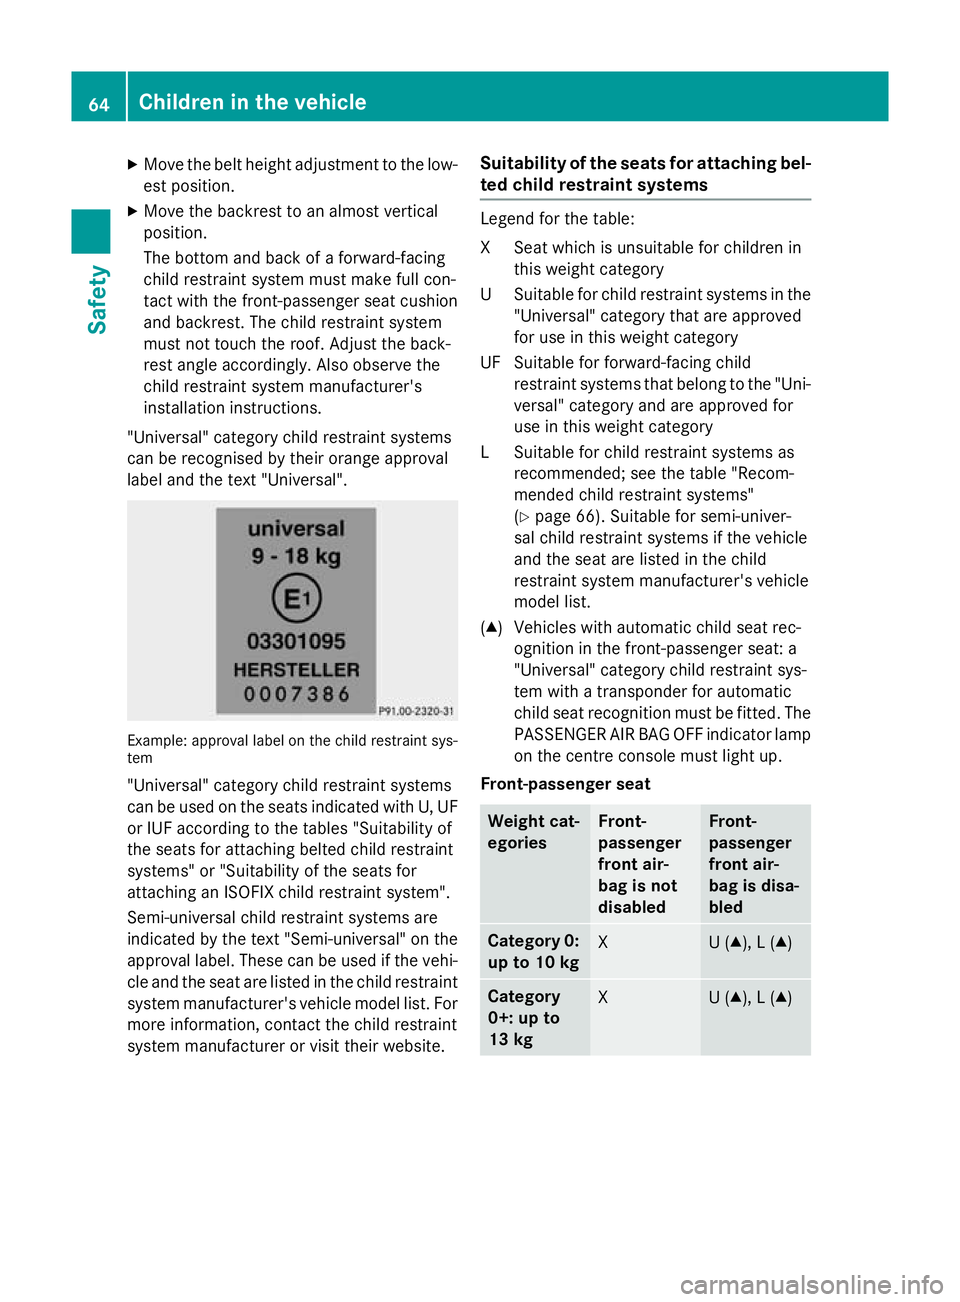
"Universal" category child restraint systems
can be recognised by their orange approval
label and the text "Universal". Example: approval label on the child restraint sys-
tem
"Universal" category child restraint systems
can be used on the seats indicated with U, UF
or IUF according to the tables "Suitability of
the seats for attaching belted child restraint
systems" or "Suitability of the seats for
attaching an ISOFIX child restraint system".
Semi-universal child restraint systems are
indicated by the text "Semi-universal" on the
approval label. These can be used if the vehi-
cle and the seat are listed in the child restraint system manufacturer's vehicle model list. For
more information, contact the child restraint
system manufacturer or visit their website. Suitability of the seats for attaching bel-
ted child restraint systems Legend for the table:
XS
eat which is unsuitable for children in
this weight category
US uitable for child restraint systems in the
"Universal" category that are approved
for use in this weight category
UF Suitable for forward-facing child restraint systems that belong to the "Uni-versal" category and are approved for
use in this weight category
LS uitable for child restraint systems as
recommended; see the table "Recom-
mended child restraint systems"
(Y page 66). Suitable for semi-univer-
sal child restraint systems if the vehicle
and the seat are listed in the child
restraint system manufacturer's vehicle
model list.
(▲) Vehicles with automatic child seat rec- ognition in the front-passenger seat: a
"Universal" category child restraint sys-
tem with a transponder for automatic
child seat recognition must be fitted. The
PASSENGER AIR BAG OFF indicator lamp
on the centre console must light up.
Front-passenger seat Weight cat-
egories Front-
passenger
front air-
bag is not
disabled Front-
passenger
front air-
bag is disa-
bled
Category 0:
up to 10 kg X U (▲), L (▲)
Category
0+: up to
13 kg
X U (▲), L (▲)64
Children in the vehicleSafety
Page 80 of 417
Always pay particular attention to the traffic
situation and be ready to brake, especially if
PRE-SAFE ®
Brake warns you. Terminate the
intervention in a non-critical driving situation.
In order to maintain the appropriate distance
to the vehicle in front and thus prevent a col-
lision, you must apply the brakes yourself. G
WARNING
PRE-SAFE ®
Brake does not react:
R to people or animals
R to oncoming vehicles
R to crossing traffic
R when cornering
As a result, PRE-SAFE ®
Brake may neither
give warnings nor intervene in all critical sit-
uations. There is a risk of an accident.
Always pay careful attention to the traffic sit-
uation and be ready to brake.
In the event of snowfall or heavy rain, detec-
tion can be impaired.
Detection by the radar sensor system is also
impaired in the event of:
R dirt on the sensors or obscured sensors
R interference by other radar sources
R strong radar reflections, for example, in
multi-storey car parks
R a narrow vehicle travelling in front, e.g. a
motorcycle
R a vehicle travelling in front on a different
line
Following damage to the front end of the vehi-
cle, have the radar sensor settings and oper- ation checked at a qualified specialist work-
shop. This also applies to collisions at slow
speeds where there is no visible damage to
the front of the vehicle. Function X
To activate/deactivate: activate or deac-
tivate PRE-SAFE ®
Brake in the on-board
computer (Y page 250).
If the PRE-SAFE ®
Brake is not activated, the
æ symbol appears in the multifunction
display.
This function will issue a warning if:
R at a speed of around 30 km/h or more the
distance maintained to the vehicle travel-
ling in front is insufficient for several sec-
onds.
The · distance warning lamp then lights
up in the instrument cluster.
R at a speed of approximately 7 km/h or
more, you rapidly approach a vehicle in
front.
An intermittent warning tone will then
sound and the ·distance warning lamp
will light up in the instrument cluster.
X Brake immediately to defuse the situation.
or X Take evasive action provided it is safe to do
so.
The PRE-SAFE ®
Brake function can also brake
the vehicle automatically under the following
conditions:
R the driver and front passenger have their
seat belts fastened
and
R the vehicle speed is between approx-
imately 7 km/h and 200 km/h
At speeds of up to approximately 70 km/h
PRE-SAFE ®
Brake can also detect stationary
objects. Examples of stationary objects are
stopped or parked vehicles.
You can prevent the intervention of PRE-
SAFE ®
Brake at any time by:
R depressing the accelerator pedal further
R activating kickdown
R releasing the brake pedal Driving safety systems
77Safety Z
Page 107 of 417
Useful information
i This Owner's Manual describes all mod-
els, series and optional equipment for your
vehicle that were available at the time of
going to press. National variations are pos- sible. Note that your vehicle may not be
equipped with all of the functions descri-
bed. This is also the case for systems and
functions relevant to safety.
i Read the information on qualified special-
ist workshops: (Y page 26). Correct driver's seat position
G
WARNING
You could lose control of the vehicle while
driving if you:
R adjust the driver's seat, steering wheel or
mirrors
R fasten the seat belt
There is a risk of an accident.
Adjust the driver's seat, head restraint, steer-
ing wheel and mirrors and fasten your seat
belt before starting the engine. X
Observe the safety guidelines on seat
adjustment (Y page 105).
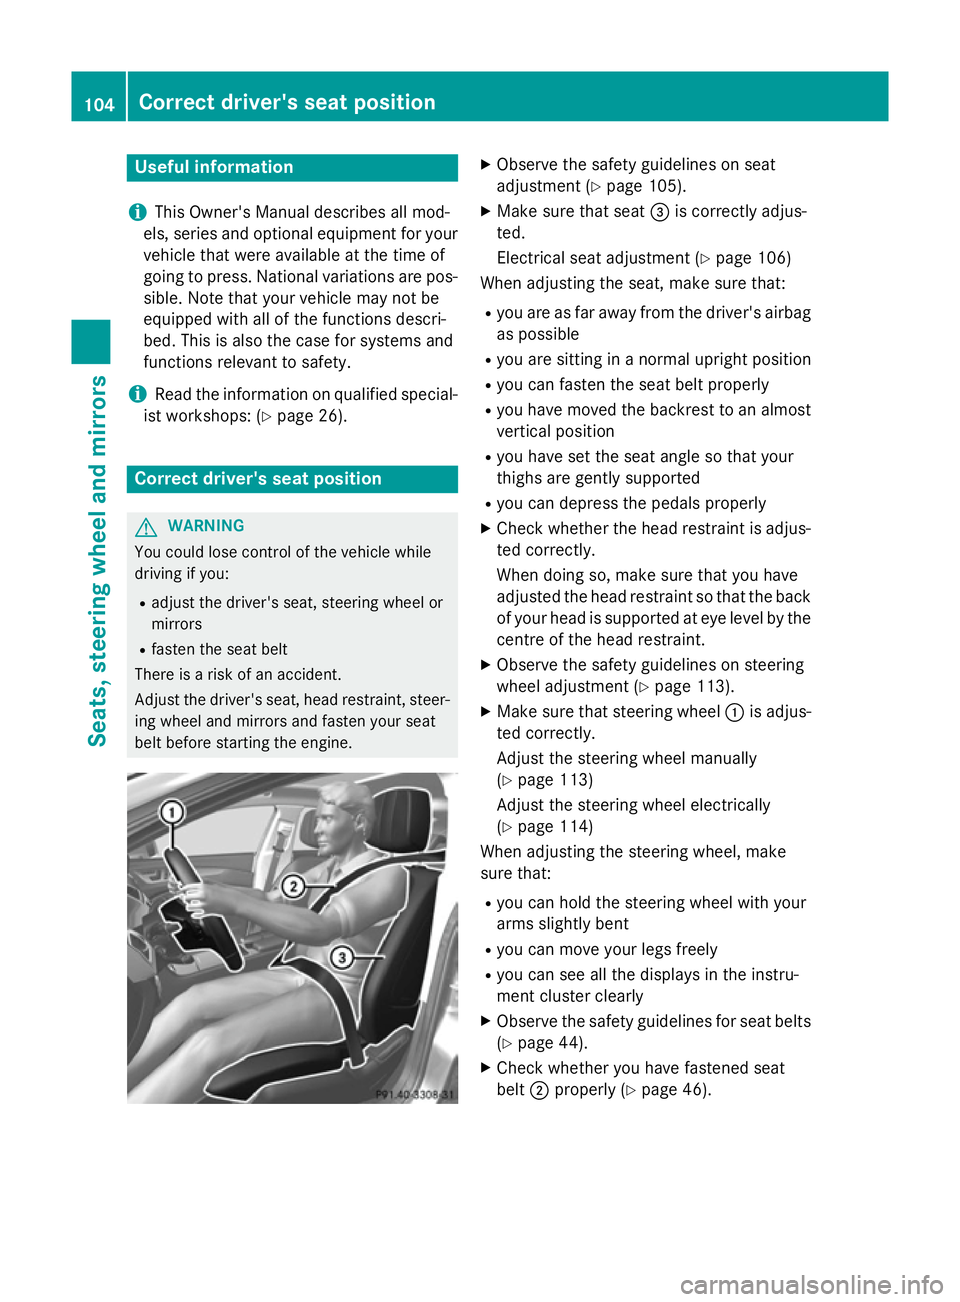
X Make sure that seat =is correctly adjus-
ted.
Electrical seat adjustment (Y page 106)
When adjusting the seat, make sure that:
R you are as far away from the driver's airbag
as possible
R you are sitting in a normal upright position
R you can fasten the seat belt properly
R you have moved the backrest to an almost
vertical position
R you have set the seat angle so that your
thighs are gently supported
R you can depress the pedals properly
X Check whether the head restraint is adjus-
ted correctly.
When doing so, make sure that you have
adjusted the head restraint so that the back
of your head is supported at eye level by the centre of the head restraint.
X Observe the safety guidelines on steering
wheel adjustment (Y page 113).
X Make sure that steering wheel :is adjus-
ted correctly.
Adjust the steering wheel manually
(Y page 113)
Adjust the steering wheel electrically
(Y page 114)
When adjusting the steering wheel, make
sure that:
R you can hold the steering wheel with your
arms slightly bent
R you can move your legs freely
R you can see all the displays in the instru-
ment cluster clearly
X Observe the safety guidelines for seat belts
(Y page 44).
X Check whether you have fastened seat
belt ;properly (Y page 46).104
Correct driver's seat positionSeats, steering wheel and mirrors
Page 108 of 417
The seat belt should:
R fit snugly across your body
R be routed across the middle of your shoul-
der
R be routed across your hips in the pelvic
area
X Before starting off, adjust the rear-view mir-
ror and the exterior mirrors so that you
have a good view of road and traffic condi-
tions (Y page 116).
X Vehicles with a memory function: save
the seat, steering wheel and exterior mirror
settings with the memory function
(Y page 119). Seats
Important safety notes
G
WARNING
If children adjust the seats, they could
become trapped, especially if they are unat-
tended. There is a risk of injury.
When leaving the vehicle, always take the key with you and lock the vehicle. Never leave
children unattended in the vehicle. G
WARNING
You could lose control of the vehicle while
driving if you:
R adjust the driver's seat, steering wheel or
mirrors
R fasten the seat belt
There is a risk of an accident.
Adjust the driver's seat, head restraint, steer-
ing wheel and mirrors and fasten your seat
belt before starting the engine. G
WARNING
If you adjust the seat height carelessly, you or other vehicle occupants could be trapped andthereby injured. Children in particular could
accidentally press the electrical seat adjust- ment buttons and become trapped. There is a
risk of injury.
While moving the seats, make sure that your
hands or other body parts do not get under the
lever assembly of the seat adjustment sys-
tem. G
WARNING
When adjusting a seat, you or another vehicle occupant could become trapped by the guiderail of the seat, for instance. There is a risk of
injury.
Make sure that no one has any part of their
body within the sweep of the seat when
adjusting it. G
WARNING
The head restraints cannot provide the inten-
ded protection unless they are fitted and
adjusted correctly. There is an increased risk of injury to the head and neck in the event of
an accident or sudden braking, for example.
Always drive with the head restraints fitted.
Ensure that the centre of the head restraints
support the back of each vehicle occupant's
head at eye level before driving off. G
WARNING
The seat belt does not offer the intended level of protection if you have not moved the back-
rest to an almost vertical position. When brak-
ing or in the event of an accident, you could
slide underneath the seat belt and sustain
abdomen or neck injuries, for example. This
poses an increased risk of injury or even fatal injury.
Adjust the seat properly before beginning
your journey. Always ensure that the backrest
is in an almost vertical position and that the
shoulder section of your seatbelt is routed
across the centre of your shoulder. Seats
105Seats, steering wheel and mirrors Z
Page 110 of 417
Adjusting the head restraints
Important safety notes G
WARNING
You could lose control of the vehicle while
driving if you:
R adjust the driver's seat, steering wheel or
mirrors
R fasten the seat belt
There is a risk of an accident.
Adjust the driver's seat, head restraint, steer-
ing wheel and mirrors and fasten your seat
belt before starting the engine. G
WARNING
The head restraints cannot provide the inten-
ded protection unless they are fitted and
adjusted correctly. There is an increased risk of injury to the head and neck in the event of
an accident or sudden braking, for example.
Always drive with the head restraints fitted.
Ensure that the centre of the head restraints
support the back of each vehicle occupant's
head at eye level before driving off.
General notes Observe the important safety notes regarding
the seats (Y page 105).
Do not interchange the head restraints of the front and rear seats. Otherwise, you will not
be able to adjust the height and angle of the
head restraints to the correct position. Adjusting the head restraints manually Adjusting the head restraint height
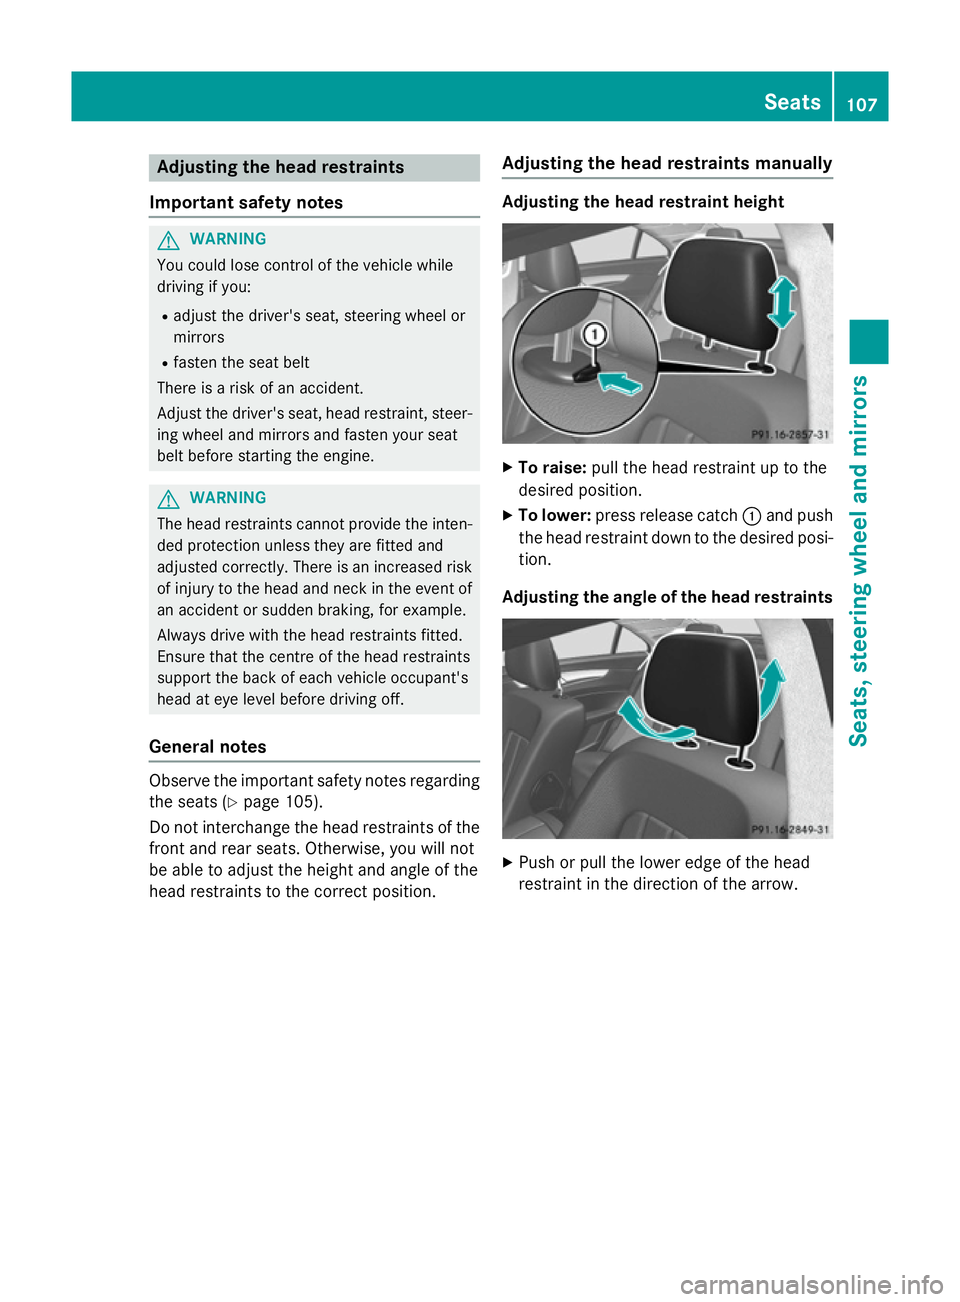
X
To raise: pull the head restraint up to the
desired position.
X To lower: press release catch :and push
the head restraint down to the desired posi-
tion.
Adjusting the angle of the head restraints X
Push or pull the lower edge of the head
restraint in the direction of the arrow. Seats
107Seats, steering wheel and mirrors Z
Page 116 of 417
Problems with the seat ventilation
Problem
Possible causes/consequences and
M
MSolutions The seat ventilation has
switched off prema-
turely or cannot be
switched on. The on-board voltage is too low because too many electrical con-
sumers are switched on.
X Switch off electrical consumers that you do not need, such as
the rear window heating or interior lighting.
Once the battery is sufficiently charged, the seat ventilation will
switch back on automatically. Steering wheel
Important safety notes
G
WARNING
You could lose control of the vehicle while
driving if you:
R adjust the driver's seat, steering wheel or
mirrors
R fasten the seat belt
There is a risk of an accident.
Adjust the driver's seat, head restraint, steer-
ing wheel and mirrors and fasten your seat
belt before starting the engine. G
WARNING
Children could become trapped by the steer-
ing wheel if they adjust it. There is a risk of
injury.
When leaving the vehicle, always take the key with you and lock the vehicle. Never leave
children unattended in the vehicle. Adjusting the steering wheel man-
ually
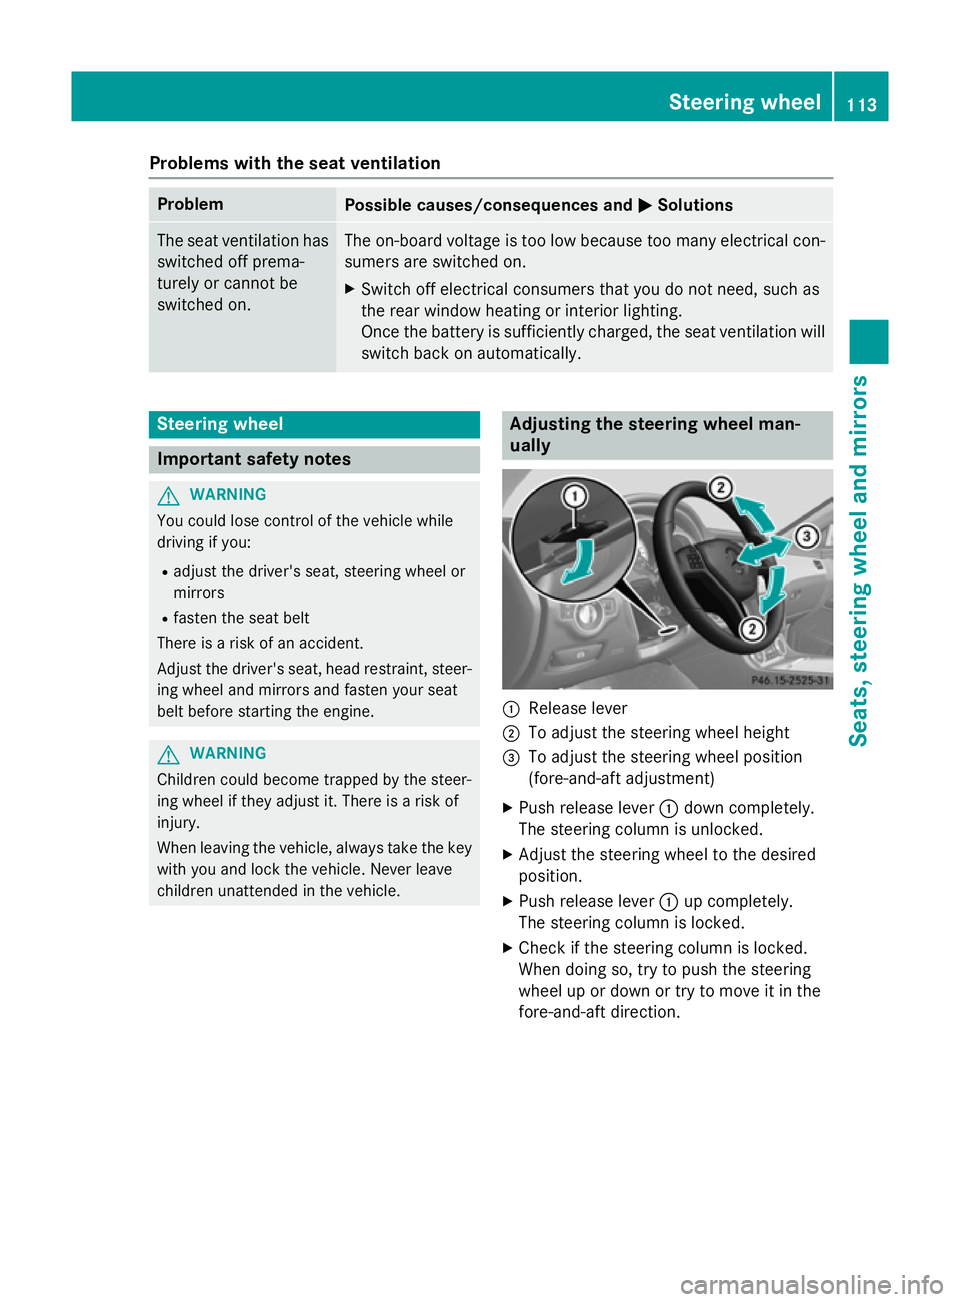
:
Release lever
; To adjust the steering wheel height
= To adjust the steering wheel position
(fore-and-aft adjustment)
X Push release lever :down completely.
The steering column is unlocked.
X Adjust the steering wheel to the desired
position.
X Push release lever :up completely.
The steering column is locked.
X Check if the steering column is locked.
When doing so, try to push the steering
wheel up or down or try to move it in the
fore-and-aft direction. Steering wheel
113Seats, steering wheel and mirrors Z
Page 119 of 417
when you store the setting with the memory
function (Y page 119).
Crash-responsive EASY-EXIT feature If the crash-responsive EASY-EXIT feature is
triggered in an accident, the steering column
will move upwards when the driver's door is
opened. This occurs irrespective of the posi-
tion of the key in the ignition lock. This makes it easier to exit the vehicle and rescue the
occupants.
The crash-responsive EASY-EXIT feature is
only operational if the EASY-EXIT/ENTRY fea-
ture is activated in the on-board computer
(Y page 257). Mirrors
Rear-view mirror
X
Anti-dazzle mode: pivot anti-dazzle
switch :forwards or back. Exterior mirrors
Adjusting the exterior mirrors G
WARNING
You could lose control of the vehicle while
driving if you:
R adjust the driver's seat, steering wheel or
mirrors
R fasten the seat belt
There is a risk of an accident. Adjust the driver's seat, head restraint, steer-
ing wheel and mirrors and fasten your seat
belt before starting the engine. G
WARNING
The exterior mirrors reduce the size of the
image. Objects visible in the mirrors are
closer than they appear. You could misjudge
the distance from road users driving behind
you when changing lanes, for instance. There is a risk of an accident.
You should therefore always look over your
shoulder to determine the actual distance
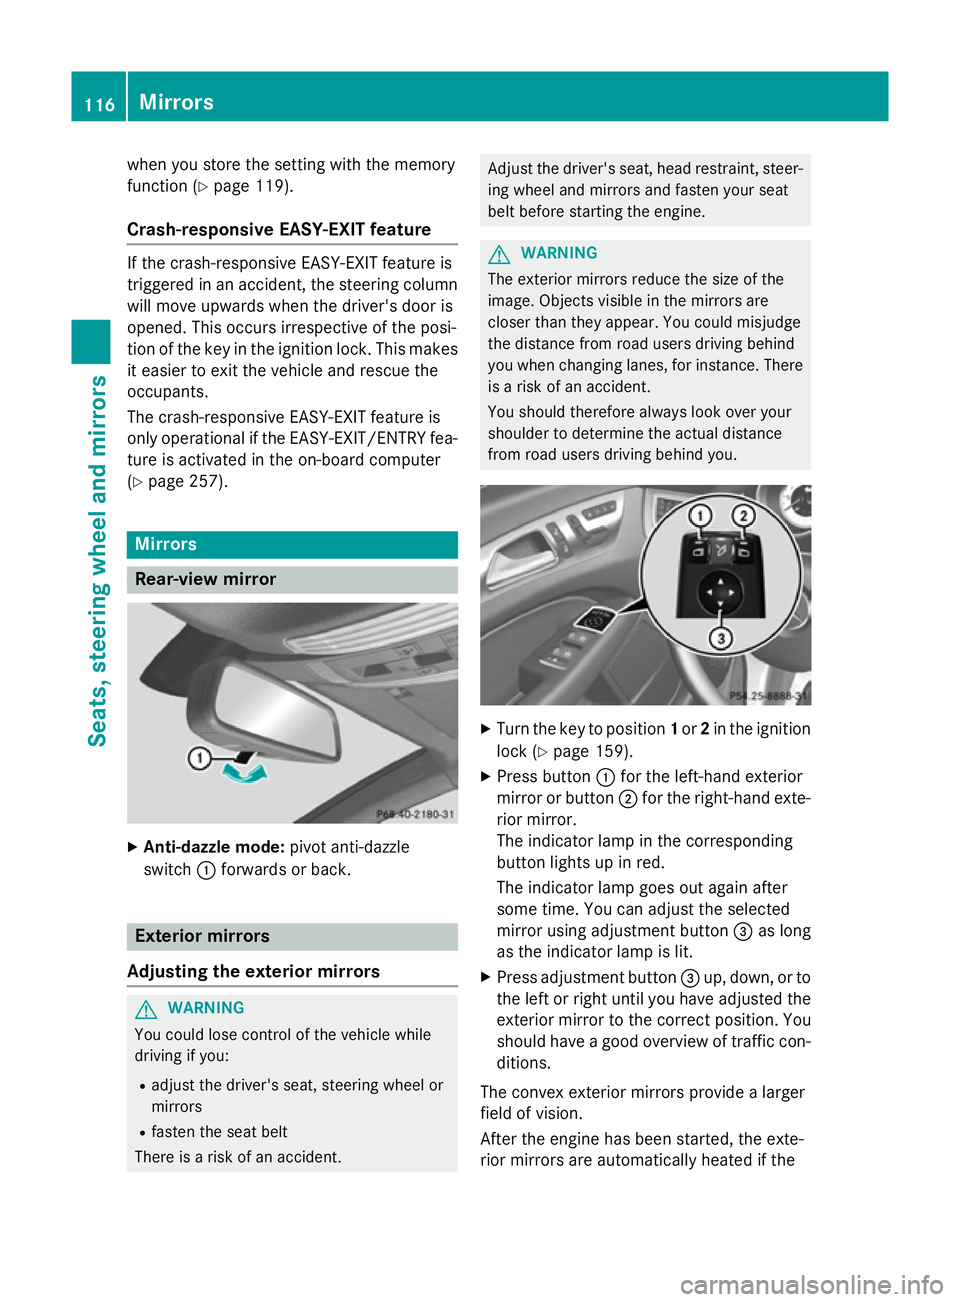
from road users driving behind you. X
Turn the key to position 1or 2in the ignition
lock (Y page 159).
X Press button :for the left-hand exterior
mirror or button ;for the right-hand exte-
rior mirror.
The indicator lamp in the corresponding
button lights up in red.
The indicator lamp goes out again after
some time. You can adjust the selected
mirror using adjustment button =as long
as the indicator lamp is lit.
X Press adjustment button =up, down, or to
the left or right until you have adjusted the
exterior mirror to the correct position. You
should have a good overview of traffic con- ditions.
The convex exterior mirrors provide a larger
field of vision.
After the engine has been started, the exte-
rior mirrors are automatically heated if the 116
MirrorsSeats, steering wheel and mirrors