2014 MERCEDES-BENZ CLS COUPE fog light
[x] Cancel search: fog lightPage 132 of 417
Important safety notes
G
WARNING
Adaptive Highbeam Assist does not recognise road users:
R who have no lights, e.g. pedestrians
R who have poor lighting, e.g. cyclists
R whose lighting is blocked, e.g. by a barrier
In very rare cases, Adaptive Highbeam Assist
recognises road users too late or not at all. In
this, or in similar situations, the automatic
main-beam headlamps will not be deactivated
or activated regardless. There is a risk of an
accident.
Always carefully observe the traffic conditions and switch off the main-beam headlamps in
good time.
Adaptive Highbeam Assist cannot take into
account road, weather or traffic conditions.
Adaptive Highbeam Assist is only an aid. You
are responsible for adjusting the vehicle's
lighting to the prevailing light, visibility and
traffic conditions.
In particular, the detection of obstacles can
be restricted if there is:
R poor visibility, e.g. due to fog, heavy rain or
snow
R dirt on the sensors or if the sensors are
obscured
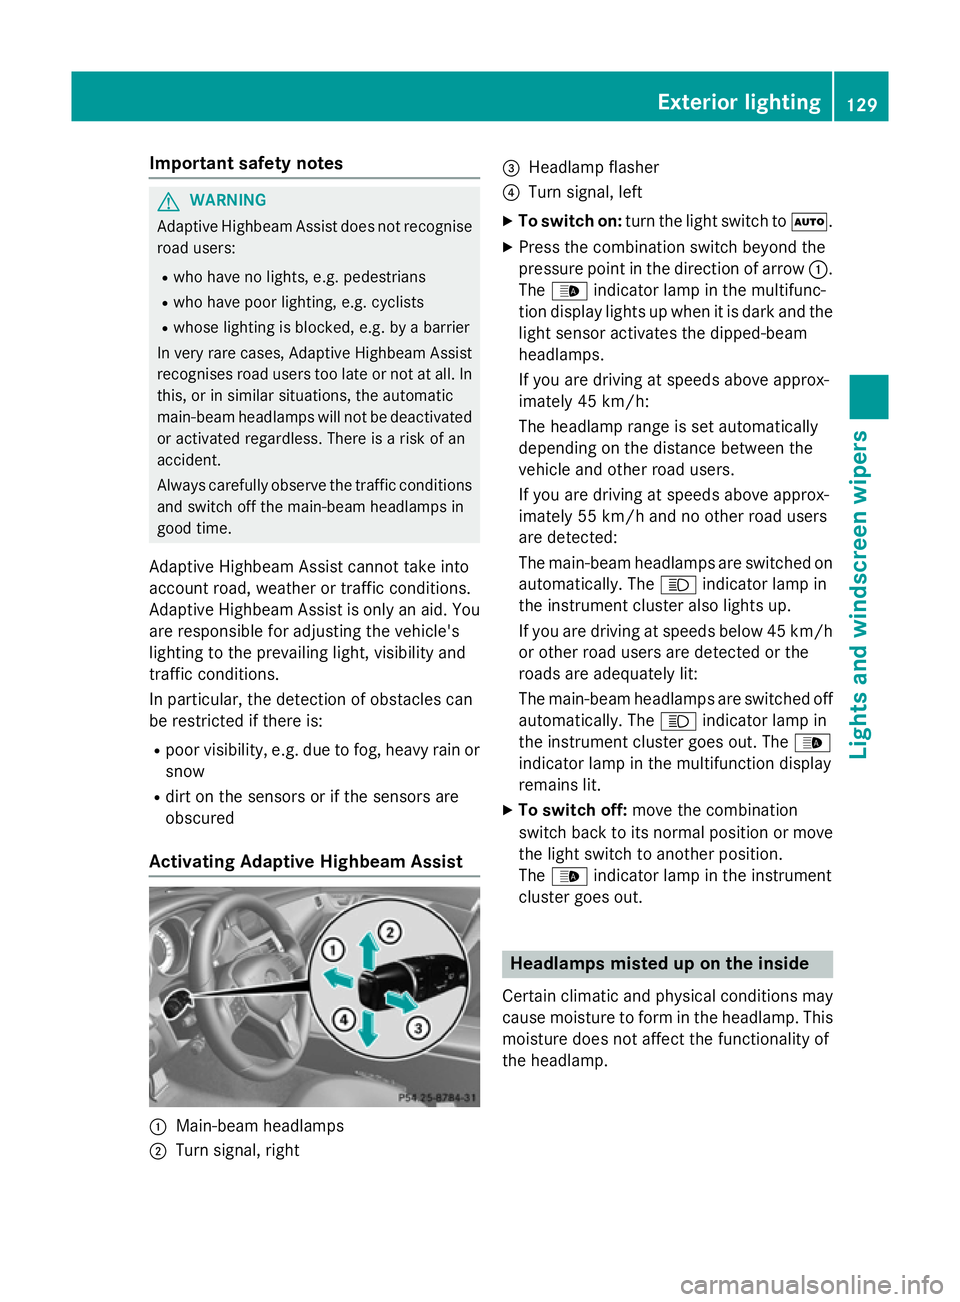
Activating Adaptive Highbeam Assist :
Main-beam headlamps
; Turn signal, right =
Headlamp flasher
? Turn signal, left
X To switch on: turn the light switch to Ã.
X Press the combination switch beyond the
pressure point in the direction of arrow :.
The _ indicator lamp in the multifunc-
tion display lights up when it is dark and the light sensor activates the dipped-beam
headlamps.
If you are driving at speeds above approx-
imately 45 km/h:
The headlamp range is set automatically
depending on the distance between the
vehicle and other road users.
If you are driving at speeds above approx-
imately 55 km/h and no other road users
are detected:
The main-beam headlamps are switched on
automatically. The Kindicator lamp in
the instrument cluster also lights up.
If you are driving at speeds below 45 km/h
or other road users are detected or the
roads are adequately lit:
The main-beam headlamps are switched off automatically. The Kindicator lamp in
the instrument cluster goes out. The _
indicator lamp in the multifunction display
remains lit.
X To switch off: move the combination
switch back to its normal position or move
the light switch to another position.
The _ indicator lamp in the instrument
cluster goes out. Headlamps misted up on the inside
Certain climatic and physical conditions may
cause moisture to form in the headlamp. This
moisture does not affect the functionality of
the headlamp. Exterior lighting
129Lights and windscreen wipers Z
Page 217 of 417
Reversing camera
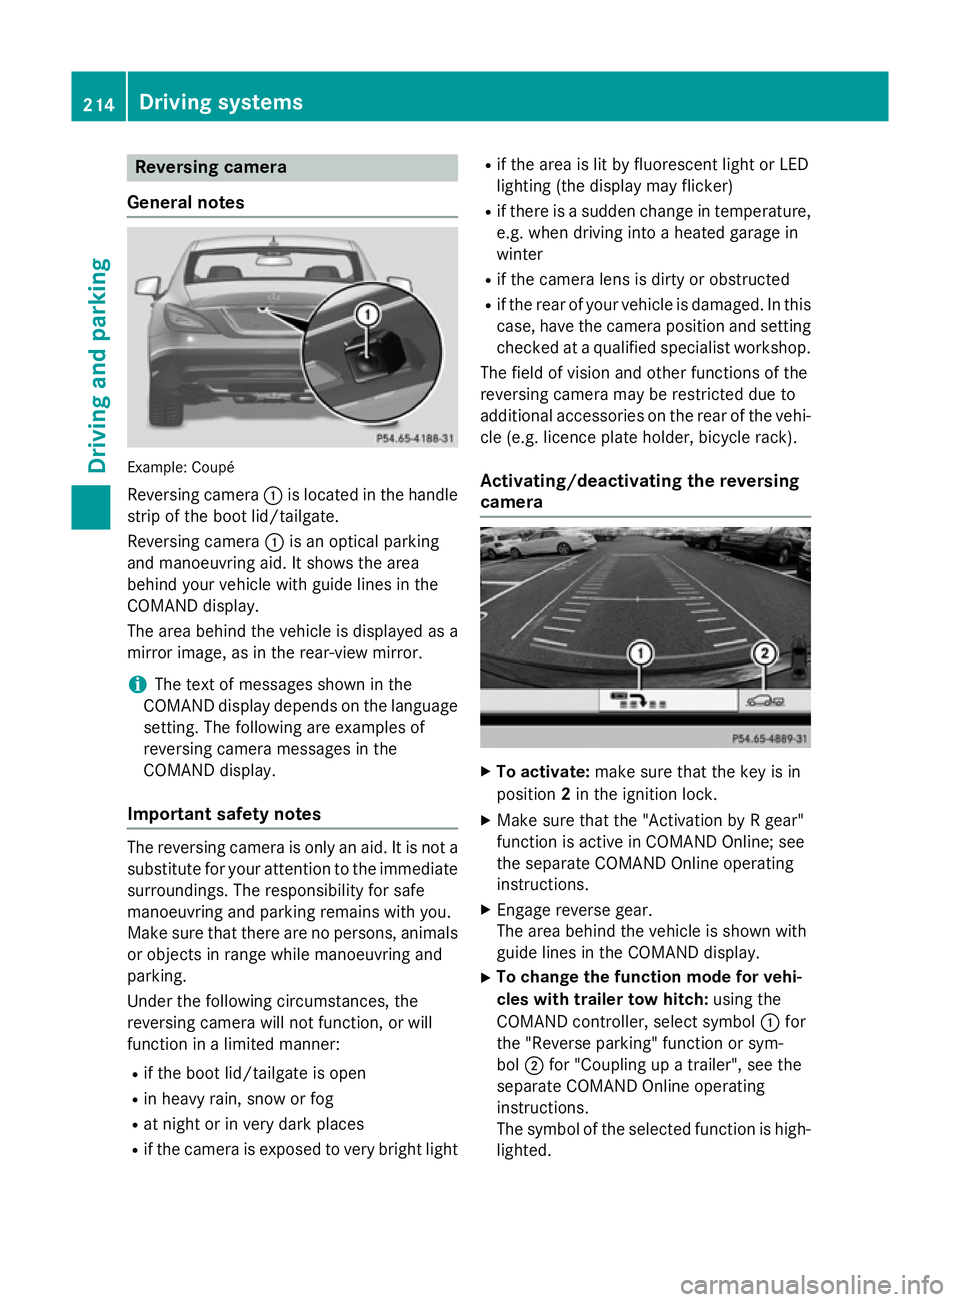
General notes Example: Coupé
Reversing camera :is located in the handle
strip of the boot lid/tailgate.
Reversing camera :is an optical parking
and manoeuvring aid. It shows the area
behind your vehicle with guide lines in the
COMAND display.
The area behind the vehicle is displayed as a
mirror image, as in the rear-view mirror.
i The text of messages shown in the
COMAND display depends on the language setting. The following are examples of
reversing camera messages in the
COMAND display.
Important safety notes The reversing camera is only an aid. It is not a
substitute for your attention to the immediate
surroundings. The responsibility for safe
manoeuvring and parking remains with you.
Make sure that there are no persons, animals
or objects in range while manoeuvring and
parking.
Under the following circumstances, the
reversing camera will not function, or will
function in a limited manner:
R if the boot lid/tailgate is open
R in heavy rain, snow or fog
R at night or in very dark places
R if the camera is exposed to very bright light R
if the area is lit by fluorescent light or LED
lighting (the display may flicker)
R if there is a sudden change in temperature,
e.g. when driving into a heated garage in
winter
R if the camera lens is dirty or obstructed
R if the rear of your vehicle is damaged. In this
case, have the camera position and setting checked at a qualified specialist workshop.
The field of vision and other functions of the
reversing camera may be restricted due to
additional accessories on the rear of the vehi-
cle (e.g. licence plate holder, bicycle rack).
Activating/deactivating the reversing
camera X
To activate: make sure that the key is in
position 2in the ignition lock.
X Make sure that the "Activation by R gear"
function is active in COMAND Online; see
the separate COMAND Online operating
instructions.
X Engage reverse gear.
The area behind the vehicle is shown with
guide lines in the COMAND display.
X To change the function mode for vehi-
cles with trailer tow hitch: using the
COMAND controller, select symbol :for
the "Reverse parking" function or sym-
bol ;for "Coupling up a trailer", see the
separate COMAND Online operating
instructions.
The symbol of the selected function is high- lighted. 214
Driving systemsDriving and parking
Page 223 of 417
R
the traffic signs are covered, for instance by
dirt, snow or trees
R the traffic signs are poorly illuminated
R there are ambiguous traffic signs, for
instance near roadworks or on multi-lane
roads
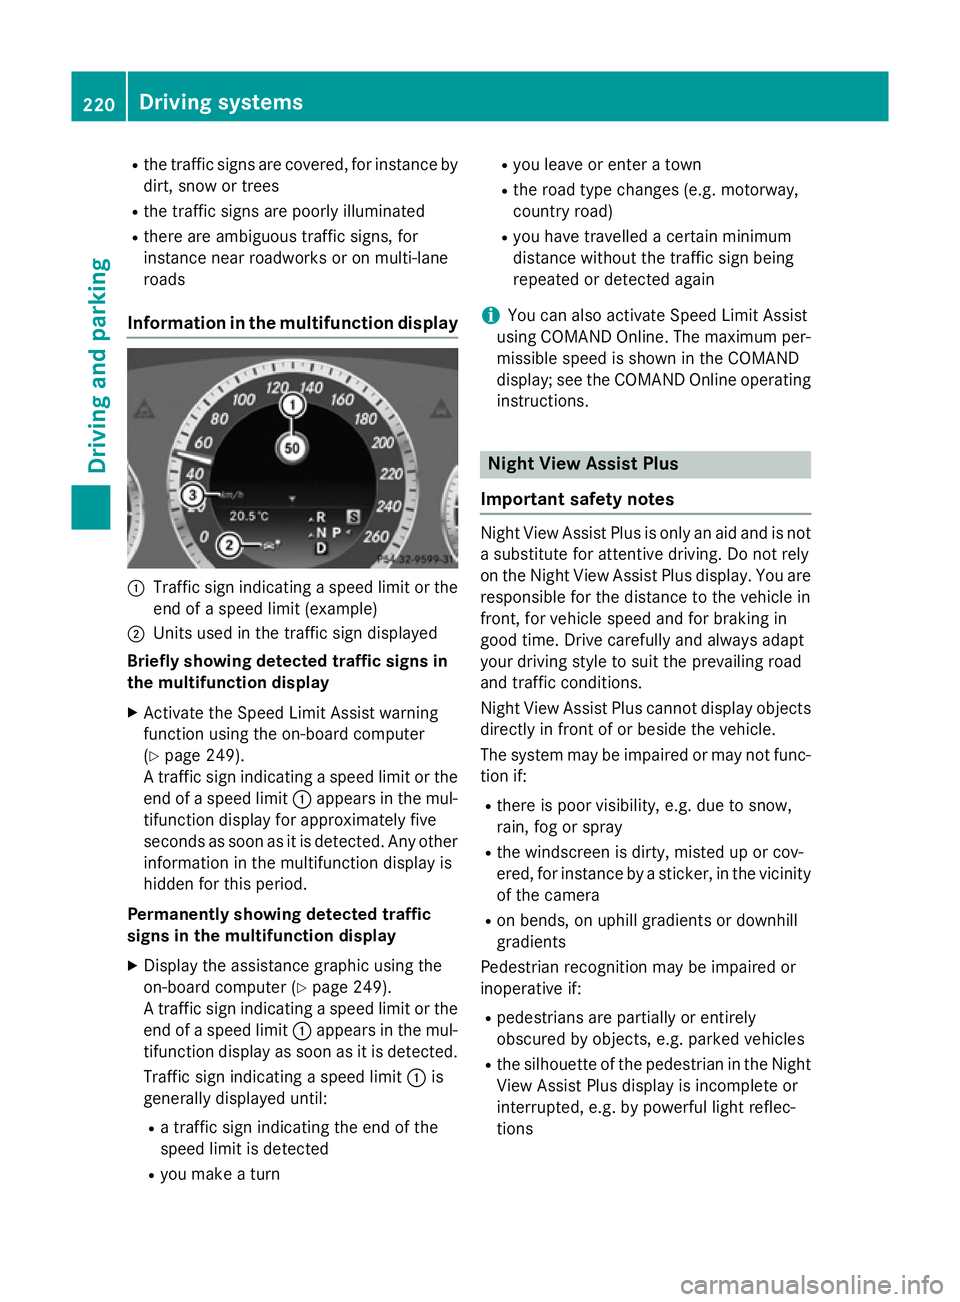
Information in the multifunction display :
Traffic sign indicating a speed limit or the
end of a speed limit (example)
; Units used in the traffic sign displayed
Briefly showing detected traffic signs in
the multifunction display
X Activate the Speed Limit Assist warning
function using the on-board computer
(Y page 249).
A traffic sign indicating a speed limit or the
end of a speed limit :appears in the mul-
tifunction display for approximately five
seconds as soon as it is detected. Any other
information in the multifunction display is
hidden for this period.
Permanently showing detected traffic
signs in the multifunction display
X Display the assistance graphic using the
on-board computer (Y page 249).
A traffic sign indicating a speed limit or the
end of a speed limit :appears in the mul-
tifunction display as soon as it is detected.
Traffic sign indicating a speed limit :is
generally displayed until:
R a traffic sign indicating the end of the
speed limit is detected
R you make a turn R
you leave or enter a town
R the road type changes (e.g. motorway,
country road)
R you have travelled a certain minimum
distance without the traffic sign being
repeated or detected again
i You can also activate Speed Limit Assist
using COMAND Online. The maximum per-
missible speed is shown in the COMAND
display; see the COMAND Online operating instructions. Night View Assist Plus
Important safety notes Night View Assist Plus is only an aid and is not
a substitute for attentive driving. Do not rely
on the Night View Assist Plus display. You areresponsible for the distance to the vehicle in
front, for vehicle speed and for braking in
good time. Drive carefully and always adapt
your driving style to suit the prevailing road
and traffic conditions.
Night View Assist Plus cannot display objects
directly in front of or beside the vehicle.
The system may be impaired or may not func-
tion if:
R there is poor visibility, e.g. due to snow,
rain, fog or spray
R the windscreen is dirty, misted up or cov-
ered, for instance by a sticker, in the vicinity
of the camera
R on bends, on uphill gradients or downhill
gradients
Pedestrian recognition may be impaired or
inoperative if:
R pedestrians are partially or entirely
obscured by objects, e.g. parked vehicles
R the silhouette of the pedestrian in the Night
View Assist Plus display is incomplete or
interrupted, e.g. by powerful light reflec-
tions 220
Driving systemsDriving an
d parking
Page 227 of 417
Monitoring range of the sensors
In particular, the detection of obstacles can
be impaired in the case of:
R dirt on the sensors or obscured sensors
R poor visibility, e.g. due to fog, heavy rain,
snow or spray
R narrow vehicles, e.g. motorcycles or bicy-
cles
R very wide lanes
R narrow lanes
R vehicles not driving in the middle of their
lane
R barriers or other road boundaries
Vehicles in the monitoring range are then not
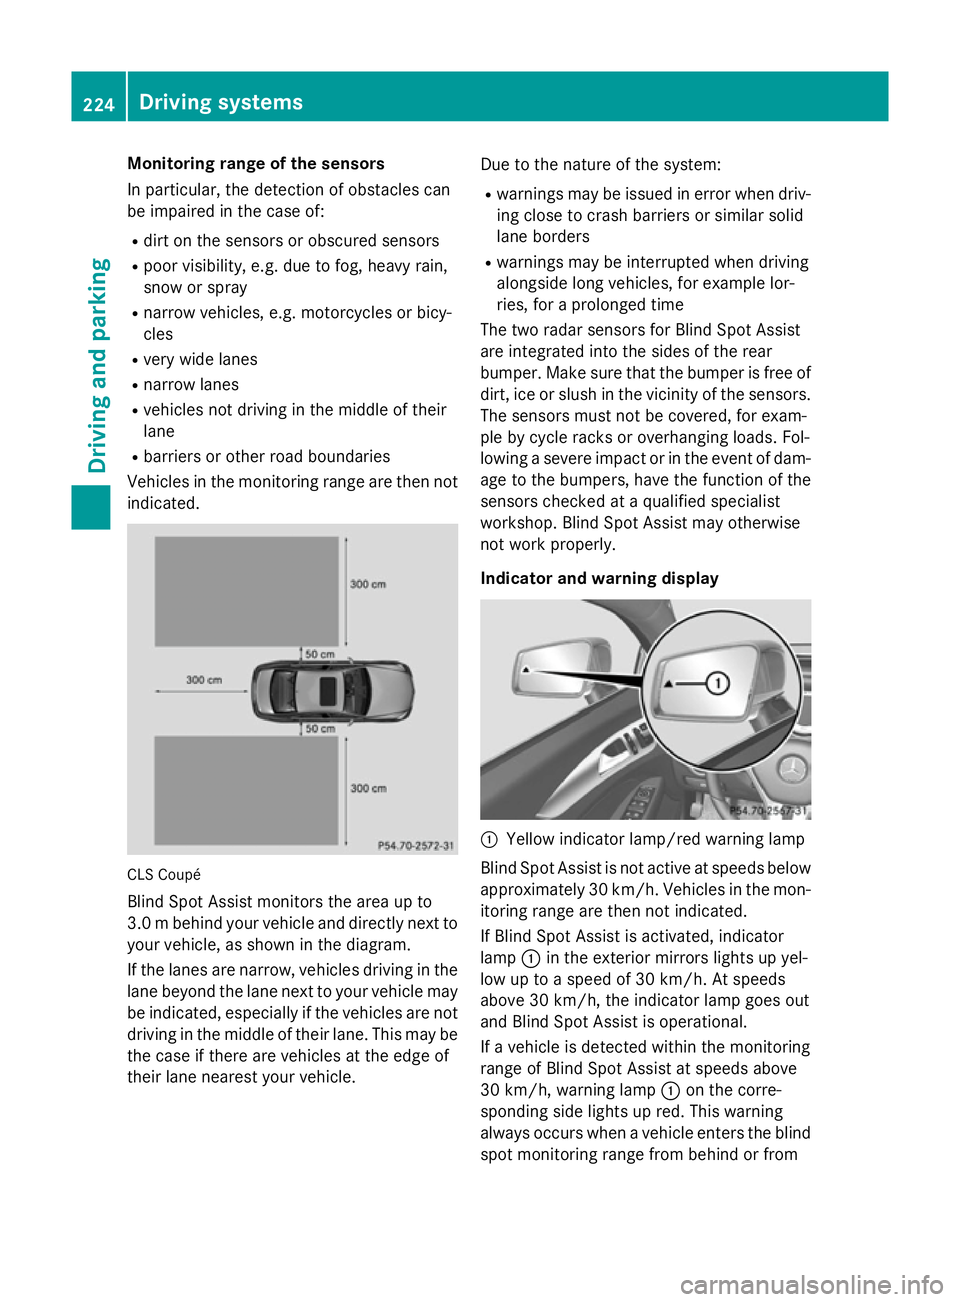
indicated. CLS Coupé
Blind Spot Assist monitors the area up to
3.0 mbehind your vehicle and directly next to
your vehicle, as shown in the diagram.
If the lanes are narrow, vehicles driving in the
lane beyond the lane next to your vehicle may
be indicated, especially if the vehicles are not
driving in the middle of their lane. This may be the case if there are vehicles at the edge of
their lane nearest your vehicle. Due to the nature of the system:
R warnings may be issued in error when driv-
ing close to crash barriers or similar solid
lane borders
R warnings may be interrupted when driving
alongside long vehicles, for example lor-
ries, for a prolonged time
The two radar sensors for Blind Spot Assist
are integrated into the sides of the rear
bumper. Make sure that the bumper is free of dirt, ice or slush in the vicinity of the sensors.
The sensors must not be covered, for exam-
ple by cycle racks or overhanging loads. Fol-
lowing a severe impact or in the event of dam- age to the bumpers, have the function of the
sensors checked at a qualified specialist
workshop. Blind Spot Assist may otherwise
not work properly.
Indicator and warning display :
Yellow indicator lamp/red warning lamp
Blind Spot Assist is not active at speeds below approximately 30 km/h. Vehicles in the mon-
itoring range are then not indicated.
If Blind Spot Assist is activated, indicator
lamp :in the exterior mirrors lights up yel-
low up to a speed of 30 km/h. At speeds
above 30 km/h, the indicator lamp goes out
and Blind Spot Assist is operational.
If a vehicle is detected within the monitoring
range of Blind Spot Assist at speeds above
30 km/h, warning lamp :on the corre-
sponding side lights up red. This warning
always occurs when a vehicle enters the blind
spot monitoring range from behind or from 224
Driving systemsDriving and parking
Page 256 of 417
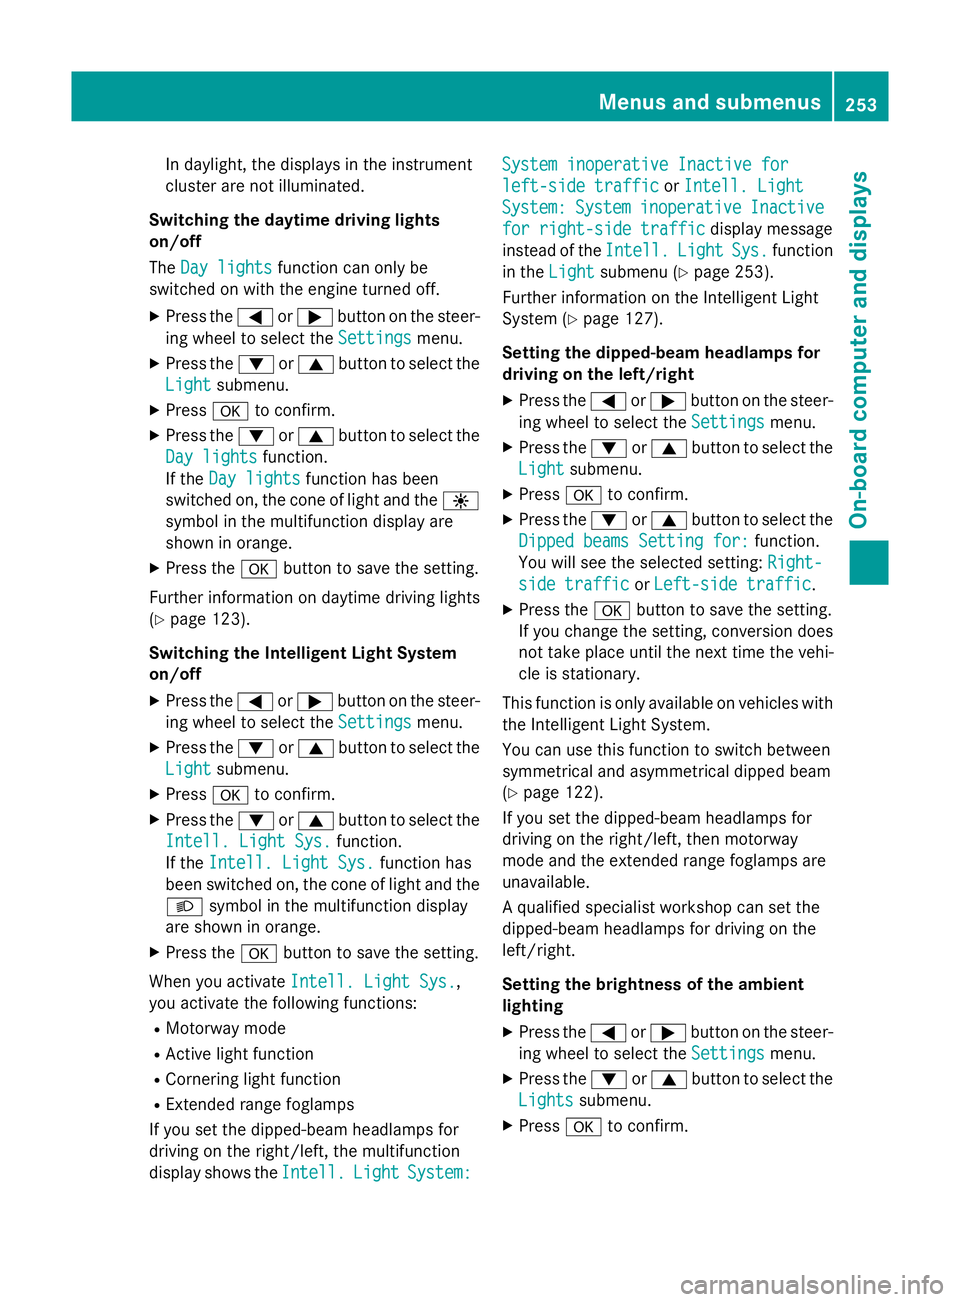
In daylight, the displays in the instrument
cluster are not illuminated.
Switching the daytime driving lights
on/off
The Day lights Day lights function can only be
switched on with the engine turned off.
X Press the =or; button on the steer-
ing wheel to select the Settings
Settings menu.
X Press the :or9 button to select the
Light
Light submenu.
X Press ato confirm.
X Press the :or9 button to select the
Day lights
Day lights function.
If the Day lights
Day lights function has been
switched on, the cone of light and the W
symbol in the multifunction display are
shown in orange.
X Press the abutton to save the setting.
Further information on daytime driving lights
(Y page 123).
Switching the Intelligent Light System
on/off
X Press the =or; button on the steer-
ing wheel to select the Settings
Settings menu.
X Press the :or9 button to select the
Light
Light submenu.
X Press ato confirm.
X Press the :or9 button to select the
Intell. Light Sys. Intell. Light Sys. function.
If the Intell. Light Sys.
Intell. Light Sys. function has
been switched on, the cone of light and the L symbol in the multifunction display
are shown in orange.
X Press the abutton to save the setting.
When you activate Intell. Light Sys.
Intell. Light Sys.,
you activate the following functions:
R Motorway mode
R Active light function
R Cornering light function
R Extended range foglamps
If you set the dipped-beam headlamps for
driving on the right/left, the multifunction
display shows the Intell. Intell.Light
LightSystem:
System: System inoperative Inactive for
System inoperative Inactive for
left-side traffic left-side traffic
orIntell. Light
Intell. Light
System:
System: System
Systeminoperative
inoperative Inactive
Inactive
for right-side traffic
for right-side traffic display message
instead of the Intell.
Intell.Light
LightSys.
Sys.function
in the Light
Light submenu (Y page 253).
Further information on the Intelligent Light
System (Y page 127).
Setting the dipped-beam headlamps for
driving on the left/right
X Press the =or; button on the steer-
ing wheel to select the Settings
Settingsmenu.
X Press the :or9 button to select the
Light
Light submenu.
X Press ato confirm.
X Press the :or9 button to select the
Dipped beams Setting for:
Dipped beams Setting for: function.
You will see the selected setting: Right-
Right-
side traffic
side traffic orLeft-side traffic
Left-side traffic.
X Press the abutton to save the setting.
If you change the setting, conversion does
not take place until the next time the vehi-
cle is stationary.
This function is only available on vehicles with
the Intelligent Light System.
You can use this function to switch between
symmetrical and asymmetrical dipped beam
(Y page 122).
If you set the dipped-beam headlamps for
driving on the right/left, then motorway
mode and the extended range foglamps are
unavailable.
A qualified specialist workshop can set the
dipped-beam headlamps for driving on the
left/right.
Setting the brightness of the ambient
lighting
X Press the =or; button on the steer-
ing wheel to select the Settings
Settings menu.
X Press the :or9 button to select the
Lights Lights submenu.
X Press ato confirm. Menus and submenus
253On-board computer and displays Z
Page 272 of 417
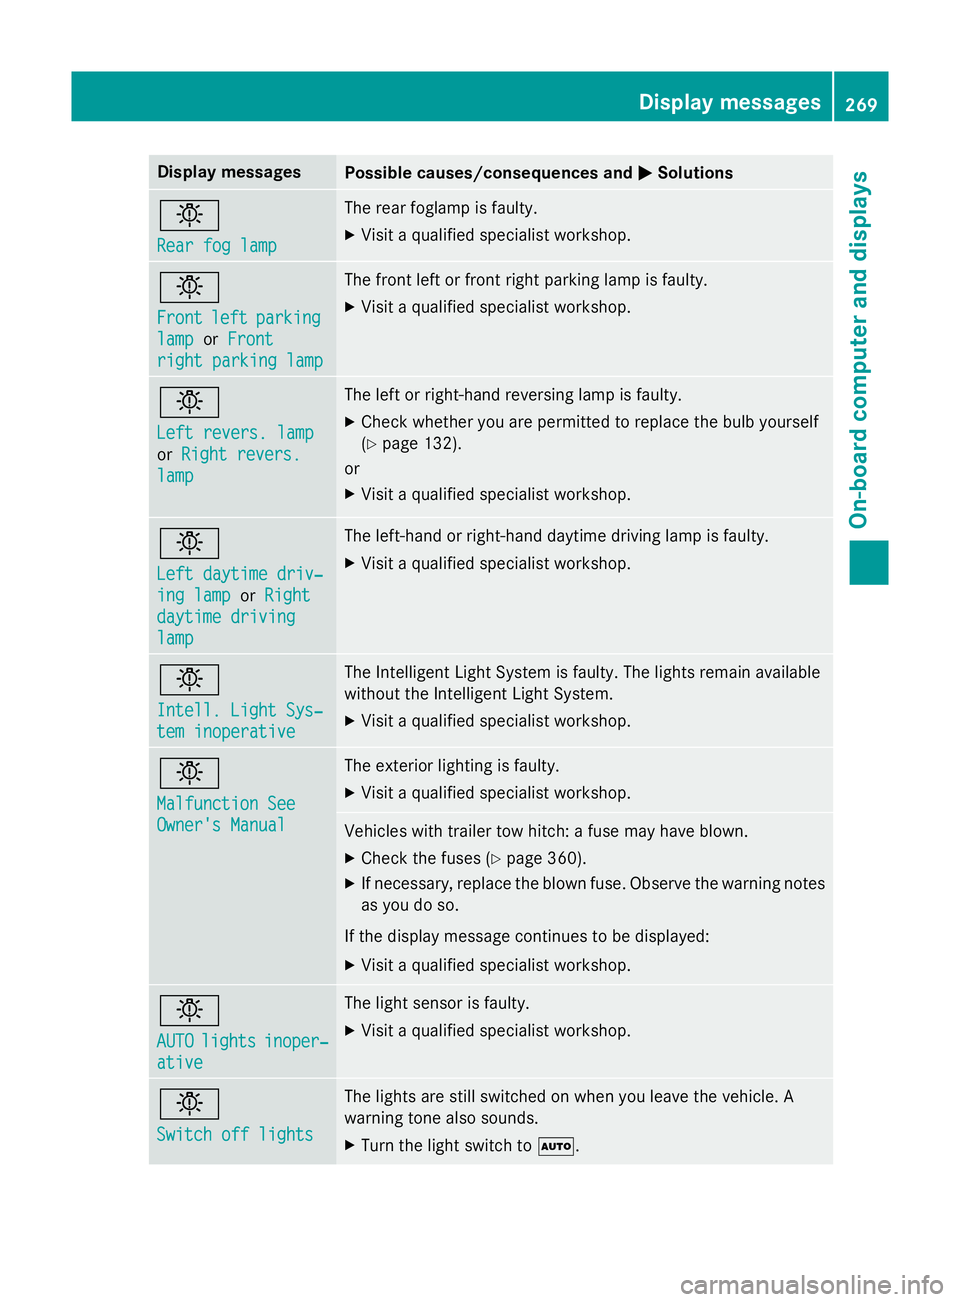
Display messages
Possible causes/consequences and
M
MSolutions b
Rear fog lamp Rear fog lamp The rear foglamp is faulty.
X Visit a qualified specialist workshop. b
Front Front
left
leftparking
parking
lamp
lamp orFront
Front
right parking lamp
right parking lamp The front left or front right parking lamp is faulty.
X Visit a qualified specialist workshop. b
Left revers. lamp Left revers. lamp
or
Right revers. Right revers.
lamp
lamp The left or right-hand reversing lamp is faulty.
X Check whether you are permitted to replace the bulb yourself
(Y page 132).
or
X Visit a qualified specialist workshop. b
Left daytime driv‐ Left daytime driv‐
ing lamp ing lamp
orRight
Right
daytime driving
daytime driving
lamp lamp The left-hand or right-hand daytime driving lamp is faulty.
X Visit a qualified specialist workshop. b
Intell. Light Sys‐ Intell. Light Sys‐
tem inoperative tem inoperative The Intelligent Light System is faulty. The lights remain available
without the Intelligent Light System.
X Visit a qualified specialist workshop. b
Malfunction See Malfunction See
Owner's Manual Owner's Manual The exterior lighting is faulty.
X Visit a qualified specialist workshop. Vehicles with trailer tow hitch: a fuse may have blown.
X Check the fuses (Y page 360).
X If necessary, replace the blown fuse. Observe the warning notes
as you do so.
If the display message continues to be displayed: X Visit a qualified specialist workshop. b
AUTO AUTO
lights
lights inoper‐
inoper‐
ative
ative The light sensor is faulty.
X Visit a qualified specialist workshop. b
Switch off lights Switch off lights The lights are still switched on when you leave the vehicle. A
warning tone also sounds.
X Turn the light switch to Ã. Display
messages
269On-board computer and displays Z