2014 MERCEDES-BENZ CLS COUPE fuse
[x] Cancel search: fusePage 13 of 417

Brakes ........................................... 183
Downhill gradient ........................... 183
Driving abroad ............................... 122
Driving in winter ............................. 185
Driving on flooded roads ................ 185
Driving on wet roads ...................... 185
General .......................................... 182
Icy road surfaces ........................... 185
Limited braking efficiency on sal-
ted roads ....................................... 184
New brake pads/linings ................ 184
Running-in tips ............................... 158
Snow chains .................................. 367
Symmetrical dipped bea m............. 122
Towing a trailer .............................. 233
Wet road surface ........................... 184
DVD audio
Operating (on-board computer) ..... 246
DVD video
Operating (on-board computer) ..... 247 E
EASY-ENTRY feature Activating/deactivating ................. 257
Function/note s............................. 115
EASY-EXIT feature
Crash-responsive ........................... 116
Function/note s............................. 115
Switching on/of f........................... 257
EASY-PACK convenience box ........... 308
EASY-PACK load-securing kit
Components and storage .............. 310
Inserting the brackets into the
loading rai l..................................... 310
EASY-PACK luggage compartment
management system ........................ 310
EBD (electronic brake force distri-
bution)
Display message ............................ 264
Function/note s................................ 76
ECO display
Function/note s............................. 182
On-board computer ....................... 244
ECO start/stop function
Automatic engine switch-off .......... 163
Deactivating/activating ................. 164
General information ....................... 163 Important safety notes .................. 163
Introduction ................................... 163
Electrical fuses
see Fuses
Electromagnetic compatibility
Declaration of conformity ................ 25
Electronic Stability Program
see ESP® (Electronic Stability Program)
Emergency
Automatic measures after an acci-
dent ................................................. 55
Emergency key
Unlocking the driver's door .............. 90
Emergency key element
Function/note s................................ 84
Inserting .......................................... 85
Locking vehicle ................................ 90
Removing ......................................... 85
Emergency release
Driver's door .................................... 90
Fuel filler fla p................................. 179
Emergency spare wheel
General notes ................................ 391
Important safety notes .................. 390
Inflating the collapsible spare
wheel ............................................. 392
Removing ....................................... 391
Storage location ............................ 391
Stowing .......................................... 392
Technical data ............................... 394
Emergency unlocking
Tailgate ............................................ 95
Vehicle ............................................. 90
Engine
Display message ............................ 270
ECO start/stop function ................ 163
Engine number ............................... 399
Jump-starting ................................. 355
Running irregularly ......................... 166
Starting problems .......................... 166
Starting the engine with the key .... 161
Starting with KEYLESS GO ............. 162
Stopping ........................................ 181
Tow-starting (vehicle) ..................... 360
Warning lamp (engine diagnos-
tics) ............................................... 295
Engine electronics
Notes ............................................. 396 10
Index
Page 15 of 417

Refuellin
g....................................... 177
Tank content/reserve fue l............. 400
Fuel filler flap
Emergency release ........................ 179
Opening ......................................... 178
Fuel filter (white display message) .. 273
Fuel level
Calling up the range (on-board
computer) ...................................... 244
Gaug e.............................................. 32
Fuel reserve
see Fuel
Fuel tank
Capacity ........................................ 400
Problem (malfunction) ................... 180
Fuse allocation chart (vehicle tool
kit) ...................................................... 345
Fuses
Allocation chart ............................. 360
Before changing ............................. 360
Fuse box in the boot ...................... 361
Fuse box in the engine compart-
ment .............................................. 361
Fuse box in the luggage compart-
ment .............................................. 362
Important safety notes .................. 360 G
Garage door opener Clearing the memory ..................... 322
Frequencies ................................... 323
General notes ................................ 320
Important safety notes .................. 320
Opening/closing the garage doo r..3 22
Programming (button in the rear-
view mirror) ................................... 320
Gear indicator (on-board com-
puter) ................................................. .258
Gearshift program
SETUP (on-board computer) .......... 258
Genuine Mercedes-Benz parts ........... 23
Glove compartment .......................... 301H
Handbrake see Parking brake Hazard warning lamps
......................126
Head restraints
Adjusting ....................................... 107
Adjusting (electrically) ................... 108
Adjusting (manually) ..................... .107
Adjusting (rear) .............................. 108
Fitting/removing (rear) .................. 109
Luxury ............................................ 108
see NECK-PRO head restraints
see NECK-PRO luxury head restraints
Headbag
Display message ............................ 267
Headlamp
Cleaning system (function) ............ 127
Cleaning system (notes) ................ 406
Headlamps
Misting up ...................................... 129
Topping up the cleaning system .... 332
see Automatic headlamp mode
Heating
see Climate control
High-pressure cleaners .................... 335
Hill start assist .................................. 162
HOLD function
Activating ....................................... 201
Deactivating ................................... 201
Display message ............................ 275
Function/notes ............................ .200 I
Ignition lock see Key positions
Immobiliser .......................................... 78
In-car hotspot
see Separate operating instructions
Indicator and warning lamp
Restraint system ............................ 294
Indicator and warning lamps
Coolant .......................................... 295
DISTRONIC PLUS ........................... 297
Engine diagnostics ......................... 295
SPORT handling mode ................... 292
Indicator lamps
Display message ............................ 268
see Warning and indicator lamps
Indicators
see Turn signals 12
Index
Page 80 of 417
Always pay particular attention to the traffic
situation and be ready to brake, especially if
PRE-SAFE ®
Brake warns you. Terminate the
intervention in a non-critical driving situation.
In order to maintain the appropriate distance
to the vehicle in front and thus prevent a col-
lision, you must apply the brakes yourself. G
WARNING
PRE-SAFE ®
Brake does not react:
R to people or animals
R to oncoming vehicles
R to crossing traffic
R when cornering
As a result, PRE-SAFE ®
Brake may neither
give warnings nor intervene in all critical sit-
uations. There is a risk of an accident.
Always pay careful attention to the traffic sit-
uation and be ready to brake.
In the event of snowfall or heavy rain, detec-
tion can be impaired.
Detection by the radar sensor system is also
impaired in the event of:
R dirt on the sensors or obscured sensors
R interference by other radar sources
R strong radar reflections, for example, in
multi-storey car parks
R a narrow vehicle travelling in front, e.g. a
motorcycle
R a vehicle travelling in front on a different
line
Following damage to the front end of the vehi-
cle, have the radar sensor settings and oper- ation checked at a qualified specialist work-
shop. This also applies to collisions at slow
speeds where there is no visible damage to
the front of the vehicle. Function X
To activate/deactivate: activate or deac-
tivate PRE-SAFE ®
Brake in the on-board
computer (Y page 250).
If the PRE-SAFE ®
Brake is not activated, the
æ symbol appears in the multifunction
display.
This function will issue a warning if:
R at a speed of around 30 km/h or more the
distance maintained to the vehicle travel-
ling in front is insufficient for several sec-
onds.
The · distance warning lamp then lights
up in the instrument cluster.
R at a speed of approximately 7 km/h or
more, you rapidly approach a vehicle in
front.
An intermittent warning tone will then
sound and the ·distance warning lamp
will light up in the instrument cluster.
X Brake immediately to defuse the situation.
or X Take evasive action provided it is safe to do
so.
The PRE-SAFE ®
Brake function can also brake
the vehicle automatically under the following
conditions:
R the driver and front passenger have their
seat belts fastened
and
R the vehicle speed is between approx-
imately 7 km/h and 200 km/h
At speeds of up to approximately 70 km/h
PRE-SAFE ®
Brake can also detect stationary
objects. Examples of stationary objects are
stopped or parked vehicles.
You can prevent the intervention of PRE-
SAFE ®
Brake at any time by:
R depressing the accelerator pedal further
R activating kickdown
R releasing the brake pedal Driving safety systems
77Safety Z
Page 145 of 417
Information about using
THERMOTRONIC automatic climate
control
Automatic climate control The following contains instructions and rec-
ommendations to enable you to get the most
out of your THERMOTRONIC automatic cli-
mate control.
R Activate climate control using the Ãand
¿ buttons. The indicator lamps above
the à and¿ buttons light up.
R In automatic mode, you can also use the
ñ button to adjust airflow (FOCUS/
MEDIUM/DIFFUSE). The MEDIUM level is
recommended.
R Set the temperature to 22 †.
R Only use the "Windscreen demisting" func-
tion briefly until the windscreen is clear
again.
R Only use air-recirculation mode briefly, e.g.
if there are unpleasant outside odours or
when in a tunnel. The windows could oth-
erwise mist up as no fresh air is drawn into
the vehicle in air-recirculation mode.
R Use the ZONE function to adopt the tem-
perature settings on the driver's side for
the front-passenger side and the rear com-
partment as well. The indicator lamp above
the á button goes out.
R Use the residual heat function if you want to
heat or ventilate the vehicle interior when
the ignition is switched off. The residual
heat function can only be activated or deac- tivated with the ignition switched off.
R Vehicles with COMAND Online: if you
change the settings of the climate control
system, the climate status display appears for approximately three seconds at the bot-
tom of the screen in the COMAND display. See also the separate COMAND Online
operating instructions. You will see the cur- rent settings of the various climate controlfunctions. ECO start/stop function During automatic engine switch-off, the cli-
mate control only operates at a reduced capa-
city. If you require the full climate control out-
put, you can switch off the ECO start/stop
function by pressing the ECO button
(Y page 164). Operating the climate control system
Switching climate control on/off
General notes When the climate control is switched off, the
air supply and air circulation are also
switched off. The windows could mist up.
Therefore, only switch off climate control
briefly.
i Activate climate control primarily using
the à button (Y page 144).
Switching on/off X
Turn the key to position 2in the ignition
lock (Y page 159).
X To switch on: press theÃbutton on
the control panel for the climate control.
The indicator lamp in the Ãbutton lights
up. Airflow and air distribution are set to
automatic mode.
or X Press the ^button.
The indicator lamp in the ^button goes
out. The previous settings are reactivated.
X To switch off: press the^button.
The indicator lamp in the ^button lights
up. 142
Operating the climate control systemClimate cont
rol
Page 147 of 417
Problems with the "Cooling with air dehumidification" function
Problem
Possible causes/consequences and
M
MSolutions The indicator lamp in
the
¿ button
flashes three times or
remains off. The cool-
ing with air dehumidifi-
cation system cannot
be switched on. Cooling with air dehumidification has been deactivated due to a
malfunction.
X Visit a qualified specialist workshop. Setting climate control to automatic
mode
General notes In automatic mode, the set temperature is
maintained automatically at a constant level.
The system automatically regulates the tem-
perature of the dispensed air, the airflow and
the air distribution.
The automatic mode functions optimally
when the "Cooling with air dehumidification"
function is activated. If desired, cooling with
air dehumidification can be deactivated.
If you deactivate the "Cooling with air-dehu-
midification" function, the air inside the vehi-
cle will not be cooled. The air inside the vehi- cle will also not be dehumidified. The win-
dows can mist up more quickly. Therefore,
only switch off cooling with air dehumidifica-
tion for a short period.
Activating/switching X
Turn the key to position 2in the ignition
lock (Y page 159).
X Set the desired temperature.
X To activate: press theÃbutton.
The indicator lamp in the Ãbutton lights
up. Automatic air distribution and airflow
are activated.
i THERMOTRONIC automatic climate con-
trol: when automatic mode is activated, you can set the climate mode (Y page 144).X
To switch to manual mode: press the
_ button.
or X Press the IorK button.
The indicator lamp in the Ãbutton goes
out. Setting the climate mode
The "Set climate mode" function is only avail-
able with THERMOTRONIC automatic climate control.
In automatic mode you can select the follow-
ing climate modes:
FOCUS high airflow that is set slightly cooler
MEDIUM medium airflow, standard setting
DIFFUSE low airflow that is set slightly warmer and with less of a draught
X Turn the key to position 2in the ignition
lock (Y page 159).
X Press the Ãbutton.
X Press the ñbutton repeatedly until the
desired climate mode appears in the dis-
play. 144
Operating the climate control systemClimate control
Page 199 of 417
Even if the vehicle in front leaves the detec-
tion range, DISTRONIC PLUS temporarily
maintains the current driving speed and does not accelerate. This is based on the current
map data in the navigation system.
Afterwards, the vehicle accelerates back to
the speed you set.
Stopping G
WARNING
When leaving the vehicle, even if it is braked
only by DISTRONIC PLUS, it could roll away if:
R there is a malfunction in the system or in
the voltage supply.
R DISTRONIC PLUS has been deactivated
with the cruise control lever, e.g. by a vehi-
cle occupant or from outside the vehicle.
R the electrical system in the engine com-
partment, the battery or the fuses have
been tampered with.
R the battery is disconnected.
R the accelerator pedal has been depressed,
e.g. by a vehicle occupant.
There is a risk of an accident.
If you wish to exit the vehicle, always turn off
DISTRONIC PLUS and secure the vehicle
against rolling away.
If DISTRONIC PLUS detects that the vehicle in front is stopping, it brakes your vehicle until it
is stationary.
Once your vehicle is stationary, it remains
stationary and you do not need to depress the
brake.
i Depending on the specified minimum dis-
tance, your vehicle will come to a standstill
at a sufficient distance behind the vehicle in front. The specified minimum distance is
set using the control on the cruise control
lever. When DISTRONIC PLUS is activated, the
transmission is shifted automatically to posi-
tion Pif:
R the driver's door is open and the driver's
seat belt is unfastened
R the engine is switched off, unless it is auto-
matically switched off by the ECO start/
stop function
R the bonnet is opened
R a system fault occurs
R the power supply is insufficient
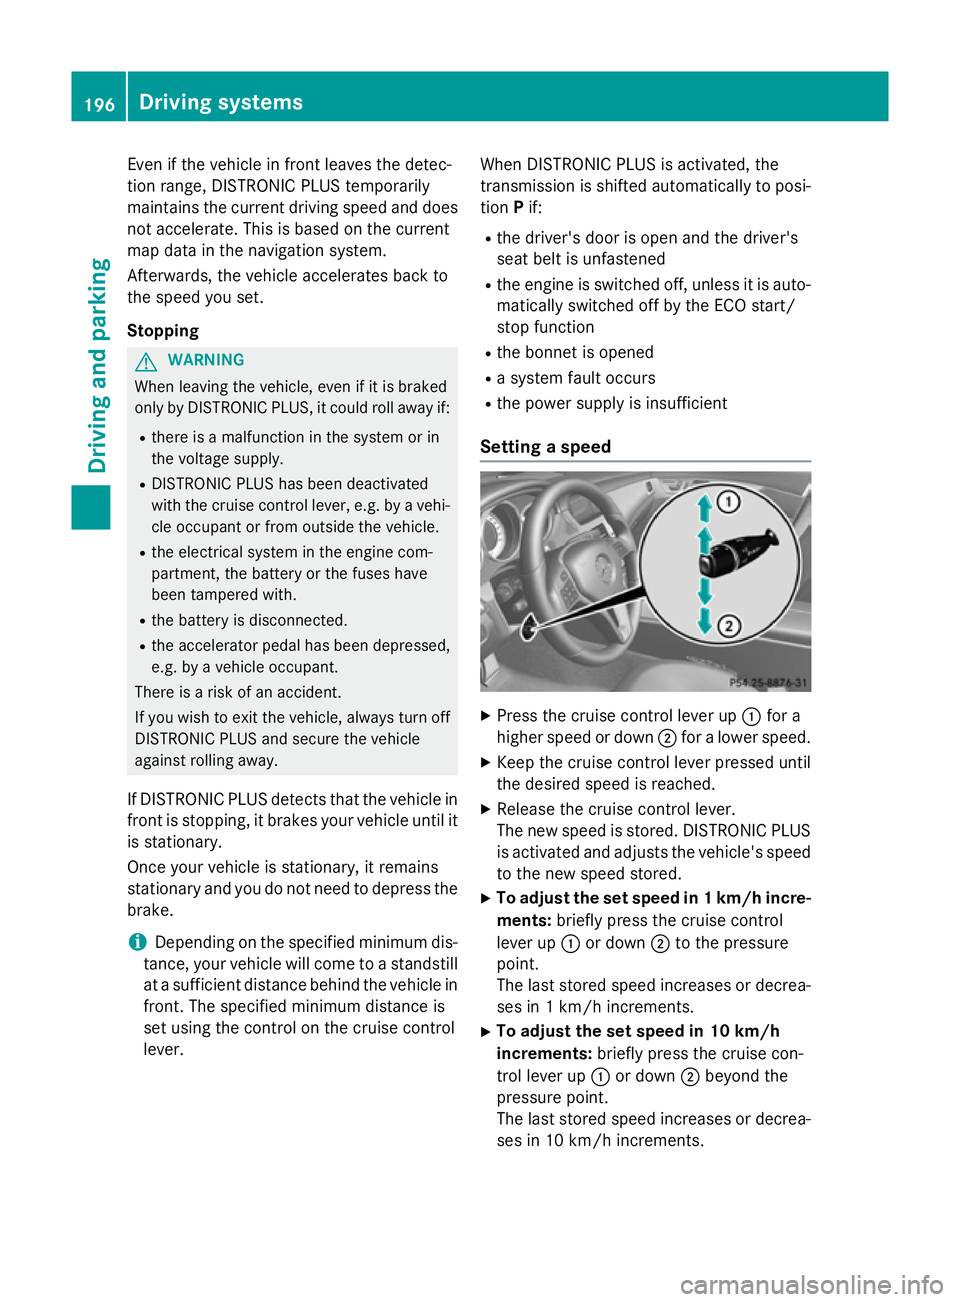
Setting a speed X
Press the cruise control lever up :for a
higher speed or down ;for a lower speed.
X Keep the cruise control lever pressed until
the desired speed is reached.
X Release the cruise control lever.
The new speed is stored. DISTRONIC PLUS
is activated and adjusts the vehicle's speed to the new speed stored.
X To adjust the set speed in 1 km/h incre-
ments: briefly press the cruise control
lever up :or down ;to the pressure
point.
The last stored speed increases or decrea-
ses in 1 km/h increments.
X To adjust the set speed in 10 km/h
increments: briefly press the cruise con-
trol lever up :or down ;beyond the
pressure point.
The last stored speed increases or decrea- ses in 10 km/h increments. 196
Driving systemsDriving an
d parking
Page 203 of 417
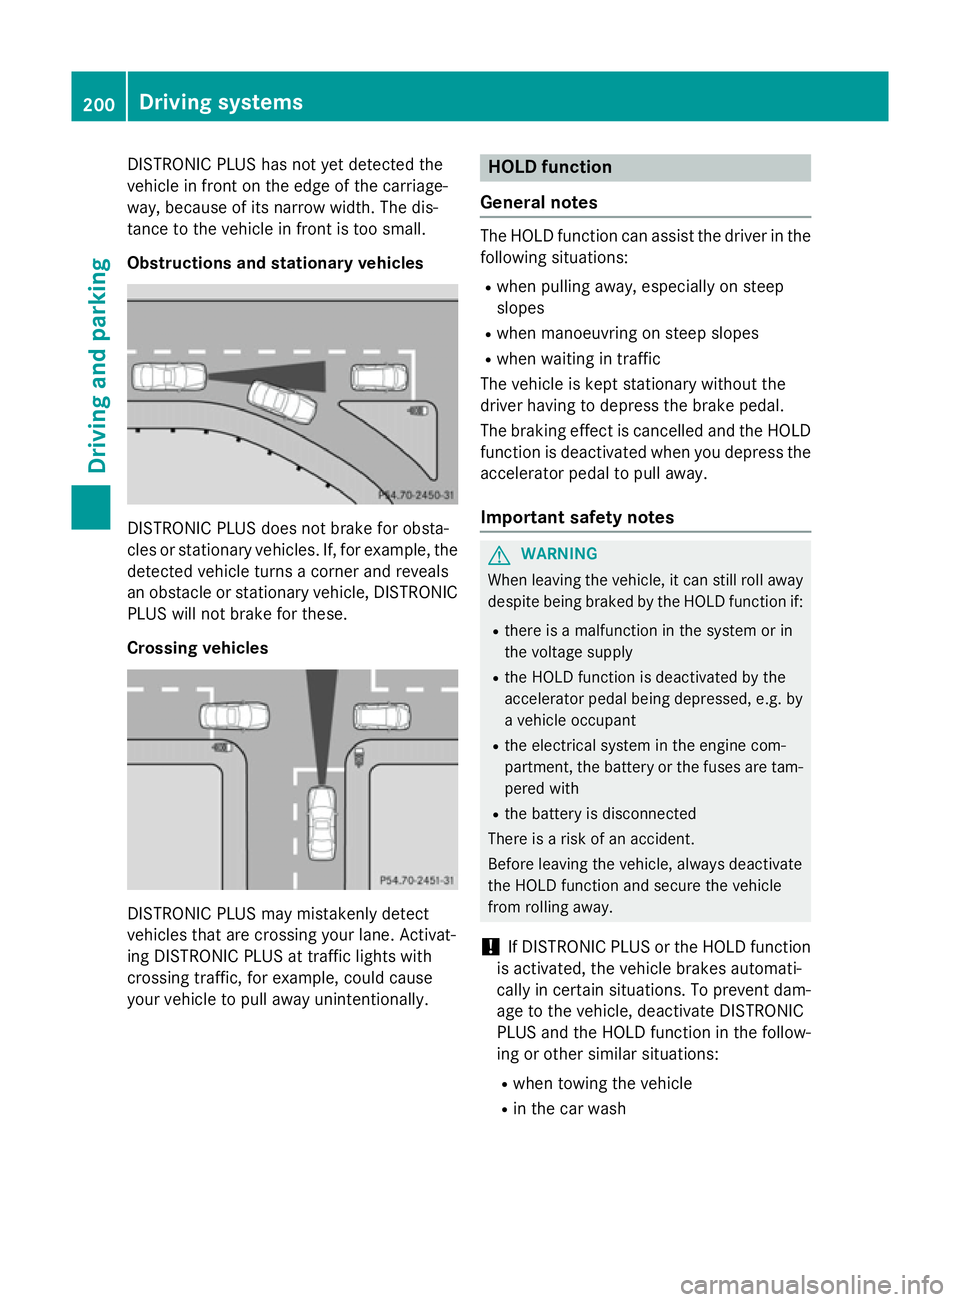
DISTRONIC PLUS has not yet detected the
vehicle in front on the edge of the carriage-
way, because of its narrow width. The dis-
tance to the vehicle in front is too small.
Obstructions and stationary vehicles DISTRONIC PLUS does not brake for obsta-
cles or stationary vehicles. If, for example, the
detected vehicle turns a corner and reveals
an obstacle or stationary vehicle, DISTRONIC PLUS will not brake for these.
Crossing vehicles DISTRONIC PLUS may mistakenly detect
vehicles that are crossing your lane. Activat-
ing DISTRONIC PLUS at traffic lights with
crossing traffic, for example, could cause
your vehicle to pull away unintentionally. HOLD function
General notes The HOLD function can assist the driver in the
following situations:
R when pulling away, especially on steep
slopes
R when manoeuvring on steep slopes
R when waiting in traffic
The vehicle is kept stationary without the
driver having to depress the brake pedal.
The braking effect is cancelled and the HOLD function is deactivated when you depress the
accelerator pedal to pull away.
Important safety notes G
WARNING
When leaving the vehicle, it can still roll away despite being braked by the HOLD function if:
R there is a malfunction in the system or in
the voltage supply
R the HOLD function is deactivated by the
accelerator pedal being depressed, e.g. by
a vehicle occupant
R the electrical system in the engine com-
partment, the battery or the fuses are tam-
pered with
R the battery is disconnected
There is a risk of an accident.
Before leaving the vehicle, always deactivate
the HOLD function and secure the vehicle
from rolling away.
! If DISTRONIC PLUS or the HOLD function
is activated, the vehicle brakes automati-
cally in certain situations. To prevent dam-
age to the vehicle, deactivate DISTRONIC
PLUS and the HOLD function in the follow-
ing or other similar situations:
R when towing the vehicle
R in the car wash 200
Driving systemsDriving an
d parking
Page 272 of 417
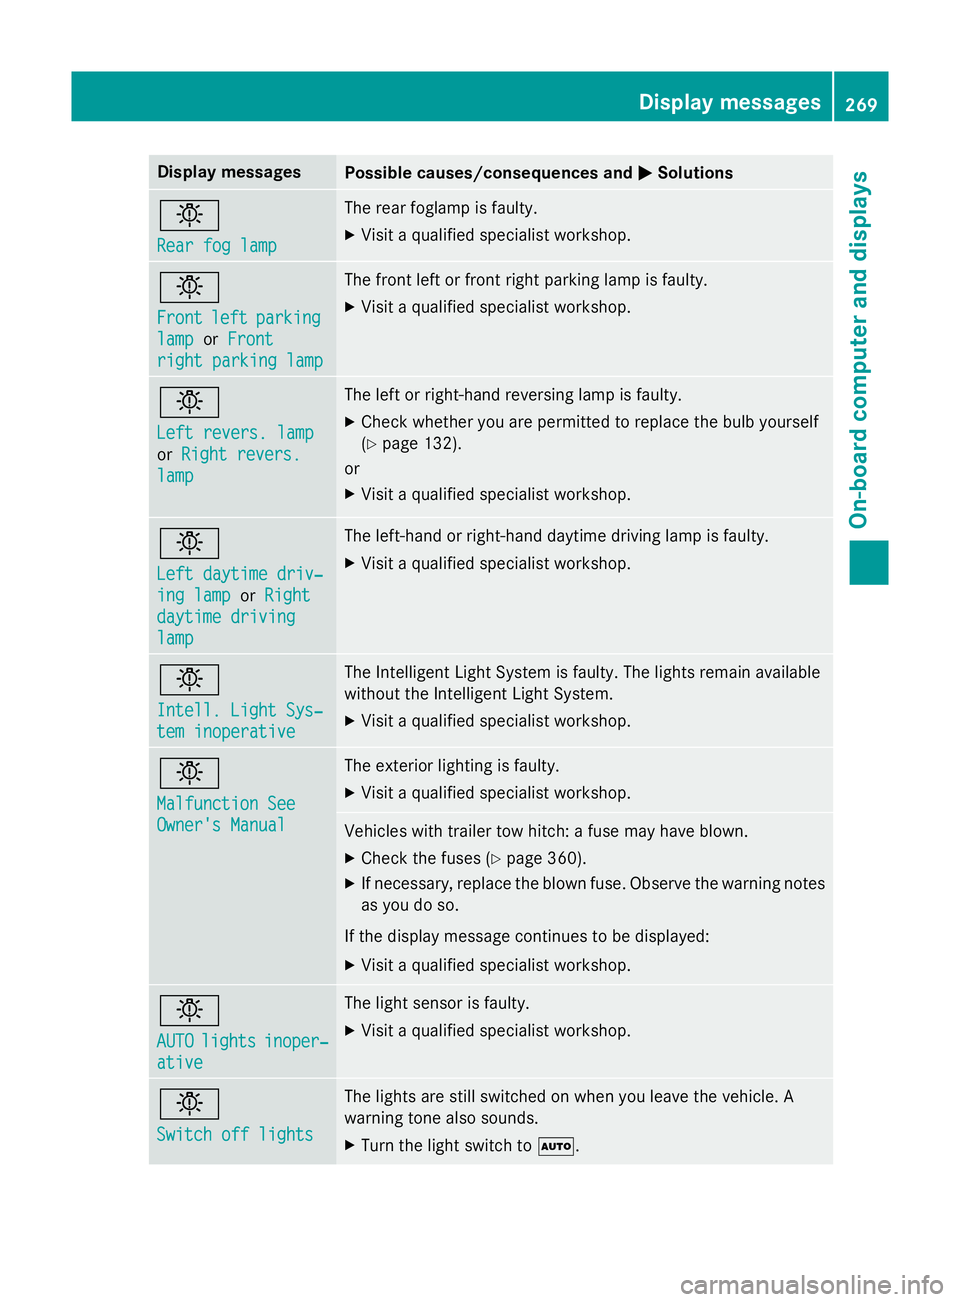
Display messages
Possible causes/consequences and
M
MSolutions b
Rear fog lamp Rear fog lamp The rear foglamp is faulty.
X Visit a qualified specialist workshop. b
Front Front
left
leftparking
parking
lamp
lamp orFront
Front
right parking lamp
right parking lamp The front left or front right parking lamp is faulty.
X Visit a qualified specialist workshop. b
Left revers. lamp Left revers. lamp
or
Right revers. Right revers.
lamp
lamp The left or right-hand reversing lamp is faulty.
X Check whether you are permitted to replace the bulb yourself
(Y page 132).
or
X Visit a qualified specialist workshop. b
Left daytime driv‐ Left daytime driv‐
ing lamp ing lamp
orRight
Right
daytime driving
daytime driving
lamp lamp The left-hand or right-hand daytime driving lamp is faulty.
X Visit a qualified specialist workshop. b
Intell. Light Sys‐ Intell. Light Sys‐
tem inoperative tem inoperative The Intelligent Light System is faulty. The lights remain available
without the Intelligent Light System.
X Visit a qualified specialist workshop. b
Malfunction See Malfunction See
Owner's Manual Owner's Manual The exterior lighting is faulty.
X Visit a qualified specialist workshop. Vehicles with trailer tow hitch: a fuse may have blown.
X Check the fuses (Y page 360).
X If necessary, replace the blown fuse. Observe the warning notes
as you do so.
If the display message continues to be displayed: X Visit a qualified specialist workshop. b
AUTO AUTO
lights
lights inoper‐
inoper‐
ative
ative The light sensor is faulty.
X Visit a qualified specialist workshop. b
Switch off lights Switch off lights The lights are still switched on when you leave the vehicle. A
warning tone also sounds.
X Turn the light switch to Ã. Display
messages
269On-board computer and displays Z