2014 MERCEDES-BENZ CLS-Class navigation
[x] Cancel search: navigationPage 165 of 270

X
Bring the Dest./Route
Dest./Route Download
Downloadpanel to
the front and press 0098to confirm.
i With Exit
Exit , you quit the destination/route
download.
With Options
Options, you set the options for the
destination/route download
(Y page 165).
X Confirm the Dest./Route Download
Dest./Route Download
panel by pressing 0098.
Available routes and destinations are
shown in the list.
You can save up to 20 routes and 50 desti-
nations for your vehicle on the server and dis-
play these in the list. If you send further routes
or destinations to the server, the existing
entries are deleted from the list.
i The routes/destinations sent from Goo-
gle™ maps to the server are automatically
deleted from there after seven days. Using destinations
Calling up the menu X
Select an entry in the list by turning 00790052007A
the COMAND controller and press 0098to
confirm.
A menu appears.
Displaying details X
Confirm Details
Details in the menu by pressing
0098 the COMAND controller.
The route or destination is displayed. X
To call up a POI: confirm the entry by
pressing 0098.
i You can use the function if:
R a mobile phone is connected
(Y page 126)
R the destination address contains a tele-
phone number
Using as the destination X
Select Navigate Navigate to
toin the menu by turning
00790052007A the COMAND controller and press
0098 to confirm.
You then switch to navigation mode and
can start route calculation (Y page 69).
i A route can only be stored as a personal
POI on an SD memory card or taken directly
for route calculation (Y page 163).
Calling up the destination X
Select Call Callin the menu by turning 00790052007A
the COMAND controller and press 0098to
confirm.
You then switch to the telephone function
and make the call (Y page 132).
Importing a destination/route When importing, you can choose whether you
want to save the destination as a personal POI
on an SD memory card or in the address book.
You can only save routes as personal POIs to
an SD memory card, but not in the address
book.
X
Select Import Import in the menu with the
COMAND controller and press 0098to con-
firm.
i If there is no SD memory card in the slot,
the As AsPersonal Personal POI
POImenu item is grayed
out.
X Insert the SD memory card (Y page 191). Destination/route download
163Online and Internet functions
Page 166 of 270

X
To save as a personal POI: confirmAs
As
Personal POI
Personal POI by pressing0098the
COMAND controller.
The entry is saved as a personal POI on the
SD memory card.
i You can use a personal POI in navigation
mode for route calculation (Y page 85).
You can also use a personal POI in another
vehicle for route calculation.
X To save to the address book: selectTo
To
Address Book
Address Book by turning00790052007Athe
COMAND controller and press 0098to con-
firm.
The entry is stored in the address book.
Deleting a destination/route from the
server X
Select an entry in the list by turning 00790052007A
the COMAND controller and press 0098to
confirm.
X Select Delete
Delete and press 0098to confirm.
A query appears asking whether the desti-
nation or the route should be deleted.
X Select Yes
Yes orNo No and press 0098to confirm. Options
Introduction
You can select options for the following
Mercedes-Benz Apps on COMAND:
R Local Search (Y page 164)
R Destination download (Y page 165)
You can reset the selected options to the
default settings (Y page 166). Calling up the options menu
X Select the 00A7symbol in the main function
bar by turning 00790052007Athe COMAND con-
troller and press 0098to confirm.
The carousel view appears.
X Bring the Mercedes-Benz Apps Mercedes-Benz Apps panel to
the front by turning 00790052007Athe COMAND
controller and press 0098to confirm.
X Select Options
Options by sliding 00520064and turning
00790052007A the COMAND controller and press
0098 to confirm. Selecting options for the local search
Setting the search radius X
Select Local Search
Local Search in the Options menu
by turning 00790052007Athe COMAND controller
and press 0098to confirm.
The menu shows the current settings. 164
OptionsOnline and
Internet functions
Page 169 of 270

To call up Facebook:
X
Select the 00A7icon in the main function bar
by turning 00790052007Athe COMAND controller
and press 0098to confirm.
The carousel view appears.
X Bring the Mercedes-Benz Apps
Mercedes-Benz Apps panel to
the front by turning 00790052007Athe COMAND
controller and pressing 0098to confirm.
The Mercedes-Benz Apps menu is dis-
played.
X Select Facebook Facebook by turning 00790052007Athe
COMAND controller and press 0098to con-
firm.
The Facebook home page appears.
X To call up Google™ services: this is done
through Google™ Local Search
(Y page 161).
i Facebook is a social network. This App
allows you to log in from your vehicle and
use Facebook's many functions.
Google™ Street View allows you to view
streets in 360-degree panoramas.
Google™ Panoramio expands Google Local
Search to include photos at the selected
position. Internet radio
General notes
A good Internet connection is required to
transmit audio data efficiently. To ensure the
best-possible reception, your mobile phone
should be connected to the vehicle's exterior
antenna via the phone bracket (optional).
Bear in mind that a relatively large volume of
data can be transmitted when using the Inter-
net radio. An average 128 kbit per second
data transfer rate can transfer 56 MB of data
in one hour.
The data transfer rate of a station is displayed
while receiving data. Calling up the Internet radio
X
Select the 00A7icon in the main function bar
by sliding 00970052and turning 00790052the
COMAND controller and press 0098to con-
firm.
The carousel view appears.
X Bring the Internet Radio Internet Radio panel to the
front by turning 00790052007Athe COMAND con-
troller and press 0098to confirm.
The Internet radio menu appears. Searching for stations
X Select Search
Search in the Internet radio menu.
A list with search criteria appears.
X Select criterion and press 0098to confirm.
i For example as a search criterion, you can
set an Internet radio station that is located
close to your navigation destination. Connecting to a station
X Search for a station ( Ypage 167).
X Select 0065(play) in the Internet radio
menu and press 0098to confirm.
The call is placed.
If the data stream is interrupted, an automatic
attempt is made to re-establish the connec-
tion.
Manually re-establishing a connection
X Select 0065(play) again in the Internet
radio menu and press 0098to confirm. Internet radio
167Online andInternet functions
Page 170 of 270

Ending data transfer:
X
Select 00DB(stop) in the Internet radio
menu and press 0098to confirm.
or
X Change to another audio source, for exam-
ple Disc
Disc.
If you change to a main function that is not an
audio source, e.g. navigation, the data con-
nection remains on. You can continue listen-
ing to the set station. Internet
Display restriction
Internet pages cannot be shown while the
vehicle is in motion. Calling up a website
Calling up the carousel view X
Select the 00A7symbol in the main function
bar by turning 00790052007Athe COMAND con-
troller and press 0098to confirm.
The carousel view appears.
You can now enter a web address (option 1
(Y page 168)) or select it in the carousel view
(option 2 (Y page 169)).
To select in the carousel view, you must first
create favorites (Y page 173). Option 1: entering the web address You can enter the web address using either
the character bar or the number keypad
(Y
page 36).
X Call up the carousel view (Y page 168).
X Select www wwwby sliding 00520064and turning
00790052007A the COMAND controller and press
0098 to confirm.
An input menu appears. X
To enter using the character bar: enter
the web address in the input line. Character
entry (Y page 34).
As soon as the first letter has been entered
in the input line, a list appears below it. The
list shows web addresses which begin with
the letters you have entered and web
addresses which have already been called
up.
The list is empty the first time you call it up. 168
InternetOnline and
Internet functions
Page 199 of 270

Database
Database
menu item is shown in gray and
cannot be selected.
X Select an entry by turning 00790052007Athe
COMAND controller and press 0098to con-
firm.
Switching the Gracenote ®
data display
on/off X
Switch on CD mode (Y page 191).
X Select CD
CD by sliding 00520064and turning 00790052007A
the COMAND controller and press 0098to
confirm.
X Select Gracenote Media Database
Gracenote Media Database by
turning 00790052007Athe COMAND controller and
press 0098to confirm.
X To switch off the display: selectNone
None and
press 0098to confirm.
In the basic display, Track 1
Track 1, Track 2 Track 2etc.
are shown instead of the Gracenote ®
data,
for example (Y page 192).
X To switch on the display: select an entry
in the menu by turning 00790052007Athe COMAND
controller and press 0098to confirm.
Updating Gracenote ®
music recogni-
tion technology and the Gracenote
Media Database Due to the release of new CDs, the digital data
on the Gracenote Media Database must be
updated. Optimum functionality can only be
attained with up-to-date Gracenote ®
music
recognition technology. Information about
new versions can be obtained from an author-
ized Mercedes-Benz Center.
You can have your music recognition soft-
ware updated there with a DVD, or you can
update it yourself.
i The Gracenote Media Database is
updated in conjunction with the navigation
system's digital map (Y page 118). Displaying the track and album
X Press the 0090button.
The current track and album are displayed
in a window. Displaying metadata (MP3 mode)
COMAND can also display the album name
and artist (metadata) during playback if this
information has been entered into the sys-
tem.
For all media that contain MP3 data (e.g. MP3
CD, SD memory card, MUSIC REGISTER), you
can determine whether:
R the metadata contained in the tags of the
encoded music data should be displayed
R the file and directory names should be dis-
played during playback
X To display the album and artist name:
select MP3
MP3 orUSB USB in the basic display by
sliding 00520064and turning 00790052007Athe COMAND
controller and press 0098to confirm.
X Select Display Track Information
Display Track Information and
press 0098to confirm. Selecting a group (audio DVD)
The content of an audio DVD can be divided
into up to 9 groups. The availability and type
of group depends on the respective DVD.
A group can contain music in different sound
qualities (stereo and multichannel formats,
for example), or bonus tracks.
Each group can contain up to 99 tracks.
If an audio DVD only contains one audio for-
mat, the Group Groupmenu item(s) cannot be
selected.
X Switch on audio DVD mode (Y page 191).
X Select DVD-A DVD-Aby sliding 00520064and turning
00790052007A the COMAND controller and press
0098 to confirm. CD/audio DVD and MP3 mode
197Audio Z
Page 222 of 270

Audio AUX mode
Notes on audio AUX mode
External audio sources may have different
volumes, which can mean that system mes-
sages such as traffic announcements and
navigation system announcements are much
louder. If necessary, deactivate the system
messages or adjust their volume manually.
You can connect an external audio source
(AUX) to COMAND.
Depending on the vehicle model series the
connection is made via a jack in the storage
compartment in the center console or via the
USB port (Y page 191).
If COMAND is equipped with the Media Inter-
face, external audio sources are connected
using the cable set provided. An AUX socket
is not provided. The connections for the
Media Interface are located in the stowage
compartment in the center console.
i You will find further information online at
http://www.mbusa-mobile.com. Or call
the Mercedes-Benz Customer Assistance
Center at 1-800-FOR-MERCedes
(1-800-367-6372 )(for the USA) or Cus-
tomer Relations at 1-800-387-010 0(for
Canada). Switching to audio AUX mode
Switching modes using the function
button The external device is connected to the audio
AUX in.
X Press the 003Afunction button one or more
times.
By pressing the function button repeatedly,
you can change the operating mode in the
following order:
R CD/audio DVD/MP3 (disc)
R Memory card mode
R MUSIC REGISTER
R USB storage device R
Media Interface or audio AUX mode
R Bluetooth ®
audio mode
Switching modes via the audio menu When you connect an external audio source,
audio AUX is not selected automatically.
X
Select Audio
Audio in the main function bar by
sliding 00970052and turning 00790052007Athe COMAND
controller and press 0098to confirm.
If AUX mode was the last mode selected, it
will now be active.
If another audio source is switched on, you
can now switch to audio AUX mode in the
audio menu.
X Select Audio Audiousing00970052and press 0098to
confirm.
The audio menu appears.
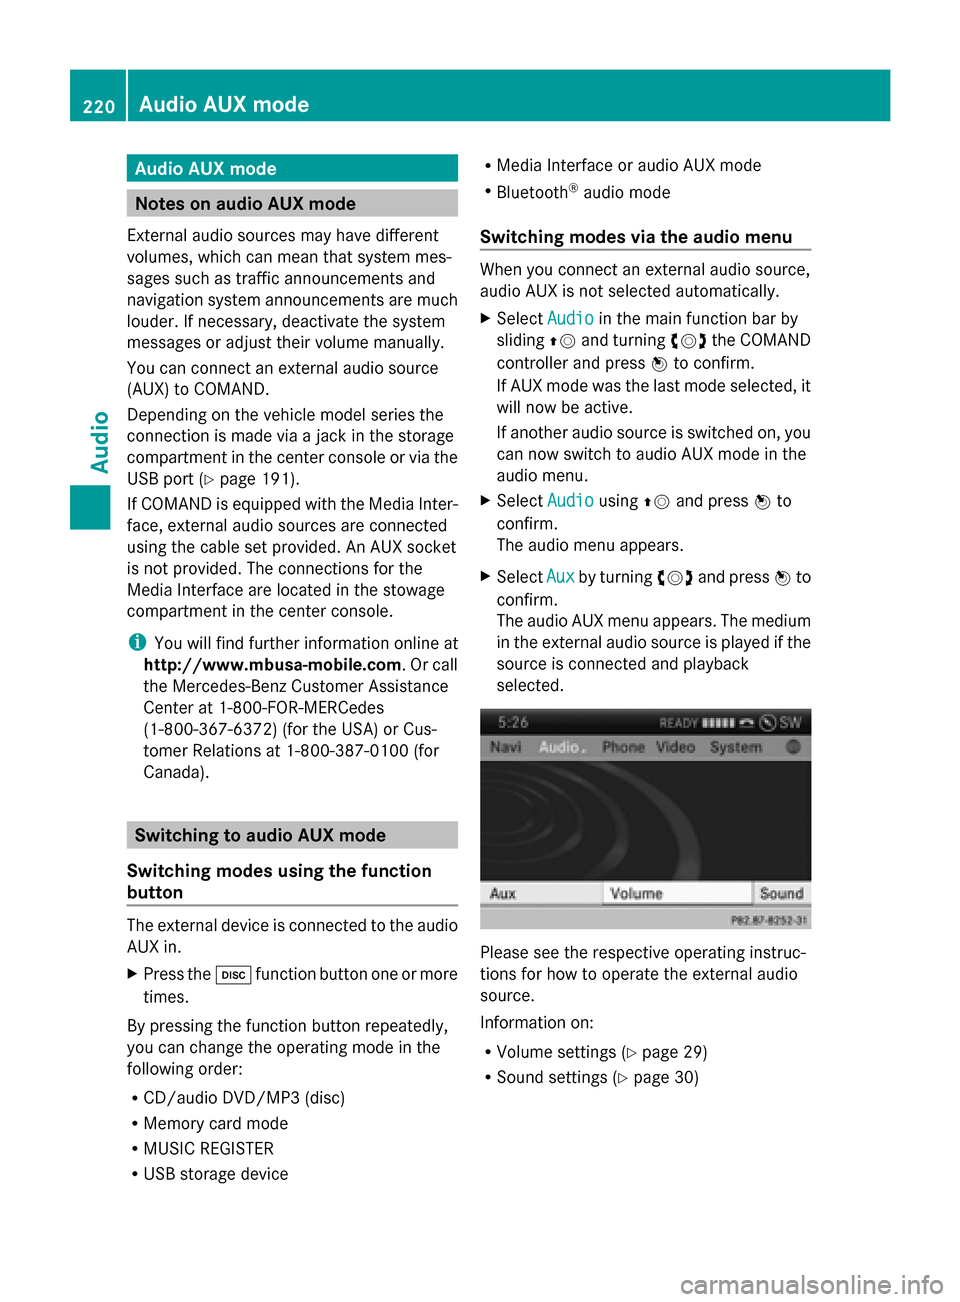
X Select Aux Auxby turning 00790052007Aand press 0098to
confirm.
The audio AUX menu appears. The medium
in the external audio source is played if the
source is connected and playback
selected. Please see the respective operating instruc-
tions for how to operate the external audio
source.
Information on:
R
Volume settings (Y page 29)
R Sound settings (Y page 30)220
Audio AUX modeAudio
Page 229 of 270

0085
Media selection
0083 Sound settings
i This function is not available while the
DVD's own menu is being displayed. Fast forwarding/rewinding
X In full-screen DVD video mode, slide 009500520096
and hold the COMAND controller until the
desired position is reached.
or
X Press and hold the 0048or0049 button
until the desired position is reached.
You see the control menu. Stop function
X Show the menu (Y page 226).
X To interrupt playback: select00DBby
turning 00790052007Athe COMAND controller and
press 0098to confirm.
The 00CF display changes to 00D0. The
video image is hidden.
X To continue playback: select00D0and
press 0098to confirm.
Playback continues from the point where it
was interrupted.
X To stop playback: while playback is inter-
rupted, select 00DBagain and press 0098to
confirm.
or
X During playback, confirm 00DBby pressing
0098 twice in rapid succession.
00D0 is selected.
X To restart playback: confirm00D0by
pressing 0098.
Playback restarts from the beginning. Pause function
X Show the menu (Y page 226).
X To pause playback: select00CFby turn-
ing 00790052007A the COMAND controller and press
0098 to confirm.
The 00CF display changes to 00D0.
X To continue playback: select00D0and
press 0098to confirm.
The menu is hidden. Selecting a scene/chapter
If the film is divided into scenes or chapters,
you can select them directly while the film is
running, or skip forwards step by step. Some
DVDs do not permit this at certain points (e.g.
during the opening credits).
It may also be possible to select the scene/
chapter from within the menu stored on the
DVD.
X To skip forwards or back: in full screen
mode, turn 00790052007Athe COMAND controller.
or
X Slide 009500520096 the COMAND controller.
or
X Press the 0048or0049 button on the
control panel.
The navigation menu (Y page 226) appears
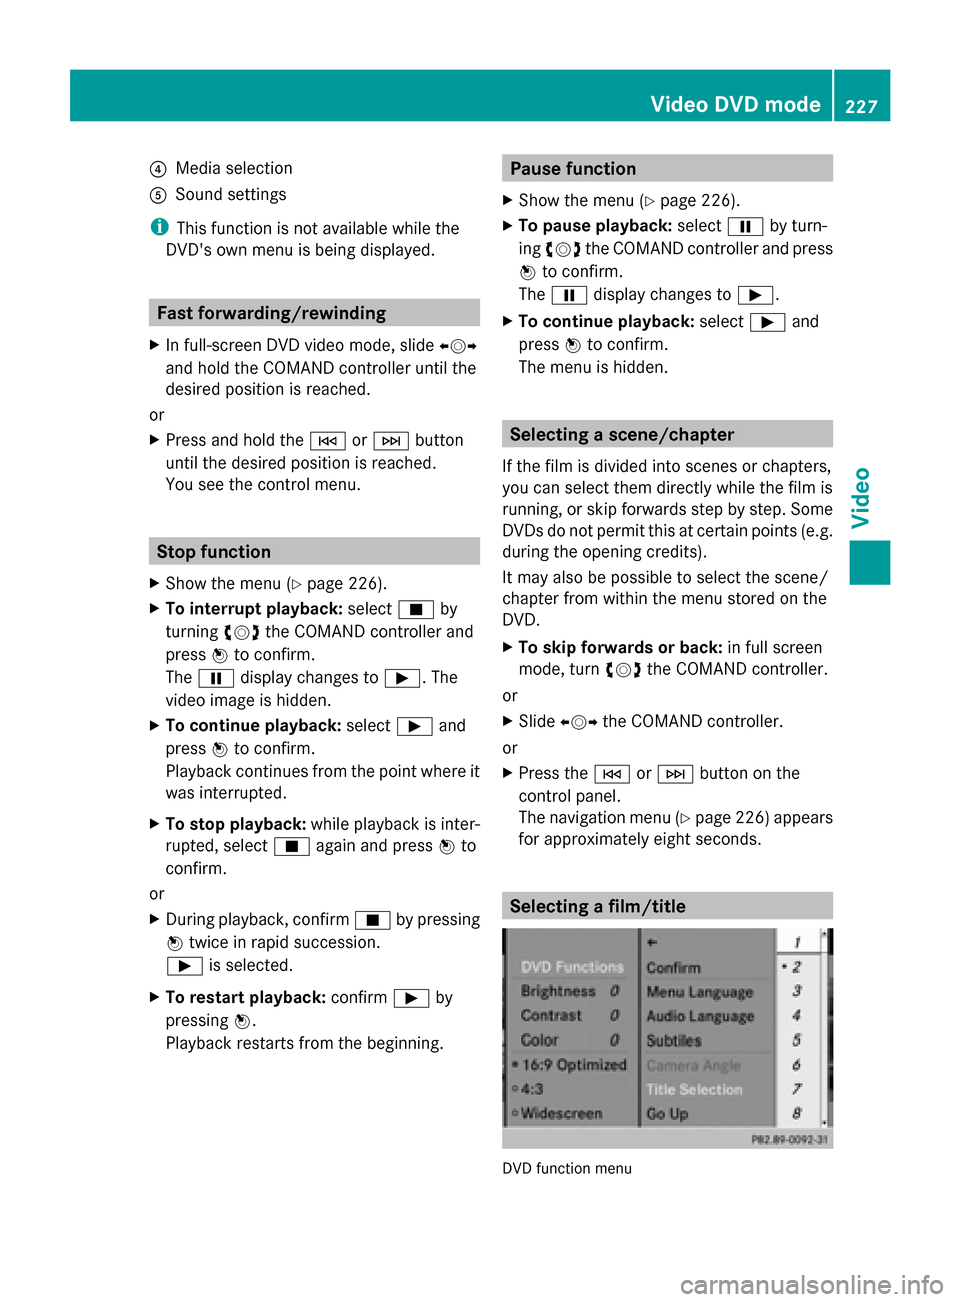
for approximately eight seconds. Selecting a film/title
DVD function menu Video DVD mode
227Video Z
Page 232 of 270

you may be able to influence events by select-
ing and triggering actions. The type and num-
ber of actions depend on the DVD.
X Select an action by sliding 009700520064or009500520096 the
COMAND controller and press 0098to exe-
cute it.
A menu appears and the first entry,
Select
Select , is highlighted.
X Press 0098the COMAND controller. AUX video mode
Connecting external video sources
External video sources may have different
volumes, which can mean that system mes-
sages such as traffic announcements and
navigation system announcements are much
louder. If necessary, deactivate the system
messages or adjust their volume manually.
If your vehicle is equipped with Media Inter-
face, you can connect an external video
source (AUX video) ( Ypage 213).
The 1/8 inch audio/video jacks are in the
center console stowage compartment.
i In vehicles with a rear view camera, the
AUX video jack cannot be used for external
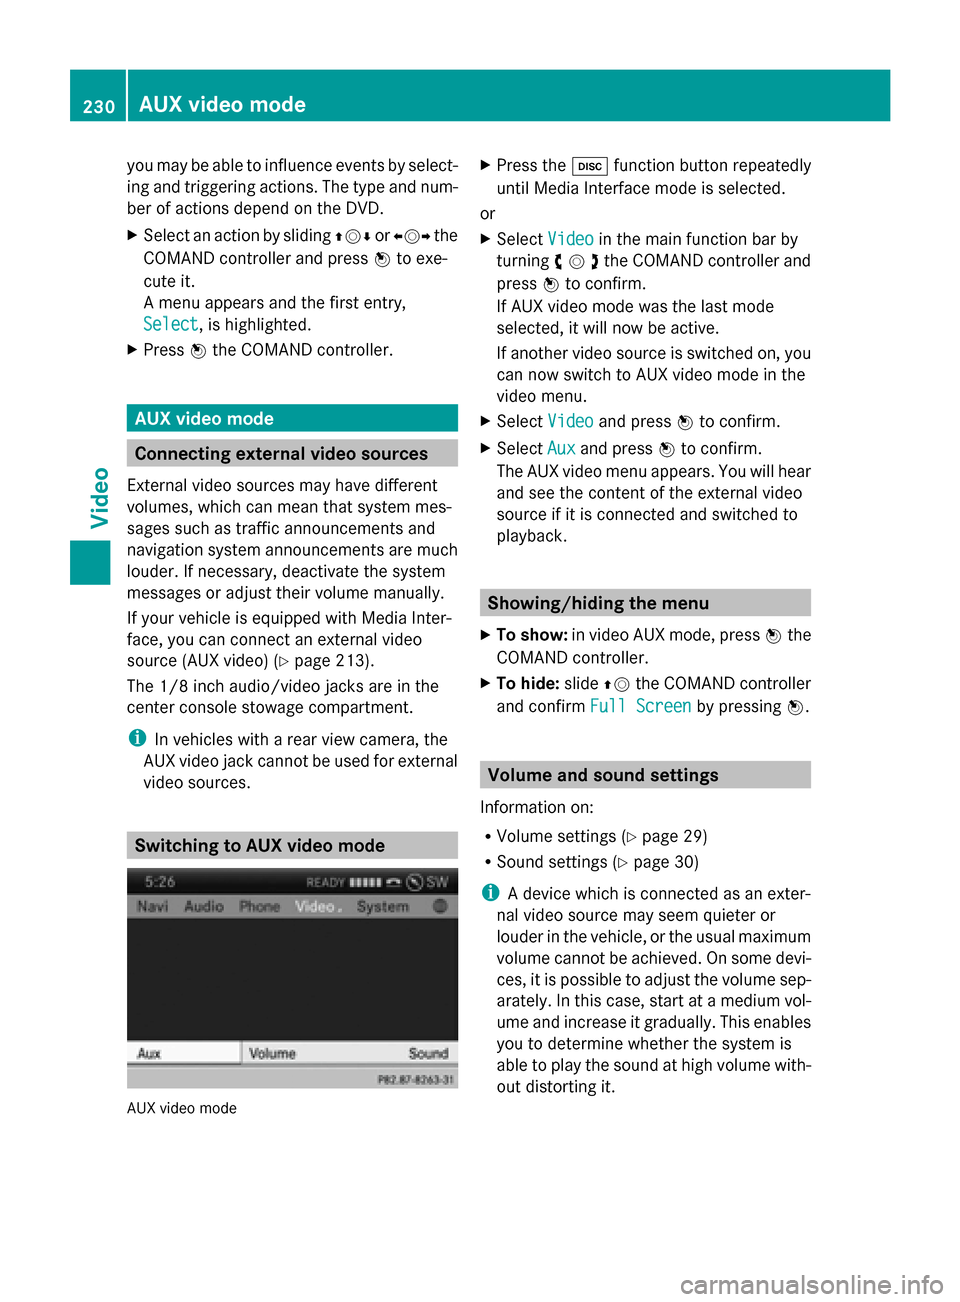
video sources. Switching to AUX video mode
AUX video mode X
Press the 003Afunction button repeatedly
until Media Interface mode is selected.
or
X Select Video
Video in the main function bar by
turning 00790052007Athe COMAND controller and
press 0098to confirm.
If AUX video mode was the last mode
selected, it will now be active.
If another video source is switched on, you
can now switch to AUX video mode in the
video menu.
X Select Video Videoand press 0098to confirm.
X Select Aux
Auxand press 0098to confirm.
The AUX video menu appears. You will hear
and see the content of the external video
source if it is connected and switched to
playback. Showing/hiding the menu
X To show: in video AUX mode, press 0098the
COMAND controller.
X To hide: slide00970052the COMAND controller
and confirm Full Screen Full Screen by pressing0098. Volume and sound settings
Information on:
R Volume settings (Y page 29)
R Sound settings ( Ypage 30)
i A device which is connected as an exter-
nal video source may seem quieter or
louder in the vehicle, or the usual maximum
volume cannot be achieved. On some devi-
ces, it is possible to adjust the volume sep-
arately. In this case, start at a medium vol-
ume and increase it gradually. This enables
you to determine whether the system is
able to play the sound at high volume with-
out distorting it. 230
AUX video modeVideo