2014 MERCEDES-BENZ CLA-Class mirror
[x] Cancel search: mirrorPage 195 of 358

speeds above 20 mph (30 km/h), the indica-
tor lamp goes out and Blind Spot Assist is
operational.
If a vehicle is detected within the monitoring
range of Blind Spot Assist at speeds above
20 mph (30 km/h), then warning lamp 0043on
the corresponding side lights up red. This
warning is always emitted when a vehicle
enters the blind spot monitoring range from
behind or from the side. When you overtake a vehicle, the warning only occurs if the differ-
ence in speed is less than 7 mph (12 km/h).
The yellow indicator lamp goes out if reverse gear is engaged. In this event, Blind Spot
Assist is no longer active.
The brightness of the indicator/warning
lamps is adjusted automatically according to
the ambient light.
Collision warning
If a vehicle is detected in the monitoring range of Blind Spot Assist and you switch on the
corresponding turn signal, a double warning
tone sounds. Red warning lamp 0043flashes. If
the turn signal remains on, vehicles detected
are indicated by the flashing of red warning
lamp 0043. There are no further warning tones.
Switching on Blind Spot Assist X Make sure that Blind Spot Assist is activa-
ted in the on-board computer
(Y page 206).
X Turn the SmartKey to position 2in the igni-
tion lock.
Warning lamps 0043in the exterior mirrors
light up red for approximately 1.5 seconds
and then turn yellow. Lane Keeping Assist General notes
Lane Keeping Assist monitors the area in
front of your vehicle with camera
0043, which is
mounted at the top of the windshield. Active
Lane Keeping Assist detects lane markings on
the road and can warn you before you leave
your lane unintentionally.
This function is available in the range between
40 mph and 120 mph (60 km/h and
200 km/h).
A warning may be given if a front wheel
passes over a lane marking. It will warn you by means of intermittent vibration in the steer-
ing wheel for up to 1.5 seconds.
Important safety notes G
WARNING
Lane Keeping Assist may not always clearly
recognize lane markings.
In this case, Lane Keeping Assist may:
R give an unnecessary warning
R not give a warning
There is a risk of an accident.
Always pay particular attention to the traffic
situation and stay in lane, in particular if
warned by Lane Keeping Assist. G
WARNING
The Lane Keeping Assist warning does not
return the vehicle to the original lane. There is a risk of an accident. Driving systems
193Driving and parking
Z
Page 211 of 358

around the vehicle are displayed in orange
in the multifunction display.
X Press the 0076button to save the setting.
Deactivating delayed switch-off of the exte-
rior lighting temporarily:
X Before leaving the vehicle, turn the Smart-
Key to position 0in the ignition lock.
X Turn the SmartKey to position 2in the igni-
tion lock.
The exterior lighting delayed switch-off is
deactivated.
Delayed switch-off of the exterior lighting is
reactivated the next time you start the
engine.
i Depending on your vehicle's equipment,
when the surround lighting and delayed
switch-off exterior lighting are on, the fol-
lowing light up:
R Parking lamps
R Front fog lamps
R Low-beam headlamps
R Daytime running lamps
R Side marker lamps
R Surround lighting in the exterior mirrors
Activating/deactivating the interior light-
ing delayed switch-off
If you activate the Interior Lighting
Interior Lighting
Delay
Delay function, the interior lighting remains
on for 20 seconds after you remove the key
from the ignition lock.
X Press the 0059or0065 button on the steer-
ing wheel to select the Sett Settmenu.
X Press the 0064or0063 button to select the
Light
Light submenu.
X Press 0076to confirm.
X Press the 0064or0063 button to select the
Interior Lighting Delay
Interior Lighting Delay function.
If the Interior
Interior Lighting
LightingDelay
Delayfunction
has been switched on, the vehicle interior is
displayed in orange in the multifunction
display.
X Press the 0076button to save the setting. Vehicle Activating/deactivating the automatic
door locking mechanism
X Press the 0059or0065 button on the steer-
ing wheel to select the Sett Settmenu.
X Press the 0064or0063 button to select the
Vehicle
Vehicle submenu.
X Press 0076to confirm.
X Press the 0064or0063 button to select the
Automatic Door Lock
Automatic Door Lock function.
When the Automatic
Automatic Door
DoorLock
Lockfunction
is activated, the vehicle doors are displayed in orange in the multifunction display.
X Press the 0076button to save the setting.
If you activate the Automatic Door Lock
Automatic Door Lock
function, the vehicle is centrally locked above
a speed of approximately 9 mph (15 km/h).
For further information on the automatic lock- ing feature, see (Y page 83).
Activating/deactivating the acoustic
locking verification signal
If you switch on the Acoustic AcousticLock
Lockfunction,
an acoustic signal sounds when you lock the
vehicle.
X Press the 0059or0065 button on the steer-
ing wheel to select the Sett
Sett menu.
X Press the 0064or0063 button to select the
Vehicle Vehicle submenu.
X Press 0076to confirm.
X Press the 0064or0063 button to select the
Acoustic Lock
Acoustic Lock function.
If the Acoustic
Acoustic Lock
Lockfunction is activated,
the 0037 symbol in the multifunction dis-
play lights up orange.
X Press the 0076button to save the setting.
Activating/deactivating the radar sensor
system X Press the 0059or0065 button on the steer-
ing wheel to select the Sett Settmenu.
X Press the 0064or0063 button to select the
Vehicle
Vehicle submenu.
X Press 0076to confirm. Menus and submenus
209On-board computer and displays Z
Page 212 of 358

X
Press the 0063or0064 button to select
Radar Sensor (See Oper. Manual):
Radar Sensor (See Oper. Manual):.
You will see the selected setting: Enabled
Enabled
or Disabled
Disabled.
X Press the 0076button to save the setting.
If the radar sensor system is switched off,
Blind Spot Assist is deactivated (Y page 191).
Convenience Switching the fold-in mirrors when lock-
ing feature on/off
This function is only available on vehicles with
the memory function (Y page 105).
When you activate the Auto. Auto.Mirror
Mirror Fold‐
Fold‐
ing ing function, the exterior mirrors are folded
in when the vehicle is locked.
If you unlock the vehicle and then open a
door, the exterior mirrors fold out again.
If you have switched on the Auto. Mirror Auto. Mirror
Folding
Folding function and you fold in the exterior
mirrors using the button on the door
(Y page 103), they will not fold out automat-
ically. The exterior mirrors can then only be
folded out using the button on the door.
X Press the 0059or0065 button on the steer-
ing wheel to select the Sett
Sett menu.
X Press the 0064or0063 button to select the
Convenience Convenience submenu.
X Press 0076to confirm.
X Press the 0064or0063 button to select the
Auto. Mirror Folding
Auto. Mirror Folding function.
If the Auto. Mirror Folding
Auto. Mirror Folding function is
activated, the vehicle's exterior mirror is
displayed in orange in the multifunction
display.
X Press the 0076button to save the setting.
Restoring the factory settings X
Press the 0059or0065 button on the steer-
ing wheel to select the Sett Settmenu.
X Press the 0064or0063 button to select the
Factory Setting
Factory Setting submenu. X
Press 0076to confirm.
The Reset All Settings? Reset All Settings? message
appears.
X Press the 0064or0063 button to select No No
or Yes
Yes.
X Press 0076to confirm the selection.
If you have selected Yes
Yes, the multifunction
display shows a confirmation message.
For safety reasons, the Daytime Running
Daytime Running
Lamps
Lamps function in the Light
Lightsubmenu is only
reset if the vehicle is stationary. AMG menu in AMG vehicles
AMG displays 0043
Digital speedometer
0044 Gear indicator
0087 Upshift indicator
0085 Engine oil temperature
0083 Coolant temperature
0084 Transmission fluid temperature
X Press 0059or0065 on the steering wheel
to select the AMG
AMG menu.
Upshift indicator UP
UP0087 indicates that the
engine has reached the overrevving range
when in the manual gearshift program.
Upshift indicator UP UP0087 fades out other mes-
sages until you have shifted up.
If the engine oil temperature is below 176 ‡
(80 †), oil temperature 0085is shown in blue.
Avoid driving at full engine output during this time.
If the transmission fluid temperature is below
122 ‡(50 †), oil temperature 0084is shown in
blue. Avoid driving at full engine output during
this time. 210
Menus and submenusOn-board computer and displays
Page 229 of 358

Display messages
Possible causes/consequences and
0050
0050Solutions 0049
Check Front Left Check Front Left
Turn Signal Turn Signal
or
Check Front Right
Check Front Right
Turn Signal Turn Signal The front left-hand or front right-hand turn signal is defective.
X Check whether you are permitted to replace the bulb yourself
(Y page 114).
or
X Visit a qualified specialist workshop. 0049
Check Left Mirror Check Left Mirror
Turn Signal Turn Signal
or
Check
Check Right
RightMirror
Mirror
Turn Signal
Turn Signal The turn signal in the left-hand or right-hand exterior mirror is
defective.
X Visit a qualified specialist workshop. 0049
Check Check
Center
Center Brake
Brake
Lamp
Lamp The high-mounted brake lamp is faulty.
X
Visit a qualified specialist workshop. 0049
Check Left Brake Check Left Brake
Lamp Lamp
orCheck
Check
Right Brake Lamp
Right Brake Lamp The left or right-hand brake lamp is defective.
X Check whether you are permitted to replace the bulb yourself
(Y page 114).
or
X Visit a qualified specialist workshop. 0049
Check Left Tail Check Left Tail
and Brake Lamps and Brake Lamps
or
Check Right Tail
Check Right Tail
and Brake Lamps and Brake Lamps The left or right-hand tail lamp/brake lamp is defective.
X Check whether you are permitted to replace the bulb yourself
(Y page 114).
or
X Visit a qualified specialist workshop. 0049
Check Left High Check Left High
Beam Beam
orCheck
Check
Right High Beam
Right High Beam The left or right-hand high beam is defective.
X Check whether you are permitted to replace the bulb yourself
(Y page 114).
or
X Visit a qualified specialist workshop. 0049
License Plate Lamp License Plate Lamp The left or right-hand license plate lamp is defective.
X Visit a qualified specialist workshop. 0049
Check Left Fog Check Left Fog
Lamp Lamp
orCheck
Check
Right Fog Lamp
Right Fog Lamp The left-hand or right-hand front fog lamp is defective.
X Visit a qualified specialist workshop. Display
messages
227On-board computer and displays Z
Page 265 of 358
The stowage compartments in the doors pro-
vide space for bottles:
R front: capacity up to 34 fl. oz. (1.0 l)
R rear: capacity up to 17 fl. oz. (0.5 l)
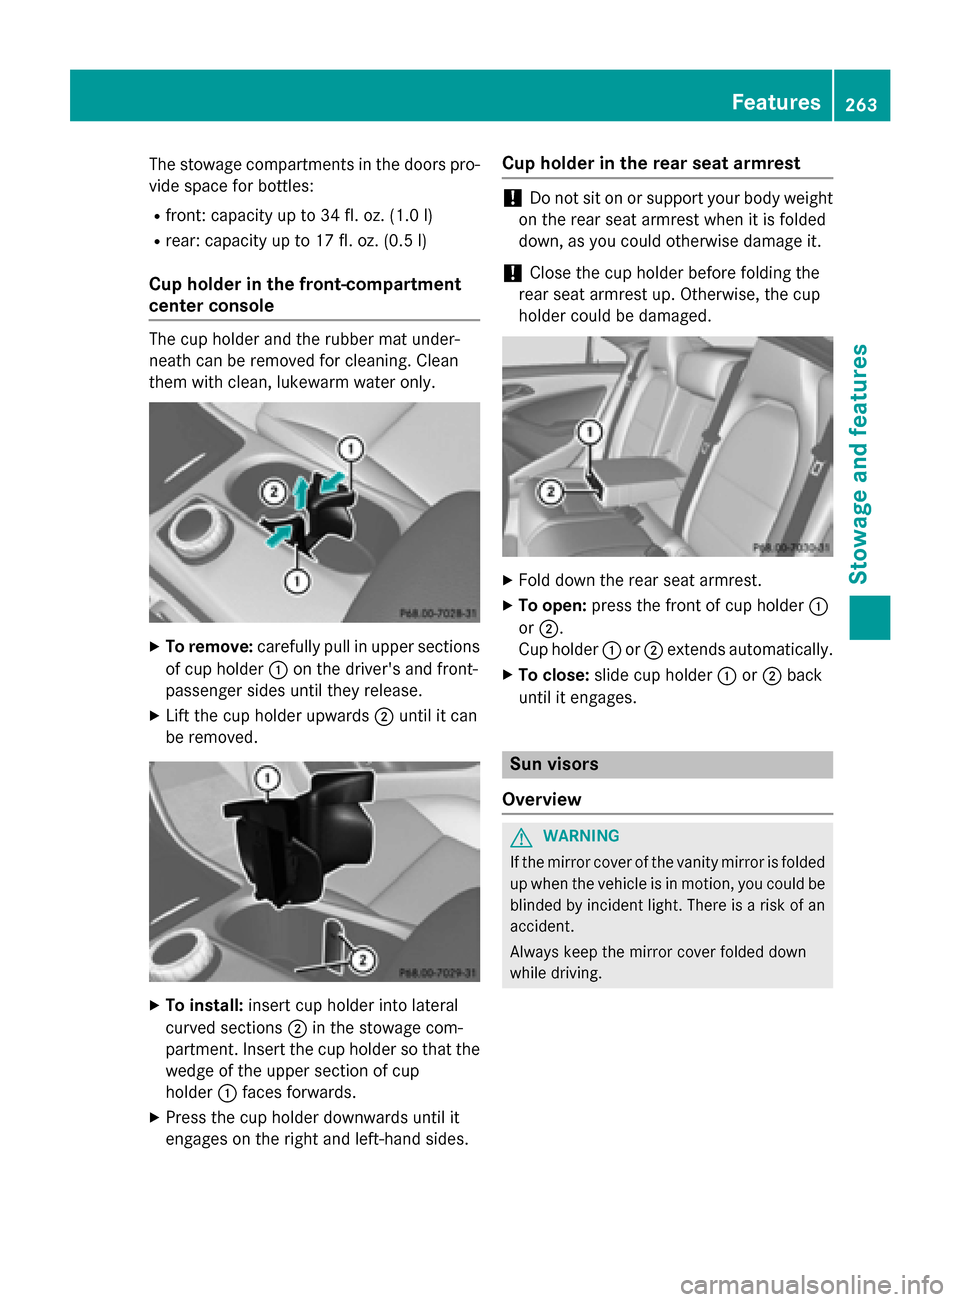
Cup holder in the front-compartment
center console The cup holder and the rubber mat under-
neath can be removed for cleaning. Clean
them with clean, lukewarm water only. X
To remove: carefully pull in upper sections
of cup holder 0043on the driver's and front-
passenger sides until they release.
X Lift the cup holder upwards 0044until it can
be removed. X
To install: insert cup holder into lateral
curved sections 0044in the stowage com-
partment. Insert the cup holder so that the wedge of the upper section of cup
holder 0043faces forwards.
X Press the cup holder downwards until it
engages on the right and left-hand sides. Cup holder in the rear seat armrest !
Do not sit on or support your body weight
on the rear seat armrest when it is folded
down, as you could otherwise damage it.
! Close the cup holder before folding the
rear seat armrest up. Otherwise, the cup
holder could be damaged. X
Fold down the rear seat armrest.
X To open: press the front of cup holder 0043
or 0044.
Cup holder 0043or0044 extends automatically.
X To close: slide cup holder 0043or0044 back
until it engages. Sun visors
Overview G
WARNING
If the mirror cover of the vanity mirror is folded up when the vehicle is in motion, you could be
blinded by incident light. There is a risk of an
accident.
Always keep the mirror cover folded down
while driving. Features
263Stowage and features Z
Page 266 of 358
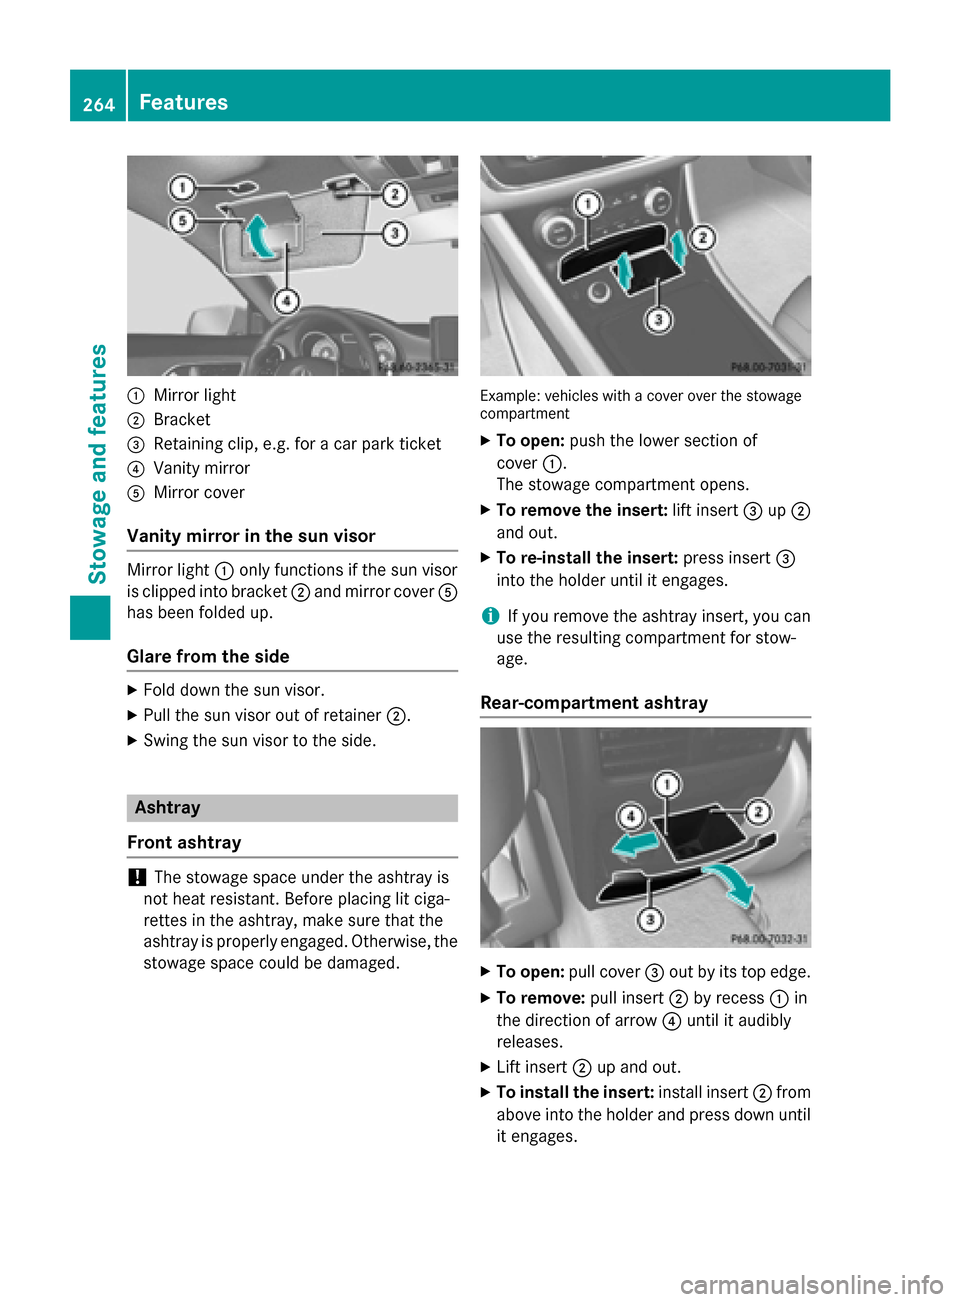
0043
Mirror light
0044 Bracket
0087 Retaining clip, e.g. for a car park ticket
0085 Vanity mirror
0083 Mirror cover
Vanity mirror in the sun visor Mirror light
0043only functions if the sun visor
is clipped into bracket 0044and mirror cover 0083
has been folded up.
Glare from the side X
Fold down the sun visor.
X Pull the sun visor out of retainer 0044.
X Swing the sun visor to the side. Ashtray
Front ashtray !
The stowage space under the ashtray is
not heat resistant. Before placing lit ciga-
rettes in the ashtray, make sure that the
ashtray is properly engaged. Otherwise, the
stowage space could be damaged. Example: vehicles with a cover over the stowage
compartment
X To open: push the lower section of
cover 0043.
The stowage compartment opens.
X To remove the insert: lift insert0087up0044
and out.
X To re-install the insert: press insert0087
into the holder until it engages.
i If you remove the ashtray insert, you can
use the resulting compartment for stow-
age.
Rear-compartment ashtray X
To open: pull cover 0087out by its top edge.
X To remove: pull insert0044by recess 0043in
the direction of arrow 0085until it audibly
releases.
X Lift insert 0044up and out.
X To install the insert: install insert0044from
above into the holder and press down until it engages. 264
FeaturesStowage and features
Page 276 of 358

A route can be prepared and sent either by a
customer service representative or via the
mbrace portal on the Internet.
Each route can include up to 20 way points.
Once a route has been received by the navi-
gation system, you will see the
name> has
hasbeen
been saved
saved to
tomemory
memory card.
card.
Do
Do you
you want
want to
tostart
start route
routeguidance?
guidance?
message in the COMAND display. The route is
saved to the SD memory card.
X To start route guidance: selectYes
Yes.
An overview of the route is shown in the
display.
i If you select
No
No, the saved route can be
called up later via the navigation menu.
X Select Start
Start.
Route guidance is started.
i Downloaded and saved data can be called
up again in COMAND.
You can find further information in the sep-
arate COMAND Operating Instructions.
Speed alert You can define the upper speed limit, which
must not be exceeded by the vehicle.
If this selected speed is exceeded by the vehi-
cle, a message will be sent to the Customer
Assistance Center. The Customer Assistance Center then forwards this information to you.
You can select the way in which you receive
this information beforehand. Possible options
include text message, e-mail or an automated call.
The data you receive contains the following
information:
R the location where the speed limit was
exceeded
R the time at which the speed limit was
exceeded
R the selected speed limit which was excee-
ded Geo fencing Geo fencing allows you to select areas which
the vehicle should not enter or leave. You will be informed if the vehicle crosses the boun-
daries of the selected areas. You can select
the way in which you receive this information
beforehand. Possible options include text
message, e-mail or an automated call.
The area can be determined as either a circle
or a polygon with a maximum of ten corners. You can specify up to ten areas simultane-
ously. Different settings are possible for each
area.
USA only: these settings can be called up
under "Owners Online" at http://
www.mbusa.com.
Alternatively, you can trigger an MB Info call
and inform the customer service representa-
tive that you wish to activate geo fencing.
Currently inactive areas can be activated by
text message.
Triggering the vehicle alarm With this function, you can trigger the vehi-
cle's panic alarm via text message. An alarm
sounds and the exterior lighting flashes.
Depending on the setting, the panic alarm
lasts five or ten seconds. Afterwards, the
alarm switches off. Garage door opener
General notes The HomeLink
®
garage door opener integra-
ted in the rear-view mirror allows you to oper-
ate up to three different door and gate sys-
tems.
Use the integrated garage door opener only
on garage doors that:
R have safety stop and reverse features and
R meet current U.S. federal safety standards
Once programed, the integrated garage door opener in the rear-view mirror will assume the
function of the garage door system's remote 274
FeaturesSto
wage an d features
Page 277 of 358
control. Please also read the operating
instructions for the garage door system.
When programing a garage door opener, park the vehicle outside the garage. Do not run the
engine while programing.
Certain garage door drives are incompatible
with the integrated garage door opener. If you have difficulty programing the integrated
garage door opener, contact an authorized
Mercedes-Benz Center.
Alternatively, you can call the following tele-
phone assistance services:
R USA: Mercedes-Benz Customer Assistance
Center at 1-800-FOR-MERCedes
R Canada: Customer Service at
1-800-387-0100
R HomeLink ®
hotline 1-800-355-3515 (free
of charge)
More information on HomeLink ®
and/or
compatible products is also available online
at http://www.homelink.com.
Notes on the declaration of conformity
(Y page 25).
USA: FCC ID: CB2HMIHL4
Canada: IC: 279B-HMIHL4
Important safety notes G
WARNING
When you operate or program the garage door with the integrated garage door opener, per-
sons in the range of movement of the garage
door can become trapped or struck by the
garage door. There is a risk of injury.
When using the integrated garage door
opener, always make sure that nobody is
within the range of movement of the garage
door. G
WARNING
Combustion engines emit poisonous exhaust
gases such as carbon monoxide. Inhaling
these exhaust gases leads to poisoning. There is a risk of fatal injury. Therefore never leave the engine running in enclosed spaces with-
out sufficient ventilation.
Programing Programing buttons
Pay attention to the "Important safety notes"
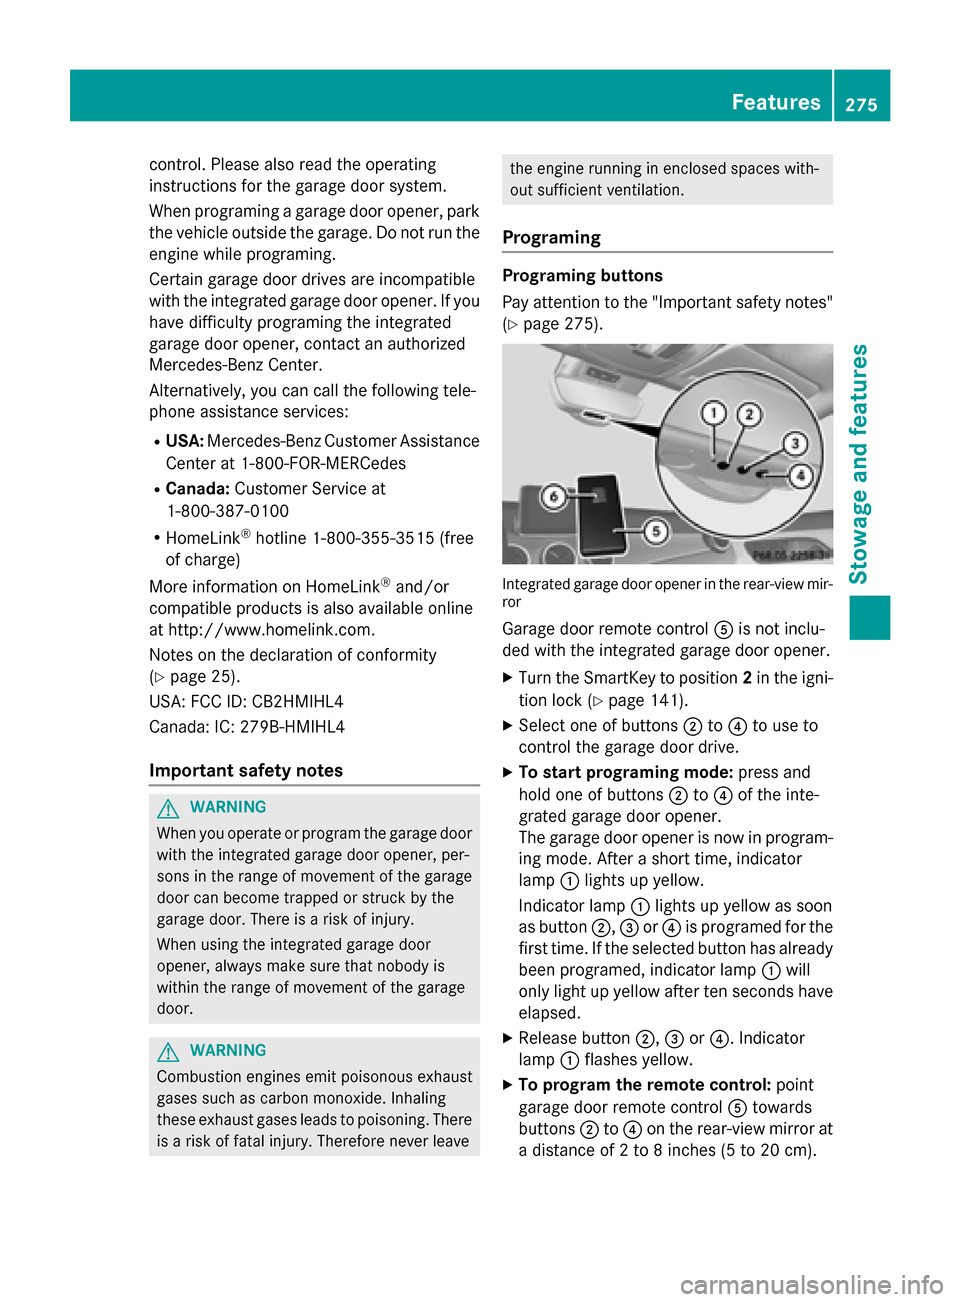
(Y page 275). Integrated garage door opener in the rear-view mir-
ror
Garage door remote control 0083is not inclu-
ded with the integrated garage door opener.
X Turn the SmartKey to position 2in the igni-
tion lock (Y page 141).
X Select one of buttons 0044to0085 to use to
control the garage door drive.
X To start programing mode: press and
hold one of buttons 0044to0085 of the inte-
grated garage door opener.
The garage door opener is now in program-
ing mode. After a short time, indicator
lamp 0043lights up yellow.
Indicator lamp 0043lights up yellow as soon
as button 0044,0087or0085 is programed for the
first time. If the selected button has already
been programed, indicator lamp 0043will
only light up yellow after ten seconds have elapsed.
X Release button 0044,0087or0085. Indicator
lamp 0043flashes yellow.
X To program the remote control: point
garage door remote control 0083towards
buttons 0044to0085 on the rear-view mirror at
a distance of 2 to 8 inches (5 to 20 cm). Features
275Stowage and features Z