2014 MERCEDES-BENZ CLA-Class ECO mode
[x] Cancel search: ECO modePage 210 of 358
![MERCEDES-BENZ CLA-Class 2014 C117 Owners Manual X
Press the 0064or0063 button to select the
Speedometer [km/h]
Speedometer [km/h] orSpeedometer
Speedometer
[mph]
[mph] function.
You will see the selected setting: on
onoroff
off.
X Press the 0076but MERCEDES-BENZ CLA-Class 2014 C117 Owners Manual X
Press the 0064or0063 button to select the
Speedometer [km/h]
Speedometer [km/h] orSpeedometer
Speedometer
[mph]
[mph] function.
You will see the selected setting: on
onoroff
off.
X Press the 0076but](/manual-img/4/3597/w960_3597-209.png)
X
Press the 0064or0063 button to select the
Speedometer [km/h]
Speedometer [km/h] orSpeedometer
Speedometer
[mph]
[mph] function.
You will see the selected setting: on
onoroff
off.
X Press the 0076button to save the setting.
Selecting the permanent display function
You can determine whether the multifunction display permanently shows your speed or the
outside temperature.
X Press the 0059or0065 button on the steer-
ing wheel to select the Sett
Sett menu.
X Press the 0064or0063 button to select the
Instrument Cluster
Instrument Cluster submenu.
X Press 0076to confirm.
X Press the 0064or0063 button to select the
Permanent Display
Permanent Display function.
You will see the selected setting Outside
Outside
Temperature
Temperature orSpeedometer [km/h]
Speedometer [km/h]/
Speedometer [mph]
Speedometer [mph].
X Press the 0076button to save the setting.
Lights Switching the daytime running lamps on/
off
Canada only: daytime running lamps are
required by law. You cannot set the Daytime
Daytime
Running Lights
Running Lights function via the on-board
computer.
X Press the 0059or0065 button on the steer-
ing wheel to select the Sett
Sett menu.
X Press the 0064or0063 button to select the
Light Light submenu.
X Press 0076to confirm.
X Press the 0064or0063 button to select the
Daytime Running Lights
Daytime Running Lights function.
If the Daytime Running Lights
Daytime Running Lights function
has been switched on, the cone of light and the 0086 symbol in the multifunction dis-
play are shown in orange.
X Press the 0076button to save the setting.
Further information on daytime running
lamps (Y page 109). Setting the brightness of the ambient
lighting
X Press the 0059or0065 button on the steer-
ing wheel to select the Sett
Sett menu.
X Press the 0064or0063 button to select the
Light
Light submenu.
X Press 0076to confirm.
X Press the 0064or0063 button to select the
Amb. Light +/- Amb. Light +/- function.
You will see the selected setting.
X Change the setting with 0076.
X Press the 0064or0063 button to adjust the
brightness to a level from Off
OfftoLevel 5
Level 5
(bright).
X Press the 0076or0038 button to save the
setting.
Activating/deactivating surround light-
ing and exterior lighting delayed switch-
off
If you have activated the Surround Light‐
Surround Light‐
ing ing function and the light switch is set to
0058, the following functions are activated
when it is dark:
R surround lighting: the exterior lighting
remains lit for 40 seconds after unlocking
with the key. If you start the engine, the
surround lighting is switched off and auto-
matic headlamp mode is activated
(Y page 109).
R exterior lighting delayed switch-off: the
exterior lighting remains lit for 60 seconds
after the engine is switched off. If you close all the doors and the trunk lid, the exterior
lighting goes off after 15 seconds.
X Press the 0059or0065 button on the steer-
ing wheel to select the Sett Settmenu.
X Press the 0064or0063 button to select the
Light
Light submenu.
X Press 0076to confirm.
X Press the 0064or0063 button to select the
Surround Lighting
Surround Lighting function.
When the Surround Lighting
Surround Lighting function is
activated, the light cone and the area 208
Menus and submenusOn-board computer and displays
Page 213 of 358

SETUP
0043
Drive program (C C/SS/MM)
0044 ESP ®
mode (ON ON/OFFOFF) or SPORT handling
mode (SPORT SPORT)
SETUP shows the drive program, the ESP ®
(Electronic Stability Program) mode and the
SPORT handling mode. X Press the 0059or0065 button on the steer-
ing wheel to select the AMG
AMG menu.
X Press the 0063button repeatedly until
SETUP is displayed.
RACETIMER Displaying and starting RACETIMER
0043
Lap
0044 RACETIMER
The RACETIMER is only intended for use on a closed race circuit. Do not use the function on
public roads.
You can start the RACETIMER when the
engine is running or if the SmartKey is in posi-
tion 2in the ignition lock.
X Press the 0059or0065 button on the steer-
ing wheel to select the AMG AMGmenu.
X Press the 0063button repeatedly until the
RACETIMER is shown.
X To start: press the 0076button to start the
RACETIMER. Displaying the intermediate time
X
Press the 0059or0065 button to select
Interm. Time
Interm. Time.
X Press 0076to confirm.
The intermediate time is displayed for five
seconds.
Starting a new lap 0043
RACETIMER
0044 Fastest lap time (best lap)
0087 Lap
X Press 0076to confirm New Lap New Lap.
i It is possible to store a maximum of six-
teen laps. The 16th lap can only be com-
pleted with Finish Lap Finish Lap.
Stopping the RACETIMER X
Press the 0038button on the steering
wheel.
X Confirm Yes
Yeswith 0076.
The RACETIMER interrupts timing when you
stop the vehicle and turn the SmartKey to
position 1in the ignition lock. If you turn the Menus and submenus
211On-board computer and displays Z
Page 277 of 358
control. Please also read the operating
instructions for the garage door system.
When programing a garage door opener, park the vehicle outside the garage. Do not run the
engine while programing.
Certain garage door drives are incompatible
with the integrated garage door opener. If you have difficulty programing the integrated
garage door opener, contact an authorized
Mercedes-Benz Center.
Alternatively, you can call the following tele-
phone assistance services:
R USA: Mercedes-Benz Customer Assistance
Center at 1-800-FOR-MERCedes
R Canada: Customer Service at
1-800-387-0100
R HomeLink ®
hotline 1-800-355-3515 (free
of charge)
More information on HomeLink ®
and/or
compatible products is also available online
at http://www.homelink.com.
Notes on the declaration of conformity
(Y page 25).
USA: FCC ID: CB2HMIHL4
Canada: IC: 279B-HMIHL4
Important safety notes G
WARNING
When you operate or program the garage door with the integrated garage door opener, per-
sons in the range of movement of the garage
door can become trapped or struck by the
garage door. There is a risk of injury.
When using the integrated garage door
opener, always make sure that nobody is
within the range of movement of the garage
door. G
WARNING
Combustion engines emit poisonous exhaust
gases such as carbon monoxide. Inhaling
these exhaust gases leads to poisoning. There is a risk of fatal injury. Therefore never leave the engine running in enclosed spaces with-
out sufficient ventilation.
Programing Programing buttons
Pay attention to the "Important safety notes"
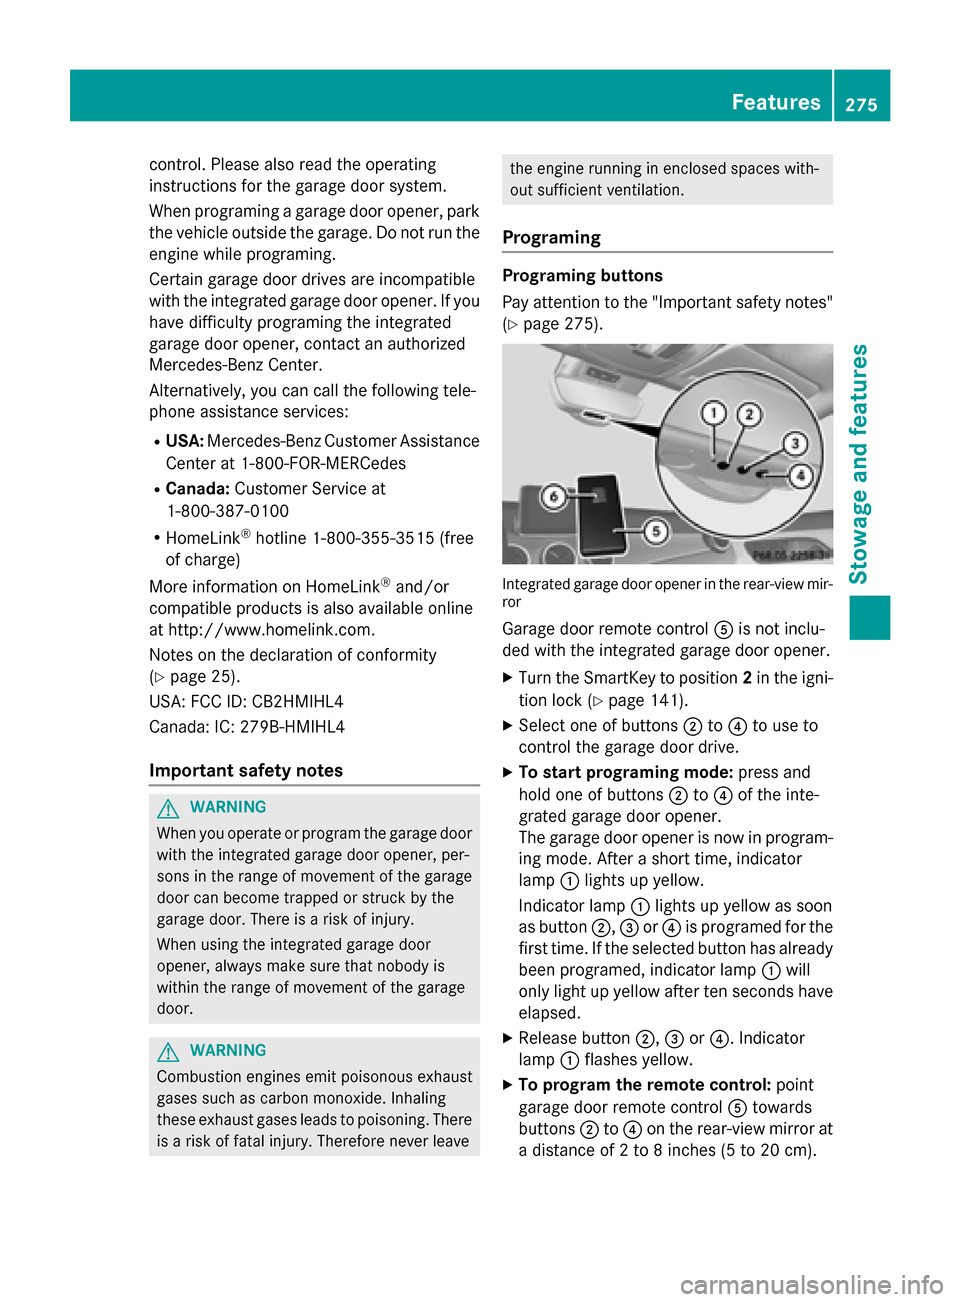
(Y page 275). Integrated garage door opener in the rear-view mir-
ror
Garage door remote control 0083is not inclu-
ded with the integrated garage door opener.
X Turn the SmartKey to position 2in the igni-
tion lock (Y page 141).
X Select one of buttons 0044to0085 to use to
control the garage door drive.
X To start programing mode: press and
hold one of buttons 0044to0085 of the inte-
grated garage door opener.
The garage door opener is now in program-
ing mode. After a short time, indicator
lamp 0043lights up yellow.
Indicator lamp 0043lights up yellow as soon
as button 0044,0087or0085 is programed for the
first time. If the selected button has already
been programed, indicator lamp 0043will
only light up yellow after ten seconds have elapsed.
X Release button 0044,0087or0085. Indicator
lamp 0043flashes yellow.
X To program the remote control: point
garage door remote control 0083towards
buttons 0044to0085 on the rear-view mirror at
a distance of 2 to 8 inches (5 to 20 cm). Features
275Stowage and features Z
Page 284 of 358
Useful information
i This Operator's manual describes all
models and all standard and optional equip- ment of your vehicle available at the time of
publication of the Operator's manual.
Country-specific differences are possible.
Please note that your vehicle may not be
equipped with all features described. This
also applies to safety-related systems and
functions.
i Read the information on qualified special-
ist workshops (Y page 26). Engine compartment
Hood
Important safety notes G
WARNING
If the hood is unlatched, it may open up when the vehicle is in motion and block your view.
There is a risk of an accident.
Never unlatch the hood while driving. G
WARNING
When opening and closing the hood, it may
suddenly fall into the closed position. There is a risk of injury to persons within range of
movement of the hood.
Open and close the hood only when no one is
within its range of movement. G
WARNING
Opening the hood when the engine is over-
heated or when there is a fire in the engine
compartment could expose you to hot gases
or other service products. There is a risk of
injury.
Let an overheated engine cool down before
opening the hood. If there is a fire in the
engine compartment, keep the hood closed
and contact the fire department. G
WARNING
The engine compartment contains moving
components. Certain components, such as
the radiator fan, may continue to run or start
again suddenly when the ignition is off. There is a risk of injury.
If you need to do any work inside the engine
compartment:
R switch off the ignition
R never reach into the area where there is a
risk of danger from moving components,
such as the fan rotation area
R remove jewelry and watches
R keep items of clothing and hair, for exam-
ple, away from moving parts G
WARNING
The ignition system and the fuel injection sys- tem work under high voltage. If you touch
components which are under voltage, you
could get an electric shock. There is a risk of
injury.
Never touch components of the ignition sys-
tem or fuel injection system when the ignition is switched on.
Opening the hood G
WARNING
Certain components in the engine compart-
ment, such as the engine, radiator and parts
of the exhaust system, can become very hot.
Working in the engine compartment poses a
risk of injury.
Where possible, let the engine cool down and touch only the components described in the
following. G
WARNING
When the hood is open and the windshield
wipers are set in motion, you can be injured by the wiper linkage. There is a risk of injury.
Always switch off the windshield wipers and
the ignition before opening the hood. 282
Engine compartmentMaintenance and care
Page 299 of 358
Information on changing/mounting a wheel
(Y page 336).
X Stop the vehicle on solid, non-slippery and
level ground, as far away as possible from
traffic.
X Switch on the hazard warning lamps.
X Secure the vehicle against rolling away
(Y page 157).
X If possible, bring the front wheels into the
straight-ahead position.
X Switch off the engine.
X Remove the SmartKey from the ignition
lock.
X All occupants must get out of the vehicle.
Make sure that they are not endangered as
they do so.
X Make sure that no one is near the danger
area while a wheel is being changed. Any-
one who is not directly assisting in the
wheel change should, for example, stand
behind the barrier.
X Get out of the vehicle. Pay attention to traf-
fic conditions when doing so.
X Close the driver's door.
i Vehicles equipped with MOExtended tires
are not equipped with a TIREFIT kit at the
factory. It is therefore recommended that
you additionally equip your vehicle with a
TIREFIT kit if you mount tires that do not
feature run-flat properties, e.g. winter tires. A TIREFIT kit can be obtained from a quali-
fied specialist workshop. MOExtended tires (tires with run-flat
properties)
General notes With MOExtended tires (tires with run flat
characteristics), you can continue to drive
your vehicle even if there is a total loss of
pressure in one or more tires. The affected
tire must not show any clearly visible damage.
You can recognize MOExtended tires by the
MOExtended marking which appears on the sidewall of the tire. You will find this marking
next to the tire size designation, the load-
bearing capacity and the speed index
(Y page 330).
MOExtended tires may only be used in con-
junction with an active tire pressure monitor. If the pressure loss warning message
appears in the multifunction display:
R Observe the instructions in the display
messages (Y page 237).
R Check the tire for damage.
R If driving on, observe the following notes.
The maximum driving distance is approx-
imately 50 miles (80 km) when the vehicle is
partially laden and approximately 18 miles
(30 km) when the vehicle is fully laden.
In addition to the vehicle load, the driving dis- tance possible depends upon:
R Speed
R Road condition
R Outside temperature
The driving distance possible in run-flat mode may be reduced by extreme driving condi-
tions/maneuvers, or it can be increased
through a moderate style of driving.
The maximum permissible distance which
can be driven in run-flat mode is counted from
the moment the tire pressure loss warning
appears in the multifunction display.
You must not exceed a maximum speed of
50 mph (80 km/h).
i When replacing one or all tires, make sure
that you use only tires:
R of the size specified for the vehicle and
R marked "MOExtended"
If a tire has gone flat and cannot be
replaced with a MOExtended tire, a stand-
ard tire may be used as a temporary meas-
ure. Make sure that you use the proper size and type (summer or winter tire).
i Vehicles equipped with MOExtended tires
are not equipped with a TIREFIT kit at the
factory. It is therefore recommended that Flat tire
297Breakdown assistance
Page 316 of 358
Useful information
i This Operator's manual describes all
models and all standard and optional equip- ment of your vehicle available at the time of
publication of the Operator's manual.
Country-specific differences are possible.
Please note that your vehicle may not be
equipped with all features described. This
also applies to safety-related systems and
functions.
i Read the information on qualified special-
ist workshops (Y page 26). Important safety notes
G
WARNING
If wheels and tires of the wrong size are used, the wheel brakes or suspension components
may be damaged. There is a risk of an acci-
dent.
Always replace wheels and tires with those
that fulfill the specifications of the original
part.
When replacing wheels, make sure to use the
correct:
R designation
R model
When replacing tires, make sure to use the
correct:
R designation
R manufacturer
R model G
WARNING
A flat tire severely impairs the driving, steer-
ing and braking characteristics of the vehicle.
There is a risk of accident.
Tires without run-flat characteristics:
R do not drive with a flat tire.
R immediately replace the flat tire with your
emergency spare wheel or spare wheel, or
consult a qualified specialist workshop. Tires with run-flat characteristics:
R pay attention to the information and warn-
ing notices on MOExtended tires (tires with
run-flat characteristics).
Accessories that are not approved for your
vehicle by Mercedes-Benz or that are not
being used correctly can impair operating
safety.
Before purchasing and using non-approved
accessories, visit a qualified specialist work-
shop and inquire about:
R suitability
R legal stipulations
R factory recommendations
Information on dimensions and types of
wheels and tires for your vehicle can be found (Y page 340).
Information on air pressure for the tires on
your vehicle can be found:
R on the vehicle's Tire and Loading Informa-
tion placard on the B-pillar
R on the tire pressure label on the fuel filler
flap (Y page 156)
R under "Tire pressure" (Y page 317)
i Further information on wheels and tires
can be obtained at any qualified specialist
workshop. Operation
Information on driving
R If the vehicle is heavily loaded, check the
tire pressures and correct them if neces-
sary.
R While driving, pay attention to vibrations,
noises and unusual handling characteris-
tics, e.g. pulling to one side. This may indi- cate that the wheels or tires are damaged.If you suspect that a tire is defective,
reduce your speed immediately. Stop the
vehicle as soon as possible to check the
wheels and tires for damage. Hidden tire
damage could also be causing the unusual 314
OperationWheels and tires
Page 318 of 358
Treadwear indicators (TWI) are required by
law. Six indicators are positioned on the tire
tread. They are visible once the tread depth is
approximately 00CDin (1.6 mm). If this is the
case, the tire is so worn that it must be
replaced. Selecting, mounting and replacing
tires
R Only mount tires and wheels of the same
type and make.
Exception: it is permissible to install a dif-
ferent type or make in the event of a flat
tire. Observe the "MOExtended tires (tires
with run-flat characteristics" section
(Y page 297).
R Only mount tires of the correct size onto
the wheels.
R After mounting new tires, break them in at
moderate speeds for the first 60 miles
(100 km), as they only reach their full per-
formance after this distance.
R Do not drive with tires which have too little
tread depth, as this significantly reduces
the traction on wet roads (hydroplaning).
R Replace the tires after six years at the lat-
est, regardless of wear. MOExtended tires (tires with run-flat
properties)
With MOExtended tires (tires with run flat
characteristics), you can continue to drive
your vehicle even if there is a total loss of
pressure in one or more tires.
MOExtended tires may only be used in con-
junction with an active tire pressure monitor
and only on wheels specifically tested by
Mercedes-Benz.
Notes on driving with MOExtended tires with
a flat tire (Y page 297).
i Vehicles equipped with MOExtended tires
are not equipped with a TIREFIT kit at the
factory. It is therefore recommended that you additionally equip your vehicle with a
TIREFIT kit if you mount tires that do not
feature run-flat properties, e.g. winter tires.
A TIREFIT kit can be obtained from a quali- fied specialist workshop. Winter operation
General notes
Have your vehicle winterproofed at a qualified specialist workshop at the onset of winter.
Observe the notes in the "Changing a wheel"
section (Y page 336). Driving with summer tires
At temperatures below 45 ‡(+7 †), summer
tires lose elasticity and therefore traction and braking power. Change the tires on your vehi-cle to M+S tires. Using summer tires at very
cold temperatures could cause cracks to
form, thereby damaging the tires perma-
nently. Mercedes-Benz cannot accept
responsibility for this type of damage. G
WARNING
Damaged tires can cause tire inflation pres-
sure loss. As a result, you could lose control of your vehicle. There is a risk of accident.
Check the tires regularly for signs of damage
and replace any damaged tires immediately. M+S tires
G
WARNING
M+S tires with a tire tread depth of less than
00CF in (4 mm) are not suitable for use in winter
and do not provide sufficient traction. There is
a risk of an accident.
M+S tires with a tread depth of less than 00CFin
(4 mm) must be replaced immediately.
At temperatures below 45 ‡(+7 †), use win-
ter tires or all-season tires. Both types of tire are identified by the M+S marking. 316
Winter operationWheels and tires
Page 343 of 358
come into contact with the bodywork and
axle components. This could result in dam- age to the tires or the vehicle.
Mercedes-Benz accepts no liability for
damage resulting from the use of tires,
wheels or accessories other than those tes-
ted and approved.
Information on tires, wheels and approved
combinations can be obtained from any
qualified specialist workshop.
! Retreaded tires are neither tested nor rec-
ommended by Mercedes-Benz, since pre-
vious damage cannot always be detected
on retreaded tires. As a result, Mercedes-
Benz cannot guarantee vehicle safety if
retreaded tires are mounted. Do not mount used tires if you have no information about
their previous usage.
Overview of abbreviations used in the follow-
ing tire tables:
R BA: both axles
R FA: front axle
R RA: rear axle
The recommended pressures for various
operating conditions can be found:
R on the Tire and Loading Information placard
with the recommended tire pressures on
the B-pillar on the driver's side
R in the tire pressure table on the inside of the
fuel filler flap
Observe the notes on recommended tire
pressures under various operating conditions (Y page 317).
Check tire pressures regularly, and only when the tires are cold. Comply with the mainte-
nance recommendations of the tire manufac-
turer in the vehicle document wallet.
Notes on the vehicle equipment – always
equip the vehicle with:
R tires of the same size on a given axle (left/
right)
R the same type of tires at a given time (sum-
mer tires, winter tires, MOExtended tires) Exception: it is permissible to install a dif-
ferent type or make in the event of a flat
tire. Observe the "MOExtended tires (tires
with run-flat characteristics" section
(Y
page 297).
i Vehicles equipped with MOExtended tires
are not equipped with a TIREFIT kit at the
factory. It is therefore recommended that
you additionally equip your vehicle with a
TIREFIT kit if you mount tires that do not
feature run-flat properties, e.g. winter tires. A TIREFIT kit can be obtained from a quali- fied specialist workshop.
i The following pages contain information
on approved wheel rim and tire sizes for
equipping your vehicle with winter tires.
Winter tires are not available at the factory as standard equipment or optional extras.
If you want to equip your vehicle with
approved winter tires, it may be necessary
to obtain wheel rims in the corresponding
size. The size of the approved winter tires
may differ from the standard tires. This is
dependent on the model and the equip-
ment installed at the factory.
The tires and wheel rims, as well as further
information, can be obtained at a qualified
specialist workshop.
i Not all wheel and tire combinations are
available at the factory for all countries. Wheel and tire combinations
341Wheels and tires Z