2014 MERCEDES-BENZ CL-Class change time
[x] Cancel search: change timePage 142 of 274
Sym
bol Explanation
0004
Entry that has been imported from
the memory card or USB device
000A
Entry imported via the Bluetooth
®
interface Searching for a phone book entry
Using the character bar You determine the first letter of the entry you
are looking for with the first character you
enter.
X Select a character by turning 003C0012003Dthe
COMAND Controller and press 0037to
confirm.
The first entry in the list that starts with the
letter selected is highlighted. If there are
similar entries, the next different character
is shown. For example, with entries such as
Christel and
Christine , the beginnings
of the names are similar. In this case, you
will be offered a choice between E and
I .
X Select the characters of the entry you are
searching for one by one and press 0037to
confirm.
When the selection is clear, COMAND
switches automatically to the selection list.
X To complete the search: slide00120036the
COMAND controller repeatedly or press
and hold 0037until the character bar
disappears.
The selection list appears.
Information about character entry
(Y page 34) Using the number keypad You determine the first letter of the entry you
are looking for with the first character you
enter.
X
Press the appropriate number keys as
many times as necessary and one after the
other.
Further information on character entry using
the number keypad (direct entry)
(Y page 36).
Directly from the list You can switch to the list at any time during
character entry.
X
Slide 00120036the COMAND controller
repeatedly or press and hold 0037until the
character bar disappears.
or
X Select 0004and press 0037to confirm.
X To selecta n entry:turn003C0012003D the
COMAND controller until the desired entry
is highlighted and press 0037to confirm.
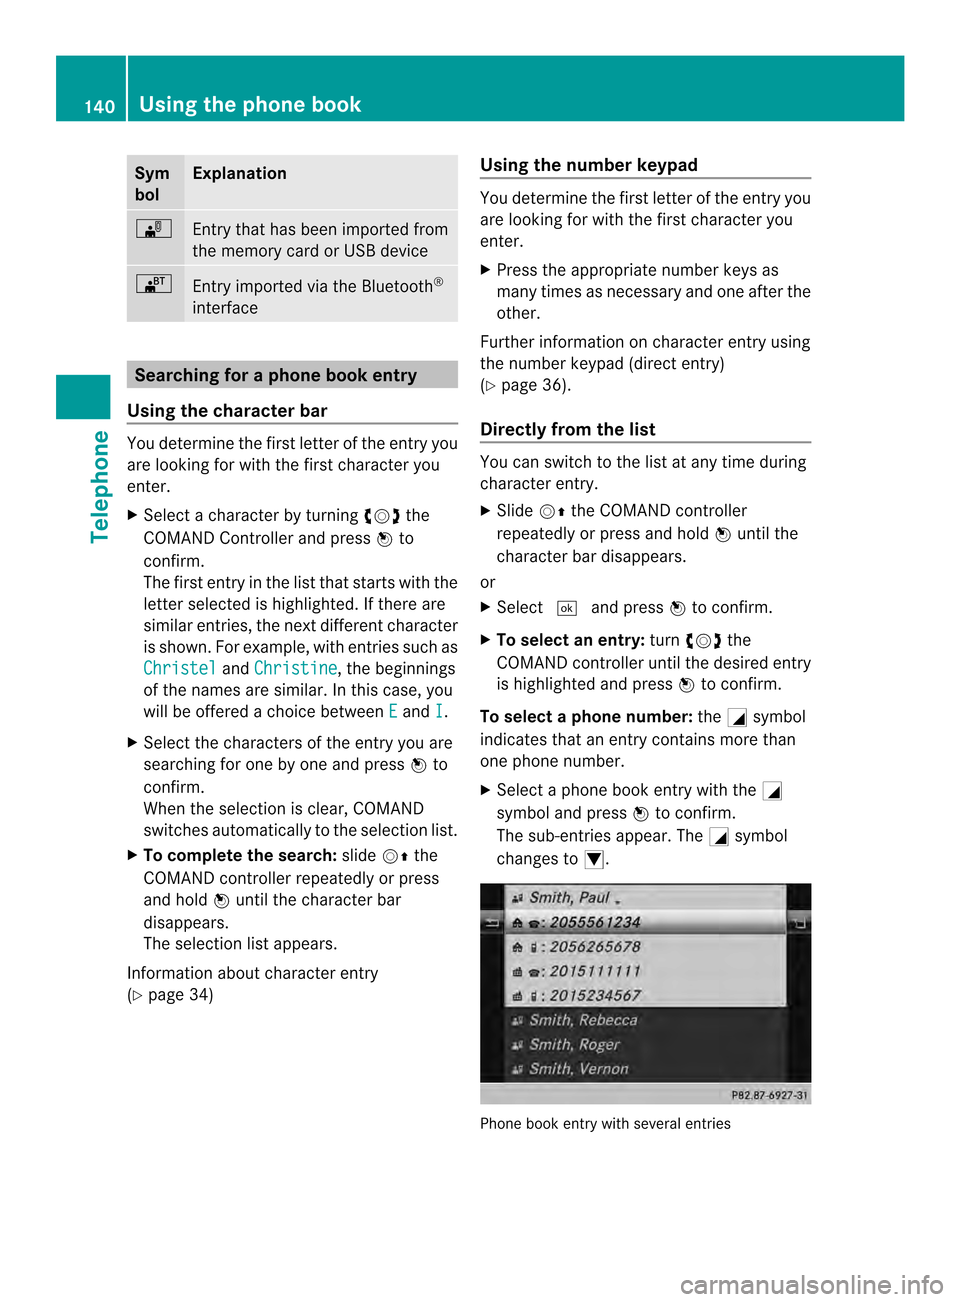
To select aphone number: the0002symbol
indicates that an entry contains more than
one phone number.
X Select a phone book entry with the 0002
symbol and press 0037to confirm.
The sub-entries appear. The 0002symbol
changes to 0003. Phone book entry with several entries140
Using the phone bookTelephone
Page 155 of 274
X
Press 0037the COMAND controller to
confirm.
X Select Call and press
0037to confirm.
The phone makes the call. The display
switches to telephone mode. Storing the phone number as
aspeed
dial number
X Display details for an address boo kentry
(Y page 151).
X Select the phone numbe rdata field by
turning 003C0012003Dthe COMAND controller.
X Select the list symbol to the righ tofthe
data field by sliding 00120035the COMAND
controller and press 0037to confirm.
X Select Speed Dial and press
0037to
confirm.
You can now store the number in one of the
ten speed dial presets (Y page 145).Starting route guidance to an entry
Address book entry with navigable data This function is available as soon as you have
stored a destination in the destination
memory (Y
page 105).
X Search for an address book entry with the
0006 symbol and select it from the list
(Y page 150).
X Display details for an address book entry
(Y page 151).
X Select the address data field by turning
003C0012003D the COMAND controller and press
0037 to confirm.
Route guidance begins.
or
X Select the list symbol to the right of the
entry by sliding 00120035the COMAND
controller and press 0037to confirm.
X Select Navigate and press
0037to confirm.
Route guidance begins. Address book entry without navigable
data Route guidance can also be started for an
address book entry without the
0006symbol. If
the address data or designations do not
match the digital map, COMAND prompts you
to re-enter the address.
X Enter the destination address (Y page 63)
X Start route guidance.
The navigable address is automatically
added to the address book entry.
i This will provide you with an address book
entry that is suitable for navigation. The
next time the navigation is started, the
address data in the navigation, rather than
the postal address, is used if you have
changed address in the address entry
menu. Therefore, make sure that the
destination address is the desired
destination when starting navigation from
the address book. Voice tags
Introduction You can enter voice tags via the Voice Control
System (see the separate operating
instructions). Once you have assigned a voice
tag to an address book entry, you can call up
this entry with a voice command and dial a
phone number, for example. You can add one
voice tag per address book entry.
Adding or changing
avoice tag X
Search for an address book entry with or
without a voice tag ( ¦) (Ypage 150).
X Select the list symbol to the righ tofthe
entry by sliding 00120035the COMAND
controller and press 0037to confirm. Using the address book
153Telephone Z
Page 174 of 274
Manually re-establishing a connection
X
Select 000A(play) again in the Internet
radio menu and press 0037to confirm.
Ending data transfer:
X Select 0014(stop) in the Internet radio
menu and press 0037to confirm.
or
X Change to another audio source, for
example Disc .
If you change to a main function that is not an
audio source, e.g. navigation, the data
connection remains on. You can continue
listening to the set station. Internet
Display restriction
Internet pages cannot be shown while the
vehicle is in motion. Calling up
awebsite
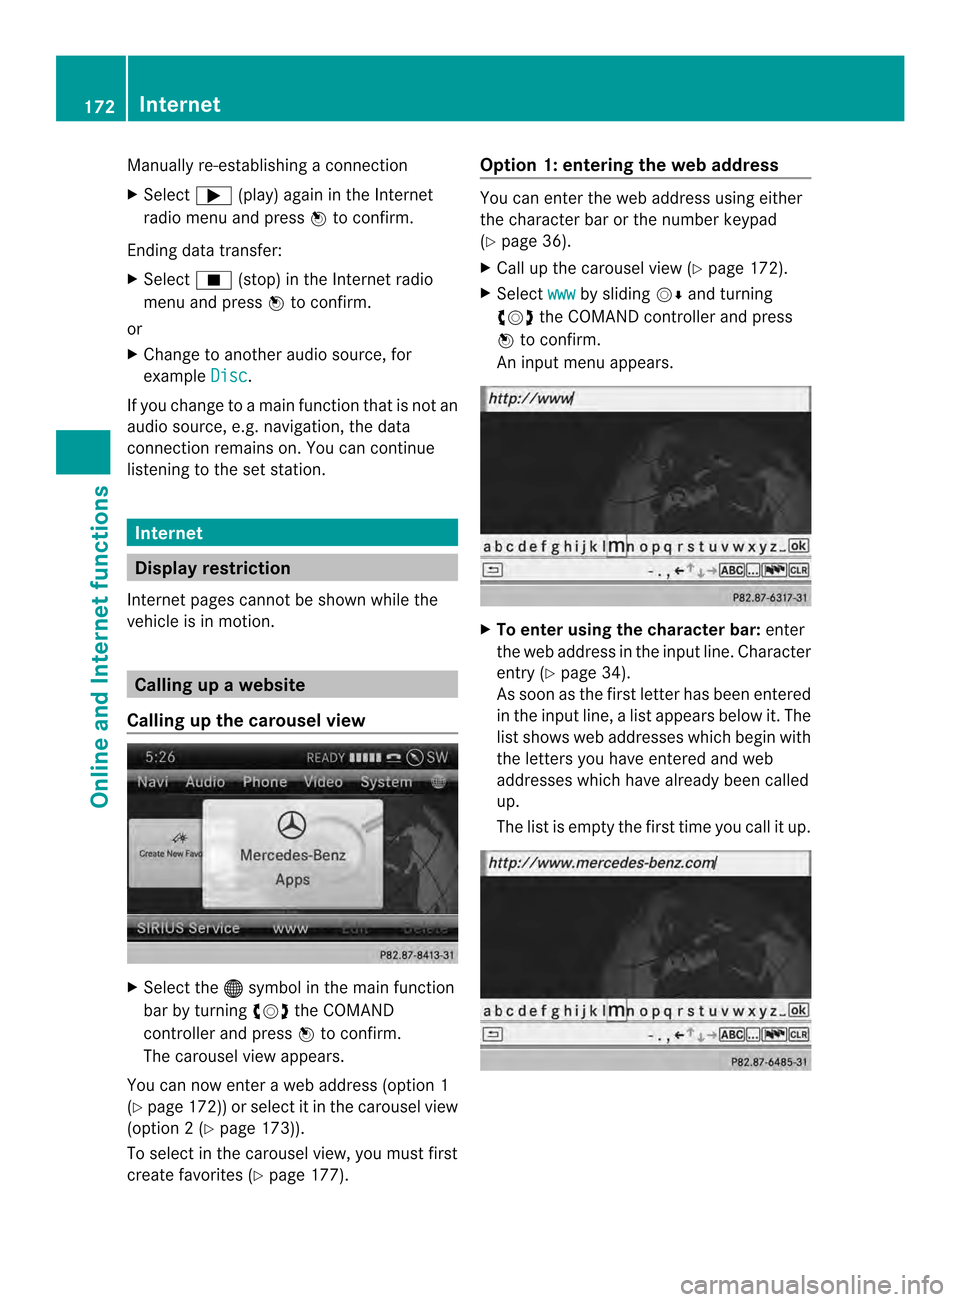
Calling up the carousel view X
Select the 000Csymbol in the main function
bar by turning 003C0012003Dthe COMAND
controller and press 0037to confirm.
The carousel view appears.
You can now enter a web address (option 1
(Y page 172)) or selec titinthe carousel view
(option 2(Ypage 173)).
To select in the carousel view, you must first
create favorites (Y page 177). Option 1: entering the web address You can enter the web address using either
the character bar or the number keypad
(Y
page 36).
X Call up the carousel view (Y page 172).
X Select www by sliding
00120008and turning
003C0012003D the COMAND controller and press
0037 to confirm.
An input menu appears. X
To enter using the character bar: enter
the web address in the input line. Character
entry (Y page 34).
As soon as the first letter has been entered
in the input line, a list appears below it. The
list shows web addresses which begin with
the letters you have entered and web
addresses which have already been called
up.
The list is empty the first time you call it up. 172
InternetOnline and Internet functions
Page 182 of 274

Settings
Settings menu X
Call up the menu (Y page 175).
X Select Settings by turning
003C0012003Dor sliding
003600120008 the COMAND controller and press
0037 to confirm.
You can activate/deactivate the following
settings:
R Download Images Automatically It may take some time to download the
contents of websites that contain a large
amount of images. Therefore, it may be
useful to deactivate this option.
R Block Pop-Ups Pop-ups are windows (usually with
advertisements) which are displayed
automatically when you call up a website.
You can block these displays.
R Activate Javascript Javascript makes it possible to display and
interact with dynamic content on the
website.
R Allow Cookies Some websites save information in small
text files (cookies) in COMAND. You can
determine whether cookies may be stored.
R Character Size You can select the font size which is used
when displaying the website.
R Character Code You can select a different character set
here, e.g. if the characters of a website
appear distorted.
R Delete Private Data Deletes data which has been saved by the
browser during Internet use.
Changing settings X
Select a setting by turning 003C0012003Dthe
COMAND controller and press 0037to
confirm.
Switch the setting on 0010or off 0003.
X Select Character Size or
Character Code by turning
003C0012003Dor sliding 003600120008the
COMAND controller and press 0037to
confirm.
X Select a setting using the COMAND
controller and press 0037to confirm.
i If you change the settings, the websites
may not be displayed correctly.
Deleting private data X
Select Delete Private Data and press
0037 to confirm.
Am enu appears. 180
InternetOnline and Internet functions
Page 196 of 274
Handle discs only whe
nthe vehicle is
stationary.
Bear in mind that at a speed of just 30 mph
(approximately 50 km/h), your vehicle is
covering a distance of 44 feet (approximately
14 m) every second. Inserting/ejecting CDs/DVDs
Notes If the CD/DVDh
as a printed side, this must
face upwards when the CD/DV Dis inserted.
If neither side is printed, the side to be played
should face downwards. The system may not
be able to play CDs/DVDsw ith copy
protection.
i If a medium contains other files in
additio nto music files, the loading time
before the first track starts to play may be
longer.
Inserting adisc into the single DVD
drive X
Press the 0007eject button.
If there is a disc already inserted, it will be
ejected.
X Take the disc out of the slot.
X Insert a disc into the slot.
If the disc is correctly inserted and is a
suitable disc, it is drawn in by the drive and
played.
Ejecting adisc from the single DVD
drive X
Press the 0007eject button.
X Take the disc out of the slot.
If you do not take the disc out of the slot, it
is drawn in again automatically after a short
while and reloaded. Inserting discs into the DVD changer The DVD changer has a fixed magazine with
six trays.
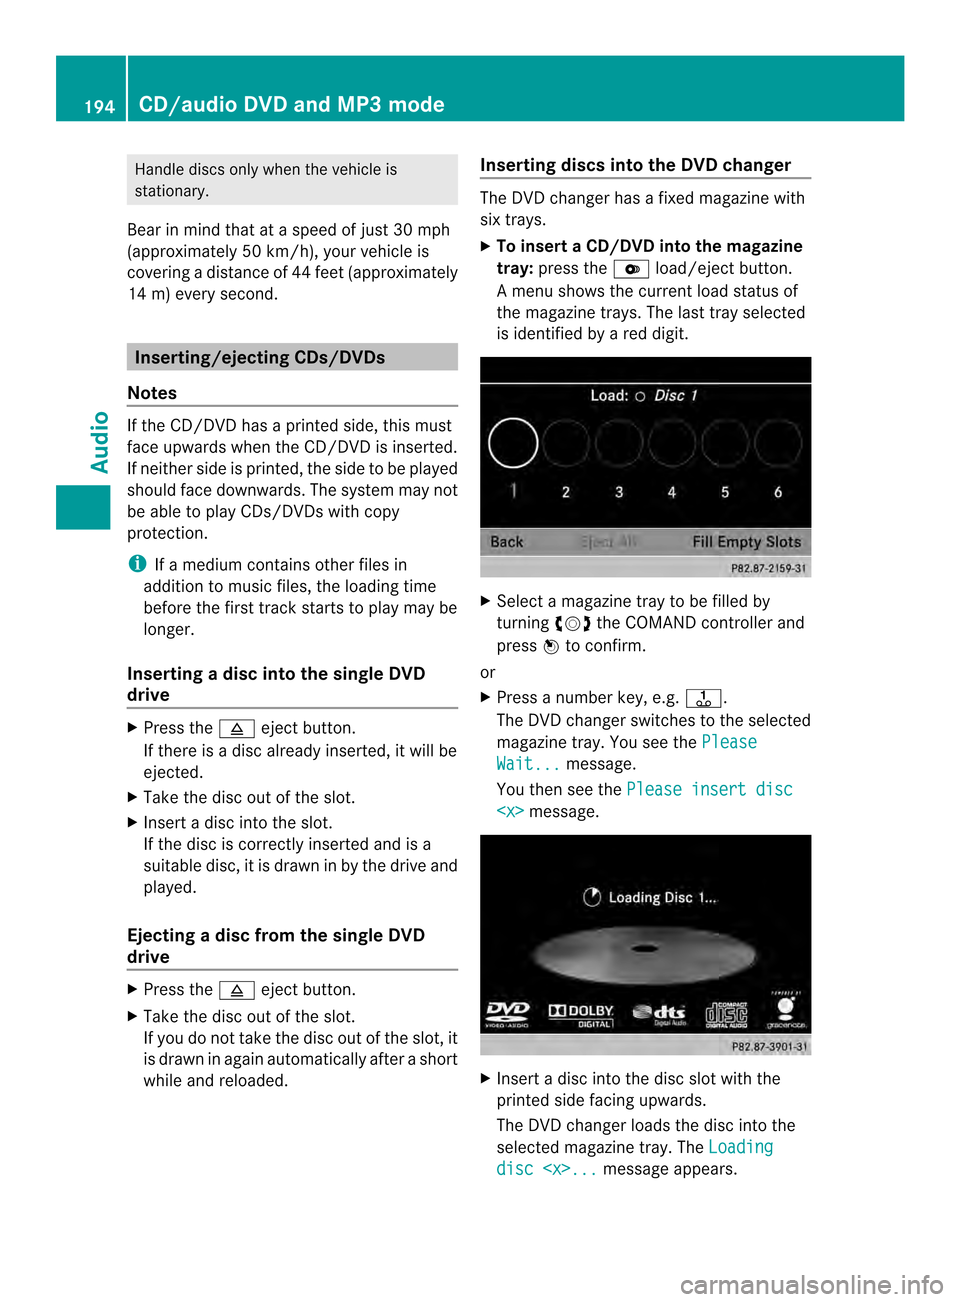
X
To insert aCD/DVD into the magazine
tray: press the 0009load/ejec tbutton.
Am enu shows the curren tload status of
the magazine trays. The last tray selected
is identified by a red digit. X
Select a magazine tray to be filled by
turning 003C0012003Dthe COMAND controller and
press 0037to confirm.
or
X Press a number key, e.g. 0029.
The DVD changer switches to the selected
magazine tray. You see the Please Wait... message.
You then see the Please insert disc
X
Insert a disc into the disc slot with the
printed side facing upwards.
The DVD changer loads the disc into the
selected magazine tray. The Loading disc
CD/audio DVD and MP3 modeAudio
Page 197 of 274
i
It may take some time for the disc to be
loaded, depending on the type of disc. If no
disc is inserted for approximately 20
seconds, the display returns to the
magazine menu.
The DVD changer plays the disc if:
R it has been inserted correctly.
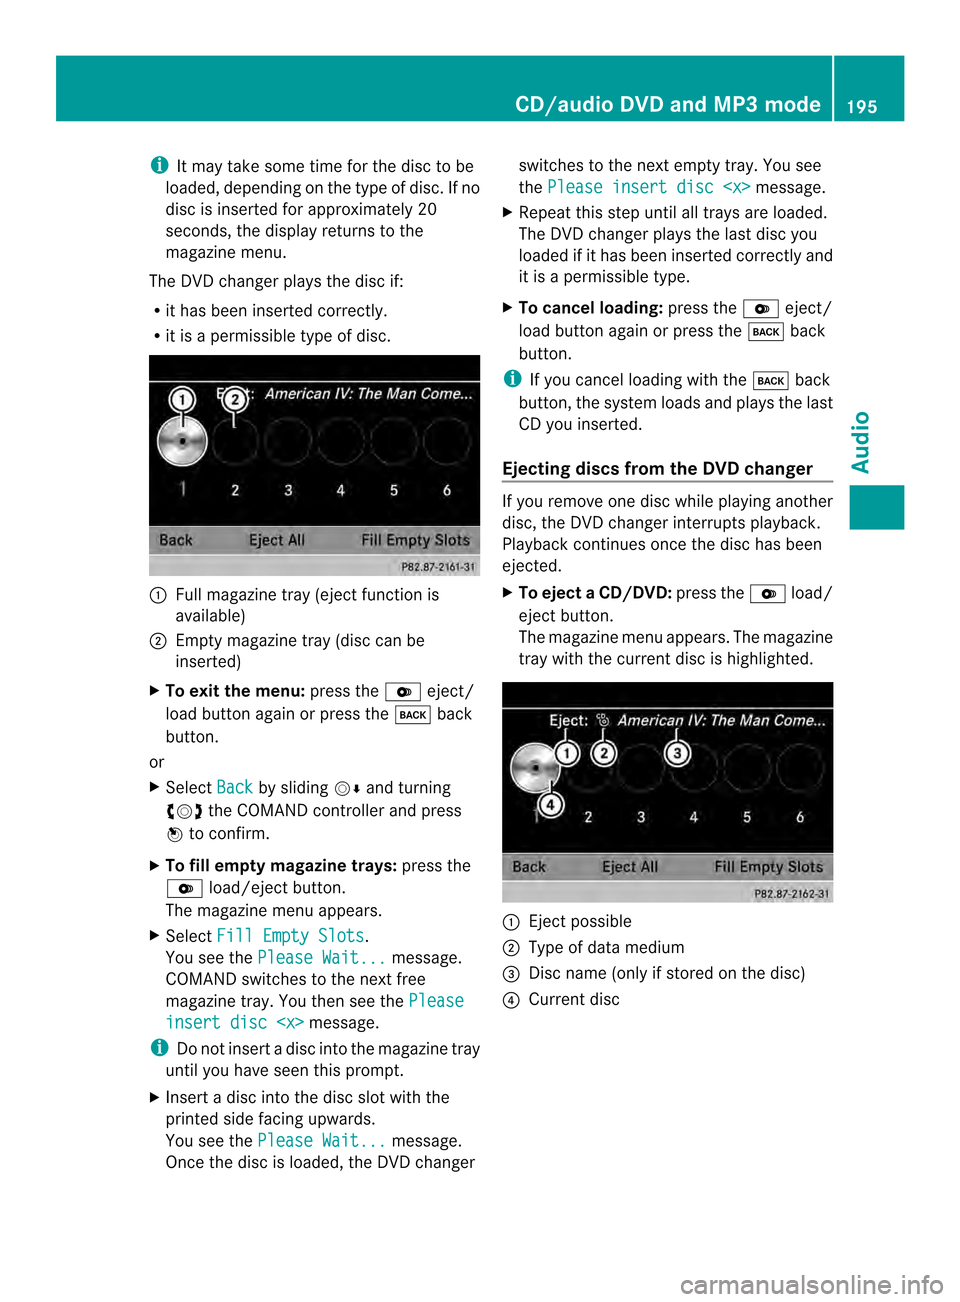
R it is a permissible type of disc. 0001
Full magazine tray (eject function is
available)
0002 Empty magazine tray (disc can be
inserted)
X To exit the menu: press the0009eject/
load button again or press the 000Aback
button.
or
X Select Back by sliding
00120008and turning
003C0012003D the COMAND controller and press
0037 to confirm.
X To fill empty magazine trays: press the
0009 load/eject button.
The magazine menu appears.
X Select Fill Empty Slots .
You see the Please Wait... message.
COMAND switches to the next free
magazine tray. You then see the Pleaseinsert disc
i Do not insert a disc into the magazine tray
until you have seen this prompt.
X Insert a disc into the disc slot with the
printed side facing upwards.
You see the Please Wait... message.
Once the disc is loaded, the DVD changer switches to the next empty tray. You see
the
Please insert disc
X Repeat this step until all trays are loaded.
The DVD changer plays the last disc you
loaded if it has been inserted correctly and
it is a permissible type.
X To cancel loading: press the0009eject/
load button again or press the 000Aback
button.
i If you cancel loading with the 000Aback
button, the system loads and plays the last
CD you inserted.
Ejecting discs from the DVD changer If you remove one disc while playing another
disc, the DVD changer interrupts playback.
Playback continues once the disc has been
ejected.
X
To eject aCD/DVD: press the 0009load/
eject button.
The magazine menu appears .The magazine
tray with the current disc is highlighted. 0001
Ejectp ossible
0002 Type of data medium
0014 Disc name (only if stored on the disc)
0013 Current disc CD/audio DVD and MP3 mode
195Audio Z
Page 199 of 274
further information at any authorized
Mercedes-Benz Center.
Insert an SD memory card X
Insert the memory card into the slot on the
control panel until it engages in place. The
side with the contacts must face
downwards and point towards the slot.
If no MP3 tracks can be found, you will see
a message to this effect.
The first 100 MP3 tracks are loaded. The
first MP3 track is then played. Further
tracks are loaded in the background; this is
indicated by an hourglass symbol.
Ejecting an SD memory card X
Press the memory card.
The memory card is ejected.
X Remove the memory card from slot. Connecting
aUSB device
The USB port is located in the stowage
compartment in the center console.
Electrical consumption at this connection
must not exceed a continuous current of
500 mA. If the electrical consumption is
higher, use a separate source to provide
power for the USB device (e.g.
12 Vp ower supply).
X Connect the USB device (e.g. USB stick)to
the USB port.
If no MP 3tracks can be found, you will see
a message to this effect.
The first 100 MP3 tracks are loaded. The
first MP3 track is then played. Further
tracks are loaded in the background; this is
indicated by an hourglass symbol.
i Due to the wide range of USB devices
available on the market, playback cannot
be guaranteed for all brands of USB device.
Information about suitable USB devices
can be obtained from an authorized
Mercedes-Benz Center. MP3 players must support Media Transfer
Protocol (MTP). The MTP mode must be
active. Switching to audio CD/DVD or MP3
mode
Inserting or connecting amedium X
Insert CDs/DVD s(Ypage 194)
or
X Insert an SD memory card (Y page 197)
or
X Connect a USB device (Y page 197).
COMAND loads the medium inserted and
starts to play it.
Switching modes using the function
button X
Press the 0007function button one or more
times.
By pressing the function button repeatedly,
you can change the operating mode in the
following order:
R CD/audio DVD/video DVD/MP3 CD/MP3
DVD in the DVD changer or single DVD
drive (disc mode)
R Memory card mode
R MUSIC REGISTER
R USB storage device
R Media Interface or audio AUX mode
R Bluetooth ®
audio mode
X Select an audio medium from the media list
(Y page 199).
Switching modes via the audio menu X
Select Audio in the main function bar by
sliding 00360012and turning 003C0012003Dthe COMAND
controller and press 0037to confirm.
The last active audio source is now
activated.
You can activate a differen taudio source
using the audio menu. CD/audio DVD and MP3 mode
197Audio Z
Page 200 of 274
X
Select Audio by sliding
00360012and turning
003C0012003D the COMAND controller and press
0037 to confirm.
The audio menu appears.
X Select Disc ,
Memory Card ,
Music Register ,
USB Storage or
Media Interface and press
0037to confirm.
This switches to the desired audio source.
X Select an audio mediu mfrom the media list
(Y page 199).
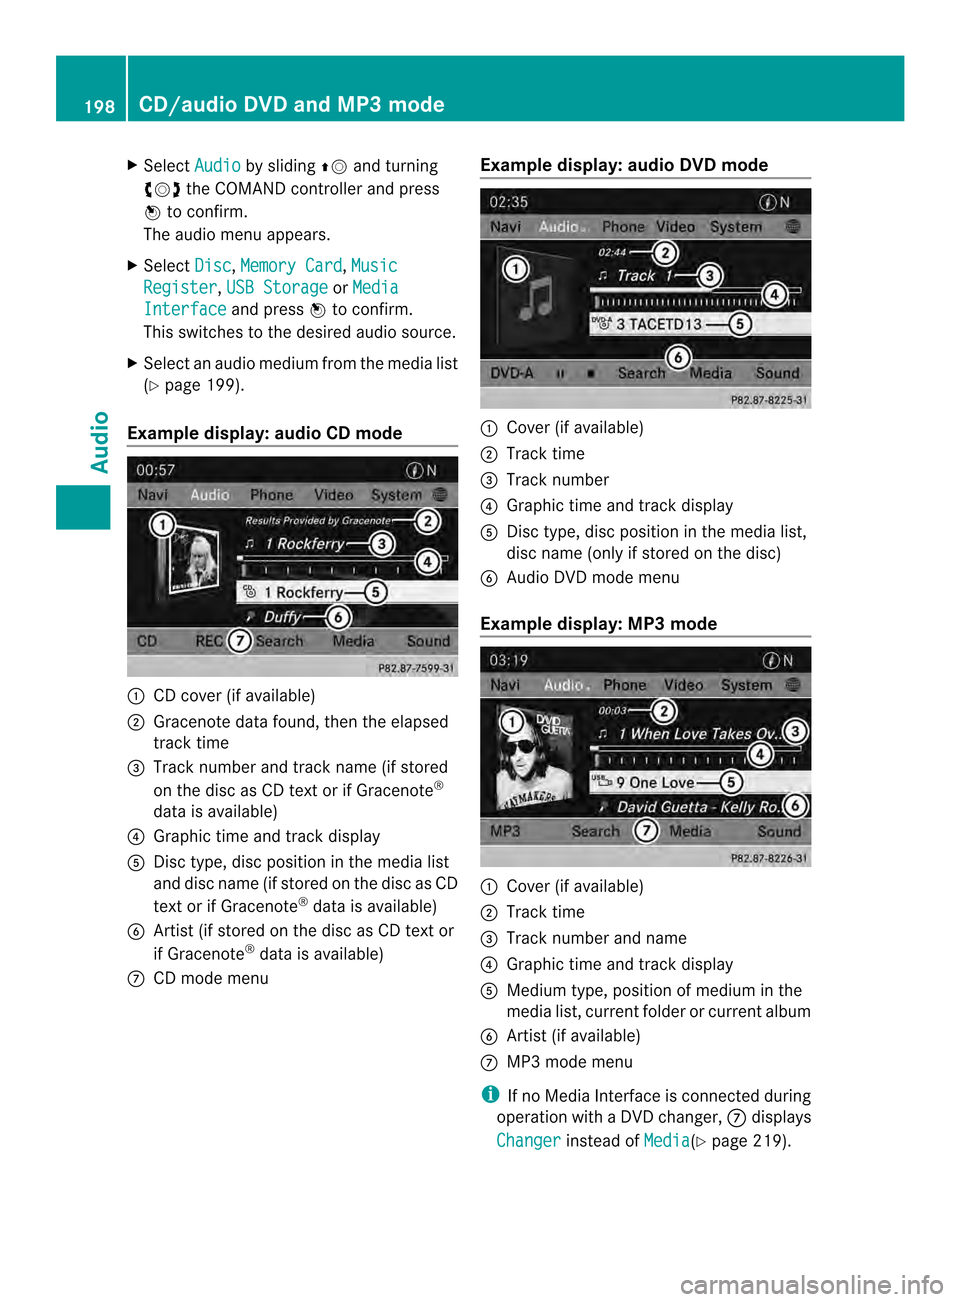
Example display: audio CD mode 0001
CD cover (if available)
0002 Gracenote data found, then the elapsed
track time
0014 Track number and track name (if stored
on the disc as CD text or if Gracenote ®
data is available)
0013 Graphic time and track display
0011 Disc type, disc position in the media list
and disc name (if stored on the disc as CD
text or if Gracenote ®
data is available)
0012 Artist (if stored on the disc as CD text or
if Gracenote ®
data is available)
0005 CD mode menu Example display: audio DVD mode 0001
Cove r(if available)
0002 Track time
0014 Track number
0013 Graphic time and track display
0011 Disc type, disc position in the media list,
disc name (only if stored on the disc)
0012 Audio DVD mode menu
Example display: MP3 mode 0001
Cover (if available)
0002 Track time
0014 Track number and name
0013 Graphic time and track display
0011 Medium type, position of medium in the
media list, current folder or current album
0012 Artis t(if available)
0005 MP3 mode menu
i If no Media Interface is connected during
operation with a DV Dchanger, 0005displays
Changer instead of
Media (Y
page 219). 198
CD/audio DVD and MP3 modeAudio