2014 MERCEDES-BENZ C-CLASS ESTATE warning lights
[x] Cancel search: warning lightsPage 171 of 489

Problems with the rear window heating
Problem
Possible causes/consequences and
M
MSolutions The rear window heat-
ing has switched off
prematurely or cannot
be activated. The battery has not been sufficiently charged.
X Switch off any consumers that are not required, e.g. reading
lamps, interior lighting or the seat heating.
When the battery is sufficiently charged, the rear window heat- ing can be activated again. Activating/deactivating air-recircula-
tion mode
General notes You can also temporarily deactivate the flow
of fresh air manually if unpleasant odours are
entering the vehicle from outside. The air
already inside the vehicle will then be recir-
culated.
If you activate air-recirculation mode, the win-
dows can mist up more quickly, in particular
at low temperatures. Only use air-recircula-
tion mode briefly to prevent the windows
misting up.
Activating/deactivating X
Turn the key to position 2in the ignition
lock (Y page 185).
X To activate: press thegrocker switch
up or down.
The indicator lamp above the grocker
switch lights up.
Air-recirculation mode is activated automati-
cally: R at high outside temperatures
R at high levels of pollution (THERMOTRONIC
automatic climate control only)
R in a tunnel (vehicles with a navigation sys-
tem only)
The indicator lamp above the grocker
switch is not lit when automatic air-recircula- tion mode is activated. Outside air is added
after approximately 30 minutes. X
To deactivate: press thegrocker
switch up or down.
The indicator lamp above the grocker
switch goes out.
Air-recirculation mode is deactivated auto-
matically:
R after approximately five minutes at outside
temperatures below approximately 5 †
R after approximately five minutes if cooling
with air dehumidification is deactivated
R after approximately 30 minutes at outside
temperatures above approximately 5 † if
the cooling with air dehumidification func-
tion is activated Convenience opening/closing using
the air-recirculation button
G
WARNING
When the convenience closing feature is oper- ating, parts of the body could become trapped
in the closing area of the side window and the
sliding sunroof. There is a risk of injury.
Observe the complete closing procedure
when the convenience closing feature is oper-
ating. When closing make sure that no parts of the body are in the closing area. G
WARNING
During convenience opening parts of the body could be drawn in or become trapped
between the side window and window frame.
There is a risk of injury. 168
Operating the climate control systemClimate control
Page 173 of 489
Activating/deactivating
X
Turn the key to position 0in the ignition
lock or remove it (Y page 185).
X To activate: press the!rocker switch
up or down.
The indicator lamp above the !rocker
switch lights up.
The blower will run at a low speed regardless of the airflow setting.
If you activate the residual heat function at
high temperatures, only the ventilation will be
activated. The blower runs at medium speed.
X To deactivate: press the!rocker
switch up or down.
The indicator lamp above the !rocker
switch goes out.
Residual heat is deactivated automatically:
R after approximately 30 minutes
R when the ignition is switched on
R if the battery voltage drops
R when the auxiliary heating is switched on Perfume atomiser
Operating the perfume atomiser G
WARNING
If children open the perfume vial, they could
drink the perfume or it could come into con-
tact with their eyes. There is a risk of injury. Do not leave children unsupervised in the vehicle.
If the perfume liquid has been drunk, consult
a doctor. If perfume comes into contact with
your eyes or skin, rinse the eyes with clean
water. If you continue to experience difficul-
ties, consult a doctor. H
Environmental note Full perfume vials must not
be disposed of with house-
hold rubbish. They must be
collected separately and dis-
posed of in an environmen- tally responsible recycling
system.
Dispose of full perfume vials
in an environmentally
responsible manner and
take them to a special waste
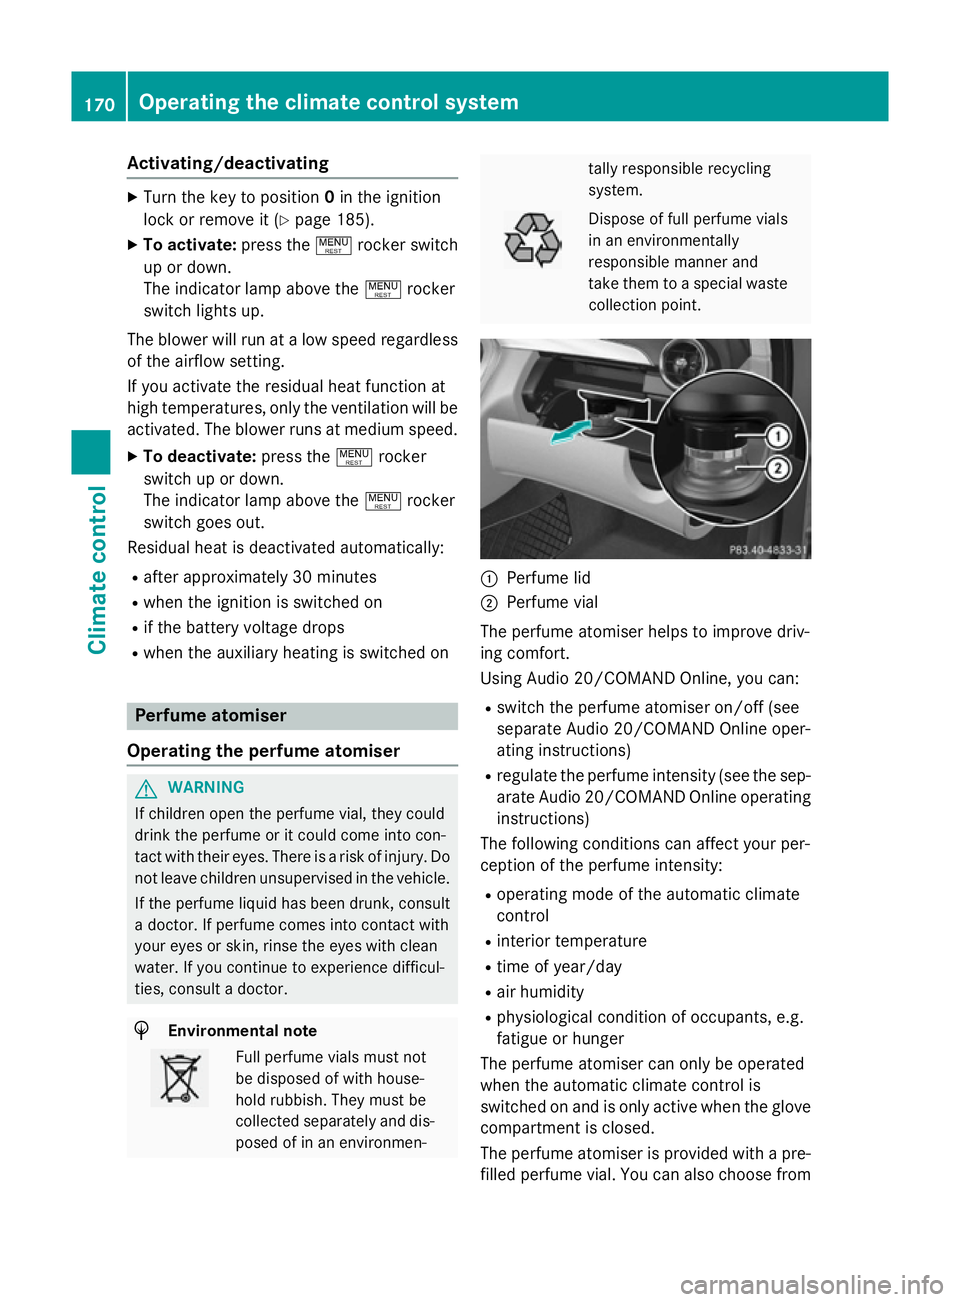
collection point. :
Perfume lid
; Perfume vial
The perfume atomiser helps to improve driv-
ing comfort.
Using Audio 20/COMAND Online, you can:
R switch the perfume atomiser on/off (see
separate Audio 20/COMAND Online oper-
ating instructions)
R regulate the perfume intensity (see the sep-
arate Audio 20/COMAND Online operating
instructions)
The following conditions can affect your per-
ception of the perfume intensity:
R operating mode of the automatic climate
control
R interior temperature
R time of year/day
R air humidity
R physiological condition of occupants, e.g.
fatigue or hunger
The perfume atomiser can only be operated
when the automatic climate control is
switched on and is only active when the glove compartment is closed.
The perfume atomiser is provided with a pre-
filled perfume vial. You can also choose from 170
Operating the climate control systemClimate cont
rol
Page 219 of 489
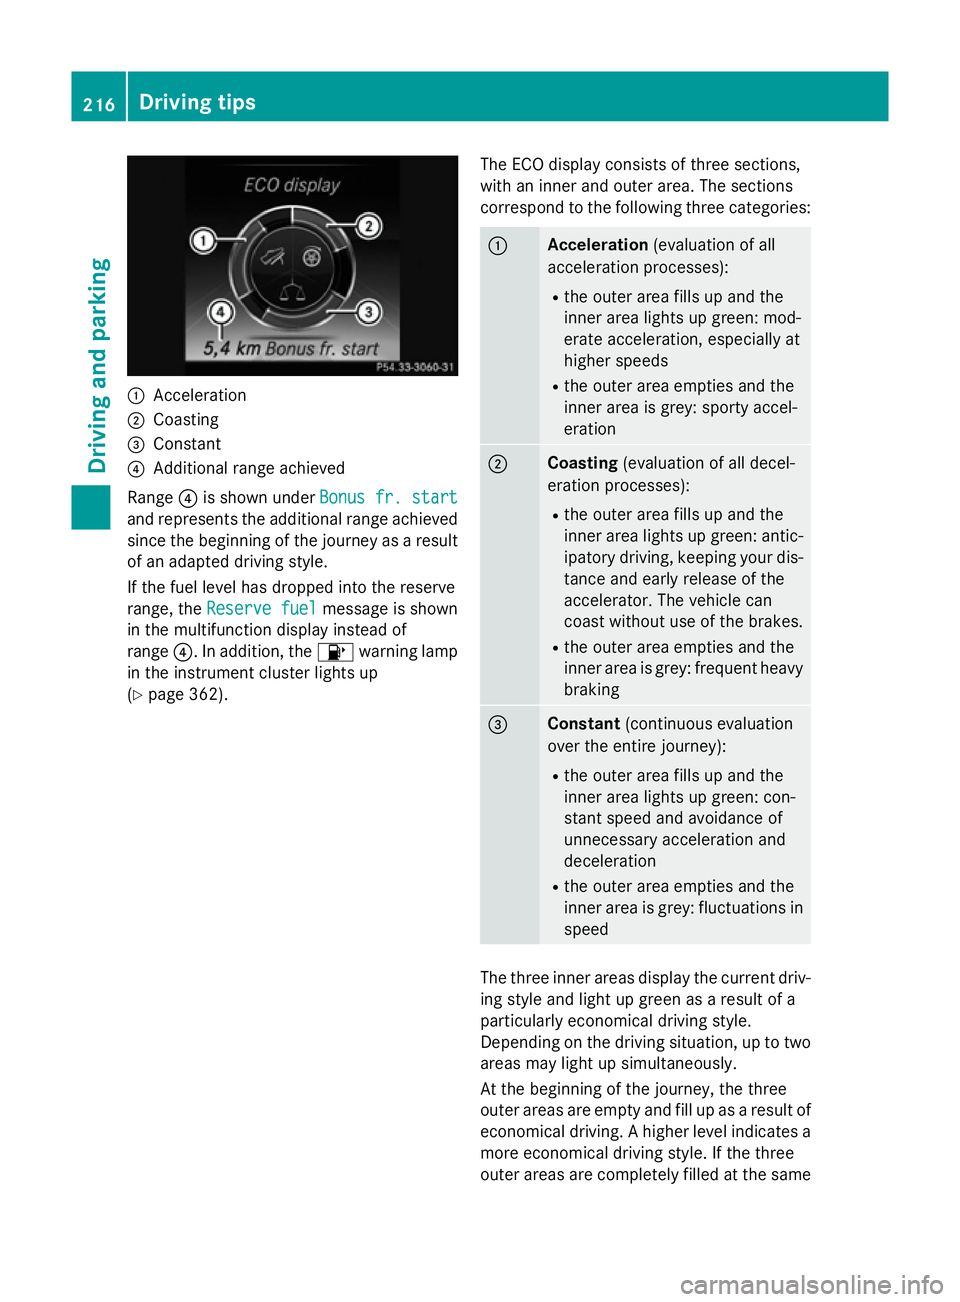
:
Acceleration
; Coasting
= Constant
? Additional range achieved
Range ?is shown under Bonus fr. start
Bonus fr. start
and represents the additional range achieved
since the beginning of the journey as a result of an adapted driving style.
If the fuel level has dropped into the reserve
range, the Reserve fuel Reserve fuel message is shown
in the multifunction display instead of
range ?. In addition, the 8warning lamp
in the instrument cluster lights up
(Y page 362). The ECO display consists of three sections,
with an inner and outer area. The sections
correspond to the following three categories: :
Acceleration
(evaluation of all
acceleration processes):
R the outer area fills up and the
inner area lights up green: mod-
erate acceleration, especially at
higher speeds
R the outer area empties and the
inner area is grey: sporty accel-
eration ;
Coasting
(evaluation of all decel-
eration processes):
R the outer area fills up and the
inner area lights up green: antic-
ipatory driving, keeping your dis- tance and early release of the
accelerator. The vehicle can
coast without use of the brakes.
R the outer area empties and the
inner area is grey: frequent heavy
braking =
Constant
(continuous evaluation
over the entire journey):
R the outer area fills up and the
inner area lights up green: con-
stant speed and avoidance of
unnecessary acceleration and
deceleration
R the outer area empties and the
inner area is grey: fluctuations in
speed The three inner areas display the current driv-
ing style and light up green as a result of a
particularly economical driving style.
Depending on the driving situation, up to two
areas may light up simultaneously.
At the beginning of the journey, the three
outer areas are empty and fill up as a result of economical driving. A higher level indicates a more economical driving style. If the three
outer areas are completely filled at the same 216
Driving tipsDriving an
d parking
Page 220 of 489
time, the driver has adopted the most eco-
nomical driving style for the selected settings
and prevailing conditions. The ECO display
border lights up.
The ECO display does not indicate the actual fuel consumption. The additionally achieved
range displayed under Bonus fr. start Bonus fr. start
does not indicate a fixed consumption reduc-
tion.
In addition to driving style, the actual con-
sumption is affected by other factors, such
as:
R load
R tyre pressure
R cold start
R choice of route
R the use of electrical consumers
These factors are not included in the ECO dis-
play.
An economical driving style involves driving at a moderate engine speed.
To achieve a higher value in the categories
"acceleration" and "smooth driving":
R observe the gearshift recommendation
R drive the vehicle in drive program E(vehi-
cles with the AGILITY SELECT switch)
On long journeys at a constant speed, e.g. on the motorway, only the outer area for "con-
stant" will change.
The ECO display summarises the driving style
from the start of the journey to its completion. Therefore, there are more marked changes in
the outer areas at the start of a journey. Dur- ing a prolonged driving time, these changes
are smaller. For more marked changes, per-
form a manual rest (Y page 301).
Further information on the ECO display
(Y page 300). Braking
Important safety notes G
WARNING
If you shift down on a slippery road surface in an attempt to increase the engine's braking
effect, the drive wheels could lose their grip.
This increases the risk of skidding and having
an accident.
Do not shift down for additional engine brak-
ing on a slippery road surface.
Downhill gradients Change into a lower gear in good time on long
and steep downhill gradients. Take particular note of this when driving a laden vehicle and
when towing a trailer.
This also applies if cruise control, DISTRONIC
PLUS or SPEEDTRONIC are activated.
This will use the braking effect of the engine,
so less braking will be required to maintain
vehicle speed. This relieves the load on the
brake system and prevents the brakes from
overheating and wearing too quickly.
Heavy and light loads G
WARNING
The braking system can overheat if you leave your foot on the brake pedal while driving.
This increases the braking distance and could
even cause the braking system to fail. There is
a risk of an accident.
Never use the brake pedal as a footrest. Do
not simultaneously depress both the brake
pedal and the accelerator pedal while driving.
! Depressing the brake pedal constantly
results in excessive and premature wear to
the brake pads.
If heavy demands are made on the brakes, do not park the vehicle immediately. Drive on for
a short while. This allows the airflow to cool
the brakes more quickly. Driving
tips
217Driving an d parking Z
Page 227 of 489
The LIM indicator lamp on the cruise control
lever indicates which system you have selec- ted:
R LIM indicator lamp off: cruise control or
DISTRONIC PLUS is selected.
R LIM indicator lamp on: variable SPEED-
TRONIC is selected.
You can use the cruise control lever to limit
the speed to any speed above 30 km/hw hile
the engine is running.
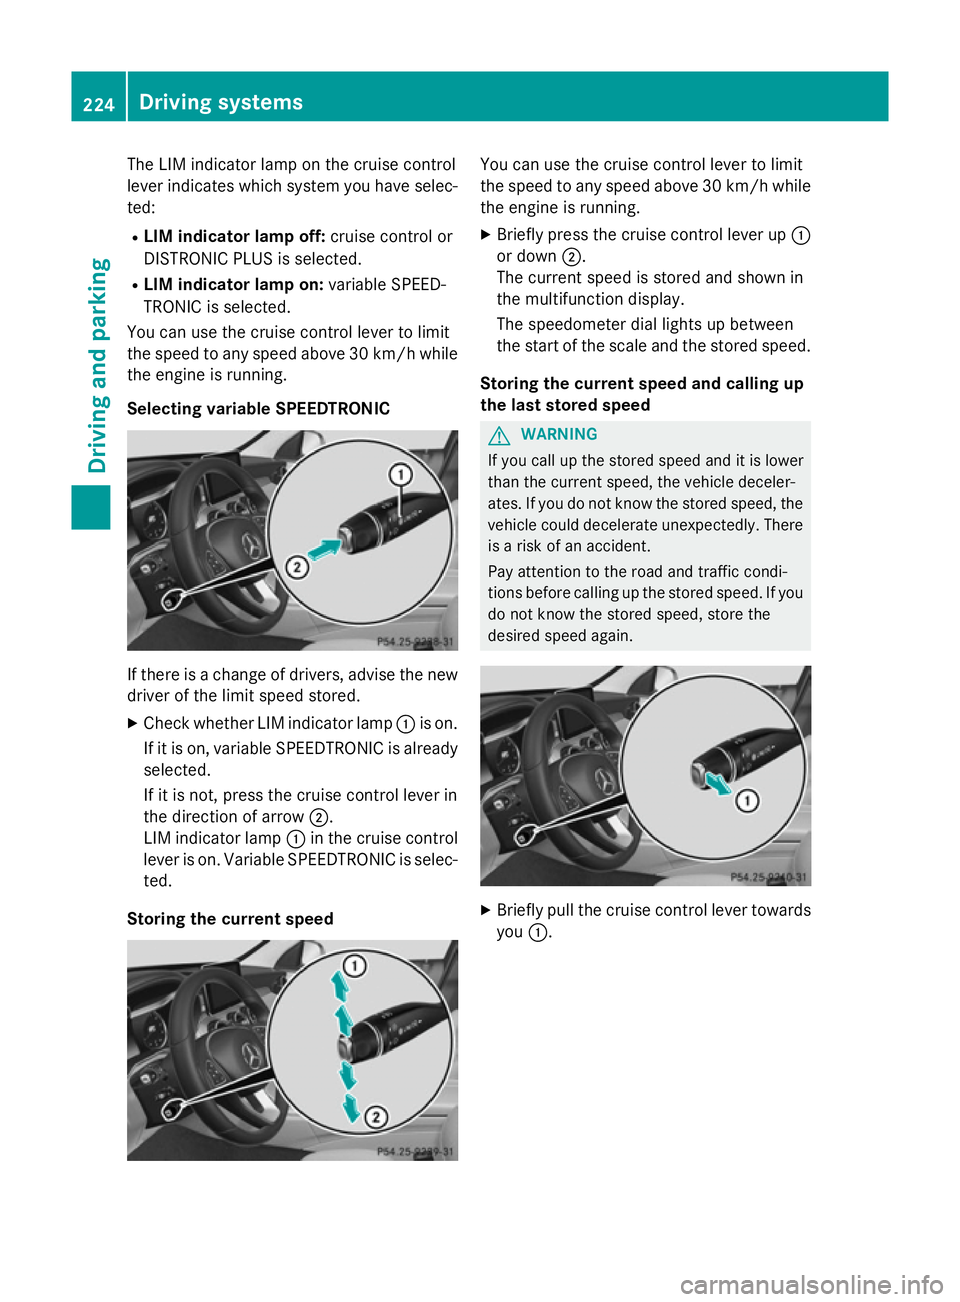
Selecting variable SPEEDTRONIC If there is a change of drivers, advise the new
driver of the limit speed stored.
X Check whether LIM indicator lamp :is on.
If it is on, variable SPEEDTRONIC is already
selected.
If it is not, press the cruise control lever in
the direction of arrow ;.
LIM indicator lamp :in the cruise control
lever is on. Variable SPEEDTRONIC is selec-
ted.
Storing the current speed You can use the cruise control lever to limit
the speed to any speed above 30 km/h while
the engine is running.
X Briefly press the cruise control lever up :
or down ;.
The current speed is stored and shown in
the multifunction display.
The speedometer dial lights up between
the start of the scale and the stored speed.
Storing the current speed and calling up
the last stored speed G
WARNING
If you call up the stored speed and it is lower
than the current speed, the vehicle deceler-
ates. If you do not know the stored speed, the vehicle could decelerate unexpectedly. There
is a risk of an accident.
Pay attention to the road and traffic condi-
tions before calling up the stored speed. If you do not know the stored speed, store the
desired speed again. X
Briefly pull the cruise control lever towards
you :. 224
Driving systemsDriving and parking
Page 236 of 489
There are several ways to deactivate
DISTRONIC PLUS:
X Briefly press the cruise control lever for-
wards :
or
X Brake, unless the vehicle is stationary.
or X Briefly press the cruise control lever in the
direction of arrow =.
Variable SPEEDTRONIC is selected. LIM
indicator lamp ;in the cruise control lever
lights up.
When you deactivate DISTRONIC PLUS, you
will see the DISTRONIC
DISTRONIC PLUS PLUSoff
offmessage in
the multifunction display for approximately
five seconds.
i The last speed stored remains stored until
you switch off the engine.
i DISTRONIC PLUS is not deactivated if you
depress the accelerator pedal.
DISTRONIC PLUS is automatically deactiva-
ted if: R you apply the electric parking brake or if the
vehicle is automatically secured with the
electric parking brake
R ESP ®
intervenes or you deactivate ESP ®
R the transmission is in the P,Ror Nposition
R you pull the cruise control lever towards
you in order to pull away and the front-
passenger door or one of the rear doors is
open
R the vehicle has skidded
R you activate Active Parking Assist
If DISTRONIC PLUS is deactivated, you will
hear a warning tone. You will see the
DISTRONIC PLUS off
DISTRONIC PLUS off message in the multi-
function display for approximately five sec-
onds. Tips for driving with DISTRONIC PLUS General notes
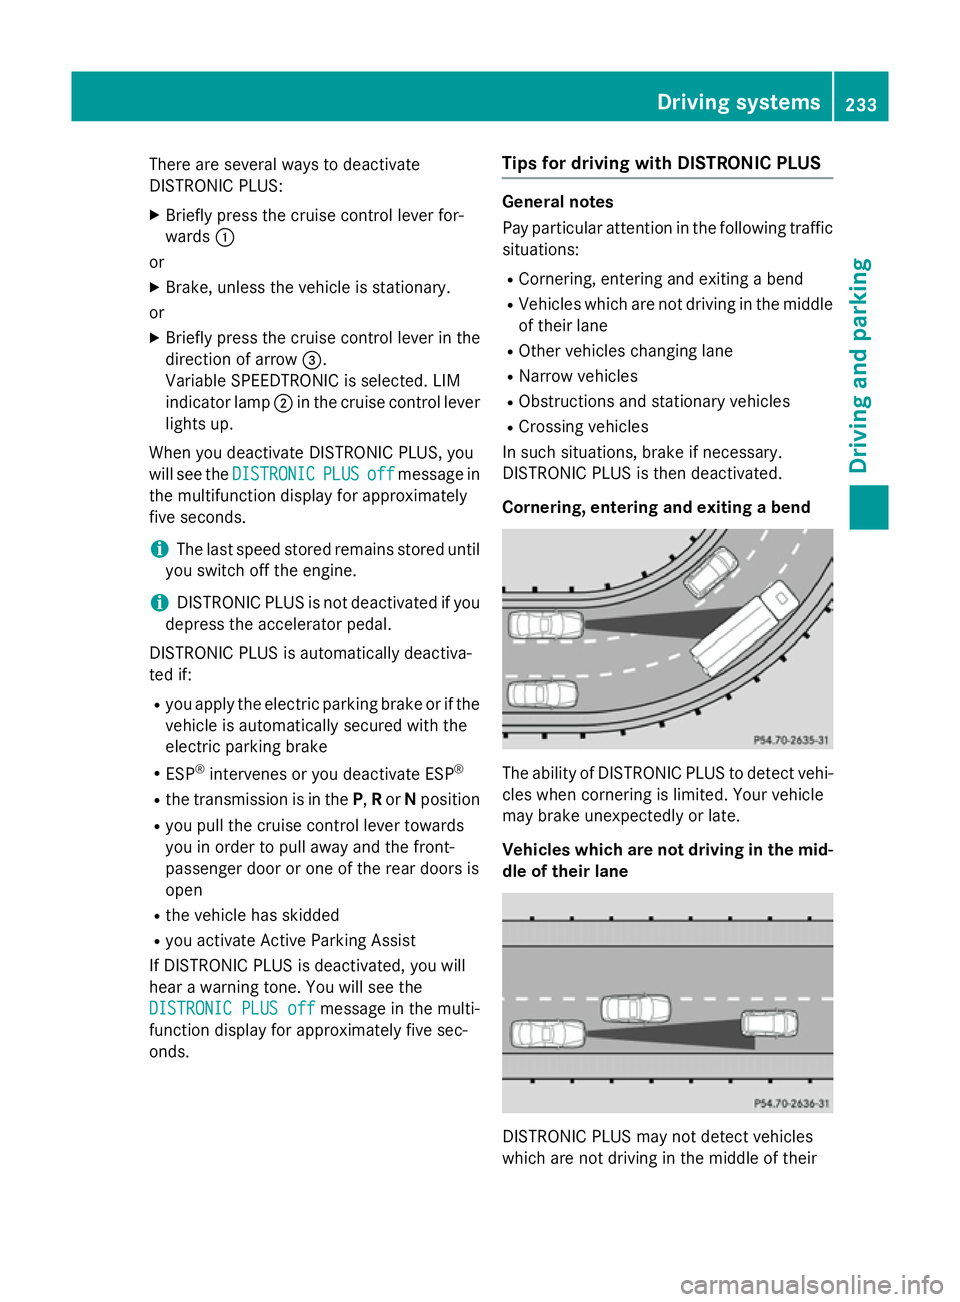
Pay particular attention in the following traffic
situations:
R Cornering, entering and exiting a bend
R Vehicles which are not driving in the middle
of their lane
R Other vehicles changing lane
R Narrow vehicles
R Obstructions and stationary vehicles
R Crossing vehicles
In such situations, brake if necessary.
DISTRONIC PLUS is then deactivated.
Cornering, entering and exiting a bend The ability of DISTRONIC PLUS to detect vehi-
cles when cornering is limited. Your vehicle
may brake unexpectedly or late.
Vehicles which are not driving in the mid- dle of their lane DISTRONIC PLUS may not detect vehicles
which are not driving in the middle of their Driving systems
233Driving and parking Z
Page 239 of 489
Also observe the important safety notes for
DISTRONIC PLUS (Y page 226).
The steering interventions are carried out
with a limited steering moment. The system
requires the driver to keep his hands on the
steering wheel and to steer himself.
If you do not steer yourself or if you take your hands off the steering wheel for a prolonged
period of time, the system will first alert you
with a visual warning. A steering wheel sym-
bol appears in the multifunction display. If youhave still not started to steer and have not
taken hold of the steering wheel after five
seconds at the latest, a warning tone also
sounds to remind you to take control of the
vehicle. Steering Assist and Stop&Go Pilot
switch to passive mode. DISTRONIC PLUS
remains active.
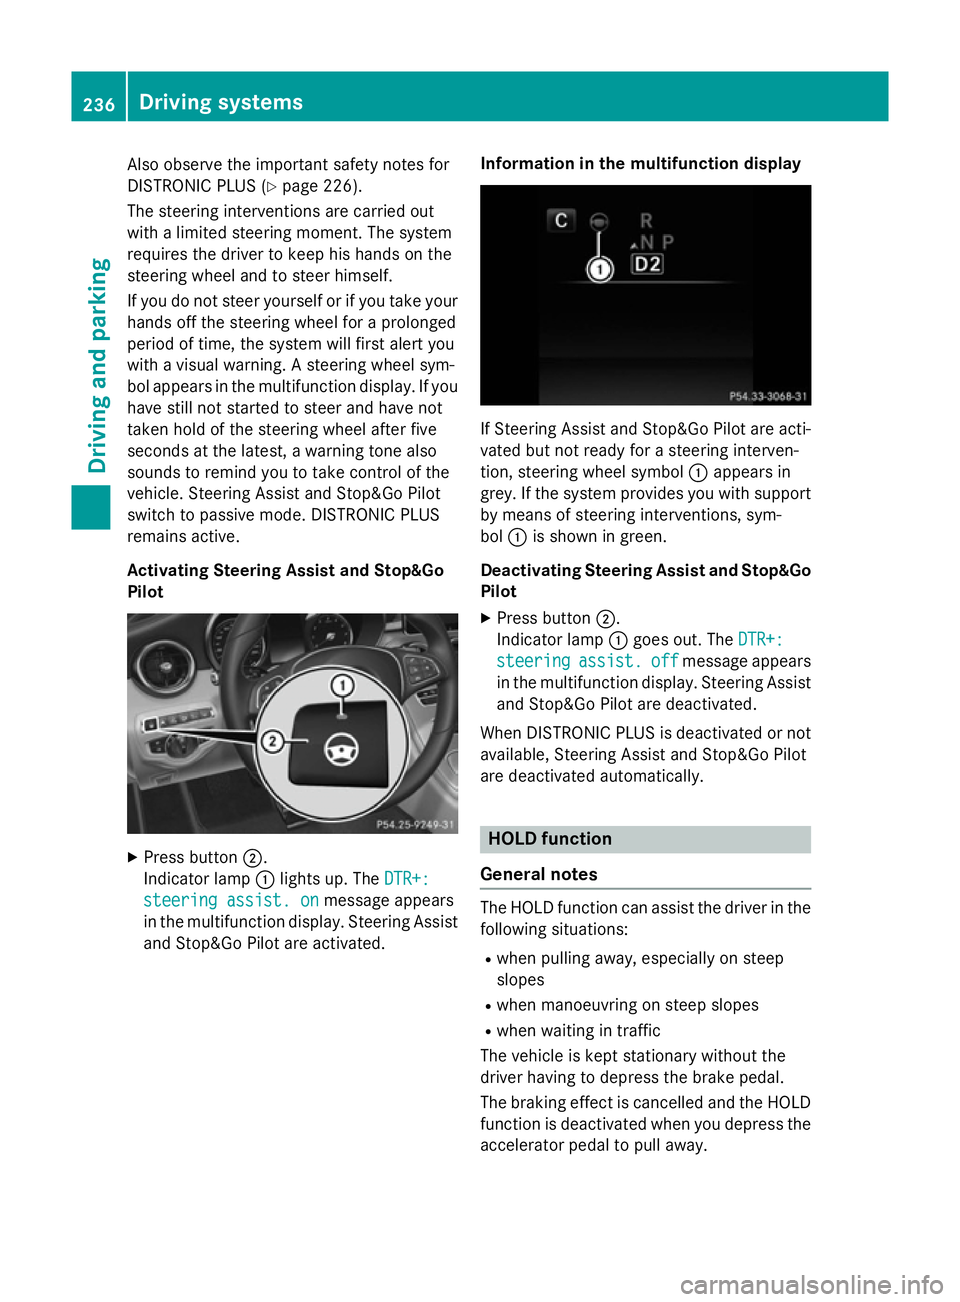
Activating Steering Assist and Stop&Go
Pilot X
Press button ;.
Indicator lamp :lights up. The DTR+: DTR+:
steering assist. on
steering assist. on message appears
in the multifunction display. Steering Assist and Stop&Go Pilot are activated. Information in the multifunction display If Steering Assist and Stop&Go Pilot are acti-
vated but not ready for a steering interven-
tion, steering wheel symbol :appears in
grey. If the system provides you with support
by means of steering interventions, sym-
bol :is shown in green.
Deactivating Steering Assist and Stop&Go Pilot
X Press button ;.
Indicator lamp :goes out. The DTR+: DTR+:
steering
steering assist.
assist.off
offmessage appears
in the multifunction display. Steering Assist and Stop&Go Pilot are deactivated.
When DISTRONIC PLUS is deactivated or not available, Steering Assist and Stop&Go Pilot
are deactivated automatically. HOLD function
General notes The HOLD function can assist the driver in the
following situations:
R when pulling away, especially on steep
slopes
R when manoeuvring on steep slopes
R when waiting in traffic
The vehicle is kept stationary without the
driver having to depress the brake pedal.
The braking effect is cancelled and the HOLD function is deactivated when you depress theaccelerator pedal to pull away. 236
Driving systemsDriving an
d parking
Page 244 of 489
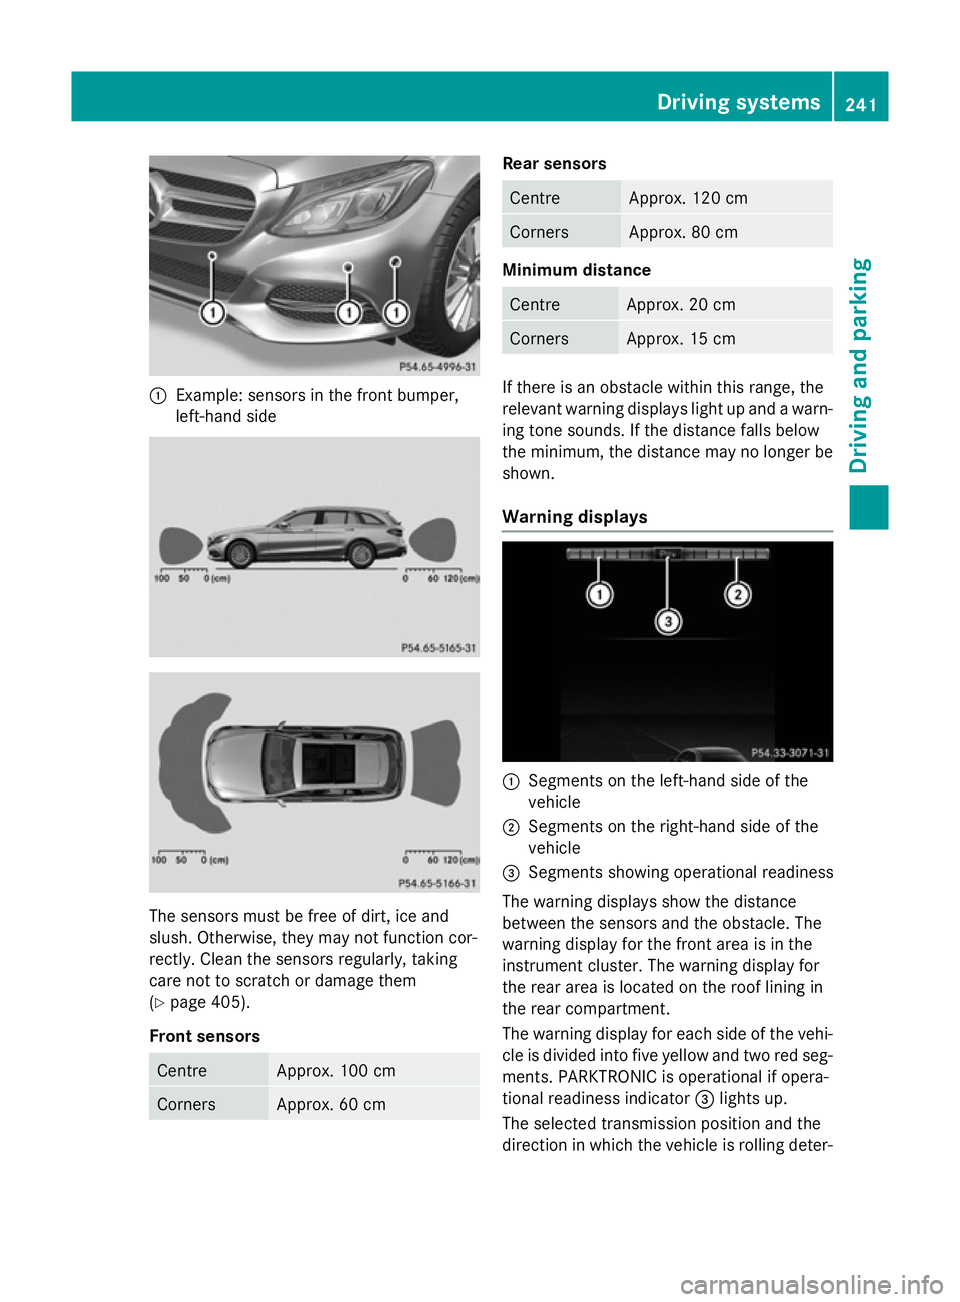
:
Example: sensors in the front bumper,
left-hand side The sensors must be free of dirt, ice and
slush. Otherwise, they may not function cor-
rectly. Clean the sensors regularly, taking
care not to scratch or damage them
(Y page 405).
Front sensors Centre Approx. 100 cm
Corners Approx. 60 cm Rear sensors
Centre Approx. 120 cm
Corners Approx. 80 cm
Minimum distance
Centre Approx. 20 cm
Corners Approx. 15 cm
If there is an obstacle within this range, the
relevant warning displays light up and a warn- ing tone sounds. If the distance falls below
the minimum, the distance may no longer be
shown.
Warning displays :
Segments on the left-hand side of the
vehicle
; Segments on the right-hand side of the
vehicle
= Segments showing operational readiness
The warning displays show the distance
between the sensors and the obstacle. The
warning display for the front area is in the
instrument cluster. The warning display for
the rear area is located on the roof lining in
the rear compartment.
The warning display for each side of the vehi-
cle is divided into five yellow and two red seg- ments. PARKTRONIC is operational if opera-
tional readiness indicator =lights up.
The selected transmission position and the
direction in which the vehicle is rolling deter- Driving systems
241Driving and parking Z