2014 MERCEDES-BENZ C-CLASS ESTATE change time
[x] Cancel search: change timePage 269 of 489
Activating Lane Keeping Assist
X
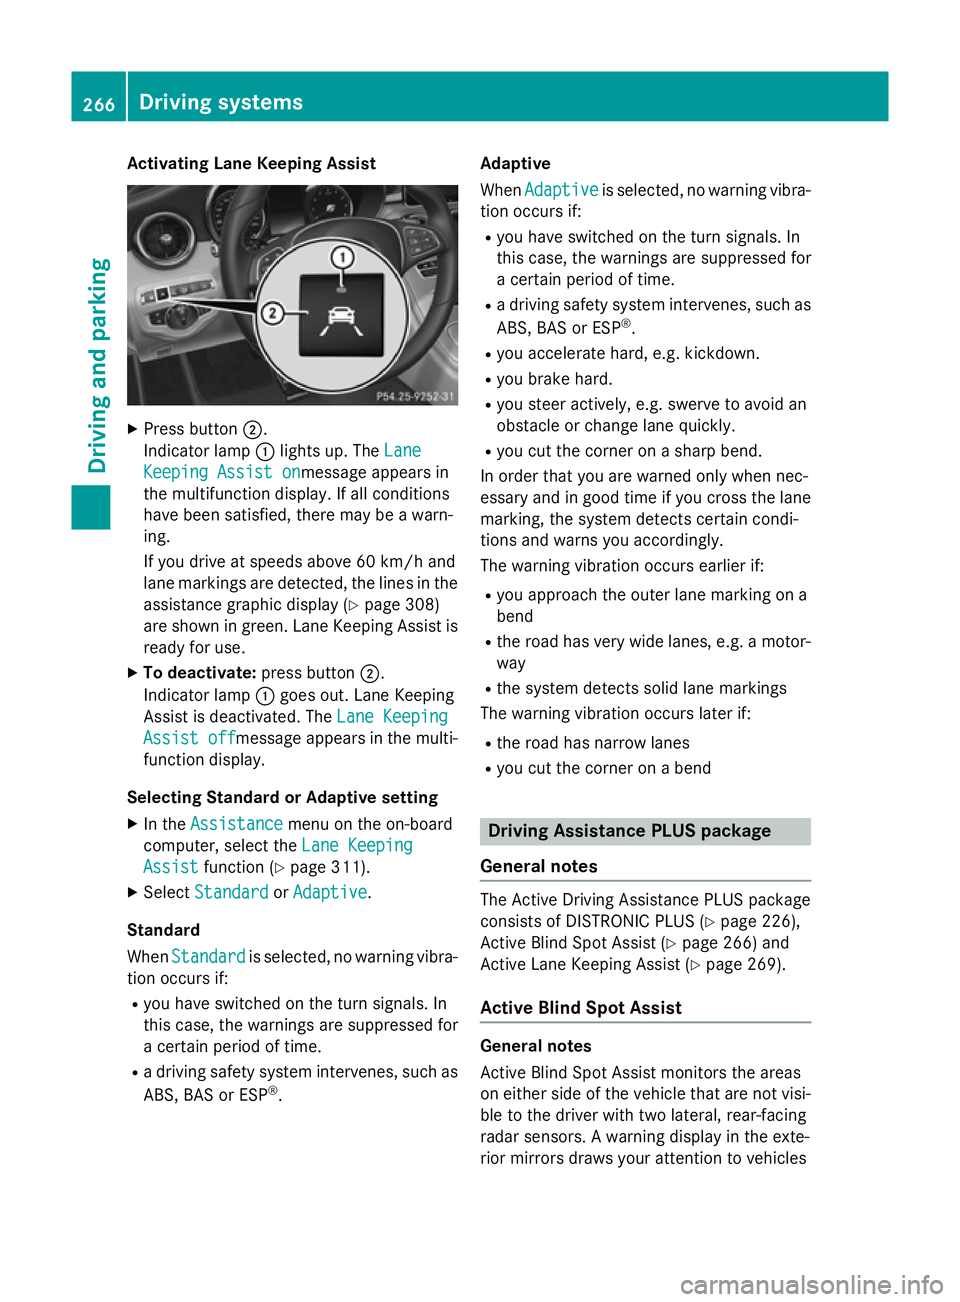
Press button ;.
Indicator lamp :lights up. The Lane
Lane
Keeping Assist on
Keeping Assist onmessage appears in
the multifunction display. If all conditions
have been satisfied, there may be a warn-
ing.
If you drive at speeds above 60 km/h and
lane markings are detected, the lines in the assistance graphic display (Y page 308)
are shown in green. Lane Keeping Assist is
ready for use.
X To deactivate: press button;.
Indicator lamp :goes out. Lane Keeping
Assist is deactivated. The Lane Keeping
Lane Keeping
Assist off Assist off message appears in the multi-
function display.
Selecting Standard or Adaptive setting
X In the Assistance
Assistance menu on the on-board
computer, select the Lane Keeping
Lane Keeping
Assist
Assist function (Y page 311).
X Select Standard
Standard orAdaptive
Adaptive.
Standard
When Standard Standard is selected, no warning vibra-
tion occurs if:
R you have switched on the turn signals. In
this case, the warnings are suppressed for
a certain period of time.
R a driving safety system intervenes, such as
ABS, BAS or ESP ®
. Adaptive
When Adaptive
Adaptive is selected, no warning vibra-
tion occurs if:
R you have switched on the turn signals. In
this case, the warnings are suppressed for
a certain period of time.
R a driving safety system intervenes, such as
ABS, BAS or ESP ®
.
R you accelerate hard, e.g. kickdown.
R you brake hard.
R you steer actively, e.g. swerve to avoid an
obstacle or change lane quickly.
R you cut the corner on a sharp bend.
In order that you are warned only when nec-
essary and in good time if you cross the lane marking, the system detects certain condi-
tions and warns you accordingly.
The warning vibration occurs earlier if:
R you approach the outer lane marking on a
bend
R the road has very wide lanes, e.g. a motor-
way
R the system detects solid lane markings
The warning vibration occurs later if:
R the road has narrow lanes
R you cut the corner on a bend Driving Assistance PLUS package
General notes The Active Driving Assistance PLUS package
consists of DISTRONIC PLUS (Y
page 226),
Active Blind Spot Assist (Y page 266) and
Active Lane Keeping Assist (Y page 269).
Active Blind Spot Assist General notes
Active Blind Spot Assist monitors the areas
on either side of the vehicle that are not visi-
ble to the driver with two lateral, rear-facing
radar sensors. A warning display in the exte-
rior mirrors draws your attention to vehicles 266
Driving systemsDriving and pa
rking
Page 271 of 489
Due to the nature of the system:
R warnings may be issued in error when driv-
ing close to crash barriers or similar solid
lane borders
R warnings may be interrupted when driving
alongside particularly long vehicles, for
example lorries, for a prolonged time
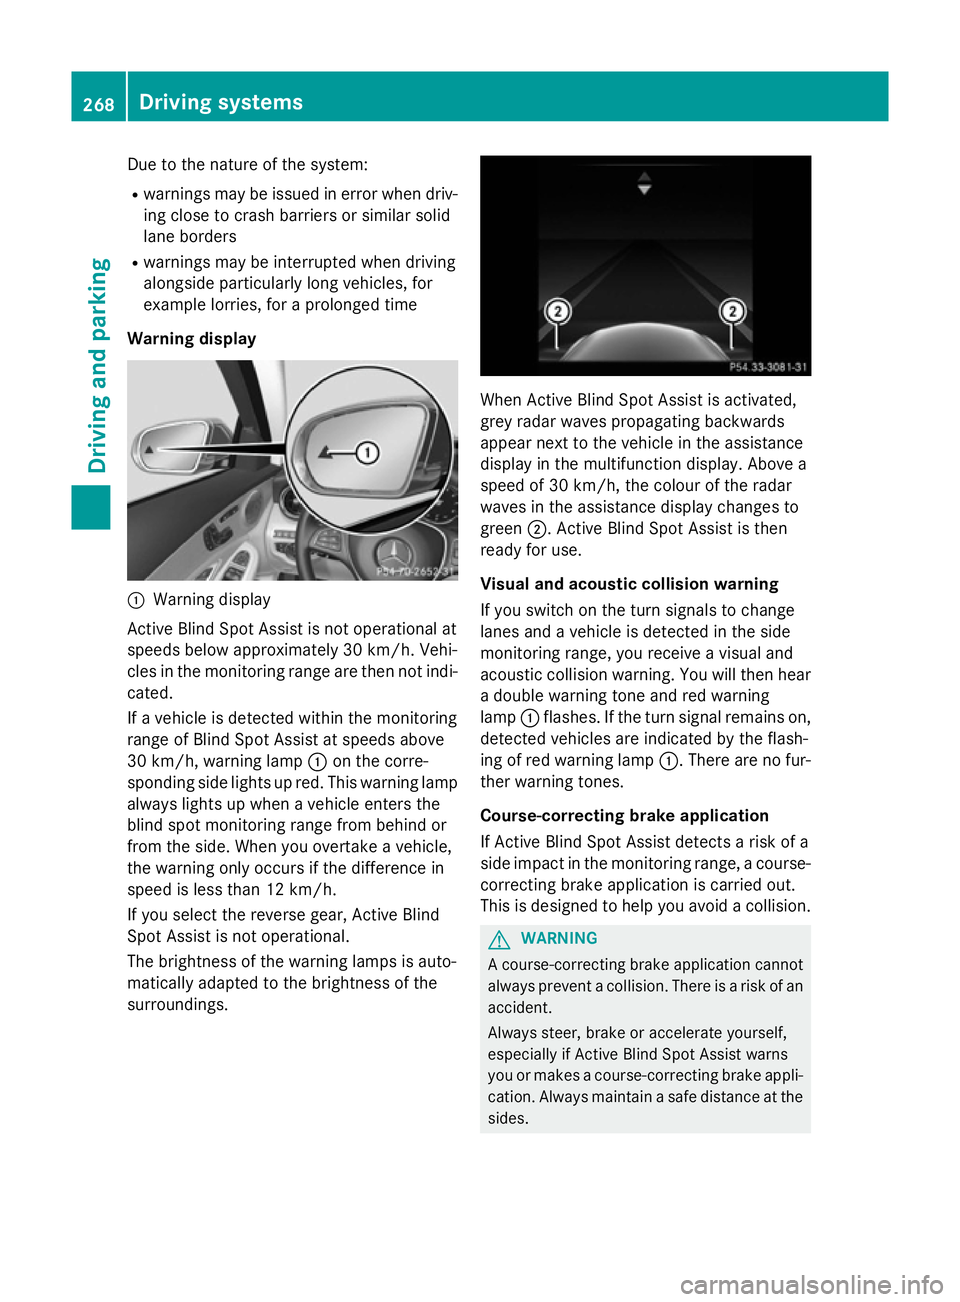
Warning display :
Warning display
Active Blind Spot Assist is not operational at
speeds below approximately 30 km/h. Vehi-
cles in the monitoring range are then not indi-
cated.
If a vehicle is detected within the monitoring
range of Blind Spot Assist at speeds above
30 km/h, warning lamp :on the corre-
sponding side lights up red. This warning lamp
always lights up when a vehicle enters the
blind spot monitoring range from behind or
from the side. When you overtake a vehicle,
the warning only occurs if the difference in
speed is less than 12 km/h.
If you select the reverse gear, Active Blind
Spot Assist is not operational.
The brightness of the warning lamps is auto-
matically adapted to the brightness of the
surroundings. When Active Blind Spot Assist is activated,
grey radar waves propagating backwards
appear next to the vehicle in the assistance
display in the multifunction display. Above a
speed of 30 km/h, the colour of the radar
waves in the assistance display changes to
green ;. Active Blind Spot Assist is then
ready for use.
Visual and acoustic collision warning
If you switch on the turn signals to change
lanes and a vehicle is detected in the side
monitoring range, you receive a visual and
acoustic collision warning. You will then hear a double warning tone and red warning
lamp :flashes. If the turn signal remains on,
detected vehicles are indicated by the flash-
ing of red warning lamp :. There are no fur-
ther warning tones.
Course-correcting brake application
If Active Blind Spot Assist detects a risk of a
side impact in the monitoring range, a course- correcting brake application is carried out.
This is designed to help you avoid a collision. G
WARNING
A course-correcting brake application cannot always prevent a collision. There is a risk of an
accident.
Always steer, brake or accelerate yourself,
especially if Active Blind Spot Assist warns
you or makes a course-correcting brake appli-
cation. Always maintain a safe distance at the sides. 268
Driving systemsDriving an
d parking
Page 273 of 489
warning, a lane-correcting application of the
brakes can bring the vehicle back into the
original lane.
If you select km
km in the Display unit Display unit
Speed-/odometer
Speed-/odometer function on the on-board
computer (Y page 314), Active Lane Keeping
Assist is activated starting at a speed of
60 km/h. If the miles
miles display unit is selected,
the assistance range begins at 40 mph.
Important safety notes
If you fail to adapt your driving style, Active
Lane Keeping Assist can neither reduce the
risk of an accident nor override the laws of
physics. Active Lane Keeping Assist cannot
take account of road and weather conditions. It may not detect traffic situations. Active
Lane Keeping Assist is only an aid. You are
responsible for the distance to the vehicle in
front, for vehicle speed, for braking in good
time, and for staying in lane.
Active Lane Keeping Assist cannot continu-
ously keep your vehicle in its lane. G
WARNING
Active Lane Keeping Assist cannot always
clearly detect lane markings.
In such cases, Active Lane Keeping Assist
can:
R give an unnecessary warning and then
make a course-correcting brake application
to the vehicle
R neither give a warning nor intervene
There is a risk of an accident.
Always pay particular attention to the traffic
situation and keep within the lane, especially
if Active Lane Keeping Assist alerts you. Ter-
minate the intervention in a non-critical driv-
ing situation. The system may be impaired or may not func-
tion if:
R there is poor visibility, e.g. due to insuffi-
cient illumination of the road, or due to
snow, rain, fog or spray
R there is glare, e.g. from oncoming traffic,
the sun or reflection from other vehicles
(e.g. if the road surface is wet)
R the windscreen is dirty, misted up, dam-
aged or covered, for instance by a sticker,
in the vicinity of the camera
R the radar sensors in the front or rear bump-
ers or the radiator trim are dirty, e.g.
obscured by snow
R no or several, unclear lane markings are
present for one lane, e.g. in a construction
area
R the lane markings are worn away, dark or
covered up, e.g. by dirt or snow
R the distance to the vehicle in front is too
small and the lane markings thus cannot be
detected
R the lane markings change quickly, e.g.
lanes branch off, cross one another or
merge
R the road is narrow and winding
R there are highly variable shade conditions
on the road
If no vehicle is detected in the adjacent lane
and broken lane markings are detected, no
lane-correcting brake application is made.
Warning vibration through the steering
wheel
A warning may be given if a front wheel
passes over a lane marking. It will warn you by means of intermittent vibration in the steer-
ing wheel for up to 1.5 seconds.
Lane-correcting brake application
If you leave your lane under certain circum-
stances, the vehicle will brake briefly on one
side. This is intended to help you return the
vehicle to the original lane. 270
Driving systemsDriving and parking
Page 275 of 489
Activating Active Lane Keeping Assist
X
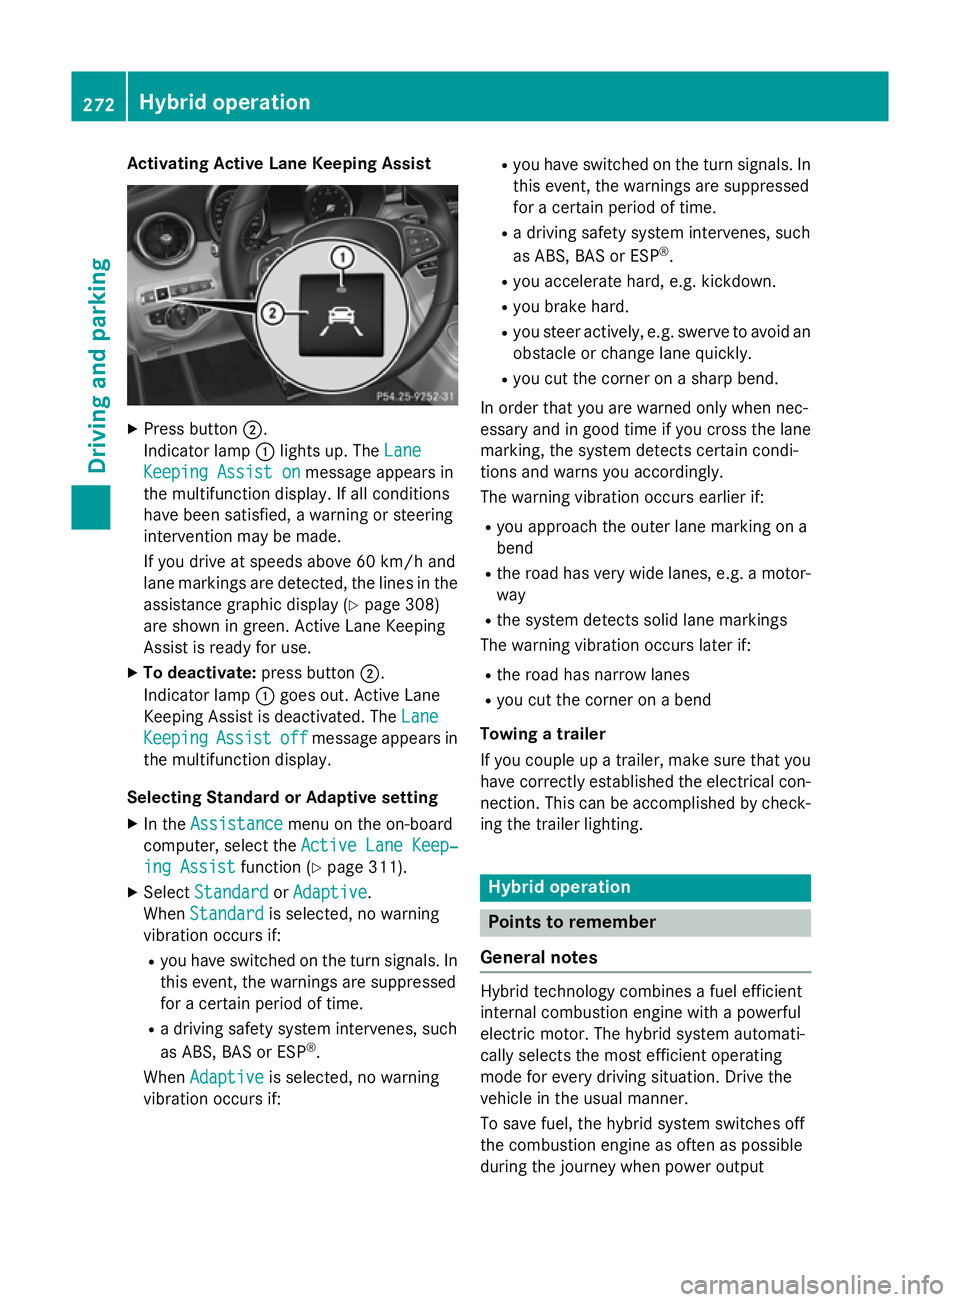
Press button ;.
Indicator lamp :lights up. The Lane
Lane
Keeping Assist on
Keeping Assist on message appears in
the multifunction display. If all conditions
have been satisfied, a warning or steering
intervention may be made.
If you drive at speeds above 60 km/h and
lane markings are detected, the lines in the assistance graphic display (Y page 308)
are shown in green. Active Lane Keeping
Assist is ready for use.
X To deactivate: press button;.
Indicator lamp :goes out. Active Lane
Keeping Assist is deactivated. The Lane Lane
Keeping
Keeping Assist
Assistoff
offmessage appears in
the multifunction display.
Selecting Standard or Adaptive setting X In the Assistance
Assistance menu on the on-board
computer, select the Active Lane Keep‐
Active Lane Keep‐
ing Assist
ing Assist function (Ypage 311).
X Select Standard
Standard orAdaptive
Adaptive.
When Standard
Standard is selected, no warning
vibration occurs if:
R you have switched on the turn signals. In
this event, the warnings are suppressed
for a certain period of time.
R a driving safety system intervenes, such
as ABS, BAS or ESP ®
.
When Adaptive
Adaptive is selected, no warning
vibration occurs if: R
you have switched on the turn signals. In
this event, the warnings are suppressed
for a certain period of time.
R a driving safety system intervenes, such
as ABS, BAS or ESP ®
.
R you accelerate hard, e.g. kickdown.
R you brake hard.
R you steer actively, e.g. swerve to avoid an
obstacle or change lane quickly.
R you cut the corner on a sharp bend.
In order that you are warned only when nec-
essary and in good time if you cross the lane marking, the system detects certain condi-
tions and warns you accordingly.
The warning vibration occurs earlier if:
R you approach the outer lane marking on a
bend
R the road has very wide lanes, e.g. a motor-
way
R the system detects solid lane markings
The warning vibration occurs later if:
R the road has narrow lanes
R you cut the corner on a bend
Towing a trailer
If you couple up a trailer, make sure that you have correctly established the electrical con- nection. This can be accomplished by check-
ing the trailer lighting. Hybrid operation
Points to remember
General notes Hybrid technology combines a fuel efficient
internal combustion engine with a powerful
electric motor. The hybrid system automati-
cally selects the most efficient operating
mode for every driving situation. Drive the
vehicle in the usual manner.
To save fuel, the hybrid system switches off
the combustion engine as often as possible
during the journey when power output 272
Hybrid operationDriving and pa
rking
Page 290 of 489
The vehicle/trailer combination:
R is heavier
R is restricted in its acceleration and gradi-
ent-climbing capability
R has an increased braking distance
R is affected more by strong crosswinds
R demands more sensitive steering
R has a larger turning circle
This can impair the vehicle's handling char-
acteristics. Adapt your driving style accord-
ingly. Maintain a safe distance. Drive care-
fully.
When towing a trailer, always adjust your
speed to the current road and weather con-
ditions. Do not exceed the maximum permis-
sible speed for your vehicle/trailer combina-
tion. Notes on towing a trailer
General notes When towing a trailer, set the tyre pressure on
the rear axle of the towing vehicle for a max-
imum load; see the tyre pressure table in the
fuel filler flap (Y page 436).
On vehicles without level control, the height
of the ball coupling will alter according to the load placed on the vehicle. If necessary, use a
trailer with a height-adjustable drawbar.
You will find fitting dimensions and loads
under "Technical data" (Y page 478).
When towing a trailer, the ECO start/stop
function is deactivated. The èECO sym-
bol appears yellow in the multifunction dis-
play. For further information on the ECO
start/stop function; see (Y page 190).
Driving tips Observe the notes on ESP
®
trailer stabilisa-
tion (Y page 83).
The maximum permissible speed for vehicle/ trailer combinations depends on the type of
trailer. Before beginning the journey, check the trailer's documents to see what the max-
imum permitted speed is. Observe the legally
prescribed maximum speed in the relevant
country.
For certain Mercedes-Benz vehicles, the max-
imum permissible rear axle load is increased
when towing a trailer. See the "Technical
data" section to find out whether this applies
to your vehicle (Y page 480). If you utilise any
of the added maximum rear axle load when
towing a trailer, the vehicle/trailer combina-
tion may not exceed a maximum speed of
100 km/h for reasons concerning the oper-
ating permit. This also applies in countries in
which the permissible maximum speed for
vehicle/trailer combinations is above
100 km/h.
When towing a trailer, your vehicle's handling
characteristics will be different in comparison to when driving without a trailer and it will
consume more fuel.
Change into a lower gear in good time on long
and steep downhill gradients.
This also applies if cruise control, DISTRONIC
PLUS or SPEEDTRONIC are activated.
This will use the braking effect of the engine,
so less braking will be required to maintain
vehicle speed. This relieves the load on the
brake system and prevents the brakes from
overheating and wearing too quickly. If you
need additional braking, depress the brake
pedal repeatedly rather than continuously.
Driving tips If the trailer swings from side to side:
X Do not accelerate.
X Do not countersteer.
X Brake if necessary.
R Maintain a greater distance to the vehicle in
front than when driving without a trailer.
R Avoid braking abruptly. If possible, brake
gently at first to allow the trailer to run on. Then, increase the braking force rapidly.
R The values given for gradient-climbing
capabilities from a standstill refer to sea Towing a trailer
287Driving and parking Z
Page 305 of 489
You can reset the values of the following func-
tions:
R Trip meter
R "From start" trip computer
R "From reset" trip computer
R ECO display
If you reset the values in the ECO display, the values in the "From start" trip computer are
also reset. If you reset the values in the "From start" trip computer, the values in the ECO
display are also reset. Navigation menu
Displaying navigation instructions In the
Navi Navimenu, the multifunction display
shows navigation instructions.
Further information on navigation can be
found in the separate Audio 20 or COMAND
Online operating instructions.
X Switch on Audio 20 or COMAND Online,
see the separate operating instructions.
X Use ò on the steering wheel to call up
the list of menus.
X Press the :or9 button on the steer-
ing wheel to select the Navi
Navi menu.
X Confirm by pressing aon the steering
wheel.
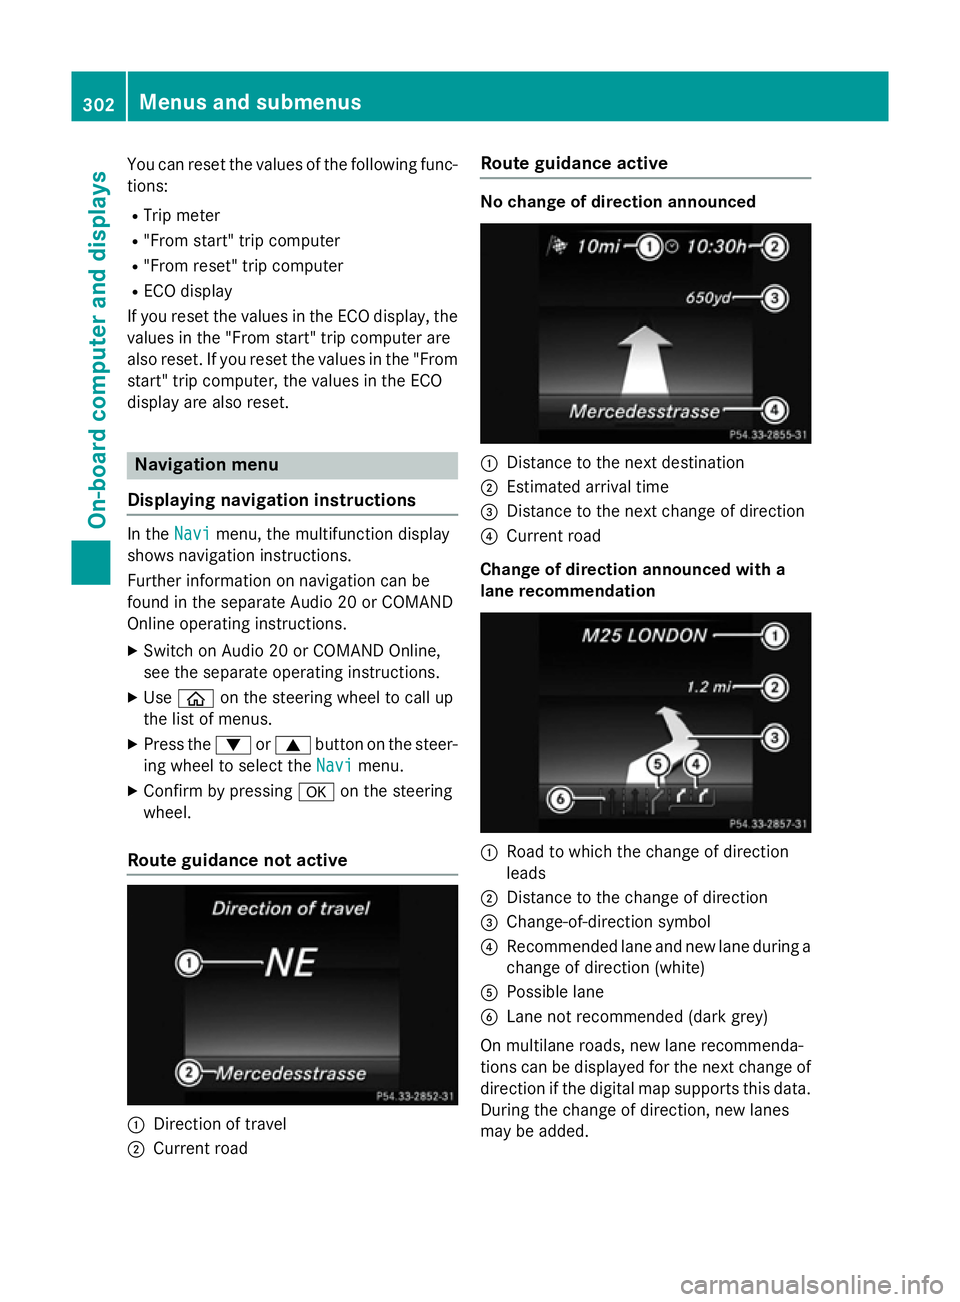
Route guidance not active :
Direction of travel
; Current road Route guidance active No change of direction announced
:
Distance to the next destination
; Estimated arrival time
= Distance to the next change of direction
? Current road
Change of direction announced with a
lane recommendation :
Road to which the change of direction
leads
; Distance to the change of direction
= Change-of-direction symbol
? Recommended lane and new lane during a
change of direction (white)
A Possible lane
B Lane not recommended (dark grey)
On multilane roads, new lane recommenda-
tions can be displayed for the next change of
direction if the digital map supports this data.
During the change of direction, new lanes
may be added. 302
Menus and submenusOn-board computer and displays
Page 307 of 489
You have reached the destination or an
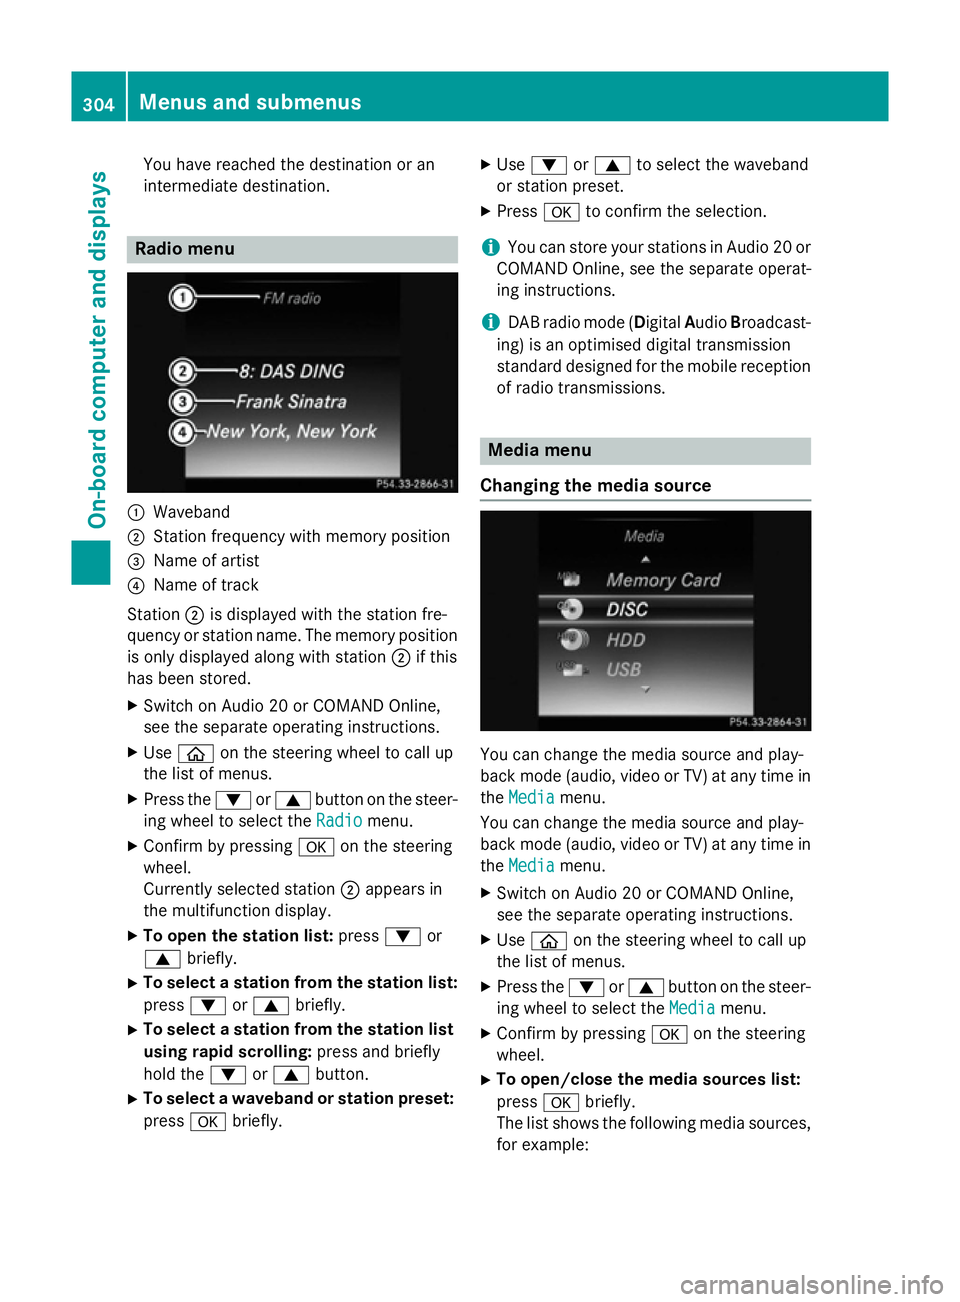
intermediate destination. Radio menu
:
Waveband
; Station frequency with memory position
= Name of artist
? Name of track
Station ;is displayed with the station fre-
quency or station name. The memory position is only displayed along with station ;if this
has been stored.
X Switch on Audio 20 or COMAND Online,
see the separate operating instructions.
X Use ò on the steering wheel to call up
the list of menus.
X Press the :or9 button on the steer-
ing wheel to select the Radio Radiomenu.
X Confirm by pressing aon the steering
wheel.
Currently selected station ;appears in
the multifunction display.
X To open the station list: press:or
9 briefly.
X To select a station from the station list:
press :or9 briefly.
X To select a station from the station list
using rapid scrolling: press and briefly
hold the :or9 button.
X To select a waveband or station preset:
press abriefly. X
Use : or9 to select the waveband
or station preset.
X Press ato confirm the selection.
i You can store your stations in Audio 20 or
COMAND Online, see the separate operat-
ing instructions.
i DAB radio mode (Digital
AudioBroadcast-
ing) is an optimised digital transmission
standard designed for the mobile reception
of radio transmissions. Media menu
Changing the media source You can change the media source and play-
back mode (audio, video or TV) at any time in
the Media Media menu.
You can change the media source and play-
back mode (audio, video or TV) at any time in the Media Media menu.
X Switch on Audio 20 or COMAND Online,
see the separate operating instructions.
X Use ò on the steering wheel to call up
the list of menus.
X Press the :or9 button on the steer-
ing wheel to select the Media Mediamenu.
X Confirm by pressing aon the steering
wheel.
X To open/close the media sources list:
press abriefly.
The list shows the following media sources,
for example: 304
Menus and submenusOn-board computer and displays
Page 316 of 489
X
Switch on the head-up display
(Y page 298).
X Use ò on the steering wheel to call up
the list of menus.
X Press the :or9 button on the steer-
ing wheel to select the Settings
Settings menu.
X Confirm by pressing aon the steering
wheel.
X Press the :or9 button to select the
Head-up display
Head-up display submenu.
X Press ato confirm.
X Press the :or9 button to select the
Brightness
Brightness function.
X Press the abutton to save the setting.
X Press the :or9 button to set the
brightness from Level +5
Level +5(bright) to
Level -5
Level -5 (dark).
X Press the aor% button to save the
setting.
Light submenu Switching the Intelligent Light System
on/off
X Use ò on the steering wheel to call up
the list of menus.
X Press the :or9 button on the steer-
ing wheel to select the Settings
Settings menu.
X Confirm by pressing aon the steering
wheel.
X Press the :or9 button to select the
Lights
Lights submenu.
X Press ato confirm.
X Press the :or9 button to select the
Intelligent Light System
Intelligent Light System function.
If the Intelligent Light System
Intelligent Light System func-
tion has been switched on, the cone of light
and the Lsymbol in the multifunction
display are shown in white.
X Press the abutton to save the setting.
When you activate the Intelligent
IntelligentLight
Light
System
System , you activate the following functions:
R Motorway mode
R Active light function R
Cornering light function
R Extended range foglamps
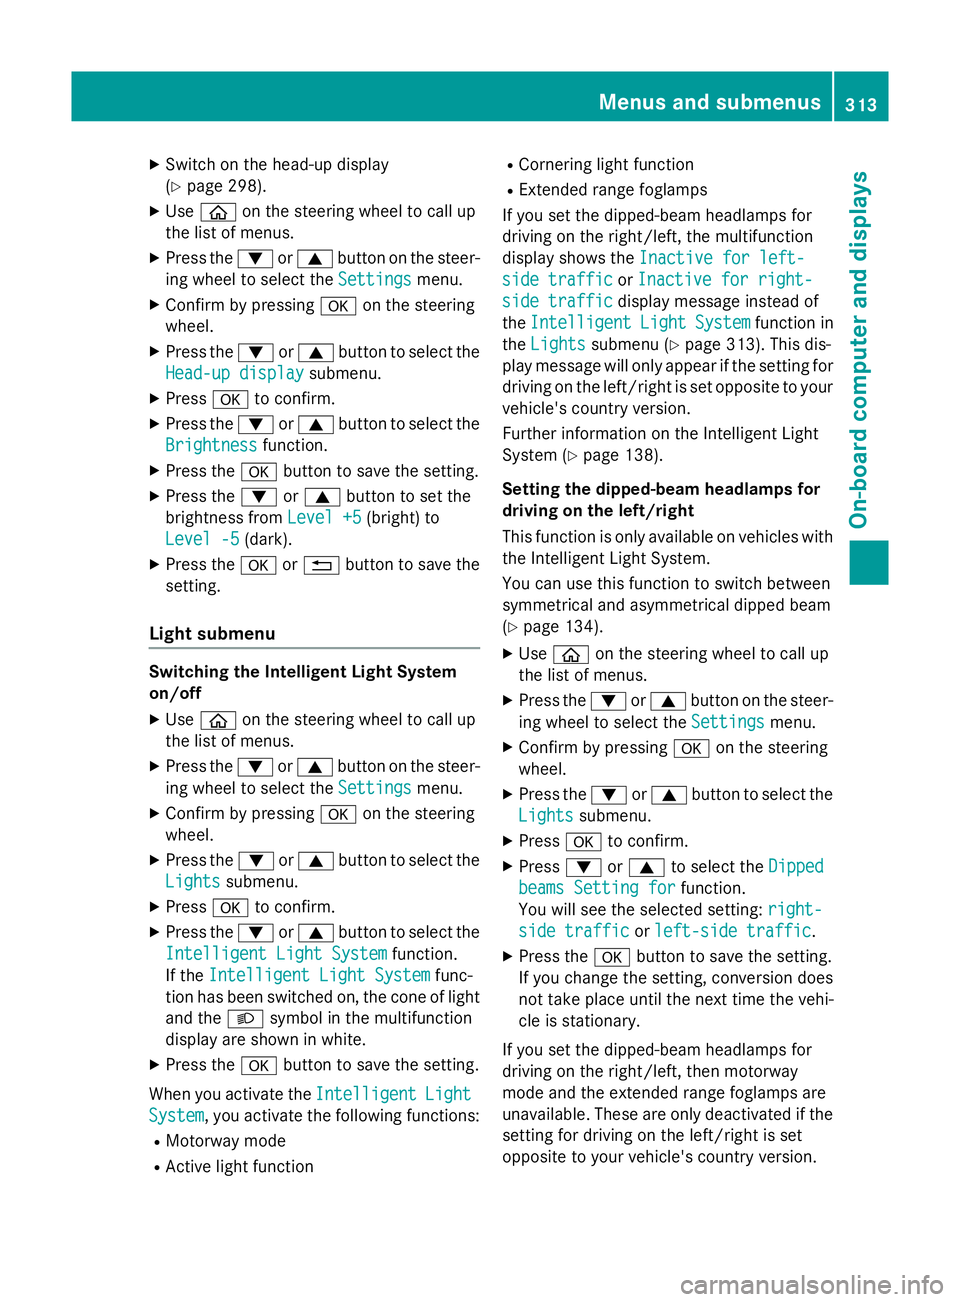
If you set the dipped-beam headlamps for
driving on the right/left, the multifunction
display shows the Inactive for left-
Inactive for left-
side traffic side traffic orInactive for right-
Inactive for right-
side traffic
side traffic display message instead of
the Intelligent
Intelligent Light
LightSystem
System function in
the Lights
Lights submenu (Y page 313). This dis-
play message will only appear if the setting for
driving on the left/right is set opposite to your
vehicle's country version.
Further information on the Intelligent Light
System (Y page 138).
Setting the dipped-beam headlamps for
driving on the left/right
This function is only available on vehicles with
the Intelligent Light System.
You can use this function to switch between
symmetrical and asymmetrical dipped beam
(Y page 134).
X Use ò on the steering wheel to call up
the list of menus.
X Press the :or9 button on the steer-
ing wheel to select the Settings Settingsmenu.
X Confirm by pressing aon the steering
wheel.
X Press the :or9 button to select the
Lights
Lights submenu.
X Press ato confirm.
X Press :or9 to select the Dipped
Dipped
beams Setting for
beams Setting for function.
You will see the selected setting: right-
right-
side traffic
side traffic orleft-side traffic
left-side traffic.
X Press the abutton to save the setting.
If you change the setting, conversion does
not take place until the next time the vehi-
cle is stationary.
If you set the dipped-beam headlamps for
driving on the right/left, then motorway
mode and the extended range foglamps are
unavailable. These are only deactivated if the setting for driving on the left/right is set
opposite to your vehicle's country version. Menus and submenus
313On-board computer and displays Z