2014 MERCEDES-BENZ C-CLASS ESTATE change time
[x] Cancel search: change timePage 191 of 489
Starting procedure with the key
To start the engine using the key instead of
the Start/Stop button, pull the Start/Stop
button out of the ignition lock.
X To start a petrol engine: turn the key to
position 3in the ignition lock (Y page 185)
and release it as soon as the engine is run-
ning.
X To start a diesel engine: turn the key to
position 2in the ignition lock (Y page 185).
The % preglow indicator lamp in the
instrument cluster lights up.
X When the %preglow indicator lamp
goes out, turn the key to position 3
(Y page 185) and release it as soon as the
engine is running.
You can start the engine without preglow if
the engine is warm.
If the engine will not start: X Remove the key from the ignition lock.
X Reinsert the key into the ignition lock after
a short waiting period.
X Turn the key to position 2in the ignition
lock (Y page 185).
The indicator lamps in the instrument clus- ter light up (Y page 353).
X Turn the key to position 3(Y page 185) in
the ignition lock and release it as soon as
the engine is running.
Starting procedure using the Start/
Stop button The Start/Stop button is only available on
vehicles with KEYLESS-GO or the KEYLESS-
GO start function.
The Start/Stop button can be used to start
the vehicle manually without inserting the key
into the ignition lock. The key must be in the
vehicle and the Start/Stop button must be
inserted in the ignition lock. This mode for
starting the engine operates independently of
the ECO start/stop automatic engine start
function. You can start the engine if a valid key is in the
vehicle. Switch off the engine and always take
the key with you when leaving the vehicle,
even if you only leave it for a short time. Pay
attention to the important safety notes.
X Depress the brake pedal and keep it
depressed.
X To start a petrol engine: press the Start/
Stop button once (Y page 185).
The engine starts.
X To start a diesel engine: press the Start/
Stop button once (Y page 185).
Preglow is activated and the engine starts. Pulling away
Manual transmission !
Change gear in good time and avoid spin-
ning the wheels. Otherwise, you could dam- age the vehicle.
X Depress the brake pedal and keep it
depressed.
X Depress the clutch pedal fully.
X Shift to either 1st gear or reverse gear R.
X Release the electric parking brake
(Y page 213).
X Release the brake pedal.
X Slowly release the clutch pedal and gently
depress the accelerator pedal.
Follow the shift recommendations in the mul-
tifunction display for an economical driving
style (Y page 195).
The vehicle locks centrally once you have
pulled away. The locking knobs in the doors
drop down.
You can open the doors from the inside at any
time.
You can also deactivate the automatic locking feature, see the Digital Owner's Manual. 188
DrivingDriving and parking
Page 206 of 489
Using the steering wheel gearshift paddles,
you can temporarily change gear yourself.
The transmission must be in position D.
Activating X
Shift the transmission to position D.
X Pull the left or right steering wheel gearshift
paddle (Y page 202).
Manual gearshifting is activated tempora-
rily. The selected gear appears in the mul-
tifunction display.
Further information on activating manual
gearshifting in hybrid vehicles (Y page 281).
Shifting gears Pulling on the left or right gear shift paddle
allows you to shift gears yourself for a limited
time. Depending on which gearshift paddle is pulled, the automatic transmission immedi-
ately shifts into the next gear up or down, if
permitted.
X To shift up: pull the right-hand steering
wheel gearshift paddle (Y page 202).
The automatic transmission shifts up to the
next gear.
If the maximum engine speed on the cur-
rently engaged gear is reached and you
continue to accelerate, the automatic
transmission automatically shifts up in
order to prevent engine damage.
X To shift down: pull on the left-hand steer-
ing wheel gearshift paddle (Y page 202).
The automatic transmission shifts down to
the next gear.
If the engine exceeds the maximum engine speed when shifting down, the automatic
transmission protects against engine dam- age by not shifting down.
Automatic downshifting occurs when
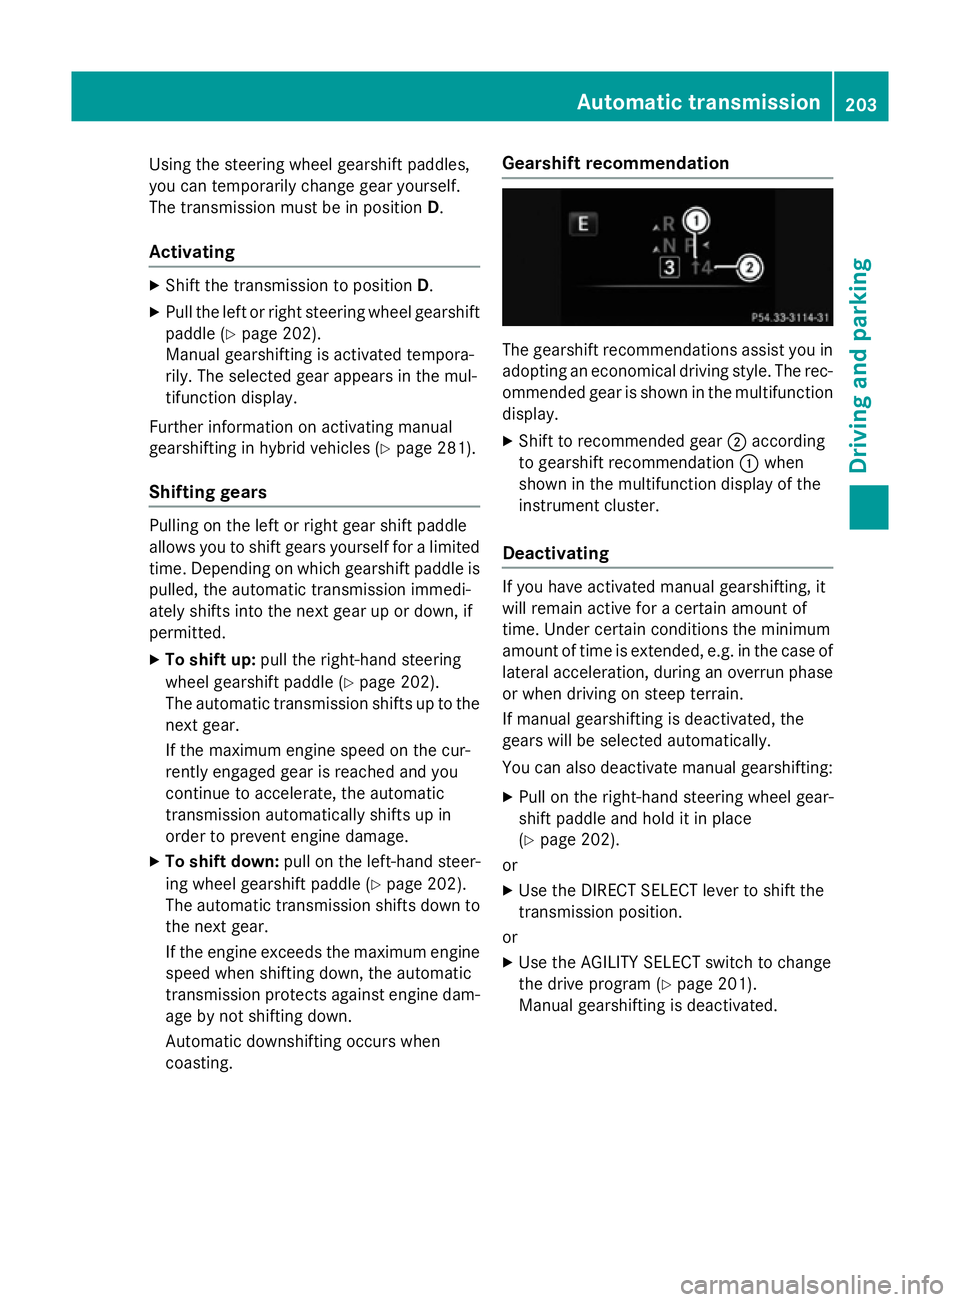
coasting. Gearshift recommendation The gearshift recommendations assist you in
adopting an economical driving style. The rec- ommended gear is shown in the multifunction
display.
X Shift to recommended gear ;according
to gearshift recommendation :when
shown in the multifunction display of the
instrument cluster.
Deactivating If you have activated manual gearshifting, it
will remain active for a certain amount of
time. Under certain conditions the minimum
amount of time is extended, e.g. in the case of
lateral acceleration, during an overrun phase
or when driving on steep terrain.
If manual gearshifting is deactivated, the
gears will be selected automatically.
You can also deactivate manual gearshifting:
X Pull on the right-hand steering wheel gear-
shift paddle and hold it in place
(Y page 202).
or
X Use the DIRECT SELECT lever to shift the
transmission position.
or X Use the AGILITY SELECT switch to change
the drive program (Y page 201).
Manual gearshifting is deactivated. Automatic transmission
203Driving and parking Z
Page 212 of 489
nose and throat. You may also experience
coughing and watery eyes.
Do not inhale any ammonia vapours that may
be released. Only fill the AdBlue ®
tank in well-
ventilated areas.
Do not swallow AdBlue ®
or let it come into
contact with skin, eyes or clothing. Keep
AdBlue ®
away from children.
If you or others come into contact with
AdBlue ®
, observe the following:
R immediately rinse AdBlue ®
off your skin
with soap and water.
R if AdBlue ®
comes into contact with your
eyes, immediately rinse them thoroughly
with clean water. Seek medical attention
immediately.
R if AdBlue ®
is swallowed, immediately rinse
your mouth out thoroughly. Drink plenty of
water. Seek medical attention immedi-
ately.
R change immediately out of clothing that
has come into contact with AdBlue ®
.
! Only use AdBlue ®
in accordance with
ISO 22241. Do not mix any additives with
AdBlue ®
, and do not dilute AdBlue ®
with
water. This may destroy the BlueTEC
exhaust gas aftertreatment system.
! In order to fill the AdBlue ®
tank, the vehi-
cle must be parked on a level surface. The
AdBlue ®
tank can only be filled as intended
with the vehicle parked on a level surface.
Fluctuations in capacity will thus be avoi-
ded. Filling a vehicle standing on an uneven
surface is not permitted. There is a danger of overfilling, which can cause damage to
BlueTEC exhaust gas aftertreatment com-
ponents.
! Surfaces which have come into contact
with AdBlue ®
while refilling should be
rinsed immediately with water, or remove
AdBlue ®
with a moist cloth and cold water.
If AdBlue ®
has already crystallised, use a
sponge and cold water to clean the area. AdBlue
®
residue crystallises after a certain
amount of time and soils the affected sur-
faces.
! AdBlue ®
is not a fuel additive and must
not be added to the fuel tank. If AdBlue ®
is
added to the fuel tank, this can lead to
engine damage.
Have the AdBlue ®
tank refilled at a qualified
specialist workshop. However, you can also
top up the AdBlue ®
tank:
R at a filling station with an AdBlue ®
filling
pump
R with AdBlue ®
refill bottles
R with an AdBlue ®
refill canister
When the pump nozzle switches off automat-
ically during filling at a filling pump, the
AdBlue ®
tank has been completely filled. Do
not fill the AdBlue ®
tank any further. AdBlue ®
may leak out.
To avoid transporting already opened refill
containers in the vehicle, completely empty
refill bottles or canisters when filling the
AdBlue ®
tank, if possible.
Further information on AdBlue ®
(Y page 474).
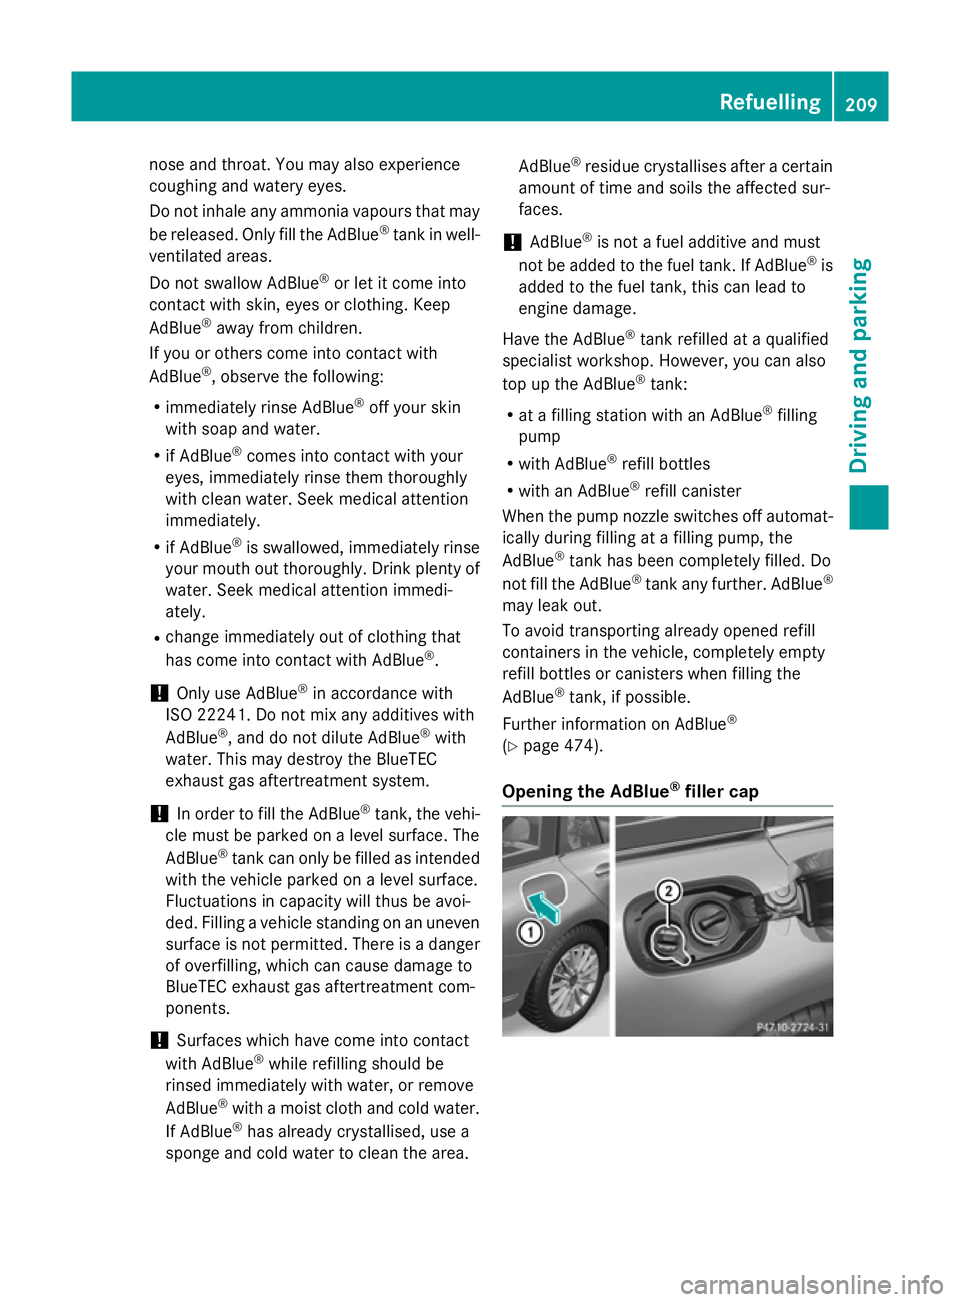
Opening the AdBlue ®
filler cap Refuelling
209Driving and parking Z
Page 220 of 489
time, the driver has adopted the most eco-
nomical driving style for the selected settings
and prevailing conditions. The ECO display
border lights up.
The ECO display does not indicate the actual fuel consumption. The additionally achieved
range displayed under Bonus fr. start Bonus fr. start
does not indicate a fixed consumption reduc-
tion.
In addition to driving style, the actual con-
sumption is affected by other factors, such
as:
R load
R tyre pressure
R cold start
R choice of route
R the use of electrical consumers
These factors are not included in the ECO dis-
play.
An economical driving style involves driving at a moderate engine speed.
To achieve a higher value in the categories
"acceleration" and "smooth driving":
R observe the gearshift recommendation
R drive the vehicle in drive program E(vehi-
cles with the AGILITY SELECT switch)
On long journeys at a constant speed, e.g. on the motorway, only the outer area for "con-
stant" will change.
The ECO display summarises the driving style
from the start of the journey to its completion. Therefore, there are more marked changes in
the outer areas at the start of a journey. Dur- ing a prolonged driving time, these changes
are smaller. For more marked changes, per-
form a manual rest (Y page 301).
Further information on the ECO display
(Y page 300). Braking
Important safety notes G
WARNING
If you shift down on a slippery road surface in an attempt to increase the engine's braking
effect, the drive wheels could lose their grip.
This increases the risk of skidding and having
an accident.
Do not shift down for additional engine brak-
ing on a slippery road surface.
Downhill gradients Change into a lower gear in good time on long
and steep downhill gradients. Take particular note of this when driving a laden vehicle and
when towing a trailer.
This also applies if cruise control, DISTRONIC
PLUS or SPEEDTRONIC are activated.
This will use the braking effect of the engine,
so less braking will be required to maintain
vehicle speed. This relieves the load on the
brake system and prevents the brakes from
overheating and wearing too quickly.
Heavy and light loads G
WARNING
The braking system can overheat if you leave your foot on the brake pedal while driving.
This increases the braking distance and could
even cause the braking system to fail. There is
a risk of an accident.
Never use the brake pedal as a footrest. Do
not simultaneously depress both the brake
pedal and the accelerator pedal while driving.
! Depressing the brake pedal constantly
results in excessive and premature wear to
the brake pads.
If heavy demands are made on the brakes, do not park the vehicle immediately. Drive on for
a short while. This allows the airflow to cool
the brakes more quickly. Driving
tips
217Driving an d parking Z
Page 223 of 489
Driving systems
Mercedes-Benz Intelligent Drive
Mercedes-Benz Intelligent Drive stands for
innovative driver assistance and safety sys-
tems which enhance comfort and support the
driver in critical situations. With these intelli-
gent co-ordinated systems Mercedes-Benz
has set a milestone on the path towards
autonomous driving.
Mercedes-Benz Intelligent Drive embraces all elements of active and passive safety in one
well thought-out system – for the safety of thevehicle occupants and that of other road
users.
Further information on driving safety systems
(Y page 75). Cruise control
General notes Cruise control maintains a constant road
speed for you. It brakes automatically in order to avoid exceeding the set speed. Change into
a lower gear in good time on long and steep
downhill gradients. Take particular note of
this when driving a laden vehicle and when
towing a trailer. By doing so, you will make
use of the braking effect of the engine. This
relieves the load on the brake system and
prevents the brakes from overheating and
wearing too quickly.
Use cruise control only if road and traffic con- ditions are appropriate for maintaining a
steady speed for a prolonged period. You can store any road speed above 30 km/h.
Important safety notes If you fail to adapt your driving style, cruise
control can neither reduce the risk of an acci-
dent nor override the laws of physics. Cruise
control cannot take into account road,
weather or traffic conditions. Cruise control is
only an aid. You are responsible for the dis-
tance to the vehicle in front, for vehicle speed, for braking in good time, and for staying in
lane.
Do not use cruise control:
R in road and traffic conditions which do not
allow you to maintain a constant speed
(e.g. in heavy traffic or on winding roads)
R on smooth or slippery roads. Braking or
accelerating can cause the drive wheels to
lose traction and the vehicle could then
skid
R when there is poor visibility, e.g. due to fog,
heavy rain or snow
If there is a change of drivers, advise the new
driver of the speed stored.
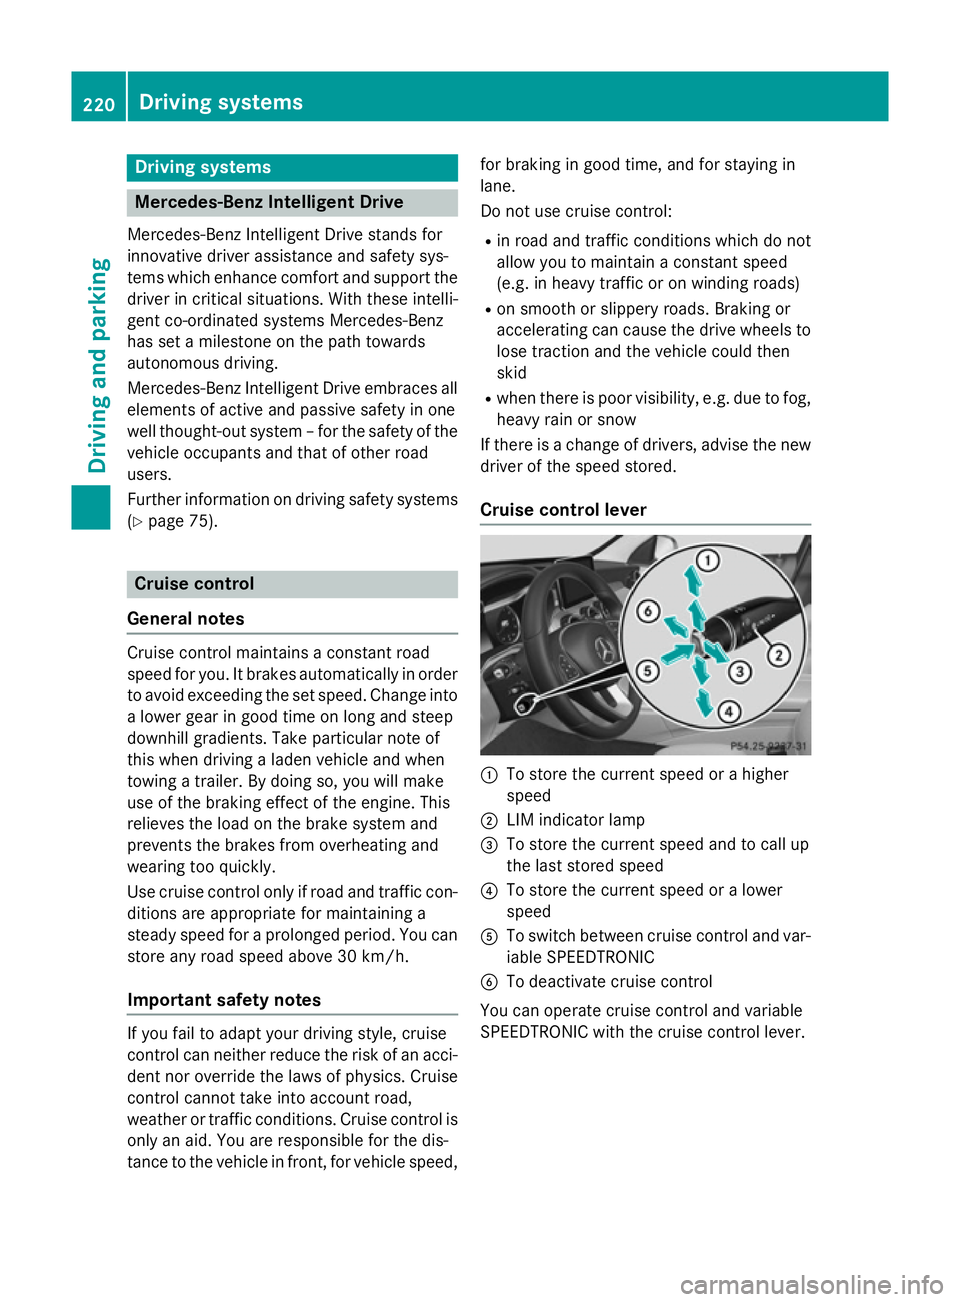
Cruise control lever :
To store the current speed or a higher
speed
; LIM indicator lamp
= To store the current speed and to call up
the last stored speed
? To store the current speed or a lower
speed
A To switch between cruise control and var-
iable SPEEDTRONIC
B To deactivate cruise control
You can operate cruise control and variable
SPEEDTRONIC with the cruise control lever. 220
Driving syste
msDriving and parking
Page 224 of 489
The LIM indicator lamp on the cruise control
lever indicates which system you have selec- ted:
R LIM indicator lamp off: cruise control is
selected.
R LIM indicator lamp on: variable SPEED-
TRONIC is selected.
When you activate cruise control, the stored
speed is shown in the multifunction display
for five seconds. In addition, the ésymbol
appears in the multifunction display. In the
speedometer, the segments between the
stored speed and the maximum speed light
up.
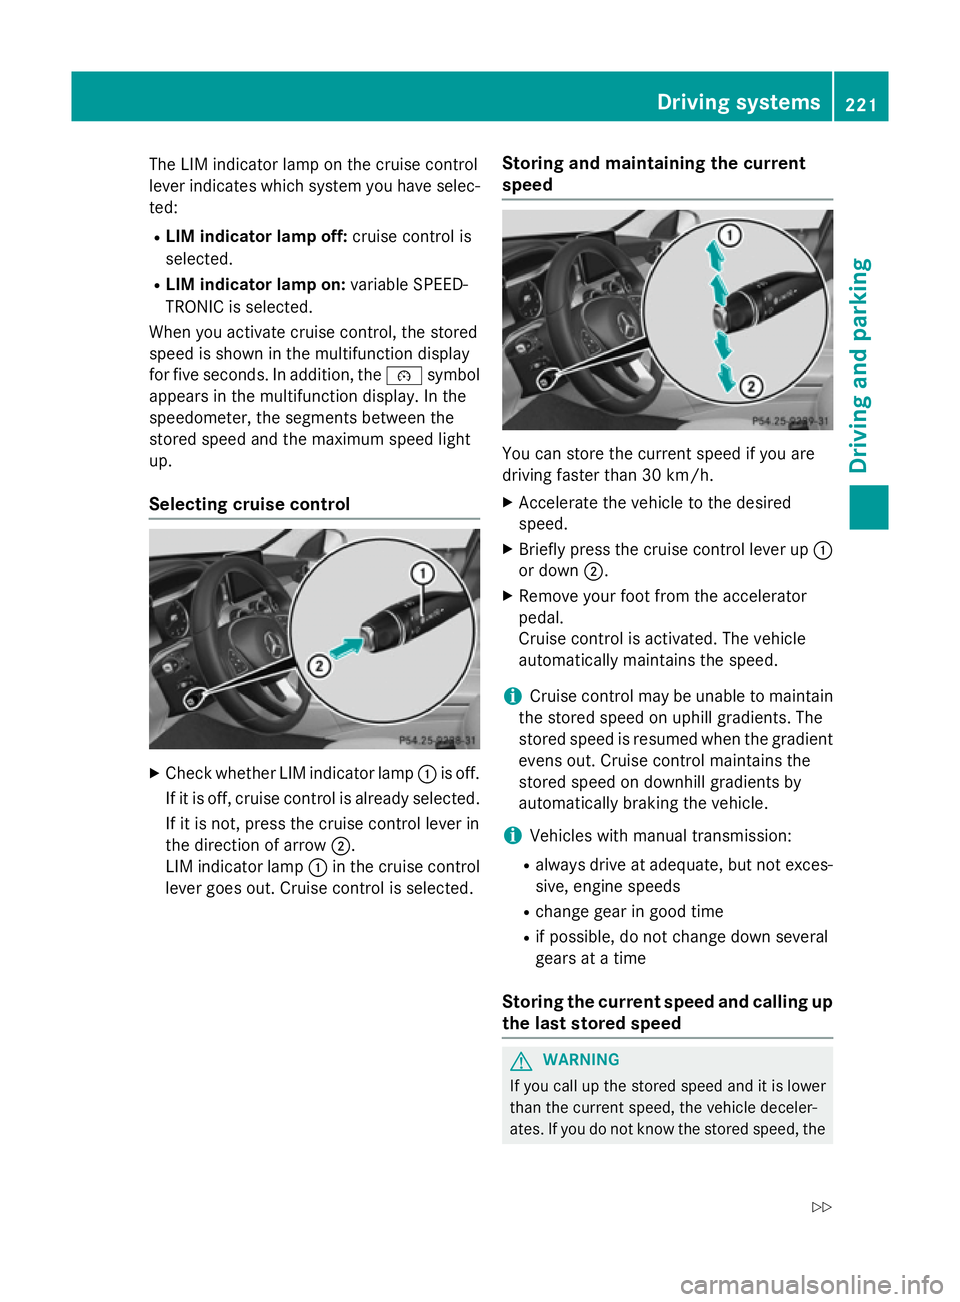
Selecting cruise control X
Check whether LIM indicator lamp :is off.
If it is off, cruise control is already selected. If it is not, press the cruise control lever in
the direction of arrow ;.
LIM indicator lamp :in the cruise control
lever goes out. Cruise control is selected. Storing and maintaining the current
speed You can store the current speed if you are
driving faster than 30 km/h.
X Accelerate the vehicle to the desired
speed.
X Briefly press the cruise control lever up :
or down ;.
X Remove your foot from the accelerator
pedal.
Cruise control is activated. The vehicle
automatically maintains the speed.
i Cruise control may be unable to maintain
the stored speed on uphill gradients. The
stored speed is resumed when the gradient evens out. Cruise control maintains the
stored speed on downhill gradients by
automatically braking the vehicle.
i Vehicles with manual transmission:
R always drive at adequate, but not exces-
sive, engine speeds
R change gear in good time
R if possible, do not change down several
gears at a time
Storing the current speed and calling up
the last stored speed G
WARNING
If you call up the stored speed and it is lower
than the current speed, the vehicle deceler-
ates. If you do not know the stored speed, the Driving systems
221Driving and parking
Z
Page 226 of 489
Cruise control is automatically deactivated if:
R you apply the electric parking brake
R you are driving at less than 30 km/h
R ESP ®
intervenes or you deactivate ESP ®
R while driving a vehicle with manual trans-
mission, you shift into neutral or depress
the clutch pedal for longer than six seconds
R on vehicles with manual transmission, you
shift to a gear that is too high, and as a
result the engine speed is too low
R on vehicles with automatic transmission,
you shift to position Nwhile driving
If cruise control is deactivated, you will hear a warning tone. You will see the Cruise con‐
Cruise con‐
trol off trol off message in the multifunction dis-
play for approximately five seconds.
i The last speed stored is cleared when you
switch off the engine. SPEEDTRONIC
General notes SPEEDTRONIC brakes automatically so that
you do not exceed the set speed. Change into
a lower gear in good time on long and steep
downhill gradients. Take particular note of
this when driving a laden vehicle. By doing so, you will make use of the braking effect of the engine. This relieves the load on the brake
system and prevents the brakes from over-
heating and wearing too quickly.
Important safety notes If you fail to adapt your driving style, SPEED-
TRONIC can neither reduce the risk of an
accident nor override the laws of physics.
SPEEDTRONIC cannot take into account
road, weather or traffic conditions. SPEED-
TRONIC is only an aid. You are responsible for
the distance to the vehicle in front, for vehicle speed, for braking in good time, and for stay-ing in lane.
If there is a change of drivers, advise the new
driver of the speed stored. You can set a variable or permanent limit
speed:
R variable for speed limits, e.g. in built-up
areas
R permanent for long-term speed restric-
tions, e.g. when driving with winter tyres
fitted (Y page 225)
i The speed indicated in the speedometer
may differ slightly from the limit speed
stored.
Variable SPEEDTRONIC General notes
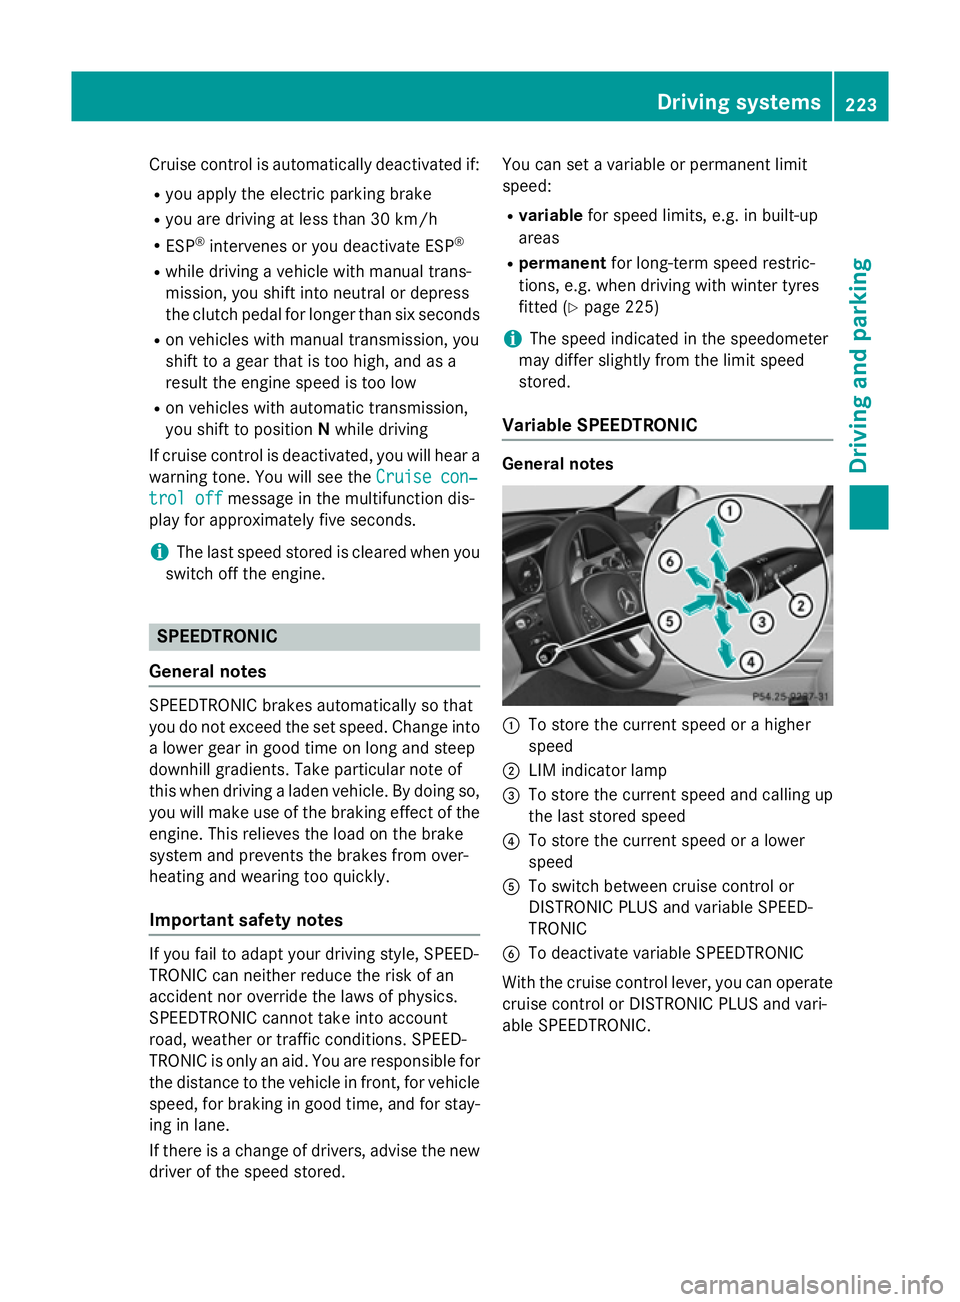
:
To store the current speed or a higher
speed
; LIM indicator lamp
= To store the current speed and calling up
the last stored speed
? To store the current speed or a lower
speed
A To switch between cruise control or
DISTRONIC PLUS and variable SPEED-
TRONIC
B To deactivate variable SPEEDTRONIC
With the cruise control lever, you can operate
cruise control or DISTRONIC PLUS and vari-
able SPEEDTRONIC. Driving systems
223Driving and parking Z
Page 229 of 489
You cannot exceed the stored limit speed,
even if you depress the accelerator pedal
beyond the pressure point (kickdown). DISTRONIC PLUS
General notes DISTRONIC PLUS regulates the speed and
automatically helps you maintain the dis-
tance to the vehicle detected in front. Vehi-
cles are detected with the aid of the radar
sensor system. DISTRONIC PLUS brakes
automatically so that the set speed is not
exceeded.
Change into a lower gear in good time on long and steep downhill gradients. Take particular
note of this when driving a laden vehicle. By
doing so, you will make use of the braking
effect of the engine. This relieves the load on
the brake system and prevents the brakes
from overheating and wearing too quickly.
If DISTRONIC PLUS detects that there is a risk of a collision, you will be warned visually and
acoustically. Without your intervention,
DISTRONIC PLUS cannot prevent a collision.
An intermittent warning tone will then sound
and the distance warning lamp will light up in the instrument cluster. Brake immediately to
increase the distance to the vehicle driving in
front, or take evasive action, provided it is
safe to do so.
DISTRONIC PLUS operates in the range
between 0 km/h and 200 km/h.
Do not use DISTRONIC PLUS while driving on roads with steep gradients.
Important safety notes G
WARNING
DISTRONIC PLUS does not react to:
R people or animals
R stationary obstacles on the road, e.g. stop-
ped or parked vehicles
R oncoming and crossing traffic As a result, DISTRONIC PLUS may neither give
warnings nor intervene in such situations.
There is a risk of an accident.
Always pay careful attention to the traffic sit-
uation and be ready to brake. G
WARNING
DISTRONIC PLUS cannot always clearly rec-
ognise other road users and complex traffic
conditions.
In such cases, DISTRONIC PLUS may:
R give an unnecessary warning and then
brake the vehicle
R neither give a warning nor intervene
R accelerate or brake unexpectedly
There is a risk of an accident.
Continue to drive carefully and be prepared to
brake, particularly if DISTRONIC PLUS warns
you. G
WARNING
DISTRONIC PLUS brakes your vehicle with up to 50% of the maximum possible deceleration.
If this deceleration is not sufficient,
DISTRONIC PLUS alerts you with a visual and
acoustic warning. There is a risk of an acci-
dent.
Apply the brakes yourself in these situations
and try to take evasive action.
! If DISTRONIC PLUS or the HOLD function
is activated, the vehicle brakes automati-
cally in certain situations. To prevent dam-
age to the vehicle, deactivate DISTRONIC
PLUS and the HOLD function in the follow-
ing or other similar situations:
R when towing the vehicle
R in the car wash
If you fail to adapt your driving style,
DISTRONIC PLUS can neither reduce the risk
of an accident nor override the laws of phys-
ics. DISTRONIC PLUS cannot take road and
weather conditions or traffic conditions into
account. DISTRONIC PLUS is only an aid. You
are responsible for the distance to the vehicle 226
Driving systemsDriving and parking