2014 MERCEDES-BENZ C-CLASS ESTATE climate control
[x] Cancel search: climate controlPage 24 of 489
Telephone compartment ................3
72
Temperature
Coolant (display in the instrumentcluster) .......................................... 295
Coolant (display in the on-board
computer) ...................................... 309
Outside temperature ..................... .295
Setting (climate control) ................ 163
TEMPOMAT
Function/notes ............................ .220
TIREFIT kit .......................................... 414
Top Tether ............................................ 65
Total distance recorder .................... 300
Tow-away protection
Activating ......................................... 88
Deactivating ..................................... 88
Function .......................................... .87
Tow-starting
Emergency engine starting ............ 428
Important safety notes .................. 424
Towing
Important safety notes .................. 424
Notes for 4MATIC vehicles ............ 427
With the rear axle raised ................ 426
Towing a trailer
Active Blind Spot Assist ................. 269
Active Lane Keeping Assist ............ 272
Active Parking Assist ..................... 243
Axle load, permissibl e.................... 482
Bulb failure indicator for LED
lamps ............................................. 290
ESP® (Electronic Stability Pro-
gram) ............................................... 83
General notes ................................ 287
Pulling away with a traile r.............. 189
Trailer tow hitch display message .. 349
Towing away
Fitting the towing eye .................... 426
Removing the towing eye ............... 426
With both axles on the ground ....... 427
Towing eye ......................................... 411
Traffic Sign Assist
Activating ....................................... 261
Activating/deactivating the warn-
ing function .................................... 310
Display message ............................ 342
Function/note s............................. 260
Important safety notes .................. 261 Instrument cluster display ............. 261
Trailer coupling
see Towing a trailer
Trailer towing
7-pin connecto r............................. 290
Blind Spot Assist ............................ 264
Cleaning the trailer tow hitch ......... 406
Coupling up a traile r...................... 288
Decoupling a trailer ....................... 289
Driving tip s.................................... 287
Folding in the ball coupling ............ 289
Folding out the ball coupling .......... 288
Important safety notes .................. 286
Lights display message .................. 331
Mounting dimensions .................... 478
Parktronic ...................................... 240
Power supply ................................. 290
Problem (fault) ............................... 292
Trailer load s................................... 480
Transfer case ..................................... 204
Transmission
see Automatic transmission
see Manual transmission
Transmission position display ......... 199
Transmission position display
(DIRECT SELECT lever) ...................... 199
Transporting the vehicle .................. 427
Trim pieces (cleaning instruc-
tions) .................................................. 407
Trip computer (on-board com-
puter) .................................................. 301
Trip meter
Calling up ....................................... 300
Resetting (on-board computer) ...... 301
Turn signals
Changing bulbs (front) ................... 144
Changing bulbs (rear) .................... 144
Switching on/of f........................... 137
TV
Operating (on-board computer) ..... 306
Two-way radio
Frequencies ................................... 468
Installation ..................................... 468
Transmission output (maximum) .... 468
Type identification plate
see Vehicle identification plate Index
21
Page 35 of 489
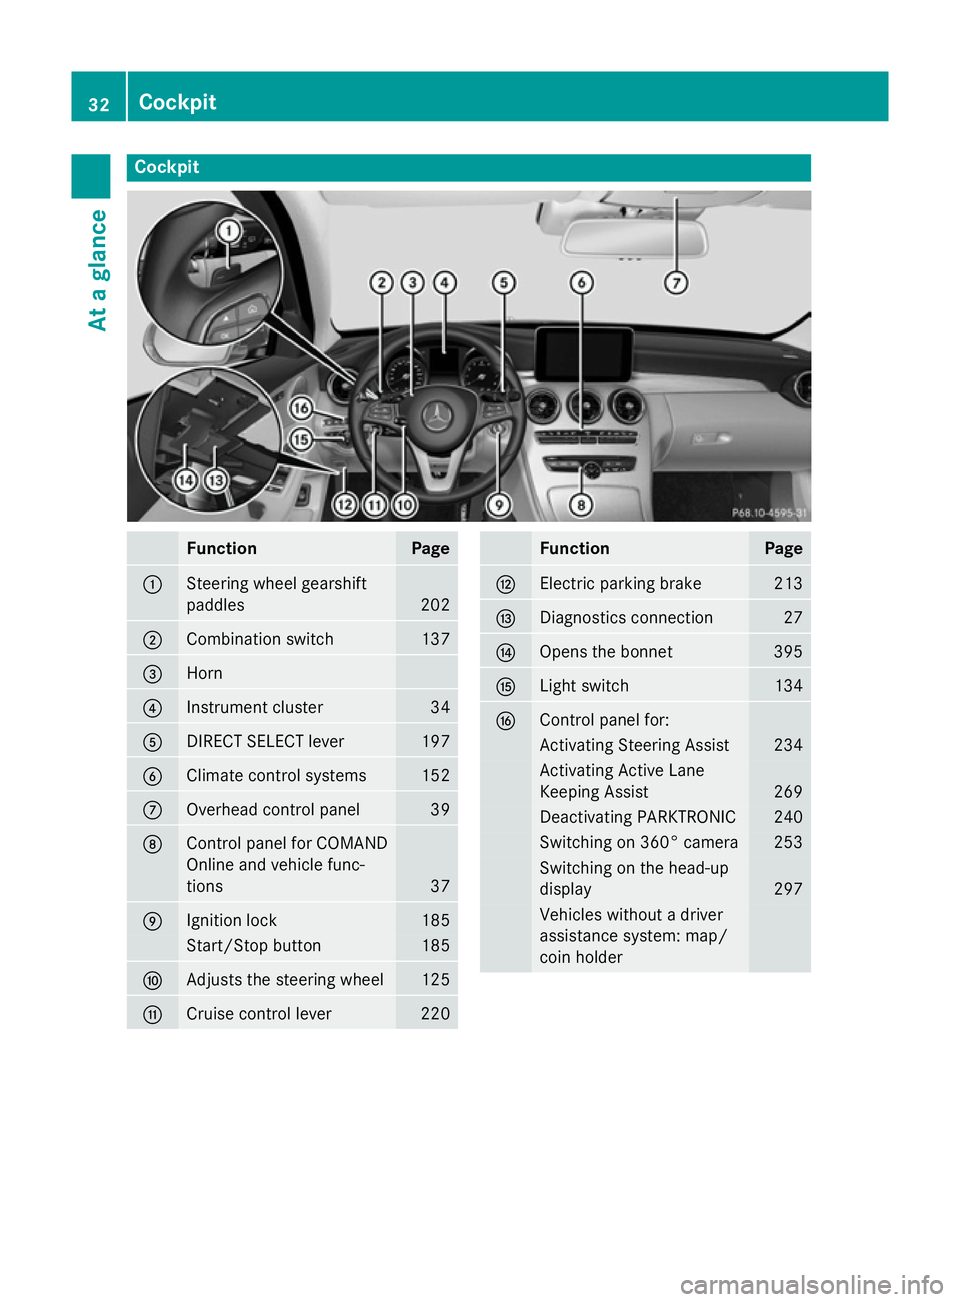
Cockpit
Function Page
:
Steering wheel gearshift
paddles
202
;
Combination switch 137
=
Horn
?
Instrument cluster 34
A
DIRECT SELECT lever 197
B
Climate control systems 152
C
Overhead control panel 39
D
Control panel for COMAND
Online and vehicle func-
tions
37
E
Ignition lock 185
Start/Stop button 185
F
Adjusts the steering wheel 125
G
Cruise control lever 220 Function Page
H
Electric parking brake 213
I
Diagnostics connection 27
J
Opens the bonnet 395
K
Light switch 134
L
Control panel for:
Activating Steering Assist 234
Activating Active Lane
Keeping Assist 269
Deactivating PARKTRONIC 240
Switching on 360° camera 253
Switching on the head-up
display
297
Vehicles without a driver
assistance system: map/
coin holder32
CockpitAt a glance
Page 36 of 489
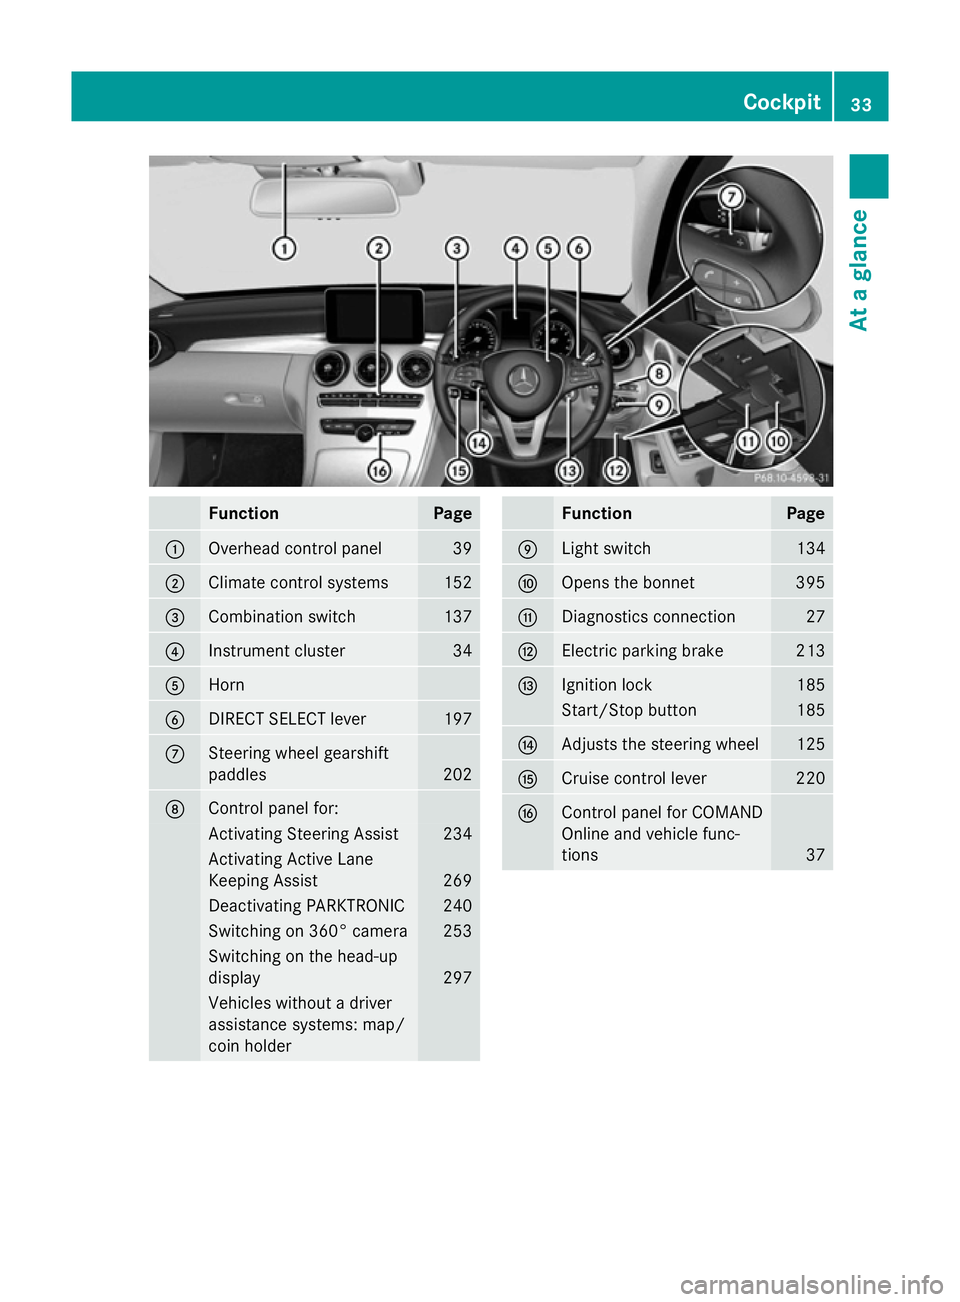
Function Page
:
Overhead control panel 39
;
Climate control systems 152
=
Combination switch 137
?
Instrument cluster 34
A
Horn
B
DIRECT SELECT lever 197
C
Steering wheel gearshift
paddles
202
D
Control panel for:
Activating Steering Assist 234
Activating Active Lane
Keeping Assist
269
Deactivating PARKTRONIC 240
Switching on 360° camera 253
Switching on the head-up
display
297
Vehicles without a driver
assistance systems: map/
coin holder Function Page
E
Light switch 134
F
Opens the bonnet 395
G
Diagnostics connection 27
H
Electric parking brake 213
I
Ignition lock 185
Start/Stop button 185
J
Adjusts the steering wheel 125
K
Cruise control lever 220
L
Control panel for COMAND
Online and vehicle func-
tions
37Cockpit
33At a glance
Page 40 of 489

Centre console
Centre console, upper section
Function Page
:
Climate control systems 152
;
£
Hazard warning
lamps 137
=
Vehicle functions/system
settings button (see the
separate operating instruc-
tions) ?
Telephone button (see the
separate operating instruc-
tions) A
PASSENGER AIRBAG indi-
cator lamp
46
ATA indicator lamp 87 Function Page
B
Analogue clock
C
Media button (see the sep-
arate operating instruc-
tions)
D
Radio button (see the sep-
arate operating instruc-
tions) E
Navigation button (see the
separate operating instruc-
tions)
F
þ
Inserts/ejects a
CD/DVD (see the separate
operating instructions) Centre console
37At a glance
Page 47 of 489
G
WARNING
If the housing of the high-voltage battery has
been damaged, electrolyte and gases may
leak out. These are poisonous and caustic.
There is a risk of injury.
Avoid contact with the skin, eyes or clothing. Immediately rinse electrolyte splashes off
with water and seek medical attention
straight away.
! Exhaustive discharge caused by the vehi-
cle standing idle for lengthy periods can
damage the high-voltage battery.
If the vehicle is idle for lengthy periods, run
it for a few minutes once every six weeks to
charge up the high-voltage battery.
During the charging process, switch off all
electrical consumers, e.g. the automatic
climate control or the seat heating.
Information on charging the high-voltage bat-
tery (Y page 420).
Engine compartment Before opening the bonnet:
X Apply the electric parking brake.
X Shift the automatic transmission to park
position P.
X Switch the ignition off.
X Remove the key from the ignition lock.
or, in vehicles with KEYLESS-GO start-func-
tion or KEYLESS ‑GO
X Remove the Start/Stop button from the
ignition lock.
X Observe the warning notes on the risk of
electric shock (Y page 42).
X Observe the warning notes about the bon-
net (Y page 395). RBS driving safety system (Recupera-
tive Brake System)
RBS supports you when braking with an elec-
tronically-controlled brake boost mode and enables the recovery of kinetic energy (recu-
peration).
For further information on the RBS system
(Y page 273). Panic alarm
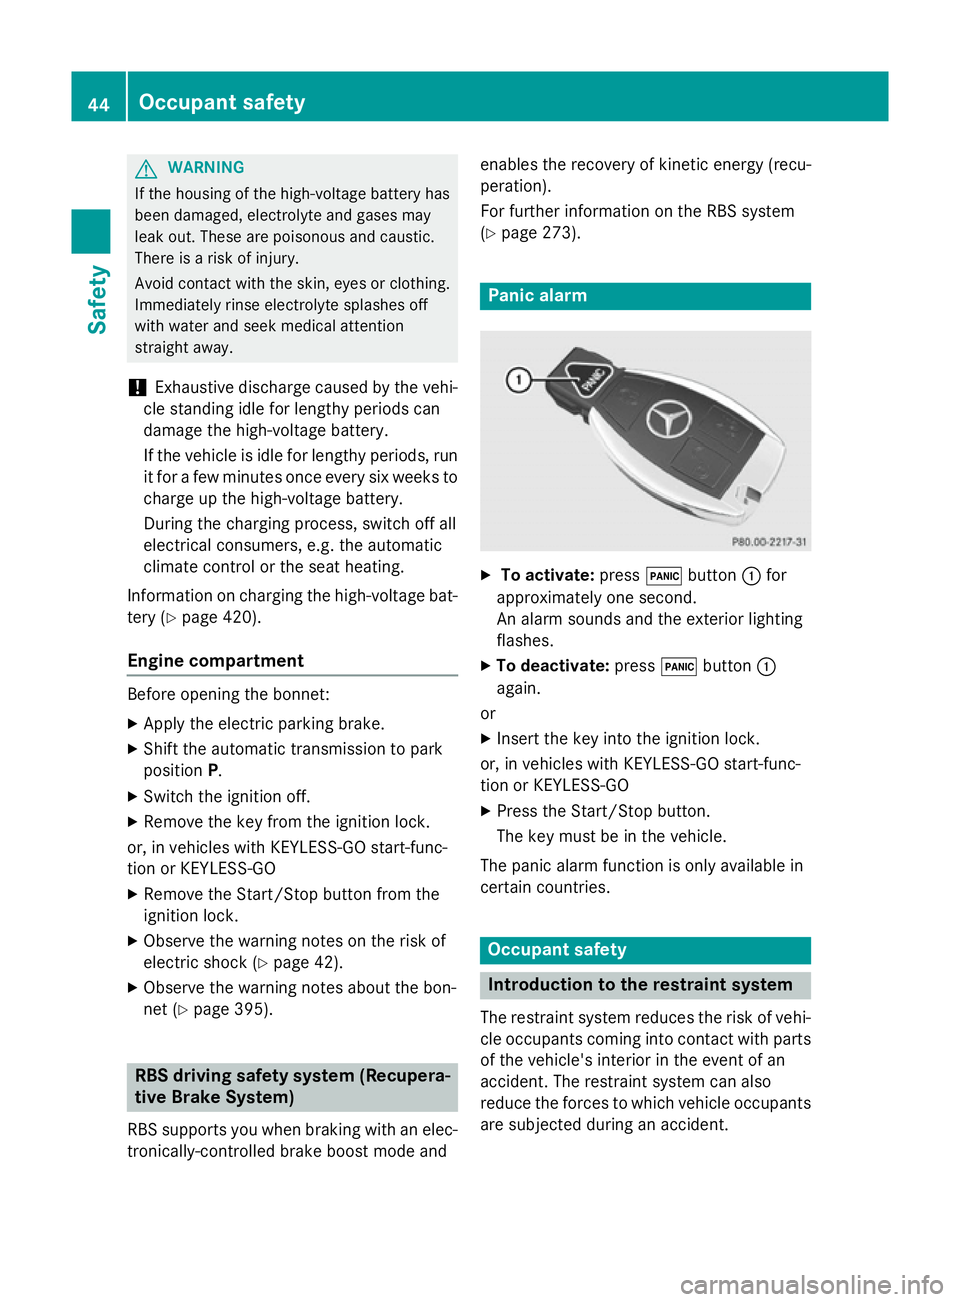
X
To activate: press!button :for
approximately one second.
An alarm sounds and the exterior lighting
flashes.
X To deactivate: press!button :
again.
or
X Insert the key into the ignition lock.
or, in vehicles with KEYLESS-GO start-func-
tion or KEYLESS ‑GO
X Press the Start/Stop button.
The key must be in the vehicle.
The panic alarm function is only available in
certain countries. Occupant safety
Introduction to the restraint system
The restraint system reduces the risk of vehi- cle occupants coming into contact with parts
of the vehicle's interior in the event of an
accident. The restraint system can also
reduce the forces to which vehicle occupants
are subjected during an accident. 44
Occupant safetySafety
Page 154 of 489
Useful information
............................152
Overview of climate control sys-
tems ................................................... 152
Operating the climate control sys-
tem ..................................................... 160
Adjusting the air vents .....................181 151Climate control
Page 155 of 489
Useful information
i This Owner's Manual describes all mod-
els, series and optional equipment for your
vehicle that were available at the time of
going to press. National variations are pos- sible. Note that your vehicle may not be
equipped with all of the functions descri-
bed. This is also the case for systems and
functions relevant to safety.
i Read the information on qualified special-
ist workshops: (Y page 27). Overview of climate control systems
Important safety notes
Observe the settings recommended on the
following pages. The windows could other-
wise mist up.
To prevent the windows from misting up:
R switch off climate control only briefly
R switch on air-recirculation mode only
briefly
R switch on the cooling with air dehumidifi-
cation function
R switch on the "demist windscreen" function
briefly, if required
Climate control regulates the temperature
and air humidity in the vehicle interior. The
interior filter cleans the air, thus improving
the interior climate.
For vehicles with a combustion engine, the
cooling with air dehumidification function is
only available when the engine is running. For hybrid vehicles, the "Cooling with air dehu-
midification" function is also available via the
electric refrigerant compressor when the
engine is not running. Optimum climate con-
trol is only achieved with the side windows
and roof closed.
The residual heat function can only be acti-
vated or deactivated with the ignition
switched off (Y page 169). i
Ventilate the vehicle for a brief period
during warm weather, e.g. using the con-
venience opening feature (Y page 108).
This will speed up the cooling process and
the desired interior temperature will be
reached more quickly.
i The integrated filter filters out most par-
ticles of dust and soot and completely fil-
ters out pollen. It also reduces gaseous pol-
lutants and odours. A clogged filter reduces
the amount of air supplied to the vehicle
interior. For this reason, you should always observe the interval for replacing the filter,which is specified in the Service Booklet. As this depends on environmental conditions,
e.g. heavy air pollution, the interval may be
shorter than stated in the Service Booklet.
i It is possible that the blower may be acti-
vated automatically 60 minutes after the
key has been removed depending on vari-
ous factors, e.g. the outside temperature.
The vehicle is then ventilated for
30 minutes to dry the automatic climate
control. 152
Overview of climate control systemsClimate control
Page 156 of 489
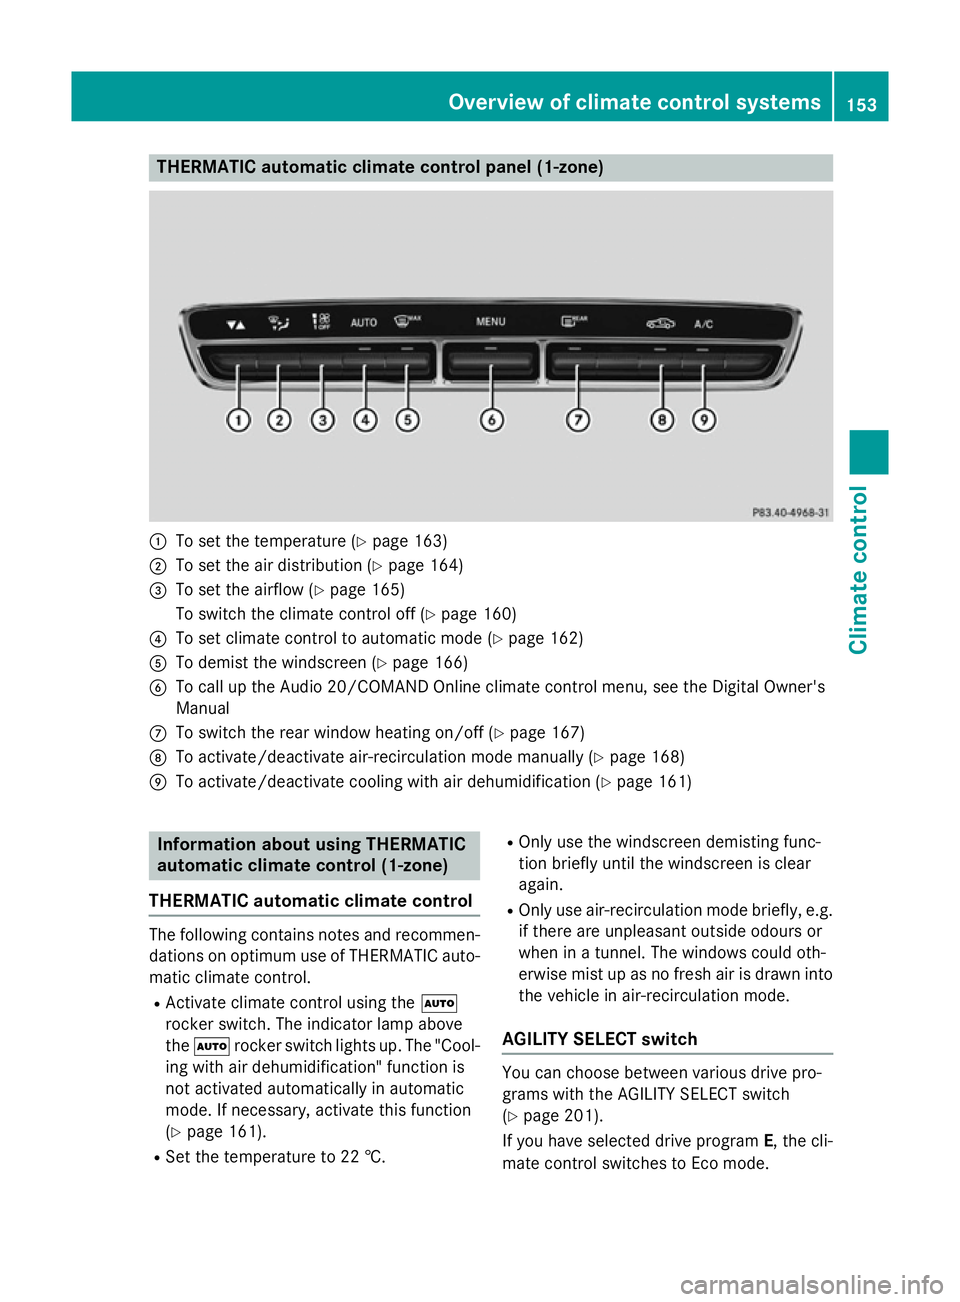
THERMATIC automatic climate control panel (1-zone)
:
To set the temperature (Y page 163)
; To set the air distribution (Y page 164)
= To set the airflow (Y page 165)
To switch the climate control off (Y page 160)
? To set climate control to automatic mode (Y page 162)
A To demist the windscreen (Y page 166)
B To call up the Audio 20/COMAND Online climate control menu, see the Digital Owner's
Manual
C To switch the rear window heating on/off (Y page 167)
D To activate/deactivate air-recirculation mode manually (Y page 168)
E To activate/deactivate cooling with air dehumidification (Y page 161)Information about using THERMATIC
automatic climate control (1 ‑zone)
THERMATIC automatic climate control The following contains notes and recommen-
dations on optimum use of THERMATIC auto-
matic climate control.
R Activate climate control using the Ã
rocker switch. The indicator lamp above
the à rocker switch lights up. The "Cool-
ing with air dehumidification" function is
not activated automatically in automatic
mode. If necessary, activate this function
(Y page 161).
R Set the temperature to 22 †. R
Only use the windscreen demisting func-
tion briefly until the windscreen is clear
again.
R Only use air-recirculation mode briefly, e.g.
if there are unpleasant outside odours or
when in a tunnel. The windows could oth-
erwise mist up as no fresh air is drawn into
the vehicle in air-recirculation mode.
AGILITY SELECT switch You can choose between various drive pro-
grams with the AGILITY SELECT switch
(Y
page 201).
If you have selected drive program E, the cli-
mate control switches to Eco mode. Overvie
w of climate cont rol systems
153Climate control