2014 MERCEDES-BENZ C-CLASS ESTATE ECU
[x] Cancel search: ECUPage 26 of 489
Hybrid system ................................ 364
LIM (cruise control) ........................ 220
LIM (DISTRONIC PLUS) .................. 227
LIM (variable SPEEDTRONIC) ......... 223
Overview .......................................... 35
Parking brake ................................ 361
PASSENGER AIR BAG ...................... 46
RBS (Recuperative Brake Sys-
tem) ............................................... 364
Reserve fuel ................................... 362
Seat belt ........................................ 353
SRS ................................................ 285
Steering ......................................... 367
Tyre pressure monitor ................... 366
Warning triangle ................................ 410
Warnings
Stickers ........................................... 42
Washer fluid
Display messag e............................ 351
Wheel and tyre combinations
see Tyres
Wheel bolt tightening torque ........... 447
Wheel chock ...................................... 443
Wheels
Changing a whee l.......................... 441
Changing/replacing ....................... 442
Checking ........................................ 433
Cleaning ......................................... 403
Emergency spare wheel ................. 463
Fitting a new wheel ........................ 446
Fitting a wheel ............................... 442
Important safety notes .................. 432
Removing a whee l.......................... 446
Storing ........................................... 442
Tightening torque ........................... 447
Wheel size/tyre size ...................... 448
Windowbag
Display message ............................ 328
Operation ......................................... 53
Windows
Cleaning ......................................... 403
see Side windows
Windscreen
Demisting ...................................... 166
Windscreen washer fluid
see Windscreen washer system
Windscreen washer system
Notes ............................................. 477 Topping up ..................................... 398
Windscreen wipers
Problem (malfunction) ................... 150
Rear window wipe r........................ 147
Replacing the wiper blades ............ 147
Switching on/of f........................... 146
Winter operation
Important safety notes .................. 434
Radiator cover ............................... 396
Slippery road surfaces ................... 219
Snow chains .................................. 435
Summer tyres ................................ 434
Winter tyres
Limiting the speed (on-board com-
puter) ............................................. 315
M+S tyres ...................................... 434
Wiper blades
Cleaning ......................................... 404
Important safety notes .................. 147
Replacing ....................................... 147
Replacing (on the rear window )..... 149
Replacing (windscreen) .................. 147
Wooden trim (cleaning instruc-
tions) .................................................. 407
Workshop
see Qualified specialist workshop Index
23
Page 30 of 489
warning stickers. The cables of the vehicle's
high-voltage electrical system are orange.
Vehicles with an electric motor generate sig-
nificantly less noise than vehicles with inter-
nal combustion engines. As a result, in certain situations your vehicle may not be heard by
other road users. This can happen, for exam-
ple, when you are parking and your vehicle is not seen by other road users. This requires
you to adopt a particularly anticipatory driving
style, as it is necessary to allow for the pos-
sibility that other road users may behave
unpredictably. Declarations of conformity
Wireless vehicle components The following information applies to all com-
ponents of the vehicle and the information
systems and communication devices integra-
ted into the vehicle which receive and/or
transmit radio waves:
The components of this vehicle that receive
and/or transmit radio waves are compliant
with the basic requirements and all other rel- evant conditions of Directive 1999/5/E C.
You can obtain further information from any
Mercedes-Benz Service Centre.
Electromagnetic compatibility The electromagnetic compatibility of the vehi-
cle components has been checked and certi-fied according to the currently valid version of
Regulation ECE-R 10. Diagnostics connection
The diagnostics connection is only intended
for the connection of diagnostic equipment at a qualified specialist workshop. G
WARNING
If you connect equipment to a diagnostics
connection in the vehicle, it can affect the
operation of the vehicle systems. This may affect the operating safety of the vehicle.
There is a risk of an accident.
Do not connect any equipment to a diagnos-
tics connection in the vehicle.
G
WARNING
Objects in the driver's footwell may restrict
the clearance around the pedals or block a
depressed pedal. This jeopardises the oper-
ating and road safety of the vehicle. There is a risk of an accident.
Stow all objects securely in the vehicle so that
they do not get into the driver's footwell.
Always fit the floormats securely and as pre-
scribed in order to ensure that there is always sufficient room for the pedals. Do not use
loose floormats and do not place several floor-mats on top of one another.
! If the engine is switched off and equip-
ment on the diagnostics connection is
used, the starter battery may discharge.
Connecting equipment to the diagnostics
connection can lead to emissions monitoring information being reset, for example. This
may lead to the vehicle failing to meet the
requirements of the next emissions test dur-
ing the main inspection. Qualified specialist workshop
A qualified specialist workshop has the nec-
essary special skills, tools and qualifications
to correctly carry out any necessary work on
your vehicle. This particularly applies to work
relevant to safety.
Observe the notes in the Service Booklet.
Always have the following work carried out at a qualified specialist workshop:
R work relevant to safety
R service and maintenance work
R repair work
R modifications, installations and conver-
sions Introduction
27 Z
Page 46 of 489
Have the restraint system checked and
repaired immediately at a qualified specialist
workshop. After an accident, immediately
switch the ignition off and remove the key
from the ignition lock.
If components of the restraint system are
activated during an accident, the hybrid sys-
tem is automatically deactivated.
The hybrid system is not activated when the
vehicle is started if:
R a short circuit is detected in the hybrid sys-
tem.
R a hybrid system electrical connection is
disconnected.
This ensures that you do not come into con-
tact with high voltage.
Manual deactivation of the hybrid sys-
tem The hybrid system can be deactivated man-
ually using the high voltage switch-off device.
! To prevent damage to the hybrid system
please observe the following instructions:
R only deactivate the hybrid system man-
ually in the following situations.
R work on the hybrid system may only be
carried out at a qualified specialist work-
shop, even when it has been deactivated
manually.
R if the 6 restraint system warning lamp
in the instrument cluster lights up after an
accident.
R if the vehicle is badly damaged, e.g. after an
accident, and the restraint system compo-
nents were not activated.
R if the vehicle is badly damaged and has to
be towed or transported.
X If possible, move the vehicle out of the
danger zone: shift the automatic transmis-
sion into position N.
X Release the electric parking brake.
X Roll the vehicle to a safe place and park it
safely. Get assistance from others if necessary.
The vehicle is locked automatically when the
ignition is switched on and the wheels are
turning. There is therefore a risk of being
locked out if the vehicle is being pushed or
tested on a dynamometer.
X Switch the ignition off.
X Shift the automatic transmission to park
position P.
Apply the electric parking brake
(Y page 213).
Secure the vehicle to prevent it from rolling
away (Y page 443).
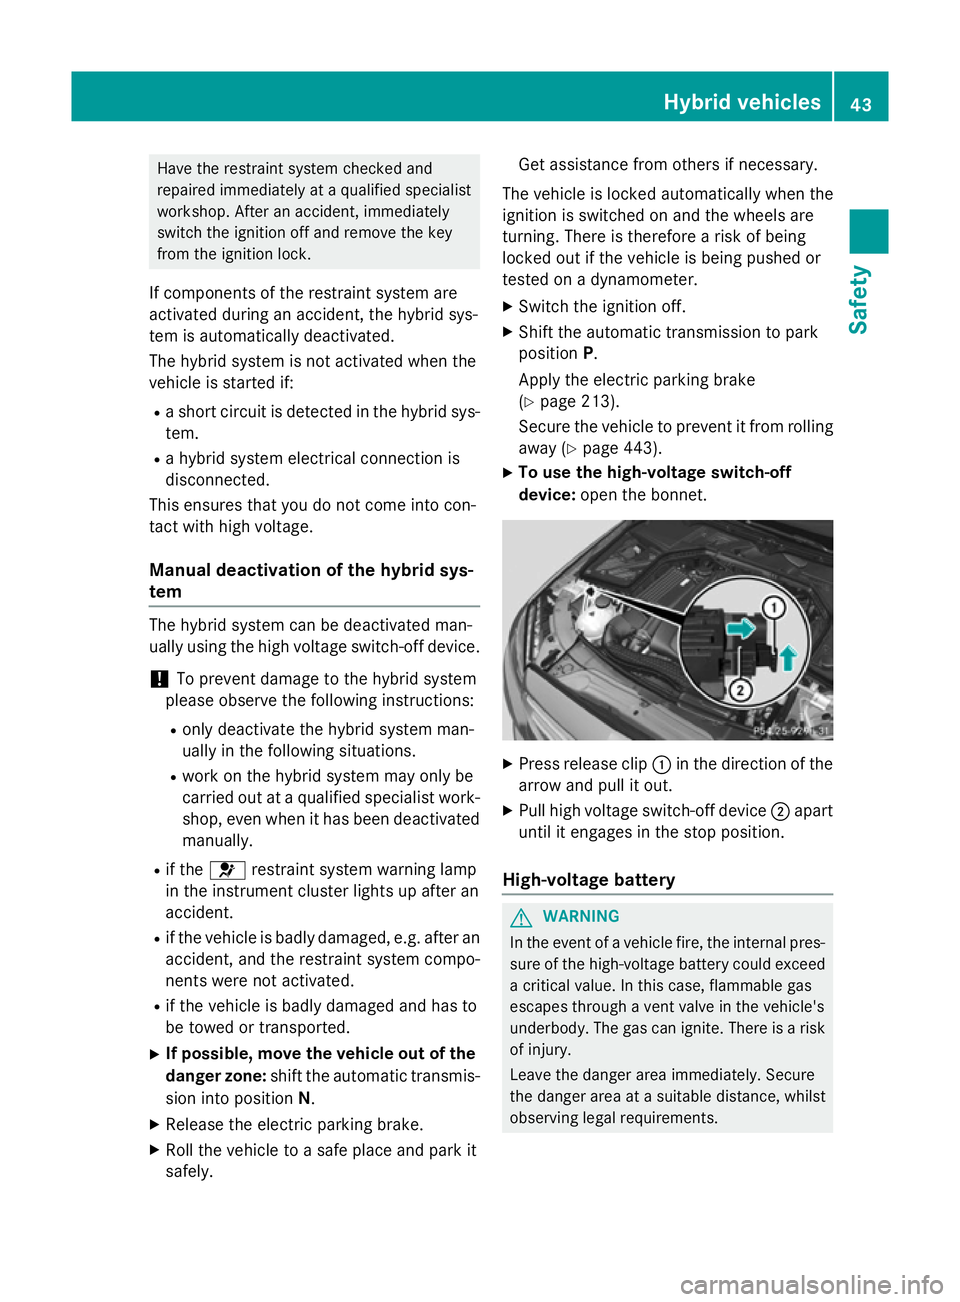
X To use the high-voltage switch-off
device: open the bonnet. X
Press release clip :in the direction of the
arrow and pull it out.
X Pull high voltage switch-off device ;apart
until it engages in the stop position.
High-voltage battery G
WARNING
In the event of a vehicle fire, the internal pres- sure of the high-voltage battery could exceeda critical value. In this case, flammable gas
escapes through a vent valve in the vehicle's
underbody. The gas can ignite. There is a risk
of injury.
Leave the danger area immediately. Secure
the danger area at a suitable distance, whilst
observing legal requirements. Hybrid vehicles
43Safety Z
Page 47 of 489
G
WARNING
If the housing of the high-voltage battery has
been damaged, electrolyte and gases may
leak out. These are poisonous and caustic.
There is a risk of injury.
Avoid contact with the skin, eyes or clothing. Immediately rinse electrolyte splashes off
with water and seek medical attention
straight away.
! Exhaustive discharge caused by the vehi-
cle standing idle for lengthy periods can
damage the high-voltage battery.
If the vehicle is idle for lengthy periods, run
it for a few minutes once every six weeks to
charge up the high-voltage battery.
During the charging process, switch off all
electrical consumers, e.g. the automatic
climate control or the seat heating.
Information on charging the high-voltage bat-
tery (Y page 420).
Engine compartment Before opening the bonnet:
X Apply the electric parking brake.
X Shift the automatic transmission to park
position P.
X Switch the ignition off.
X Remove the key from the ignition lock.
or, in vehicles with KEYLESS-GO start-func-
tion or KEYLESS ‑GO
X Remove the Start/Stop button from the
ignition lock.
X Observe the warning notes on the risk of
electric shock (Y page 42).
X Observe the warning notes about the bon-
net (Y page 395). RBS driving safety system (Recupera-
tive Brake System)
RBS supports you when braking with an elec-
tronically-controlled brake boost mode and enables the recovery of kinetic energy (recu-
peration).
For further information on the RBS system
(Y page 273). Panic alarm
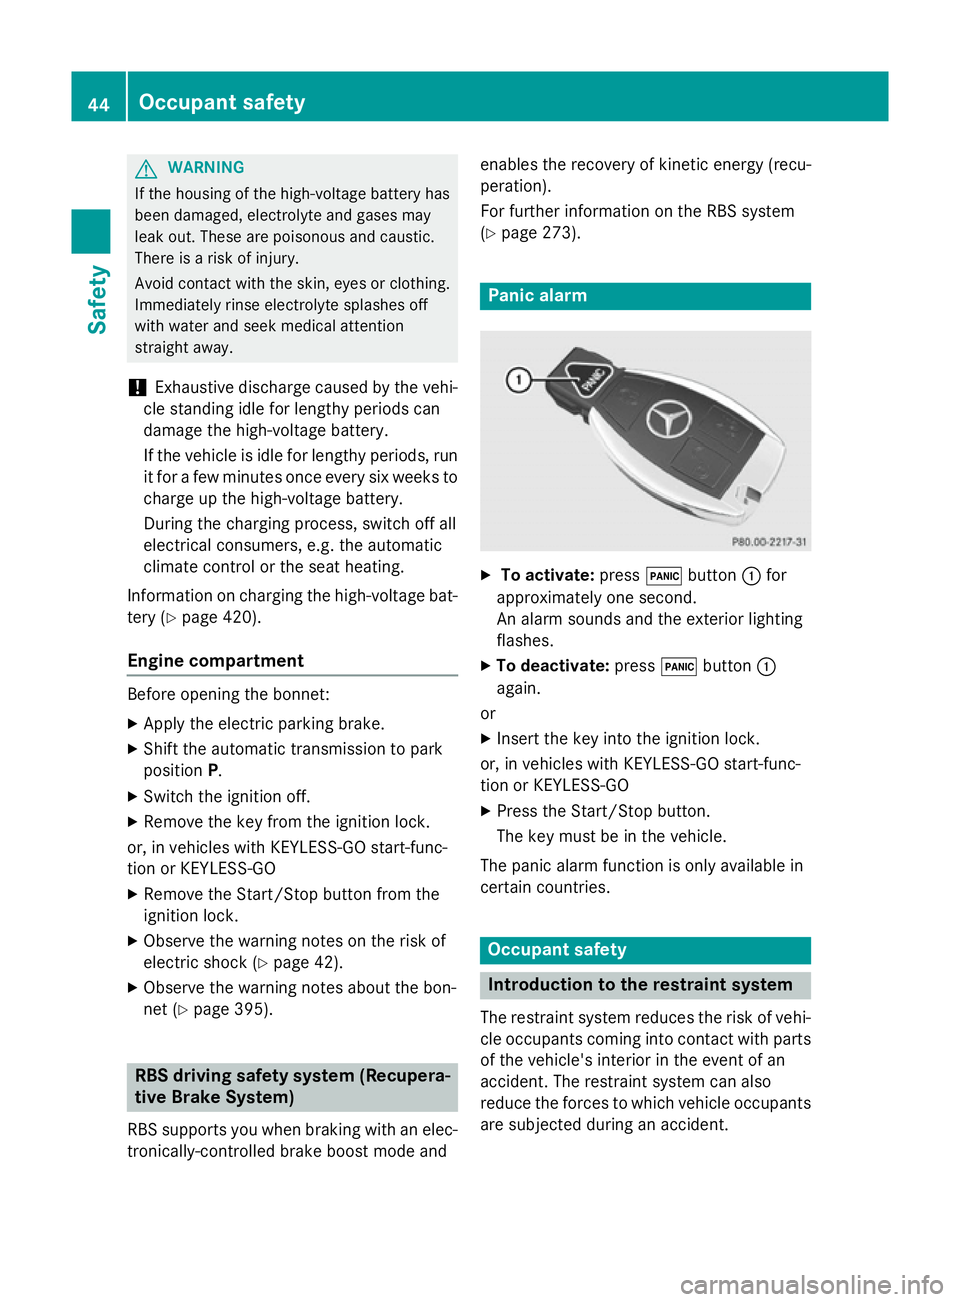
X
To activate: press!button :for
approximately one second.
An alarm sounds and the exterior lighting
flashes.
X To deactivate: press!button :
again.
or
X Insert the key into the ignition lock.
or, in vehicles with KEYLESS-GO start-func-
tion or KEYLESS ‑GO
X Press the Start/Stop button.
The key must be in the vehicle.
The panic alarm function is only available in
certain countries. Occupant safety
Introduction to the restraint system
The restraint system reduces the risk of vehi- cle occupants coming into contact with parts
of the vehicle's interior in the event of an
accident. The restraint system can also
reduce the forces to which vehicle occupants
are subjected during an accident. 44
Occupant safetySafety
Page 48 of 489
The restraint system includes:
R seat belt system
R airbags
R child restraint system
R child seat securing systems
The components of the restraint system are
complementary. They can offer maximum
protection only when all vehicle occupants:
R secure their seat belts correctly
(Y page 48)
R adjust the seat and head restraints prop-
erly (Y page 119)
As the driver, you must also make sure that
the steering wheel is adjusted correctly.
Observe the information on the correct driv-
er's seat position (Y page 118).
Additionally, you must make sure that the air- bag can inflate without restriction if deployed
(Y page 51).
An airbag is supplementary to a correctly fas-
tened seatbelt. An airbag, as an additional
safety device, provides greater protection for vehicle occupants in an accident situation. If
the seat belts offer sufficient protection in the
event of an accident, for example, the airbags
will not be deployed. Also, only the airbags
which are deemed to offer protection in the
corresponding accident situation are
deployed. However, seat belts and airbags
generally do not protect against objects pen-
etrating the vehicle from the outside.
Information on how the restraint system
operates can be found in "Deployment of the seat belt tensioner and airbags"
(Y page 60).
See "Children in the vehicle" (Y page 63) for
further information on infants and children
travelling in the vehicle as well as on child
restraint systems. Important safety notes
G
WARNING
If the restraint system is modified, it may no
longer work as intended. The restraint system
may then not perform its intended protective function by failing in an accident or triggering
unexpectedly, for example. There is an
increased risk of injury, possibly even fatal.
Never modify parts of the restraint system. Do not attempt to modify the wiring as well as
electronic components or their software.
If it is necessary to modify an airbag system
for a person with physical disabilities, contact a Mercedes-Benz Service Centre for details. Restraint system warning lamp
The functions of the restraint system are
checked after the ignition is switched on and at regular intervals while the engine is run-
ning. Therefore, malfunctions can be detec-
ted in good time.
The 6 restraint system warning lamp in
the instrument cluster lights up when the igni- tion is switched on. It goes out no later than afew seconds after the vehicle is started. The
components of the restraint system are in
operational readiness.
A malfunction has occurred if the 6
restraint system warning lamp:
R does not light up after the ignition is
switched on
R does not go out after a few seconds with
the engine running
R lights up again while the engine is running
All vehicles, except hybrid vehicles: G
WARNING
If the restraint system is malfunctioning,
restraint system components may be trig-
gered unintentionally or might not be trig-
gered at all in the event of an accident with a high rate of vehicle deceleration. This can
effect belt tensioners or airbags, for example. Occupant safety
45Safety
Z
Page 51 of 489
Secure persons less than 1.50
mtall in a suit-
able restraint system.
If a child younger than 12 years old and under
1.50 m in height is travelling in the vehicle:
R always secure the child in a child restraint
system suitable for this Mercedes-Benz
vehicle. The child restraint system must be
appropriate to the age, weight and size of
the child
R be sure to observe the instructions and
safety notes on the automatic front-
passenger front airbag deactivation system (Y page 54)
R always observe the instructions and safety
notes on "Children in the vehicle" in this
Owner's Manual (Y page 63) in addition
to the child restraint system manufactur-
er's installation instructions G
WARNING
Seat belts cannot protect as intended, if:
R they are damaged, have been modified, are
extremely dirty, bleached or dyed
R the seat belt buckle is damaged or
extremely dirty
R modifications have been made to the belt
tensioners, belt anchorages or inertia reels
Seat belts may sustain non-visible damage in an accident, e.g. due to glass splinters. Modi-
fied or damaged seat belts can tear or fail, for example in the event of an accident. Modified
seat belt tensioners may be deployed unin-
tentionally or fail to be deployed when
required. There is an increased risk of injury,
possibly even fatal.
Never modify safety belts, seat belt tension-
ers, seat belt anchorages and inertia reels.
Ensure that seat belts are not damaged or
worn and are clean. After an accident, have
the seat belts checked immediately at a quali- fied specialist workshop.
Mercedes-Benz recommends that you only
use seat belts which have been approved
specifically for your vehicle by Mercedes- Benz. Otherwise your vehicle's general oper-
ating permit could be invalidated.
Correct seat belt use Observe the safety notes on the seat belt
(Y
page 47).
All vehicle occupants must fasten their seat
belts correctly before beginning a journey.
While driving, make sure that all vehicle occu- pants are wearing their seat belts correctly.
When fastening the seat belt, make sure that:
R the seat belt buckle tongue is only inserted
into the correct belt buckle for the corre-
sponding seat
R the seat belt is pulled tight across your
body
Avoid wearing bulky clothing, e.g. a winter
coat.
R the seat belt is not twisted
Only then can exerted forces be distributed
over the surface of the belt.
R the shoulder section of the belt must
always be routed across the centre of the
shoulder
The shoulder section of the belt should not
touch the neck and may not be routed
underneath the arm. Where possible,
adjust the seat belt to the appropriate
height.
R the lap belt is routed as low and snug as
possible across the pelvis
The lap belt must always be routed across
the hip joints and never across the abdo-
men. Pregnant women, in particular, must
observe this. If necessary, press the lap
belt downwards into the hip joints and pull
taut from the shoulder section of the belt.
R the seat belt is not routed across sharp-
edged, pointed or breakable objects
If such objects are on or in your clothing,
e.g. pens, keys or spectacles, please stow
them in a suitable place.
R only one person at a time uses a seat belt 48
Occupant safetySafety
Page 52 of 489
Do not transport infants or children if they
are seated on the lap of a vehicle occupant. In the event of an accident, they could be
crushed between the vehicle occupant and seat belt.
R objects are never fastened together in a
seat belt with a person
Seat belts are only to be used to secure and
restrain persons. When securing objects, lug- gage or loads, always observe the instruc-
tions and safety notes in "Loading guidelines" (Y page 370).
Fastening and adjusting the seat belts Observe the safety notes on the seat belt
(Y page 47) and the notes on correct use of
seat belts (Y page 48).
If the centre rear seat belt is being used, also observe the information about the seat belt
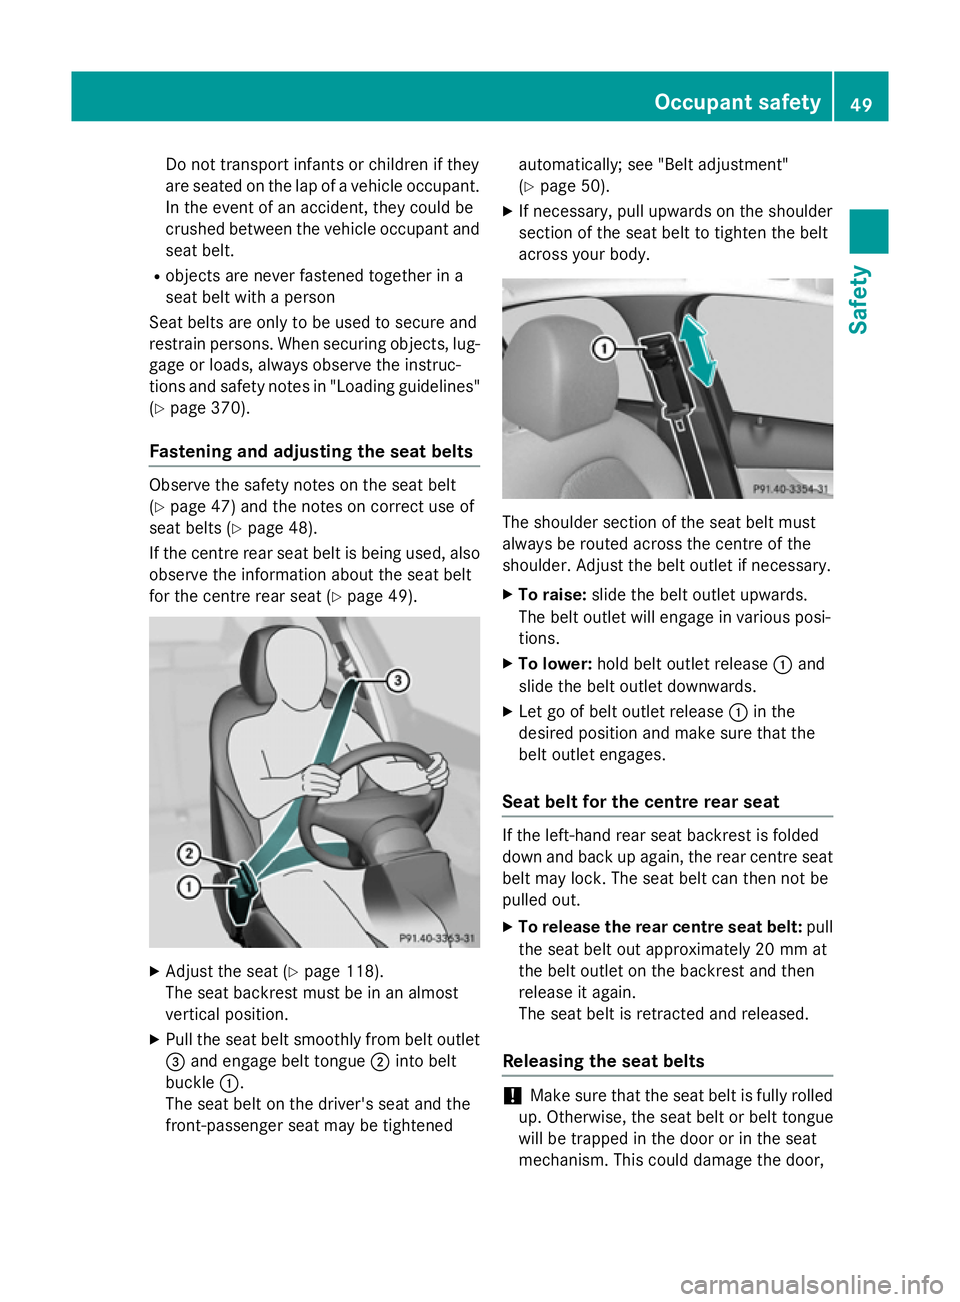
for the centre rear seat (Y page 49).X
Adjust the seat (Y page 118).
The seat backrest must be in an almost
vertical position.
X Pull the seat belt smoothly from belt outlet
= and engage belt tongue ;into belt
buckle :.
The seat belt on the driver's seat and the
front-passenger seat may be tightened automatically; see "Belt adjustment"
(Y
page 50).
X If necessary, pull upwards on the shoulder
section of the seat belt to tighten the belt
across your body. The shoulder section of the seat belt must
always be routed across the centre of the
shoulder. Adjust the belt outlet if necessary.
X To raise: slide the belt outlet upwards.
The belt outlet will engage in various posi-
tions.
X To lower: hold belt outlet release :and
slide the belt outlet downwards.
X Let go of belt outlet release :in the
desired position and make sure that the
belt outlet engages.
Seat belt for the centre rear seat If the left-hand rear seat backrest is folded
down and back up again, the rear centre seat
belt may lock. The seat belt can then not be
pulled out.
X To release the rear centre seat belt: pull
the seat belt out approximately 20 mm at
the belt outlet on the backrest and then
release it again.
The seat belt is retracted and released.
Releasing the seat belts !
Make sure that the seat belt is fully rolled
up. Otherwise, the seat belt or belt tongue
will be trapped in the door or in the seat
mechanism. This could damage the door, Occupant safety
49Safety Z
Page 54 of 489
If a rear seat passenger unfastens their seat
belt when travelling at a speed above
25 km/h, a short warning tone also sounds.
You can also cancel the rear seat belt status
indicator immediately (Y page 316).Airbags
Introduction The installation location of an airbag is iden-
tified by the AIRBAG symbol.
An airbag supplements a correctly worn seat
belt. It is not a replacement for the seat belt.
The airbag offers additional protection in
applicable accident situations.
Not all airbags are deployed in an accident.
The different airbag systems work independ-
ently of each other (Y page 60).
However, no system available today can com- pletely eliminate injuries and fatalities.
It is also not possible to completely rule out a
risk of injury caused by an airbag due to the
speed at which the airbag must be deployed.
Important safety notes G
WARNING
If you deviate from the correct seat position,
the airbag cannot perform its intended pro-
tective function and can even cause addi-
tional injuries when deployed. There is an
increased risk of serious or even fatal injuries.
In order to avoid such risks, always ensure
that all vehicle occupants:
R fasten their seatbelts correctly, including
pregnant women
R are seated correctly and maintain the fur-
thest possible distance from the airbags
R observe the following notes
Always ensure that there are no objects loca-
ted between the airbag and the vehicle occu-
pant.
R Adjust the seats properly before beginning
your journey. Always make sure that the seat is in an almost upright position. The
centre of the head restraint must support
the head at about eye level.
R Move the driver's and front-passenger
seats as far back as possible. The driver's
seat position must allow the vehicle to be
driven safely.
R Only hold the steering wheel on the out-
side. This allows the airbag to be fully
deployed.
R Always lean against the backrest while driv-
ing. Do not lean forwards or lean against
the door or side window. You may other-
wise be in the deployment area of the air-
bags.
R Always keep your feet in the footwell in
front of the seat. Do not put your feet on the
dashboard, for example. Your feet may oth-
erwise be in the deployment area of the
airbag.
R Always secure persons less than 1.50 mtall
in suitable restraint systems. Up to this
height, the seat belt cannot be worn cor-
rectly.
If a child is travelling in your vehicle, also
observe the following notes:
R Always secure children under 12 years of
age and less than 1.50 m tall in suitable
child restraint systems.
R Child restraint systems should be fitted to
the rear seats.
R Only secure a child to the front-passenger
seat when the front-passenger front airbag
is disabled, and only then in a rearward-
facing child restraint system. If the
PASSENGER AIR BAG OFF indicator lamp is permanently lit, the front-passenger front
airbag is disabled (Y page 46).
R Always observe the instructions and safety
notes on the automatic front-passenger
front airbag deactivation system
(Y page 54) and on "Children in the vehi-
cle" (Y page 63) in addition to the child
restraint system manufacturer's installa-
tion instructions. Occupant safety
51Safety Z