2014 MERCEDES-BENZ C-CLASS ESTATE lock
[x] Cancel search: lockPage 374 of 489
R
Close lockable stowage compartments
while driving.
R Stow and secure objects that are heavy,
hard, pointy, sharp-edged, fragile or too
large in the luggage compartment.
Observe the loading guidelines (Y page 370).
Front stowage compartments Glove compartment
X
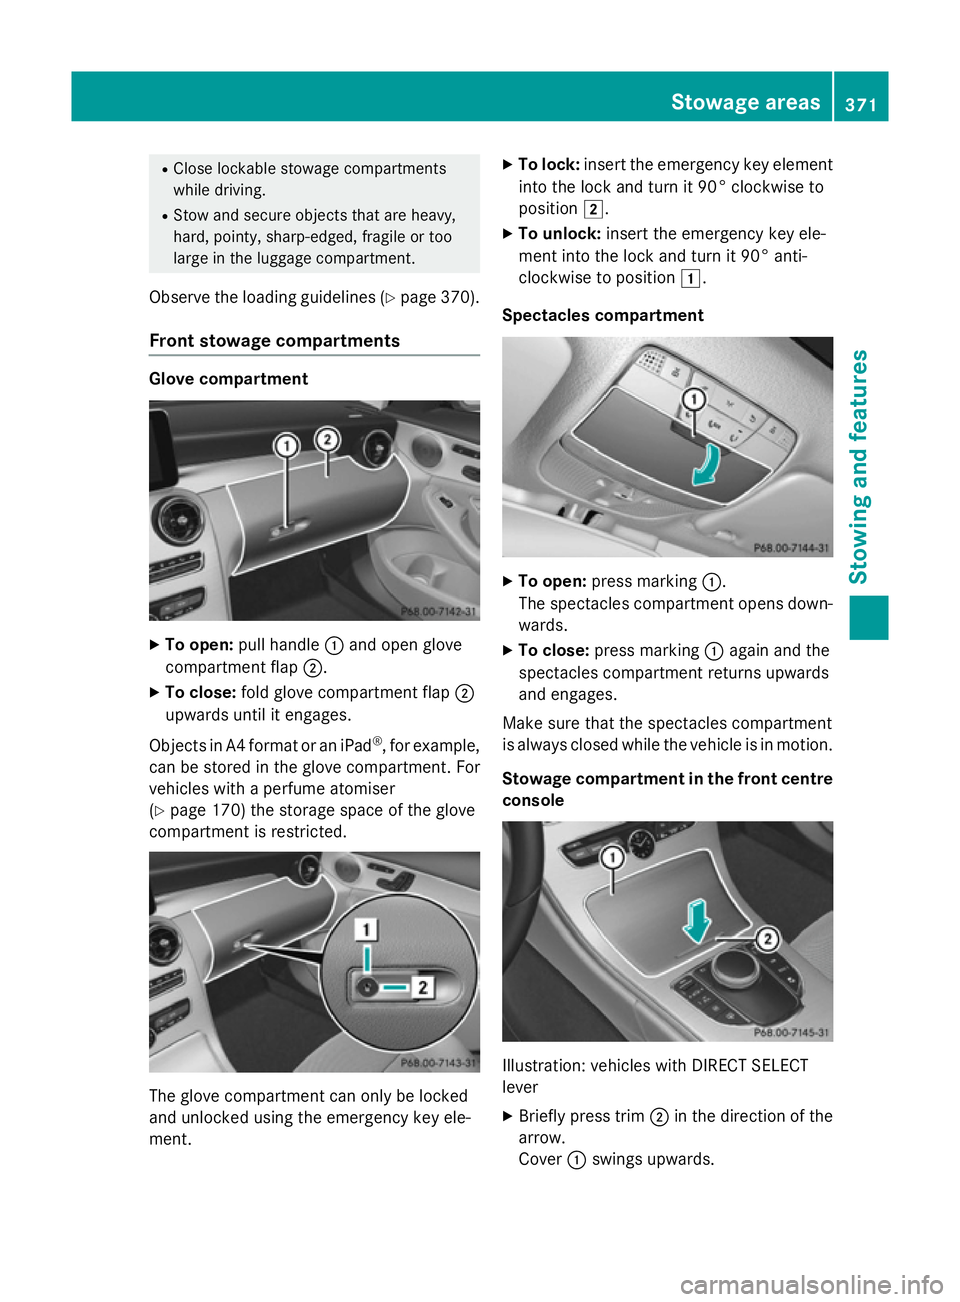
To open: pull handle :and open glove
compartment flap ;.
X To close: fold glove compartment flap ;
upwards until it engages.
Objects in A4 format or an iPad ®
, for example,
can be stored in the glove compartment. For
vehicles with a perfume atomiser
(Y page 170) the storage space of the glove
compartment is restricted. The glove compartment can only be locked
and unlocked using the emergency key ele-
ment. X
To lock: insert the emergency key element
into the lock and turn it 90° clockwise to
position 2.
X To unlock: insert the emergency key ele-
ment into the lock and turn it 90° anti-
clockwise to position 1.
Spectacles compartment X
To open: press marking :.
The spectacles compartment opens down- wards.
X To close: press marking :again and the
spectacles compartment returns upwards
and engages.
Make sure that the spectacles compartment
is always closed while the vehicle is in motion.
Stowage compartment in the front centre
console Illustration: vehicles with DIRECT SELECT
lever
X Briefly press trim ;in the direction of the
arrow.
Cover :swings upwards. Stowage areas
371Stowing and features Z
Page 377 of 489
Observe the loading guidelines (Y
page 370).
The outside and the middle rear seat backr-
ests can be folded down separately to
increase the luggage compartment capacity.
The division ratio is 40% to 20% to 40%.
The locking mechanisms of both outer rear
seat backrests open electrically. To do so,
press the button either to the side of the rear seat backrests or in the luggage compart-
ment when the tailgate is open. The corre-
sponding rear seat backrests then fold
forward automatically.
Folding the rear seat backrest forward X
Vehicles without memory function: if nec-
essary, move the driver's or front-
passenger seat forwards.
X Vehicles with memory function: when one
or both parts of the rear seat backrest are
folded forwards, the respective front seat
moves forward slightly, when necessary, in order to avoid contact.
X Fully insert the rear seat backrest head
restraints. Release handle in the luggage compartment
Release handle next to the seat backrest
Left and right seat backrest:
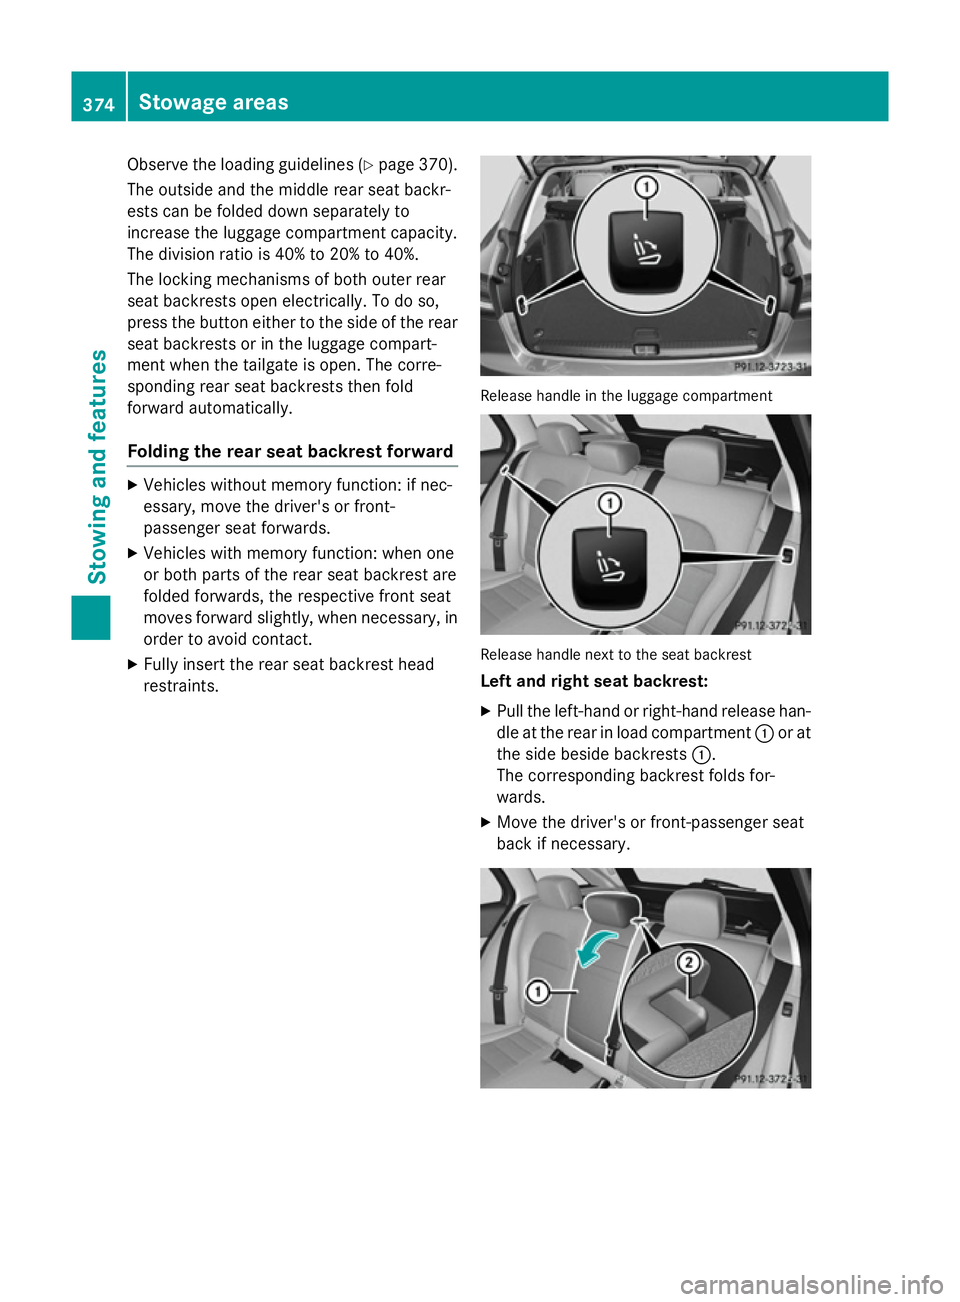
X Pull the left-hand or right-hand release han-
dle at the rear in load compartment :or at
the side beside backrests :.
The corresponding backrest folds for-
wards.
X Move the driver's or front-passenger seat
back if necessary. 374
Stowage areasStowing and features
Page 378 of 489
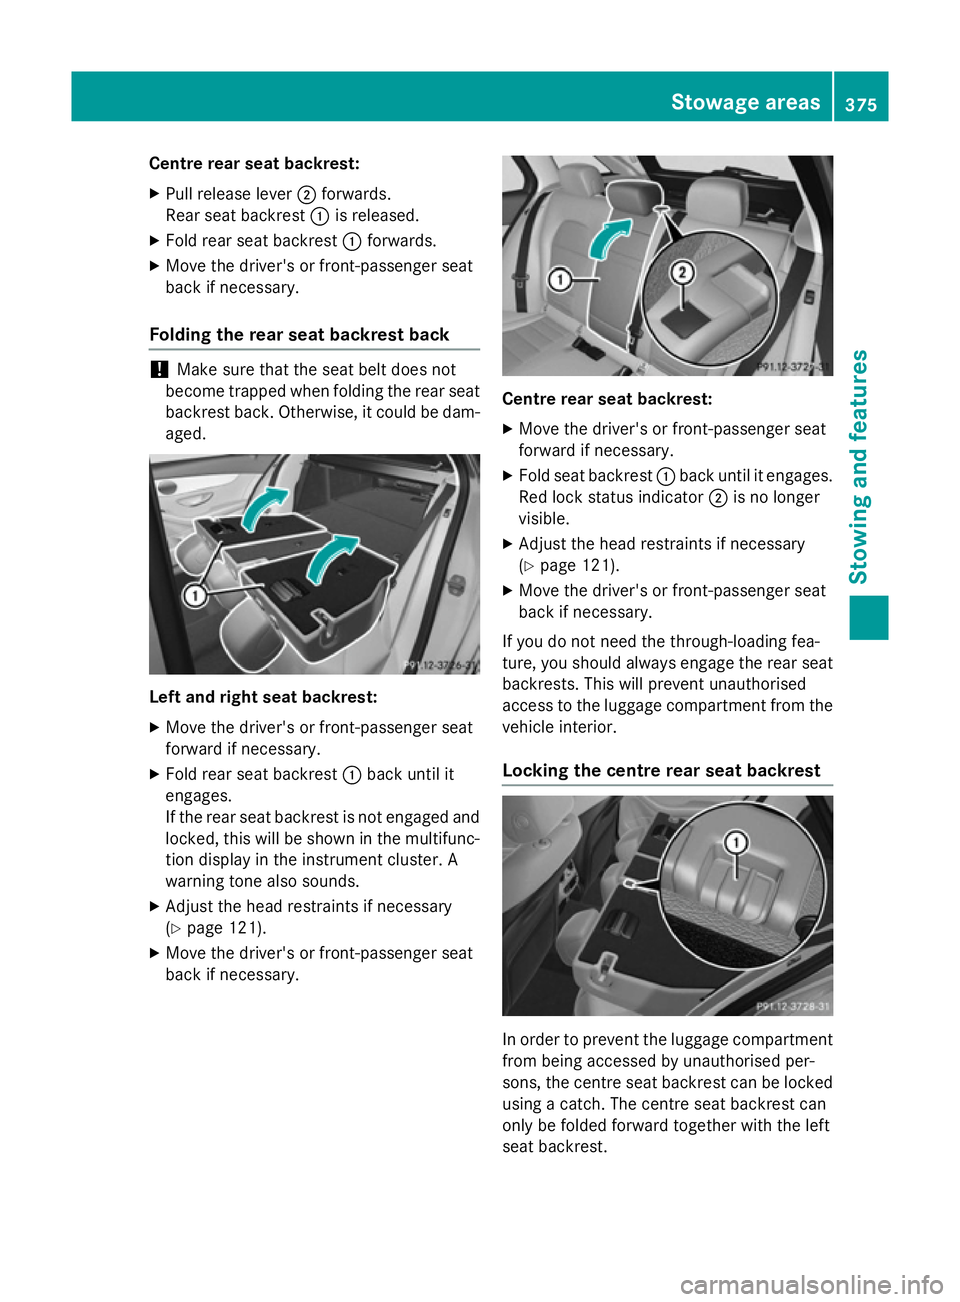
Centre rear seat backrest:
X Pull release lever ;forwards.
Rear seat backrest :is released.
X Fold rear seat backrest :forwards.
X Move the driver's or front-passenger seat
back if necessary.
Folding the rear seat backrest back !
Make sure that the seat belt does not
become trapped when folding the rear seat backrest back. Otherwise, it could be dam- aged. Left and right seat backrest:
X Move the driver's or front-passenger seat
forward if necessary.
X Fold rear seat backrest :back until it
engages.
If the rear seat backrest is not engaged and locked, this will be shown in the multifunc-
tion display in the instrument cluster. A
warning tone also sounds.
X Adjust the head restraints if necessary
(Y page 121).
X Move the driver's or front-passenger seat
back if necessary. Centre rear seat backrest:
X Move the driver's or front-passenger seat
forward if necessary.
X Fold seat backrest :back until it engages.
Red lock status indicator ;is no longer
visible.
X Adjust the head restraints if necessary
(Y page 121).
X Move the driver's or front-passenger seat
back if necessary.
If you do not need the through-loading fea-
ture, you should always engage the rear seat
backrests. This will prevent unauthorised
access to the luggage compartment from the
vehicle interior.
Locking the centre rear seat backrest In order to prevent the luggage compartment
from being accessed by unauthorised per-
sons, the centre seat backrest can be locked using a catch. The centre seat backrest can
only be folded forward together with the left
seat backrest. Stowage areas
375Stowing and features Z
Page 379 of 489
X
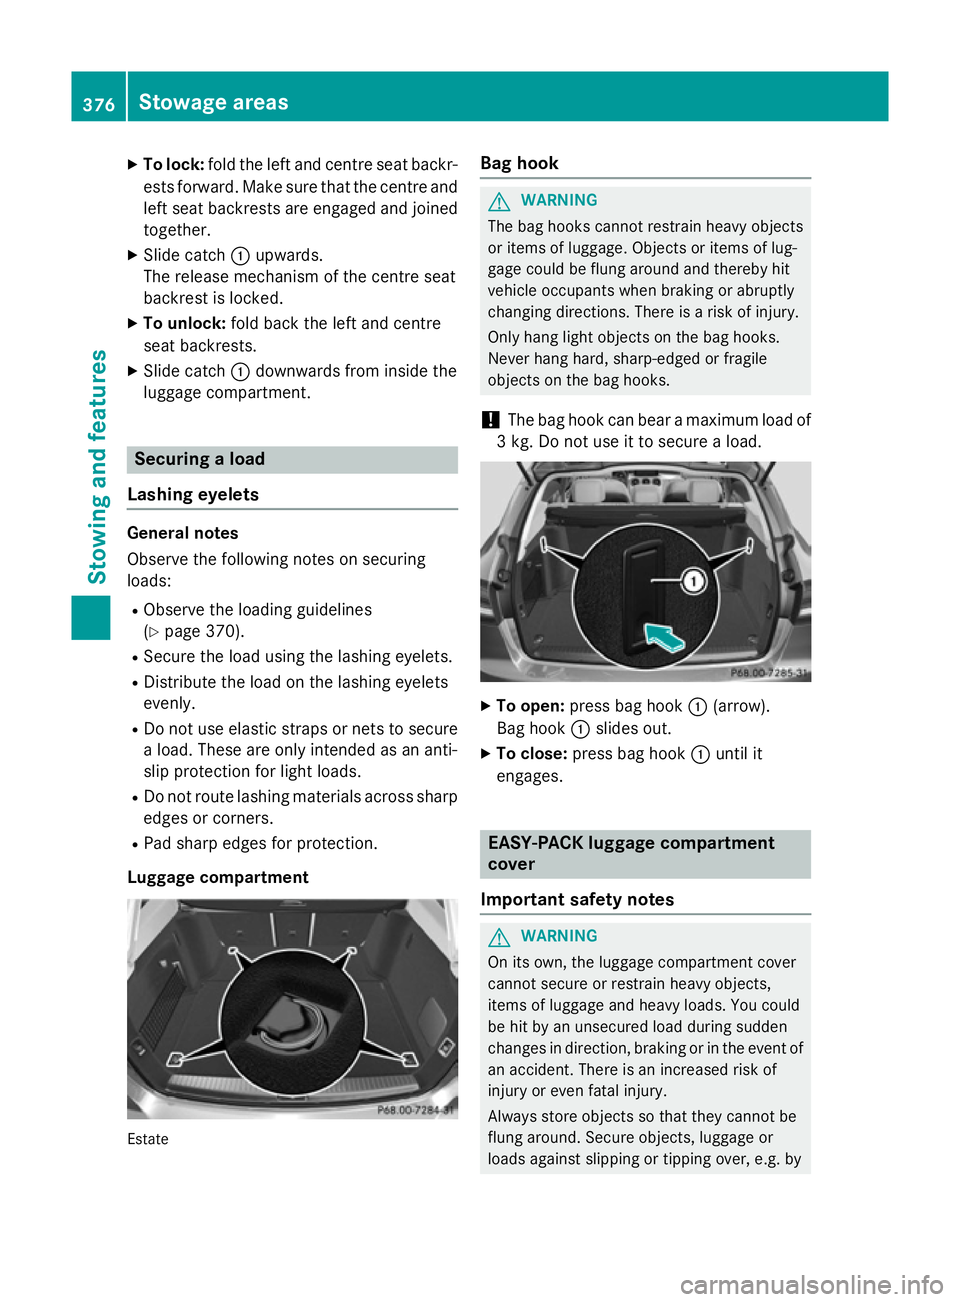
To lock: fold the left and centre seat backr-
ests forward. Make sure that the centre and
left seat backrests are engaged and joined together.
X Slide catch :upwards.
The release mechanism of the centre seat
backrest is locked.
X To unlock: fold back the left and centre
seat backrests.
X Slide catch :downwards from inside the
luggage compartment. Securing a load
Lashing eyelets General notes
Observe the following notes on securing
loads:
R Observe the loading guidelines
(Y page 370).
R Secure the load using the lashing eyelets.
R Distribute the load on the lashing eyelets
evenly.
R Do not use elastic straps or nets to secure
a load. These are only intended as an anti-
slip protection for light loads.
R Do not route lashing materials across sharp
edges or corners.
R Pad sharp edges for protection.
Luggage compartment Estate Bag hook G
WARNING
The bag hooks cannot restrain heavy objects
or items of luggage. Objects or items of lug-
gage could be flung around and thereby hit
vehicle occupants when braking or abruptly
changing directions. There is a risk of injury.
Only hang light objects on the bag hooks.
Never hang hard, sharp-edged or fragile
objects on the bag hooks.
! The bag hook can bear a maximum load of
3 kg. Do not use it to secure a load. X
To open: press bag hook :(arrow).
Bag hook :slides out.
X To close: press bag hook :until it
engages. EASY-PACK luggage compartment
cover
Important safety notes G
WARNING
On its own, the luggage compartment cover
cannot secure or restrain heavy objects,
items of luggage and heavy loads. You could
be hit by an unsecured load during sudden
changes in direction, braking or in the event of an accident. There is an increased risk of
injury or even fatal injury.
Always store objects so that they cannot be
flung around. Secure objects, luggage or
loads against slipping or tipping over, e.g. by 376
Stowage areasSto
wing an d features
Page 381 of 489
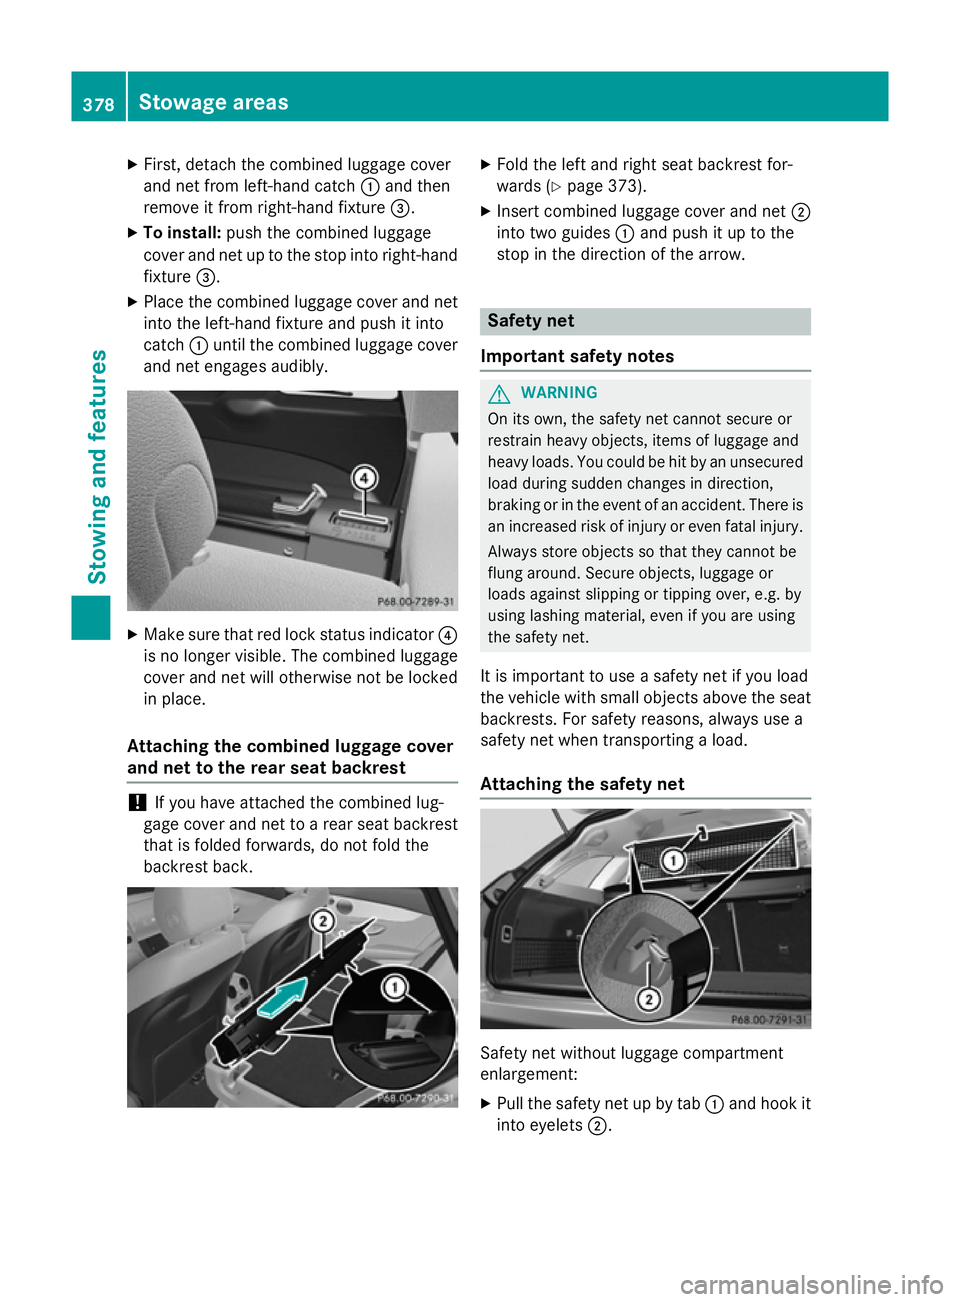
X
First, detach the combined luggage cover
and net from left-hand catch :and then
remove it from right-hand fixture =.
X To install: push the combined luggage
cover and net up to the stop into right-hand fixture =.
X Place the combined luggage cover and net
into the left-hand fixture and push it into
catch :until the combined luggage cover
and net engages audibly. X
Make sure that red lock status indicator ?
is no longer visible. The combined luggage
cover and net will otherwise not be locked
in place.
Attaching the combined luggage cover
and net to the rear seat backrest !
If you have attached the combined lug-
gage cover and net to a rear seat backrest that is folded forwards, do not fold the
backrest back. X
Fold the left and right seat backrest for-
wards (Y page 373).
X Insert combined luggage cover and net ;
into two guides :and push it up to the
stop in the direction of the arrow. Safety net
Important safety notes G
WARNING
On its own, the safety net cannot secure or
restrain heavy objects, items of luggage and
heavy loads. You could be hit by an unsecured load during sudden changes in direction,
braking or in the event of an accident. There isan increased risk of injury or even fatal injury.
Always store objects so that they cannot be
flung around. Secure objects, luggage or
loads against slipping or tipping over, e.g. by
using lashing material, even if you are using
the safety net.
It is important to use a safety net if you load
the vehicle with small objects above the seat backrests. For safety reasons, always use a
safety net when transporting a load.
Attaching the safety net Safety net without luggage compartment
enlargement:
X Pull the safety net up by tab :and hook it
into eyelets ;.378
Stowage areasStowing and features
Page 384 of 489
sunroof, the sunroof will lower slightly but
remain raised in the rear.
Attaching the roof carrier X
Secure the roof carrier to the roof rails.
X Observe the manufacturer's installation
instructions. Features
Cup holders
Important safety notes Vehicles with manual transmission:
G
WARNING
The cup holder cannot secure a drinks con-
tainer in place during a journey. If you use a
cup holder during a journey, the drinks con-
tainer could be flung around and liquid could
be spilt. Vehicle occupants could come into
contact with the liquid and, in particular, be
scalded by hot liquid. You could be distracted
from the traffic situation and lose control of
the vehicle. There is a risk of an accident and
injury.
Only use the cup holder when the vehicle is
stationary. Only place containers of a suitable size in the cup holder. Seal the container, in
particular when it contains hot liquid.
! Only use the cup holders for containers of
the right size and which have lids. The
drinks could otherwise spill. G
WARNING
If you do not correctly store objects in the
vehicle interior, they can slip or be flung
around, thus striking vehicle occupants.
There is a risk of injury, especially when brak- ing or abruptly changing directions. R
Always store objects so that they cannot be
flung around in these or in similar situa-
tions.
R Always make sure that objects do not pro-
trude from stowage compartments, lug-
gage nets or stowage nets.
R Close lockable stowage compartments
while driving.
R Stow and secure objects that are heavy,
hard, pointy, sharp-edged, fragile or too
large in the luggage compartment.
Observe the loading guidelines (Y page 370).
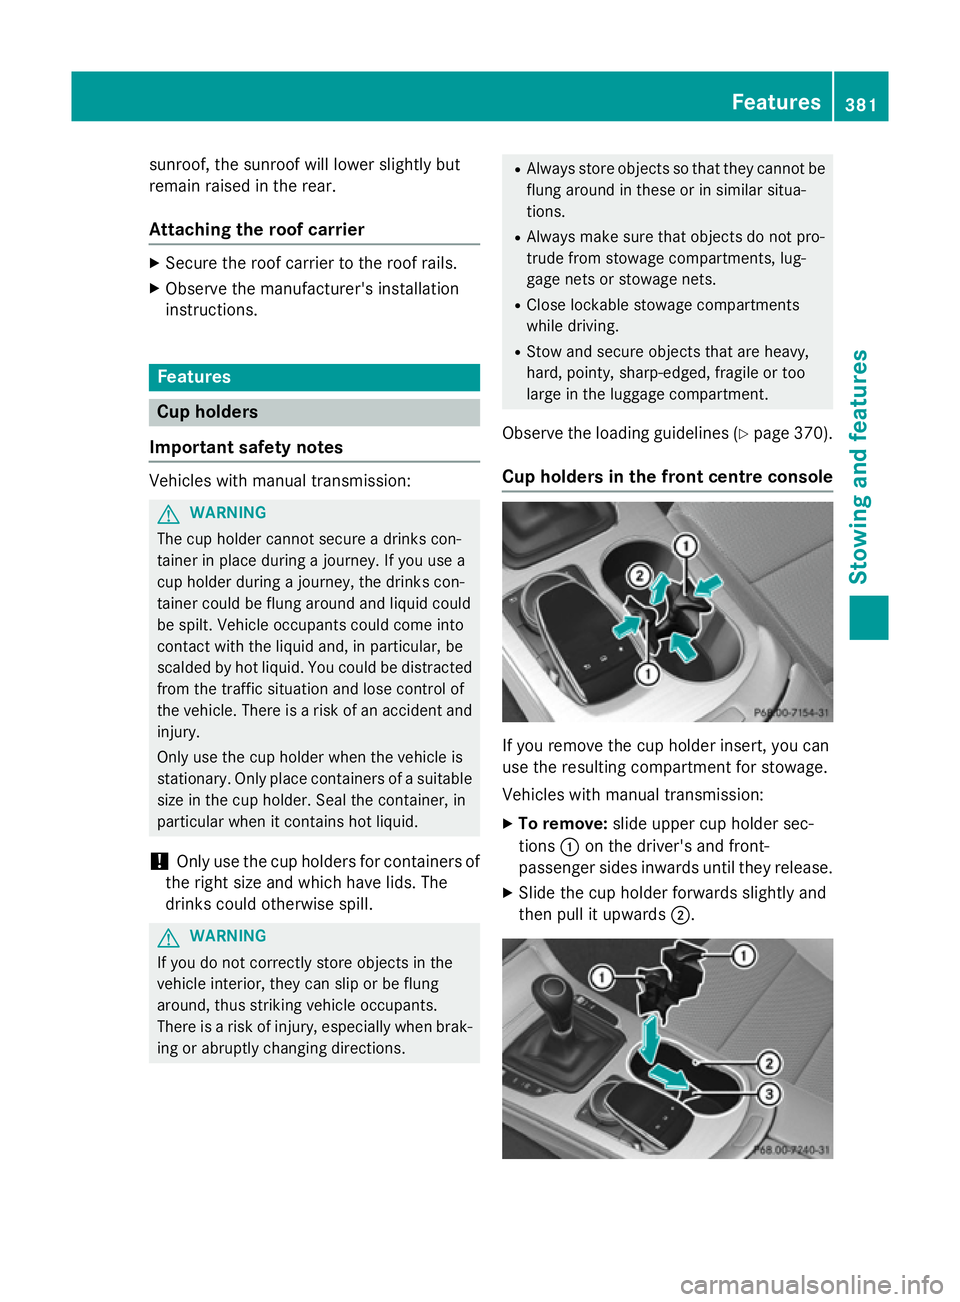
Cup holders in the front centre console If you remove the cup holder insert, you can
use the resulting compartment for stowage.
Vehicles with manual transmission:
X
To remove: slide upper cup holder sec-
tions :on the driver's and front-
passenger sides inwards until they release.
X Slide the cup holder forwards slightly and
then pull it upwards ;. Features
381Stowing and features Z
Page 387 of 489
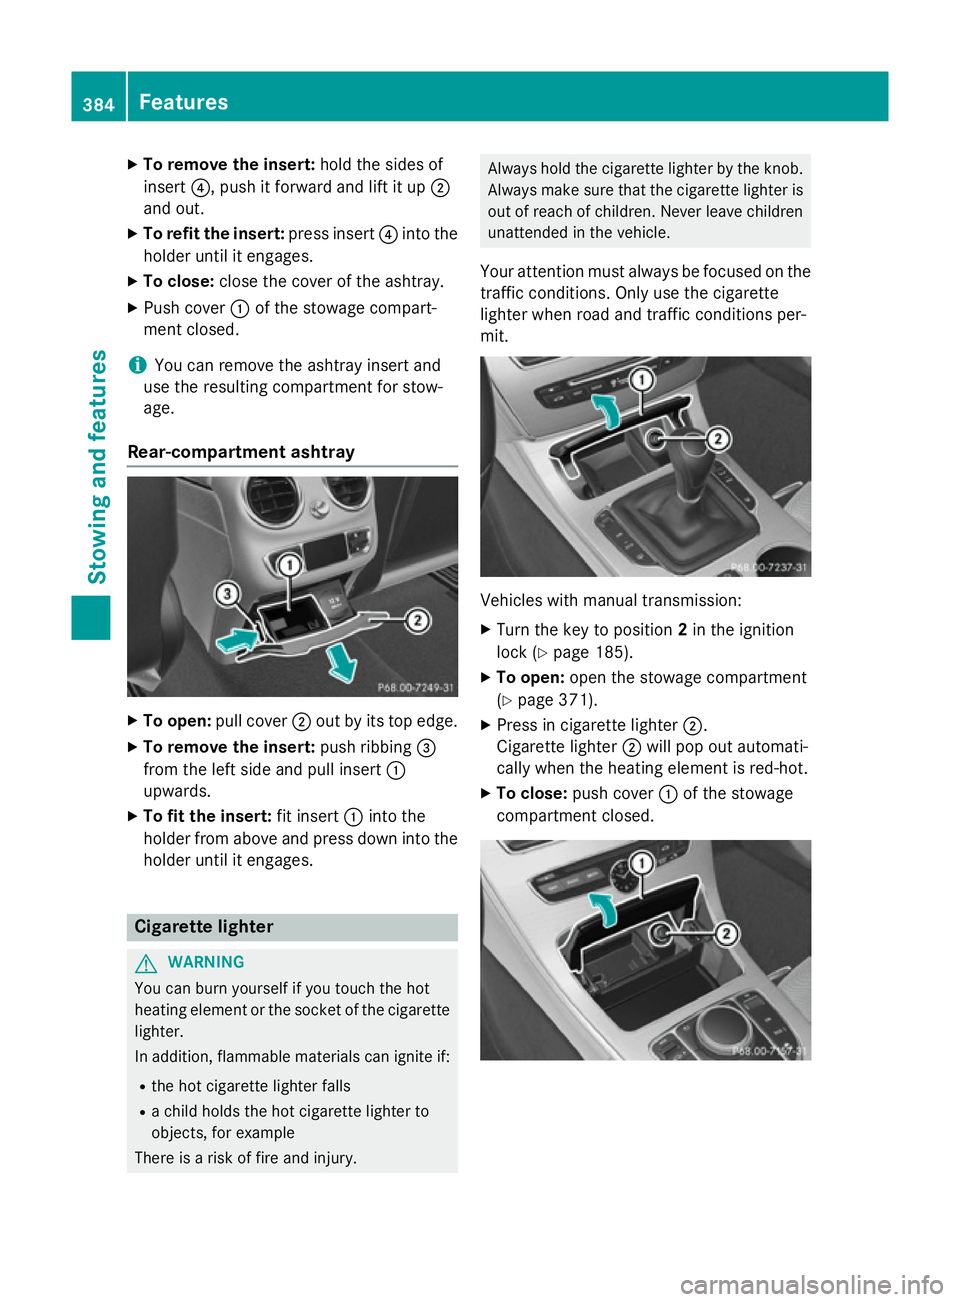
X
To remove the insert: hold the sides of
insert ?, push it forward and lift it up ;
and out.
X To refit the insert: press insert?into the
holder until it engages.
X To close: close the cover of the ashtray.
X Push cover :of the stowage compart-
ment closed.
i You can remove the ashtray insert and
use the resulting compartment for stow-
age.
Rear-compartment ashtray X
To open: pull cover ;out by its top edge.
X To remove the insert: push ribbing=
from the left side and pull insert :
upwards.
X To fit the insert: fit insert:into the
holder from above and press down into the
holder until it engages. Cigarette lighter
G
WARNING
You can burn yourself if you touch the hot
heating element or the socket of the cigarette lighter.
In addition, flammable materials can ignite if:
R the hot cigarette lighter falls
R a child holds the hot cigarette lighter to
objects, for example
There is a risk of fire and injury. Always hold the cigarette lighter by the knob.
Always make sure that the cigarette lighter is
out of reach of children. Never leave children unattended in the vehicle.
Your attention must always be focused on the
traffic conditions. Only use the cigarette
lighter when road and traffic conditions per-
mit. Vehicles with manual transmission:
X
Turn the key to position 2in the ignition
lock (Y page 185).
X To open: open the stowage compartment
(Y page 371).
X Press in cigarette lighter ;.
Cigarette lighter ;will pop out automati-
cally when the heating element is red-hot.
X To close: push cover :of the stowage
compartment closed. 384
FeaturesSto
wing an d features
Page 388 of 489
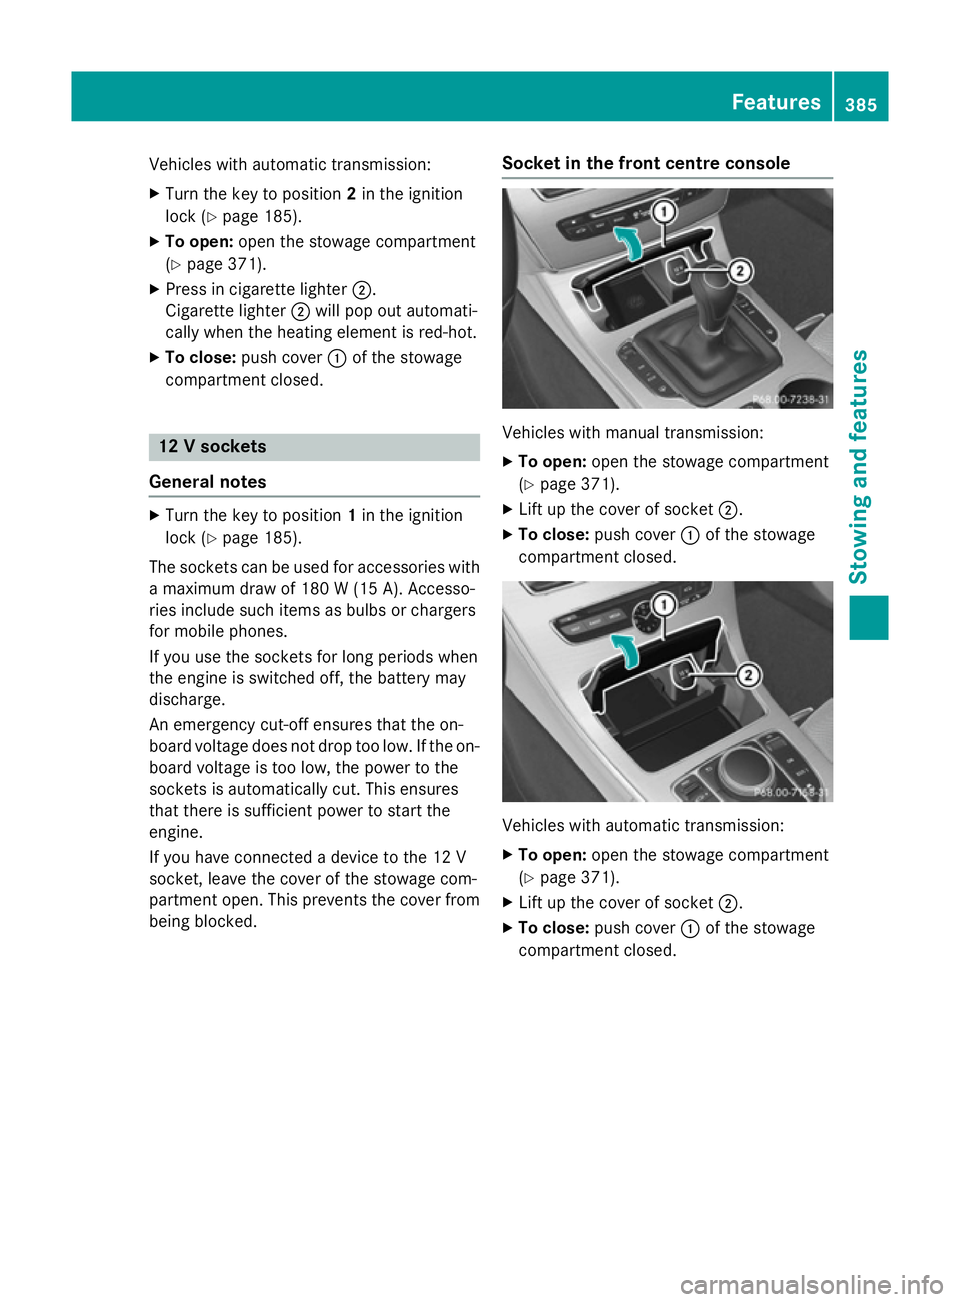
Vehicles with automatic transmission:
X
Turn the key to position 2in the ignition
lock (Y page 185).
X To open: open the stowage compartment
(Y page 371).
X Press in cigarette lighter ;.
Cigarette lighter ;will pop out automati-
cally when the heating element is red-hot.
X To close: push cover :of the stowage
compartment closed. 12 V sockets
General notes X
Turn the key to position 1in the ignition
lock (Y page 185).
The sockets can be used for accessories with a maximum draw of 180 W(15 A). Accesso-
ries include such items as bulbs or chargers
for mobile phones.
If you use the sockets for long periods when
the engine is switched off, the battery may
discharge.
An emergency cut-off ensures that the on-
board voltage does not drop too low. If the on-
board voltage is too low, the power to the
sockets is automatically cut. This ensures
that there is sufficient power to start the
engine.
If you have connected a device to the 12 V
socket, leave the cover of the stowage com-
partment open. This prevents the cover from
being blocked. Socket in the front cent
re console Vehicles with manual transmission:
X
To open: open the stowage compartment
(Y page 371).
X Lift up the cover of socket ;.
X To close: push cover :of the stowage
compartment closed. Vehicles with automatic transmission:
X
To open: open the stowage compartment
(Y page 371).
X Lift up the cover of socket ;.
X To close: push cover :of the stowage
compartment closed. Features
385Stowing an d features Z