2014 MERCEDES-BENZ C-Class navigation
[x] Cancel search: navigationPage 31 of 270

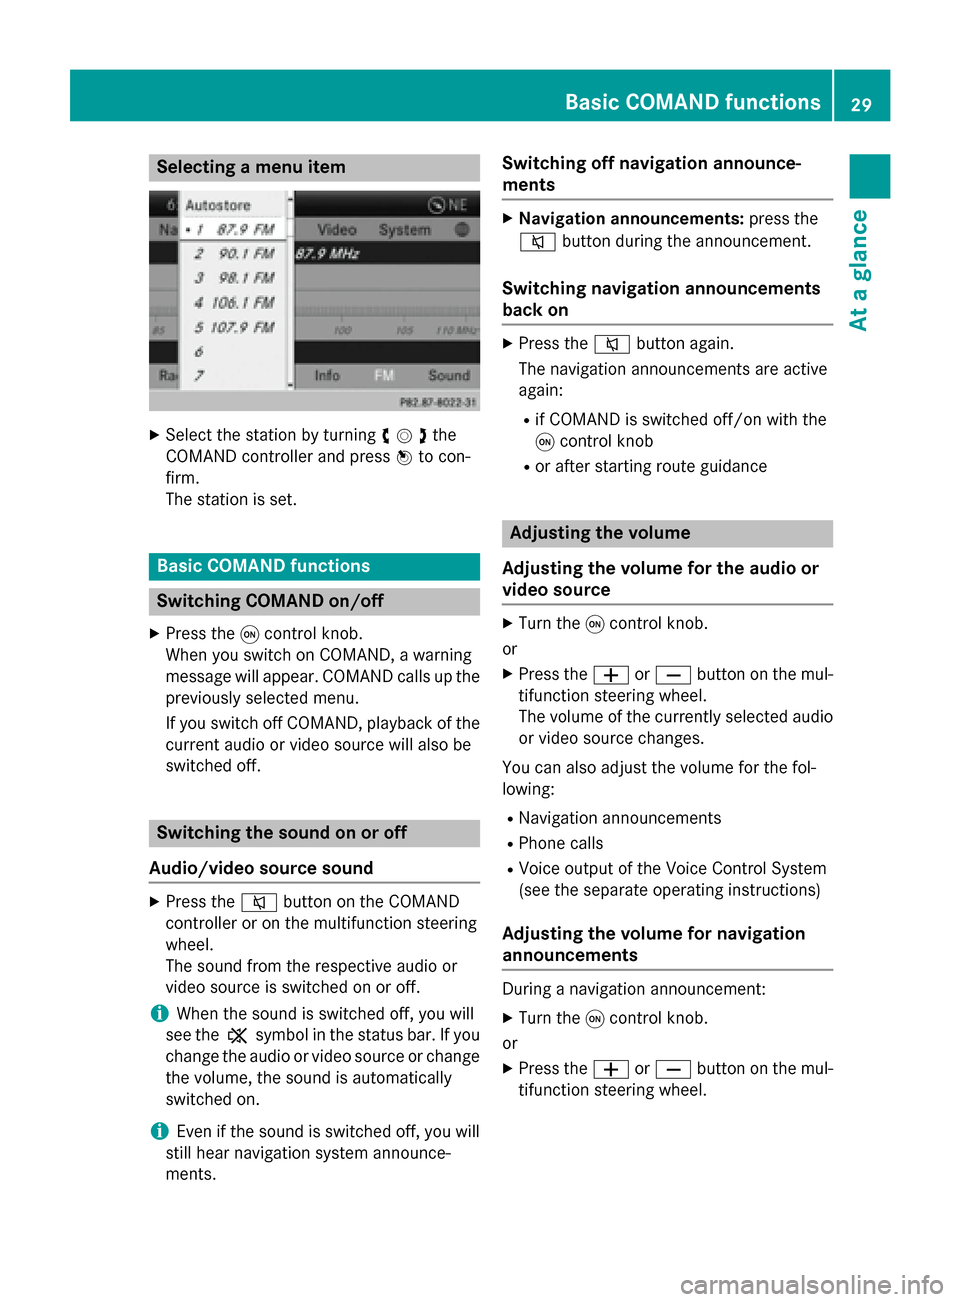
Selecting a menu item
X
Select the station by turning 00790052007Athe
COMAND controller and press 0098to con-
firm.
The station is set. Basic COMAND functions
Switching COMAND on/off
X Press the 0043control knob.
When you switch on COMAND, a warning
message will appear. COMAND calls up the previously selected menu.
If you switch off COMAND, playback of the
current audio or video source will also be
switched off. Switching the sound on or off
Audio/video source sound X
Press the 0063button on the COMAND
controller or on the multifunction steering
wheel.
The sound from the respective audio or
video source is switched on or off.
i When the sound is switched off, you will
see the 006Bsymbol in the status bar. If you
change the audio or video source or change
the volume, the sound is automatically
switched on.
i Even if the sound is switched off, you will
still hear navigation system announce-
ments. Switching off navigation announce-
ments X
Navigation announcements: press the
0063 button during the announcement.
Switching navigation announcements
back on X
Press the 0063button again.
The navigation announcements are active
again:
R if COMAND is switched off/on with the
0043 control knob
R or after starting route guidance Adjusting the volume
Adjusting the volume for the audio or
video source X
Turn the 0043control knob.
or X Press the 0081or0082 button on the mul-
tifunction steering wheel.
The volume of the currently selected audio
or video source changes.
You can also adjust the volume for the fol-
lowing:
R Navigation announcements
R Phone calls
R Voice output of the Voice Control System
(see the separate operating instructions)
Adjusting the volume for navigation
announcements During a navigation announcement:
X Turn the 0043control knob.
or
X Press the 0081or0082 button on the mul-
tifunction steering wheel. Basic COMAND functions
29At a glance
Page 37 of 270

Changing the character set
While making an entry in the input menu
(Y
page 139):
X Select the 0042symbol and press 0098to
confirm.
R ABC ABC (upper/lower case)
R 123
123 (digits)
R Other
Other (special characters such as @, €,
etc.)
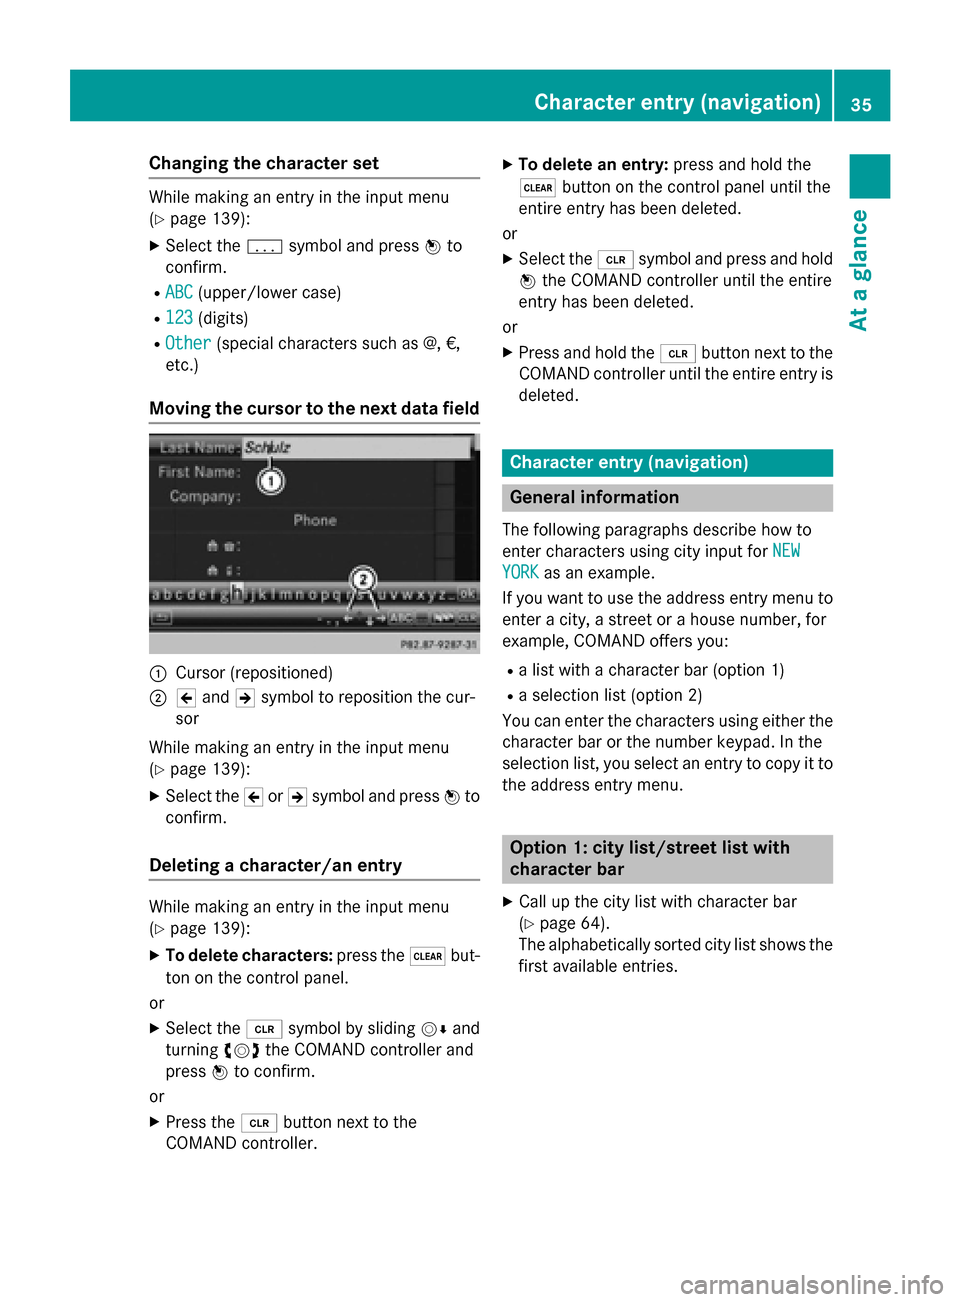
Moving the cursor to the next data field 0043
Cursor (repositioned)
0044 005D and 005Esymbol to reposition the cur-
sor
While making an entry in the input menu
(Y page 139):
X Select the 005Dor005E symbol and press 0098to
confirm.
Deleting a character/an entry While making an entry in the input menu
(Y page 139):
X To delete characters: press the0037but-
ton on the control panel.
or
X Select the 0084symbol by sliding 00520064and
turning 00790052007Athe COMAND controller and
press 0098to confirm.
or
X Press the 0084button next to the
COMAND controller. X
To delete an entry: press and hold the
0037 button on the control panel until the
entire entry has been deleted.
or X Select the 0084symbol and press and hold
0098 the COMAND controller until the entire
entry has been deleted.
or
X Press and hold the 0084button next to the
COMAND controller until the entire entry is
deleted. Character entry (navigation)
General information
The following paragraphs describe how to
enter characters using city input for NEW NEW
YORK
YORK as an example.
If you want to use the address entry menu to enter a city, a street or a house number, for
example, COMAND offers you:
R a list with a character bar (option 1)
R a selection list (option 2)
You can enter the characters using either the
character bar or the number keypad. In the
selection list, you select an entry to copy it to the address entry menu. Option 1: city list/street list with
character bar
X Call up the city list with character bar
(Y page 64).
The alphabetically sorted city list shows the first available entries. Character entry (navigation)
35At a glance
Page 38 of 270

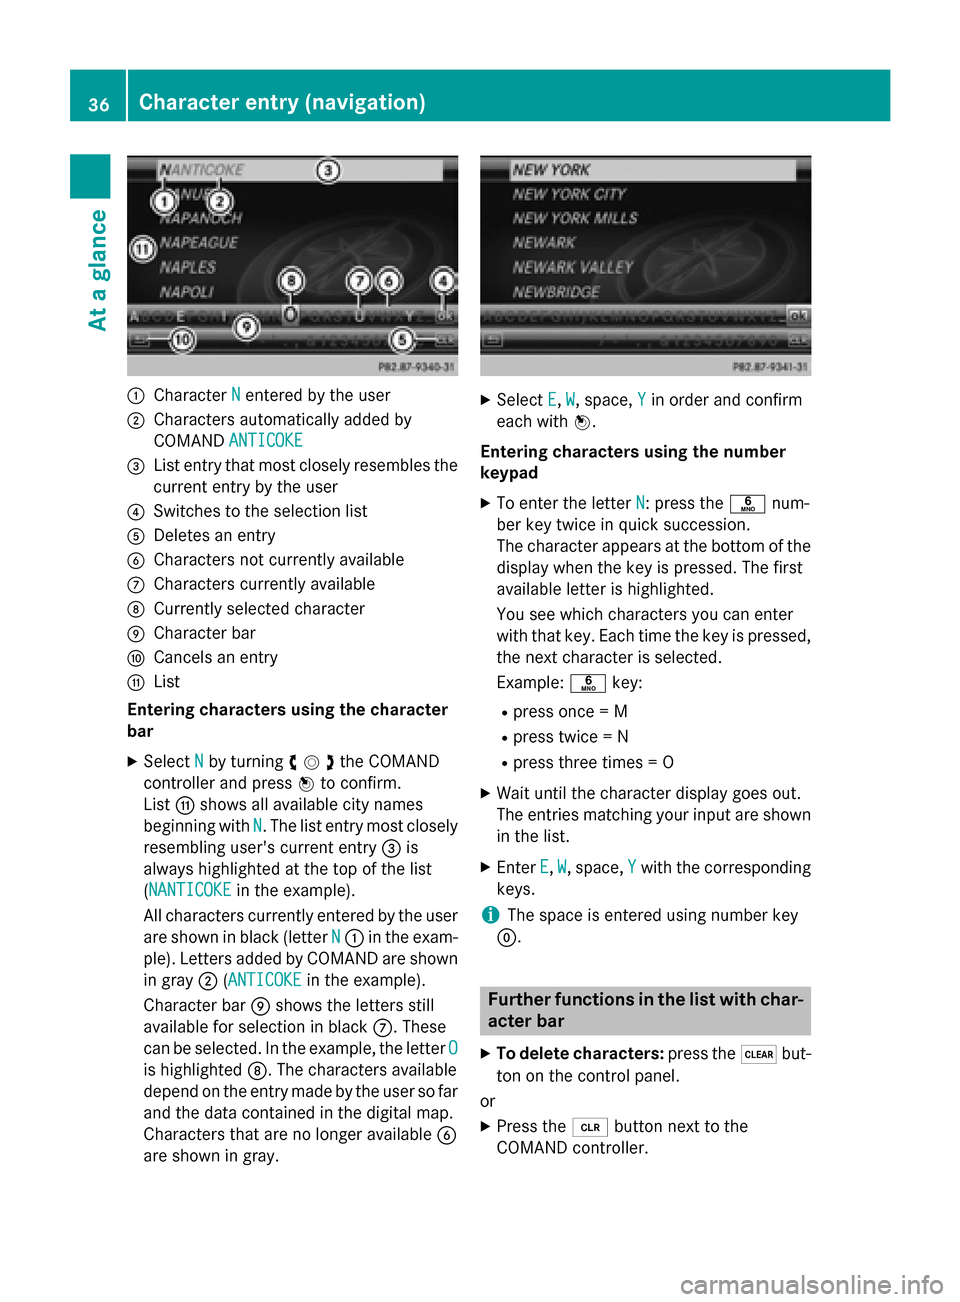
0043
Character N
Nentered by the user
0044 Characters automatically added by
COMAND ANTICOKE ANTICOKE
0087 List entry that most closely resembles the
current entry by the user
0085 Switches to the selection list
0083 Deletes an entry
0084 Characters not currently available
006B Characters currently available
006C Currently selected character
006D Character bar
006E Cancels an entry
006F List
Entering characters using the character
bar
X Select N Nby turning 00790052007Athe COMAND
controller and press 0098to confirm.
List 006Fshows all available city names
beginning with N
N. The list entry most closely
resembling user's current entry 0087is
always highlighted at the top of the list
(NANTICOKE NANTICOKE in the example).
All characters currently entered by the user
are shown in black (letter N
N 0043 in the exam-
ple). Letters added by COMAND are shown
in gray 0044(ANTICOKEANTICOKE in the example).
Character bar 006Dshows the letters still
available for selection in black 006B. These
can be selected. In the example, the letter O
O
is highlighted 006C. The characters available
depend on the entry made by the user so far and the data contained in the digital map.
Characters that are no longer available 0084
are shown in gray. X
Select E E,W
W, space, Y
Yin order and confirm
each with 0098.
Entering characters using the number
keypad
X To enter the letter N N: press the0086num-
ber key twice in quick succession.
The character appears at the bottom of the
display when the key is pressed. The first
available letter is highlighted.
You see which characters you can enter
with that key. Each time the key is pressed,
the next character is selected.
Example: 0086key:
R press once = M
R press twice = N
R press three times = O
X Wait until the character display goes out.
The entries matching your input are shown
in the list.
X Enter E
E, W W, space, Y
Ywith the corresponding
keys.
i The space is entered using number key
0045. Further functions in the list with char-
acter bar
X To delete characters: press the0037but-
ton on the control panel.
or
X Press the 0084button next to the
COMAND controller. 36
Character entry (navigation)At a glance
Page 41 of 270

longer. After this period, reactivation on the
front-passenger side means that the settings from the driver's side will be used. Transferring the driver's website
X To switch on SPLITVIEW: select System
System
from the main function bar by turning 00790052007A
the COMAND controller and press 0098to
confirm.
X Select 0044in the menu bar and confirm.
SPLITVIEW symbol 0043appears in the dis-
play, and display 0044switches to Off
Off. X
Select 00A7in the main function bar with the
remote control.
A menu appears with the following options:
R Operator's Manual
Operator's Manual
R Enter URL Enter URL
R Internet Favorites
Internet Favorites
R Mercedes-Benz Apps
Mercedes-Benz Apps
R Internet Radio
Internet Radio
R Mercedes Mobile Website
Mercedes Mobile Website
R Transfer Driver's Website
Transfer Driver's Website
X Select Transfer
Transfer Driver's
Driver'sWebsite
Websitewith
the remote control.
You see the last website called up by the
driver. Transferring a destination to the
driver
Using SPLITVIEW you can select a destination
from the front-passenger side and transfer
this to the driver's side.
X To switch on SPLITVIEW: select Settings Settings
from the main function bar by turning 00790052007A
the COMAND controller and press 0098to
confirm.
X Select 0044in the menu bar and confirm.
SPLITVIEW symbol 0043appears in the dis-
play, and display 0044switches to Off Off.
X Select 00A7in the main function bar with the
remote control.
A menu appears.
X Select Mercedes-Benz Apps Mercedes-Benz Apps with the
remote control.
You see the selection of Mercedes-Benz
Apps.
X Select Google Local Search Google Local Search with the
remote control.
Using a menu you can select a category for the destination.
X Select At Current Position At Current Position , for exam-
ple.
Using a menu you can determine the type
of search inquiry.
X Select Enter Enter Search
Search Term:
Term:, for example.
An input field appears.
X Enter the destination with the remote con-
trol and confirm the entry with 0070.
You see the results list from Google.
X Select the exact destination with the
remote control.
An additional menu appears.
X Select Navigate to Navigate to.
X A window appears on the driver's side with
the message: Accept the navigation
Accept the navigation
data from Mercedes-Benz Apps?
data from Mercedes-Benz Apps? SPLITVIEW
39At a glance
Page 44 of 270

Your COMAND equipment
These operating instructions describe all the
standard and optional equipment for your
COMAND system, as available at the time of
going to print. Country-specific differences
are possible. Please note that your
COMAND system may not be equipped with
all the features described. Display settings
Setting the brightness
The brightness detected by the display light
sensor affects the setting options for this
function. X
Press 0066.
X Select Settings Settings by turning 00790052the
COMAND controller and press 0098to con-
firm.
X Select Display
Display and press 0098to confirm.
X Select Brightness
Brightness and press0098to con-
firm.
X Adjust the brightness by turning 00790052the
COMAND controller and press 0098to con-
firm. Display design
Your COMAND display features optimized
designs for operation during daytime and
night-time hours. You can customize the
design by manually selecting day or night
design, or opt for an automatic setting. X
Press 0066.
X Select Settings Settings by turning 00790052the
COMAND controller and press 0098to con-
firm.
X Select Display
Display and press 0098to confirm.
X Select Day Mode
Day Mode ,Night Mode
Night Mode orAuto‐
Auto‐
matic
matic by turning 00790052the COMAND con-
troller and press 0098to confirm.
A dot indicates the current setting. Design Explanation
Day Mode
Day Mode The display is set perma-
nently to day design. Night Mode
Night Mode The display is set perma-
nently to night design. Automatic
Automatic If the
Automatic
Automatic setting
is selected, COMAND
evaluates the readings
from the automatic vehi- cle light sensor and auto-
matically switches
between the display
designs. Time settings
General information
If COMAND is equipped with a navigation sys- tem and has GPS reception, COMAND auto-
matically sets the time and date. You can
change the time in minute increments. The
date can also be changed.
i If you adjust the time in minute incre-
ments, any time zone settings and settings for changing between summer and stand-
ard time are lost. Switching between sum-
mer and standard time (Y page 43).42
Time settingsSystem settings
Page 45 of 270

i
The following navigation system functions
require the time, time zone and summer/
standard time to be set correctly in order to
work properly:
R route guidance on routes with time-
dependent traffic guidance
R calculation of expected time of arrival
i With this function, you can set the time for
every display in the vehicle. Setting the time/date format
X Press the 0066button.
X Select Time
Timeby turning 00790052007Athe COMAND
controller and press 0098to confirm.
X Select Format
Format and press 0098to confirm.
The 003Bsymbols show the current settings.
X Set the format by turning 00790052007Athe
COMAND controller and press 0098to con-
firm. Abbreviation Meaning
DD
DD
.MM
MM .YY
YY Day . Month . Year
(date format, two digits)
MM MM
/DD
DD /YYYY
YYYY Month/Day/Year
date format, year (all
four digits)
YY YY
/MM
MM /DD
DD Year/Month/Day
date format, year (two
digits)
HH HH
:MM
MM
(24 hrs)
(24 hrs) Hours : Minutes
(24 hour time format)
HH HH
:MM
MM (AM/PM)
(AM/PM) Hours : Minutes
(AM/PM time format)
Adjusting the time zone and switching
to Daylight Savings Time (Summer)
X Press 0066. X
Select Time
Time by turning 00790052007Athe COMAND
controller and press 0098to confirm.
X Select Time TimeZone
Zoneand press 0098to confirm.
A list of countries or time zones appears.
The 003Bdot indicates the current setting.
X Select the country or time zone by turning
00790052007A the COMAND controller and press 0098
to confirm.
A time zone list may also be displayed,
depending on the country selected.
X Select the time zone and press 0098to con-
firm.
The entry for the Automatic Time Set‐
Automatic Time Set‐
tings tings is accepted.
Subsequent operation depends on whether
the automatic changeover function to sum-
mer time is available.
X To change manually: selectON ONorOFF
OFF and
press 0098to confirm.
X To change to automatic time: select
Automatic
Automatic and press0098to confirm.
The entry for the Automatic Time Set‐
Automatic Time Set‐
tings
tings is accepted.
X To switch the automatic time setting
off/on: press the 0066button.
X Select Time
Time by turning 00790052007Athe COMAND
controller and press 0098to confirm.
X Press 0098to confirm the Automatic AutomaticTime
Time
Settings
Settings.
Switch the automatic time setting off 0053or
on again 0073.
To switch on: the menu item is switched
on as the default setting. If the Automatic Automatic
Time Settings
Time Settings is switched off and you
switch it on again, the last settings for the
time zone and summer time changeover
are selected.
To switch off: the time zone is deselected
and the summer time is switched off. If
Automatic
Automatic is set for the summer time
changeover, a prompt will appear asking
whether this should be maintained.
X Select Yes YesorNo
No and press 0098to confirm. Time settings
43System settings
Page 47 of 270

Activating/deactivating Bluetooth
®
X Press 0066.
The system menu appears.
X Select Settings
Settings by turning 00790052007Athe
COMAND controller and press 0098to con-
firm.
X Select Activate Activate Bluetooth Bluetooth and press0098
to confirm.
This switches Bluetooth ®
on 0073 or off 0053. Setting the system language
This function allows you to determine the lan-
guage for the menu displays and the naviga-
tion announcements. The selected language
affects the characters available for entry.
The navigation announcements are not avail-
able in all languages. If a language is not avail- able, the navigation announcements will be in English.
When you set the system language, the lan-
guage of the Voice Control System will
change accordingly. If the selected language
is not supported by the Voice Control System,
English will be selected.
X Press the 0066button.
X Select System
System by turning 00790052007Athe
COMAND controller and press 0098to con-
firm.
X Select Language Language and press0098to confirm.
The list of languages appears. The 003Bdot
indicates the current setting.
X Select the language by turning 00790052007Athe
COMAND controller and press 0098to con-
firm.
COMAND loads the selected language and
sets it. Assigning a favorites button
X To assign a favorites button: press the
0066 button.
X Select System System by turning 00790052007Athe
COMAND controller and press 0098to con-
firm.
X Select Assign
Assign as
asFavorite
Favorite and press0098
to confirm.
The list of predefined functions appears.
The dot 003Bindicates the currently selected
function.
X Select the function by turning 00790052007Athe
COMAND controller and press 0098to con-
firm.
The favorites button is assigned the selec-
ted function.
X Example: to call up a favorite: press the
007D favorites button.
This calls up the predefined function.
You can select the following predefined func-
tions in a menu:
R SplitView on/off SplitView on/off : you can switch the
screen view for the front passenger on or
off.
R Display On/Off Display On/Off : you can switch the dis-
play off or on.
R Full Screen: 'Clock'
Full Screen: 'Clock': you can call up
the full screen with the clock.
R 00A7 Menu
Menu: you can call up the online and
Internet functions.
R 360°
360° Camera
Camera : you can call up the picture of
the 360° camera.
R Full screen: 'Map'
Full screen: 'Map' : you can call up the
full screen with the map.
R Spoken Driving Tip
Spoken Driving Tip : you can call up the
current driving recommendation.
R Display
Display Traffic
Traffic Messages
Messages: you can call
up traffic reports.
R Navigate Home
Navigate Home: you can start route guid-
ance to your home address if you have
already entered and saved the address
(Y page 69). Assigning a favorites button
45System settings
Page 49 of 270

Importing/exporting data
X
Insert the SD memory card (Y page 196).
or
X Connect a USB device (e.g. a USB memory
stick) (Y page 197).
X Press 0066.
The system menu appears.
X Select Settings
Settings by turning 00790052007Athe
COMAND controller and press 0098to con-
firm.
X Select Import/Export
Import/Export Data
Dataand press 0098
to confirm.
X Select Import Data
Import Data orExport Data
Export Data and
press 0098to confirm. If PIN protection is activated, a PIN prompt
appears when you select
Export Data
Export Data.
X Enter the PIN, select0054and press 0098to
confirm.
You can now proceed in the same way as if
PIN protection was deactivated.
X To select a preset: selectMemory Memory Card
Cardor
USB Storage
USB Storage and press0098to confirm.
X Select All Data
All Data and press0098to confirm.
This function exports all the data to the
selected disc.
or
X Select the data type and press 0098to con-
firm.
Depending on the previous entry, select the
data type for the export 0073or not 0053.
X Select Cont. Cont.and press 0098to confirm.
i Personal music files in the MUSIC REGIS-
TER cannot be saved and imported again
using this function. Reset function
You can completely reset COMAND to the
factory settings. Amongst other things, this
will delete all personal COMAND data. This
includes the station presets, entries in the
destination memory and in the list of previous
destinations in the navigation system and
address book entries. In addition, any activa-
ted PIN protection, which you have used to
protect your data against unwanted export,
will be deactivated. Resetting is recommen- Reset function
47System settings