2014 MERCEDES-BENZ C-Class audio
[x] Cancel search: audioPage 40 of 270
To do so, use the special cordless head-
phones (Y page 239). Using the headphones
on the correct sides ensures an optimal
sound.
You can connect your own headphones to a
special headphones jack. You can use the
remote control to operate them. Points to remember
R You can only adjust the volume for the
headphones supplied, directly on the head-
phones.
R Only entertainment functions, i.e. audio,
TV, video and Internet, for example, may be used with SPLITVIEW.
R Different media can be used on the driver
and front-passenger sides as long as they
use different media sources. Example: if a
medium from the single DVD drive is being
played on the driver's side, then another
medium that is also played from the single
DVD drive cannot be played separately on
the front-passenger side. However, other
media can be used at the same time on the
front-passenger side, including radio,
memory card, MUSIC REGISTER, Media
Interface, USB or AUX.
R If you use the same medium on both sides,
you can both carry out the respective set-
tings.
R Internet use is only available at any one
time to the driver or the front passenger.
A corresponding message appears on the
display.
R Internet can only be used, if it is set and
connected via a telephone on the driver's
side.
R The multifunction steering wheel can only
be used for functions which relate to the
driver's side. Switching SPLITVIEW on/off
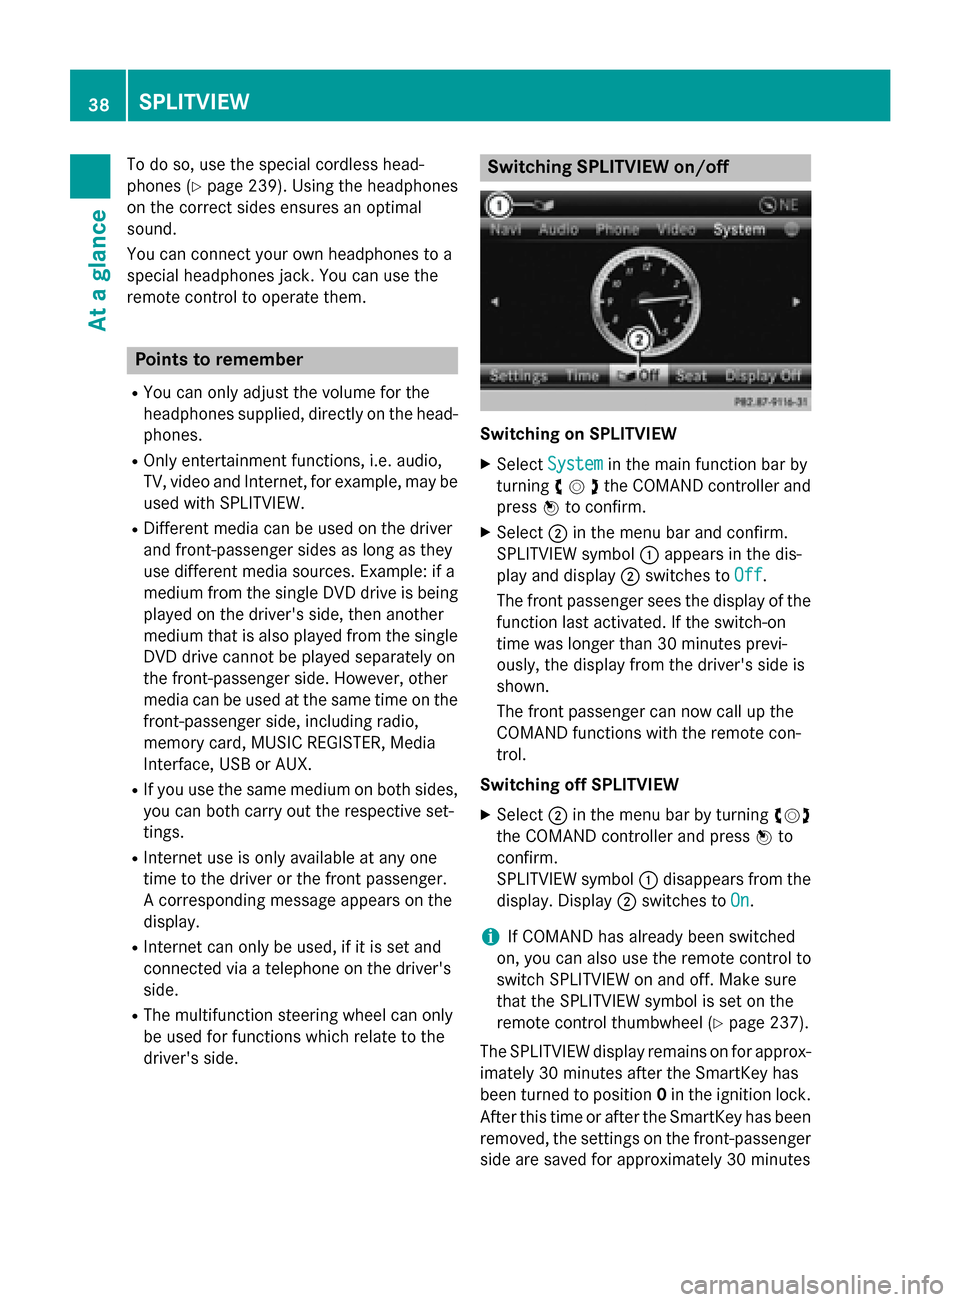
Switching on SPLITVIEW
X Select System System in the main function bar by
turning 00790052007Athe COMAND controller and
press 0098to confirm.
X Select 0044in the menu bar and confirm.
SPLITVIEW symbol 0043appears in the dis-
play and display 0044switches to Off
Off .
The front passenger sees the display of the
function last activated. If the switch-on
time was longer than 30 minutes previ-
ously, the display from the driver's side is
shown.
The front passenger can now call up the
COMAND functions with the remote con-
trol.
Switching off SPLITVIEW X Select 0044in the menu bar by turning 00790052007A
the COMAND controller and press 0098to
confirm.
SPLITVIEW symbol 0043disappears from the
display. Display 0044switches to On
On.
i If COMAND has already been switched
on, you can also use the remote control to
switch SPLITVIEW on and off. Make sure
that the SPLITVIEW symbol is set on the
remote control thumbwheel (Y page 237).
The SPLITVIEW display remains on for approx-
imately 30 minutes after the SmartKey has
been turned to position 0in the ignition lock.
After this time or after the SmartKey has been
removed, the settings on the front-passenger side are saved for approximately 30 minutes 38
SPLITVIEWAt a glance
Page 93 of 270
HOV or carpool lanes
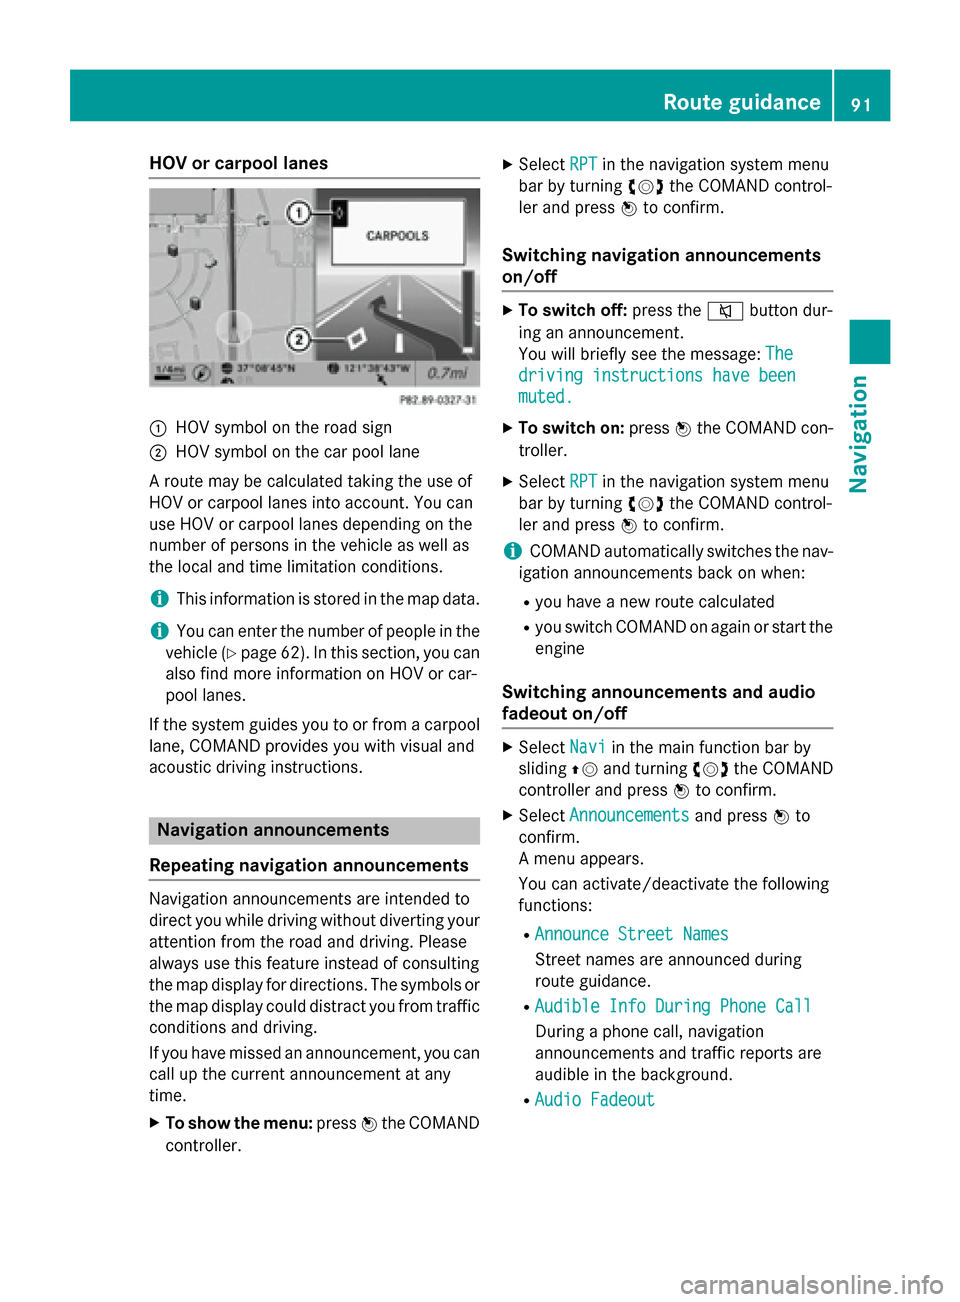
0043
HOV symbol on the road sign
0044 HOV symbol on the car pool lane
A route may be calculated taking the use of
HOV or carpool lanes into account. You can
use HOV or carpool lanes depending on the
number of persons in the vehicle as well as
the local and time limitation conditions.
i This information is stored in the map data.
i You can enter the number of people in the
vehicle (Y page 62). In this section, you can
also find more information on HOV or car-
pool lanes.
If the system guides you to or from a carpool
lane, COMAND provides you with visual and
acoustic driving instructions. Navigation announcements
Repeating navigation announcements Navigation announcements are intended to
direct you while driving without diverting your attention from the road and driving. Please
always use this feature instead of consulting
the map display for directions. The symbols or the map display could distract you from traffic
conditions and driving.
If you have missed an announcement, you can call up the current announcement at any
time.
X To show the menu: press0098the COMAND
controller. X
Select RPT
RPT in the navigation system menu
bar by turning 00790052007Athe COMAND control-
ler and press 0098to confirm.
Switching navigation announcements
on/off X
To switch off: press the0063button dur-
ing an announcement.
You will briefly see the message: The The
driving instructions have been
driving instructions have been
muted. muted.
X To switch on: press0098the COMAND con-
troller.
X Select RPT
RPTin the navigation system menu
bar by turning 00790052007Athe COMAND control-
ler and press 0098to confirm.
i COMAND automatically switches the nav-
igation announcements back on when:
R you have a new route calculated
R you switch COMAND on again or start the
engine
Switching announcements and audio
fadeout on/off X
Select Navi Naviin the main function bar by
sliding 00970052and turning 00790052007Athe COMAND
controller and press 0098to confirm.
X Select Announcements Announcements and press0098to
confirm.
A menu appears.
You can activate/deactivate the following
functions:
R Announce Street Names Announce Street Names
Street names are announced during
route guidance.
R Audible Info During Phone Call Audible Info During Phone Call
During a phone call, navigation
announcements and traffic reports are
audible in the background.
R Audio Fadeout Audio Fadeout Route guidance
91Navigation Z
Page 94 of 270
The volume of an active audio or video
source is automatically reduced during a
navigation announcement.
R Gas on Reserve
Gas on Reserve
Once you have reached reserve fuel
level, you will see a prompt asking
whether you wish to start the search for a
gas station (Y page 76).
X Select the function and press 0098to confirm.
Switch the function on 0073or off 0053.
Setting the volume manually X
Adjust the volume using the 0043control
knob during a navigation announcement.
or X Select RPT
RPT in the map view with the menu
shown and adjust the volume using the 0043
control knob.
Announce Street Names If the function is switched on, the name of the
street which you are turning into is
announced.
Announcements are not made in the chosen
language in all countries. They are made when
relevant street names for the selected lan-
guage are available in the database.
X To switch to navigation mode: press the
00BE button.
X To show the menu: press0098the COMAND
controller.
X Select Navi Naviin the main function bar by
sliding 00970052the COMAND controller and
press 0098to confirm.
X Select Announce
Announce Street
StreetNames
Namesand press
0098 to confirm.
The function is switched on 0073or off 0053,
depending on the previous status. Exit route guidance
Canceling or continuing route guidance X
To switch to navigation mode: press the
00BE button.
X To show the menu: press0098the COMAND
controller.
X Select Destination
Destination in the navigation sys-
tem menu bar by turning 00790052007Athe
COMAND controller and press 0098to con-
firm.
X To cancel route guidance: selectCancel
Cancel
Route Guidance
Route Guidance and press0098to confirm.
or X To continue route guidance: selectCon‐
Con‐
tinue Route Guidance
tinue Route Guidance and press0098to
confirm.
COMAND calculates the route.
Destination or area of destination
reached When you reach your destination, COMAND
displays a checkered flag and route guidance
is automatically ended.
If the destination is not in close proximity to a
digitized street, the Area Areaof
ofdestination
destination
reached
reached message appears when the desti-
nation is reached. Influencing route guidance
Avoiding a section of the route blocked
by a traffic jam This function blocks a section of the route
ahead of you. You can set the length of the
blocked route section. If possible, COMAND
calculates a detour around the blocked sec-
tion of the route.
X To switch to navigation mode: press the
00BE button.
X To show the menu: press0098the COMAND
controller. 92
Route guidanceNavigation
Page 131 of 270
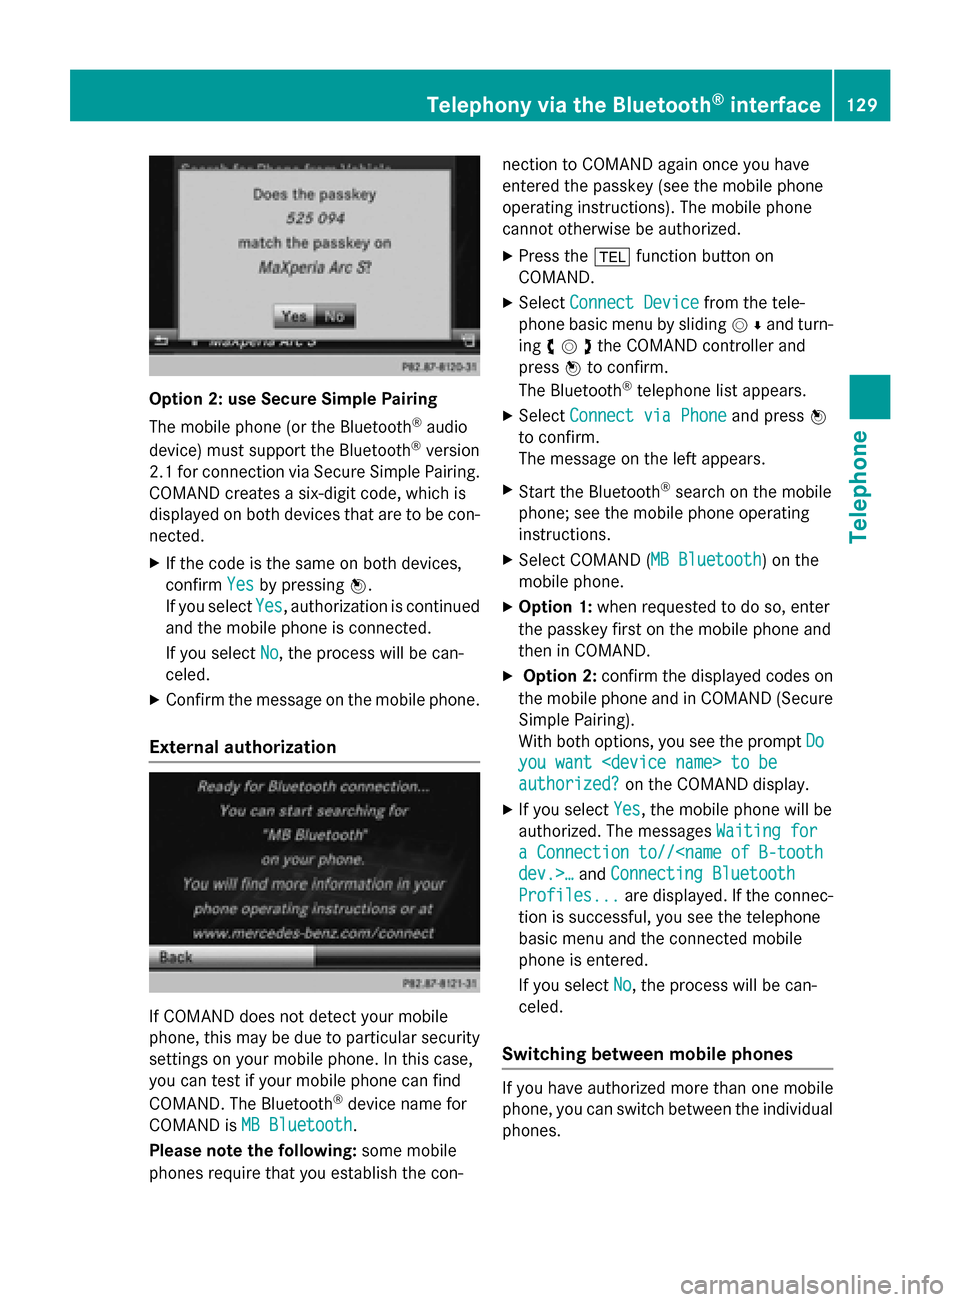
Option 2: use Secure Simple Pairing
The mobile phone (or the Bluetooth
®
audio
device) must support the Bluetooth ®
version
2.1 for connection via Secure Simple Pairing. COMAND creates a six-digit code, which is
displayed on both devices that are to be con-
nected.
X If the code is the same on both devices,
confirm Yes
Yes by pressing 0098.
If you select Yes Yes, authorization is continued
and the mobile phone is connected.
If you select No
No, the process will be can-
celed.
X Confirm the message on the mobile phone.
External authorization If COMAND does not detect your mobile
phone, this may be due to particular security settings on your mobile phone. In this case,
you can test if your mobile phone can find
COMAND. The Bluetooth ®
device name for
COMAND is MB Bluetooth
MB Bluetooth.
Please note the following: some mobile
phones require that you establish the con- nection to COMAND again once you have
entered the passkey (see the mobile phone
operating instructions). The mobile phone
cannot otherwise be authorized.
X Press the 002Bfunction button on
COMAND.
X Select Connect Device Connect Device from the tele-
phone basic menu by sliding 00520064and turn-
ing 00790052007Athe COMAND controller and
press 0098to confirm.
The Bluetooth ®
telephone list appears.
X Select Connect via Phone
Connect via Phone and press0098
to confirm.
The message on the left appears.
X Start the Bluetooth ®
search on the mobile
phone; see the mobile phone operating
instructions.
X Select COMAND ( MB Bluetooth MB Bluetooth) on the
mobile phone.
X Option 1: when requested to do so, enter
the passkey first on the mobile phone and
then in COMAND.
X Option 2: confirm the displayed codes on
the mobile phone and in COMAND (Secure Simple Pairing).
With both options, you see the prompt Do Do
you want
you want
authorized? authorized? on the COMAND display.
X If you select Yes
Yes, the mobile phone will be
authorized. The messages Waiting for
Waiting for
a Connection to//
Connecting Bluetooth
Profiles...
Profiles... are displayed. If the connec-
tion is successful, you see the telephone
basic menu and the connected mobile
phone is entered.
If you select No No, the process will be can-
celed.
Switching between mobile phones If you have authorized more than one mobile
phone, you can switch between the individual
phones. Telephony via the Bluetooth
®
interface 129Telephone Z
Page 177 of 270

i
Facebook is a social network. This App
allows you to log in from your vehicle and
use Facebook's many functions.
Google™ Street View allows you to view
streets in 360-degree panoramas.
Google™ Panoramio expands Google Local Search to include photos at the selected
position. Internet radio
General notes
A good Internet connection is required to
transmit audio data efficiently. To ensure the
best-possible reception, your mobile phone
should be connected to the vehicle's exterior antenna via the phone bracket (optional).
Bear in mind that a relatively large volume of
data can be transmitted when using the Inter- net radio. An average 128 kbit per second
data transfer rate can transfer 56 MB of data
in one hour.
The data transfer rate of a station is displayed while receiving data. Calling up the Internet radio
X
Select the 00A7icon in the main function bar
by sliding 00970052and turning 00790052the COMAND controller and press
0098to con-
firm.
The carousel view appears.
X Bring the Internet Radio
Internet Radio panel to the
front by turning 00790052007Athe COMAND con-
troller and press 0098to confirm.
The Internet radio menu appears. Searching for stations
X Select Search Search in the Internet radio menu.
A list with search criteria appears.
X Select criterion and press 0098to confirm.
i For example as a search criterion, you can
set an Internet radio station that is located
close to your navigation destination. Connecting to a station
X Search for a station (Y page 175).
X Select 0065(play) in the Internet radio
menu and press 0098to confirm.
The call is placed.
If the data stream is interrupted, an automatic attempt is made to re-establish the connec-
tion.
Manually re-establishing a connection
X Select 0065(play) again in the Internet
radio menu and press 0098to confirm.
Ending data transfer: X Select 00DB(stop) in the Internet radio
menu and press 0098to confirm.
or
X Change to another audio source, for exam-
ple Disc
Disc .
If you change to a main function that is not an
audio source, e.g. navigation, the data con-
nection remains on. You can continue listen-
ing to the set station. Internet radio
175Online and Internet functions Z
Page 187 of 270

Your COMAND equipment
................186
Radio mode ........................................ 186
Satellite radio .................................... 190
Audio CD and MP3 mode ..................195
Music search ..................................... 204
MUSIC REGISTER .............................. 207
Bluetooth ®
audio mode .................... 211
Operation with the Media Inter-
face .................................................... 217
Audio AUX mode ............................... 223 185Audio
Page 188 of 270
Your COMAND equipment
These operating instructions describe all the
standard and optional equipment for your
COMAND system, as available at the time of
going to print. Country-specific differences
are possible. Please note that your
COMAND system may not be equipped with
all the features described. Radio mode
Important notes
Portable electronic devices in the vehicle may seriously impair radio reception. Switching to radio mode
Switching modes using the function
button X
Press the 002Afunction button.
The radio display appears. You will hear the
last station played on the last waveband.
i Repeatedly pressing this function button
switches through the wavebands in this
order: FM, AM, WB. You then call up satel-
lite radio mode. Pressing the button again
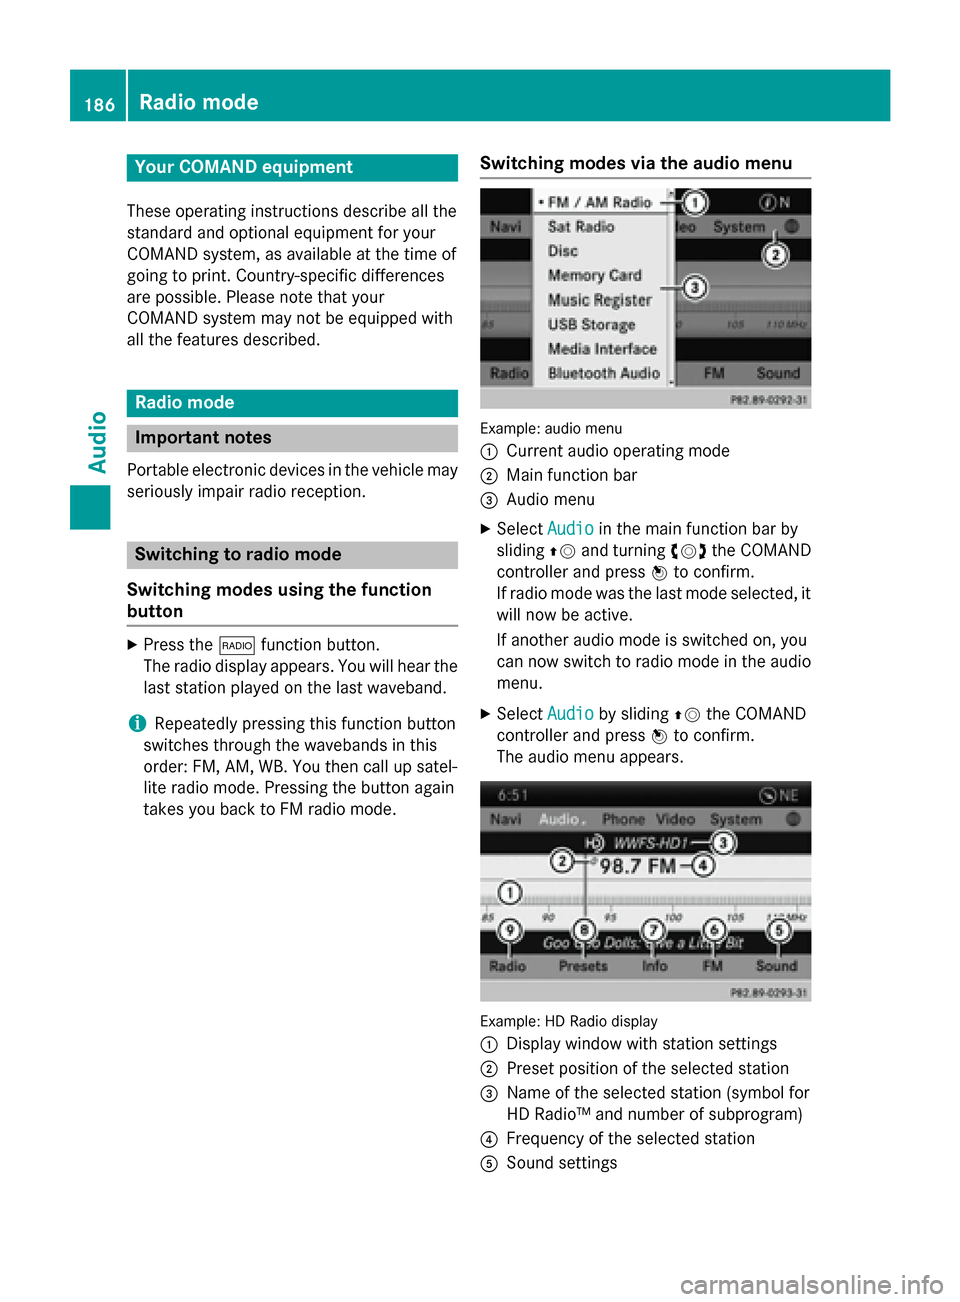
takes you back to FM radio mode. Switching modes via the audio menu Example: audio menu
0043
Current audio operating mode
0044 Main function bar
0087 Audio menu
X Select Audio Audioin the main function bar by
sliding 00970052and turning 00790052the COMAND
controller and press 0098to confirm.
If radio mode was the last mode selected, it
will now be active.
If another audio mode is switched on, you
can now switch to radio mode in the audio menu.
X Select Audio
Audio by sliding 00970052the COMAND
controller and press 0098to confirm.
The audio menu appears. Example: HD Radio display
0043 Display window with station settings
0044 Preset position of the selected station
0087 Name of the selected station (symbol for
HD Radio™ and number of subprogram)
0085 Frequency of the selected station
0083 Sound settings 186
Radio
modeAudio
Page 189 of 270
0084
FM radio, AM radio or WB radio
006B Program information
006C Preset functions
006D Radio functions
X Select FM/AM Radio FM/AM Radio by turning00790052007Athe
COMAND controller and press 0098to con-
firm. Switching HD Radio on/off
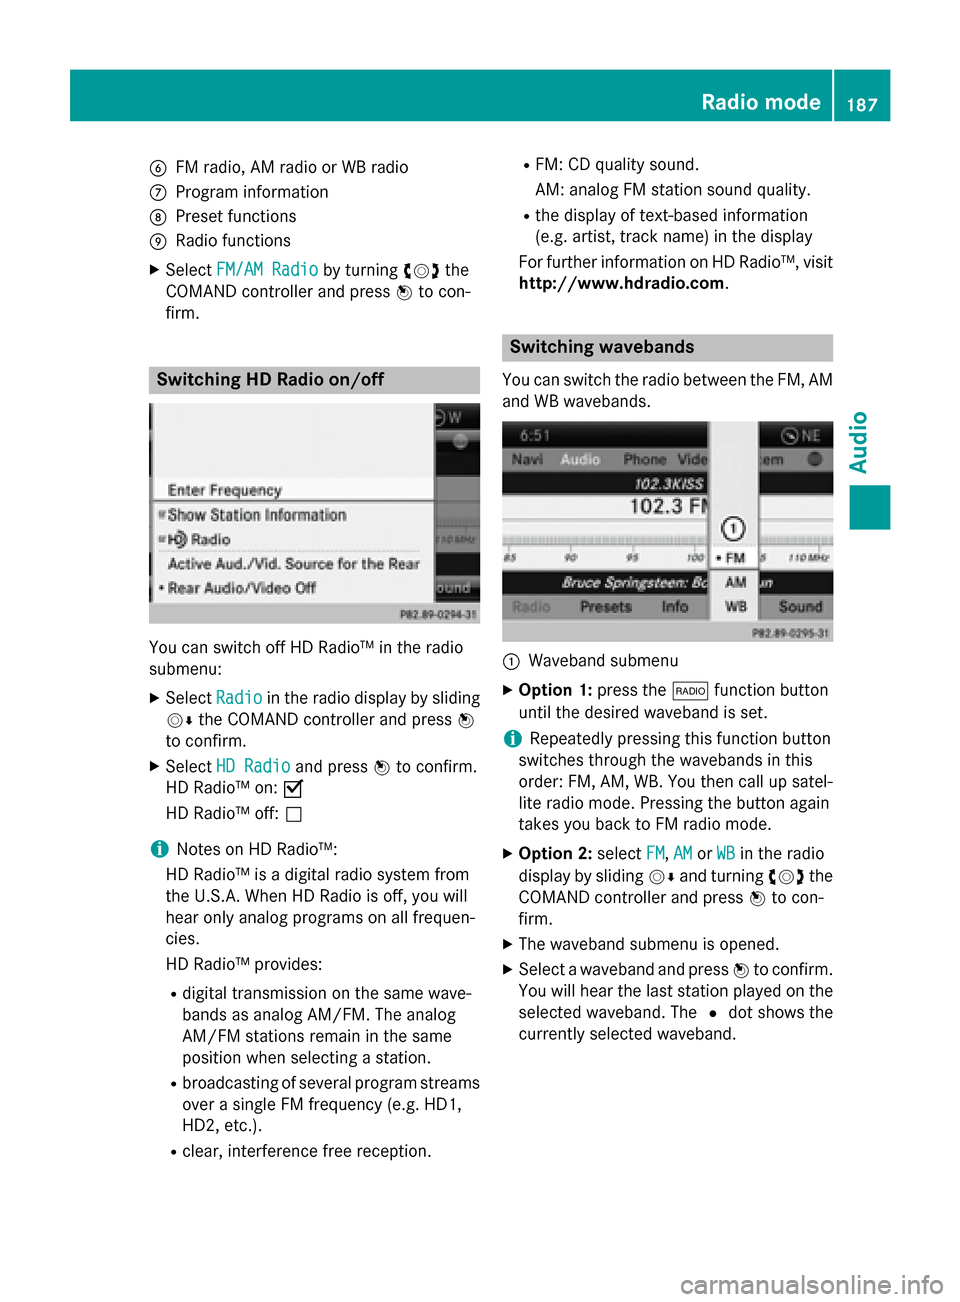
You can switch off HD Radio™ in the radio
submenu:
X Select Radio
Radio in the radio display by sliding
00520064 the COMAND controller and press 0098
to confirm.
X Select HD Radio
HD Radio and press0098to confirm.
HD Radio™ on: 0073
HD Radio™ off: 0053
i Notes on HD Radio™:
HD Radio™ is a digital radio system from
the U.S.A. When HD Radio is off, you will
hear only analog programs on all frequen-
cies.
HD Radio™ provides:
R digital transmission on the same wave-
bands as analog AM/FM. The analog
AM/FM stations remain in the same
position when selecting a station.
R broadcasting of several program streams
over a single FM frequency (e.g. HD1,
HD2, etc.).
R clear, interference free reception. R
FM: CD quality sound.
AM: analog FM station sound quality.
R the display of text-based information
(e.g. artist, track name) in the display
For further information on HD Radio™, visit
http://www.hdradio.com. Switching wavebands
You can switch the radio between the FM, AM
and WB wavebands. 0043
Waveband submenu
X Option 1: press the002Afunction button
until the desired waveband is set.
i Repeatedly pressing this function button
switches through the wavebands in this
order: FM, AM, WB. You then call up satel-
lite radio mode. Pressing the button again
takes you back to FM radio mode.
X Option 2: selectFM FM,AM
AMorWB
WB in the radio
display by sliding 00520064and turning 00790052007Athe
COMAND controller and press 0098to con-
firm.
X The waveband submenu is opened.
X Select a waveband and press 0098to confirm.
You will hear the last station played on the
selected waveband. The 0036dot shows the
currently selected waveband. Radio mode
187Audio