2014 LINCOLN NAVIGATOR battery
[x] Cancel search: batteryPage 350 of 506

J.USB port (optional):Listen to music or view images you stored on a
USB device such as a USB memory stick or a memory card reader.
K.SOURCE:Press this button to select Monitor A, Monitor B, AUX/TV
(if available), and AUX 2 (if available).
L.POWER:Press this button to turn the system off and on.
M.TFT LCD panel:Seven-inch TFT LCD panel.
N.Level lock and release latch:Use this latch to change the viewing
angle of the LCD panel or lock the panel into the secured position.
O.Infrared sensor - forward sensor eye:This allows the remote
control to navigate the on-screen display.
Remote Control
Note:The remote control uses infrared light to send commands to the
DVD player, just as many home video systems do. Just point the remote
control at the DVD player infrared window located above each screen in
order to control that DVD player. While you can connect a second device
such as a VCR through the auxiliary inputs, and view the playback on
the screen, you cannot control that device by aiming its remote control
at the Ford DVD player. The Ford DVD system remote control is the
only remote control you can use with the system. For example, if you
connect a VCR to the DVD system, you must point the VCR remote
control at the VCR to control it.
Installing the Battery
Before using your remote control, install the batteries as follows:
1. Turn the remote control face down. Press down on the ridged area of
the battery cover and slide it off.
2. Install two AAA batteries. Make sure you install the batteries
properly, with the + and – facing the correct way, as shown in the
battery compartment.
3. Slide the cover back until it clicks.
Note:Different types of batteries have different characteristics. Do not
mix different types.
Note:Do not mix old and new batteries. Mixing old and new batteries
can shorten battery life and cause chemical leaks from the old batteries.
Note:Keep the batteries out of the reach of children. If someone
swallows a battery, immediately consult a doctor. When you dispose of
used batteries, keep to governmental regulations or environmental public
institution rules that apply in your area.
Audio System349
2014 Navigator(nav)
Owners Guide gf, 1st Printing, June 2013
USA(fus)
Page 360 of 506

Connecting an MP3 Device
Using a USB Cable
Plug the MP3 Dock Connector to USB cable into a high-power USB port
on your DVD-headrest module, and then connect the other end to the
player.
See the documentation that came with your device for more information.
Charging the MP3 Player Battery
After you turn the DVD-headrest module on, connect the device to the
USB port on your DVD-headrest module
Note:Not all devices are able to charge when connected to the USB
port.
Using an A/V Cable
1. Connect the device to the headphone port using an A/V cable.Note:
Use the A/V cable made specifically for the device. Other similar
RCA-type cables might not work.
2. Connect the video and audio connectors to the AV-IN ports on
your DVD-headrest module, matching the yellow, red and white
connectors to the appropriate jacks.
Troubleshooting
Symptom Possible cause
The device does not
power on.Your vehicle ignition is not on.
The remote control does not have batteries
installed.
The infrared sensor is
inoperative.The batteries in the remote control are not
working.
The remote sensor eye is blocked.
The infrared transmitter is blocking the sensor
eye of the component to be controlled
The disc does not play. You inserted the disc backward.
The disc is defective. Try another disc.
The disc is not compatible with the
entertainment system.
The device code and disc region code do not
match. This device is set to Region 1.
Audio System359
2014 Navigator(nav)
Owners Guide gf, 1st Printing, June 2013
USA(fus)
Page 373 of 506

“MENU”
“(Phone) connections”*
“(Phone) settings (message) notification off”*
“(Phone) settings (message) notification on”*
“(Phone) settings (set) phone ringer”*
“(Phone) settings (set) ringer 1”*
“(Phone) settings (set) ringer 2”*
“(Phone) settings (set) ringer 3”*
“(Phone) settings (set) ringer off”*
“Battery”
“Phone name”
“Signal”
“Text message inbox”
*Words in ( ) are optional and do not have to be spoken for the system
to understand the command.
Phone book commands:When you ask SYNC® to access a phone book
name, number, etc., the requested information appears in the display to
view. Press the phone button and say “Call” to call the contact.
“DIAL”
“411” (four-one-one), “911” (nine-one-one)
“700 (seven hundred)” (seven hundred)
“800 (eight hundred)” (eight hundred)
“900 (nine hundred)” (nine hundred)
“#” (pound)
“
“Asterisk” (*)
“Clear” (deletes all entered digits)
“Delete” (deletes one digit)
“Plus”
“Star”
Note:To exit dial mode, press and hold the phone button or press
MENU to go to the PHONE menu.
372SYNC®
2014 Navigator(nav)
Owners Guide gf, 1st Printing, June 2013
USA(fus)
Page 380 of 506

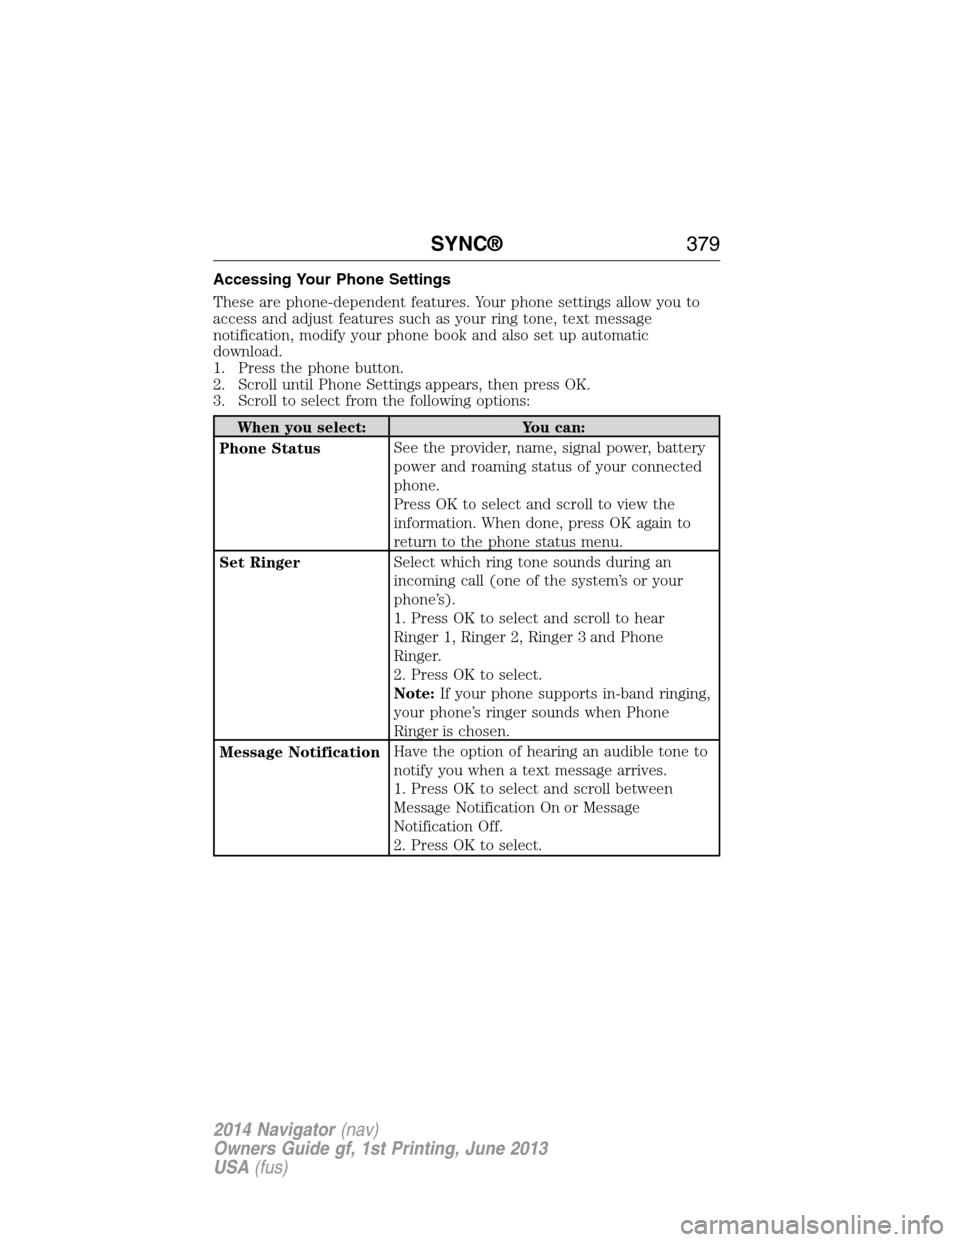
Accessing Your Phone Settings
These are phone-dependent features. Your phone settings allow you to
access and adjust features such as your ring tone, text message
notification, modify your phone book and also set up automatic
download.
1. Press the phone button.
2. Scroll until Phone Settings appears, then press OK.
3. Scroll to select from the following options:
When you select: You can:
Phone StatusSee the provider, name, signal power, battery
power and roaming status of your connected
phone.
Press OK to select and scroll to view the
information. When done, press OK again to
return to the phone status menu.
Set RingerSelect which ring tone sounds during an
incoming call (one of the system’s or your
phone’s).
1. Press OK to select and scroll to hear
Ringer 1, Ringer 2, Ringer 3 and Phone
Ringer.
2. Press OK to select.
Note:If your phone supports in-band ringing,
your phone’s ringer sounds when Phone
Ringer is chosen.
Message NotificationHave the option of hearing an audible tone to
notify you when a text message arrives.
1. Press OK to select and scroll between
Message Notification On or Message
Notification Off.
2. Press OK to select.
SYNC®379
2014 Navigator(nav)
Owners Guide gf, 1st Printing, June 2013
USA(fus)
Page 386 of 506

Setting 911 Assist On
Perform the following:
1. Press the phone button to enter the Phone Menu.
2. Scroll until 911 Assist is selected.
3. Press OK to confirm and enter the 911 Assist menu.
4. Scroll to select between On and Off selections.
5. Press OK when the desired option appears in the radio display.
Set On or Set Off appears in the display as confirmation.
Off selections include: Off with reminder and Off without reminder.
Off with reminder provides a display and voice reminder at phone
connection at vehicle start. Off without reminder provides a display
reminder only without a voice reminder at phone connection.
To make sure that 911 Assist works properly:
•SYNC must be powered and working properly at the time of the
incident and throughout feature activation and use.
•SYNC 911 Assist feature must be set on prior to the incident.
•A Bluetooth-enabled and compatible phone has to be paired and
connected to SYNC.
•A connected Bluetooth-enabled phone must have the ability to make
and maintain an outgoing call at the time of the incident.
•A connected Bluetooth-enabled phone must have adequate network
coverage, battery power and signal strength.
•The vehicle must have battery power and be located in the United
States, Canada or in a territory in which 911 is the emergency
number.
In the Event of a Crash
Not all crashes deploy an airbag or activate the fuel pump shut-off
(which would activate 911 Assist); however, if 911 Assist is triggered,
SYNC tries to contact emergency services. If a connected phone is
damaged or loses connection to SYNC, SYNC searches for, and tries to
connect to, any available previously paired phone and tries to make the
call to 911.
Before making the call:
•
SYNC provides a short window of time (about 10 seconds) to cancel the
call. Failure to cancel the call results in SYNC attempting to dial 911.
•SYNC says the following, or a similar message: “SYNC will attempt to call
911, to cancel the call, press Cancel on your screen or press and hold the
phone button on your steering wheel.”
SYNC®385
2014 Navigator(nav)
Owners Guide gf, 1st Printing, June 2013
USA(fus)
Page 387 of 506

If the call is not cancelled and a successful call is made, a pre-recorded
message is played for the 911 operator, then the occupant(s) in the
vehicle is able to talk with the operator. Be prepared to provide your
name, phone number and location immediately, because not all 911
systems are capable of receiving this information electronically.
911 Assist May Not Work If
•Your cellular phone or 911 Assist hardware was damaged in a crash.
•The vehicle’s battery or SYNC system has no power.
•The phone(s) paired and connected to the system was thrown from
the vehicle.
911 Assist Privacy Notice
Once 911 Assist is set on, it may disclose to emergency services that the
vehicle has been in a crash involving the deployment of an airbag or
activation of the fuel pump shut-off. Certain versions or updates to 911
Assist may also be capable of electronically or verbally disclosing to 911
operators the vehicle location, and/or other details about the vehicle or
crash to assist 911 operators to provide the most appropriate emergency
services. If you do not want to disclose this information, do not turn the
feature on.
Vehicle Health Report
WARNING:Always follow scheduled maintenance instructions,
regularly inspect your vehicle, and seek repair for any damage or
problem you suspect. Vehicle Health Report supplements, but cannot
replace normal maintenance and vehicle inspection. Vehicle Health
Report only monitors certain systems that are electronically monitored
by the vehicle and will not monitor or report the status of any other
system, (i.e., brake lining wear). Failure to perform scheduled
maintenance and regularly inspect your vehicle may result in vehicle
damage and serious injury.
Note:Your Vehicle Health Report feature requires activation prior to
use. Visit www.SYNCMyRide.com to register. There is no fee or
subscription associated with Vehicle Health Report, but you must register
to use this feature.
Note:This feature may not function properly if you have enabled caller
ID blocking on your mobile phone. Before running a report, review the
Vehicle Health Report privacy notice.
386SYNC®
2014 Navigator(nav)
Owners Guide gf, 1st Printing, June 2013
USA(fus)
Page 404 of 506

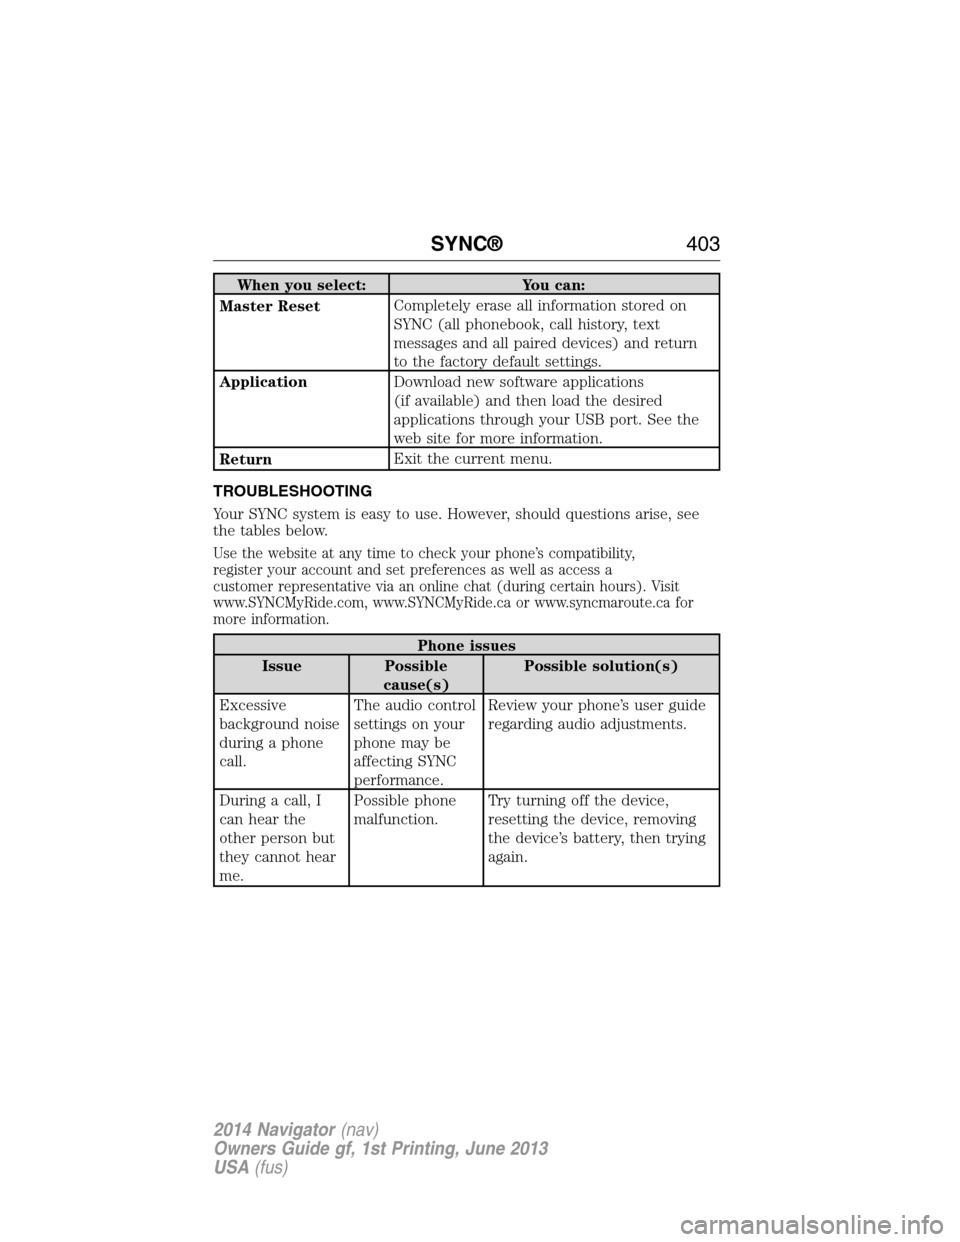
When you select: You can:
Master ResetCompletely erase all information stored on
SYNC (all phonebook, call history, text
messages and all paired devices) and return
to the factory default settings.
ApplicationDownload new software applications
(if available) and then load the desired
applications through your USB port. See the
web site for more information.
ReturnExit the current menu.
TROUBLESHOOTING
Your SYNC system is easy to use. However, should questions arise, see
the tables below.
Use the website at any time to check your phone’s compatibility,
register your account and set preferences as well as access a
customer representative via an online chat (during certain hours). Visit
www.SYNCMyRide.com, www.SYNCMyRide.ca or www.syncmaroute.ca for
more information.
Phone issues
Issue Possible
cause(s)Possible solution(s)
Excessive
background noise
during a phone
call.The audio control
settings on your
phone may be
affecting SYNC
performance.Review your phone’s user guide
regarding audio adjustments.
During a call, I
can hear the
other person but
they cannot hear
me.Possible phone
malfunction.Try turning off the device,
resetting the device, removing
the device’s battery, then trying
again.
SYNC®403
2014 Navigator(nav)
Owners Guide gf, 1st Printing, June 2013
USA(fus)
Page 405 of 506

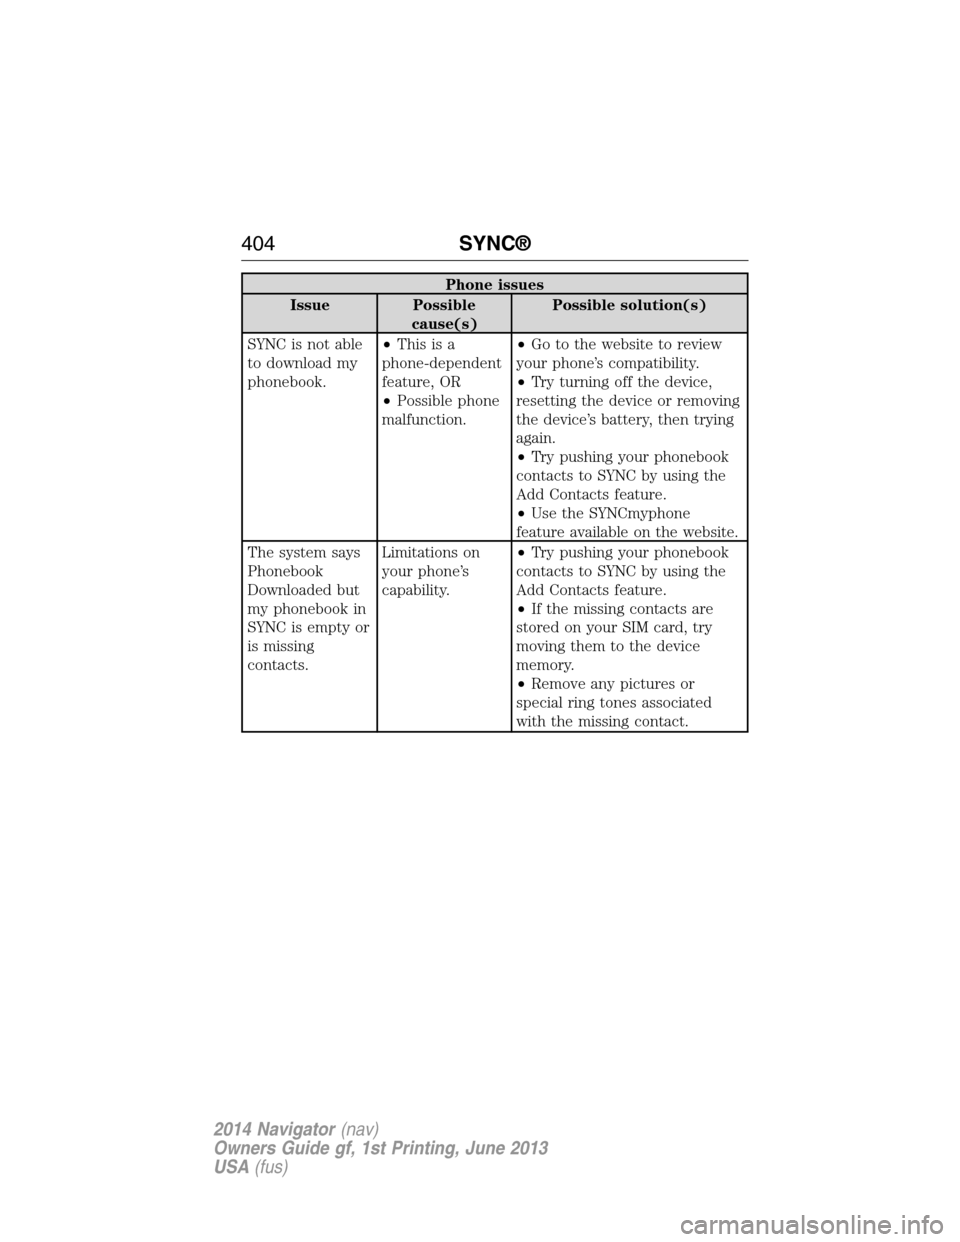
Phone issues
Issue Possible
cause(s)Possible solution(s)
SYNC is not able
to download my
phonebook.•Thisisa
phone-dependent
feature, OR
•Possible phone
malfunction.•Go to the website to review
your phone’s compatibility.
•Try turning off the device,
resetting the device or removing
the device’s battery, then trying
again.
•Try pushing your phonebook
contacts to SYNC by using the
Add Contacts feature.
•Use the SYNCmyphone
feature available on the website.
The system says
Phonebook
Downloaded but
my phonebook in
SYNC is empty or
is missing
contacts.Limitations on
your phone’s
capability.•Try pushing your phonebook
contacts to SYNC by using the
Add Contacts feature.
•If the missing contacts are
stored on your SIM card, try
moving them to the device
memory.
•Remove any pictures or
special ring tones associated
with the missing contact.
404SYNC®
2014 Navigator(nav)
Owners Guide gf, 1st Printing, June 2013
USA(fus)