2014 Lancia Voyager radio controls
[x] Cancel search: radio controlsPage 95 of 364

Blind Spot Alert Off
When the BSM system is turned off
there will be no visual or audible
alerts from either the BSM or RCP
systems.
NOTE: The BSM system will store
the current operating mode when
the vehicle is shut off. Each time
the vehicle is started the previ-
ously stored mode will be recalled
and used
Uconnect® PHONE
NOTE: For Uconnect® Phone
with Navigation or Multimedia ra-
dio, refer to the Navigation or Mul-
timedia radio's User's Manual
(separate booklet) Uconnect®
Phone section.
Uconnect® Phone is a voice-
activated, hands-free, in-vehicle com-
munications system. Uconnect®
Phone allows you to dial a phone
number with your mobile phone* us-
ing simple voice commands (e.g.,
“Call”…“Jim”… “Work” or
“Dial”…“151-1234 -5555”). Your
mobile phone's audio is transmittedthrough your vehicle's audio system;
the system will automatically mute
your radio when using the Uconnect®
Phone.
Uconnect® Phone allows you to
transfer calls between the Uconnect®
Phone and your mobile phone as you
enter or exit your vehicle and enables
you to mute the Uconnect® Phone's
microphone for private conversation.
The Uconnect® Phone is driven
through your Bluetooth® “Hands-
Free profile” mobile phone.
Uconnect® Phone features
Bluetooth® technology - the global
standard that enables different elec-
tronic devices to connect to each other
without wires or a docking station, so
Uconnect® Phone works no matter
where you stow your mobile phone
(be it your purse, pocket, or brief-
case), as long as your phone is turned
on and has been paired to the vehicle's
Uconnect® Phone. The Uconnect®
Phone allows up to seven mobile
phones to be linked to the system.
Only one linked (or paired) mobile
phone can be used with the
Uconnect® Phone at a time. The
Uconnect® Phone is available in Eng-
lish, Dutch, French, German, Italian
or Spanish languages (as equipped).
WARNING!
Any voice commanded system
should be used only in safe driving
conditions following all applicable
laws, including laws regarding
phone use. Your attention should be
focused on safely operating the ve-
hicle. Failure to do so may result in
a collision causing serious injury or
death.
Uconnect® Phone Button The radio or steering wheel
controls will contain the
two control buttons
(Uconnect® Phone
but-
ton and Voice Command
button)
that will enable you to access the sys-
tem. When you press the button you
will hear the word Uconnect® fol-
lowed by a BEEP. The beep is your
signal to give a command.
89
Page 173 of 364

PLAY A DVD USING THE TOUCH-SCREENRADIO .............................. .198
PLAY A DVD USING THE VES™ PLAYER (for versions/markets, where provided) ..........200
PLAY A Blu-ray DISC USING THE BLU-RAY PLAYER (for versions/markets, where
provided) ............................ .201
LISTEN TO AN AUDIO SOURCE WHILE A VIDEO IS PLAYING .......................... .202
THIRD ROW SWIVEL SCREEN (for versions/markets, where provided) ..........202
IMPORTANT NOTES FOR DUAL VIDEO SCREEN SYSTEM ............................. .202
VES™ REMOTE CONTROL (for versions/markets, where provided) ....................... .202
Blu-ray PLAYER REMOTE CONTROL (for versions/markets, where provided) ..........204
REMOTE CONTROL STORAGE ............205
LOCKING THE REMOTE CONTROL. . . ......205
REPLACING THE REMOTE CONTROL BATTERIES .......................... .206
HEADPHONES OPERATION ...............206
Blu-ray HEADPHONES OPERATION ........206
CONTROLS .......................... .207
REPLACING THE HEADPHONE BATTERIES . .207
UNWIRED® STEREO HEADPHONE LIFETIME LIMITED WARRANTY ...................207
SYSTEM INFORMATION .................208
SHARED MODES ...................... .208
167
Page 174 of 364

INFORMATION MODE DISPLAY...........209
NUMERIC KEYPAD MENU ................209
DISC MENU .......................... .209
DISPLAY SETTINGS ................... .209
LISTENING TO AUDIO WITH THE SCREEN CLOSED ............................. .210
DISC FORMATS ....................... .210
DISPLAY ............................ .213
PRODUCT AGREEMENT .................215
STEERING WHEEL AUDIO CONTROLS .......217
RADIO OPERATION .................... .218
CDPLAYER...........................218
CD/DVD DISC MAINTENANCE ..............218
RADIO OPERATION AND MOBILE PHONES . . . .218
CLIMATE CONTROLS .................... .219
AUTOMATIC TEMPERATURE CONTROL (ATC) ............................... .219
SUMMER OPERATION ...................224
WINTER OPERATION ...................225
VACATION/STORAGE ...................225
WINDOW FOGGING ................... .225
OUTSIDE AIR INTAKE ...................225
A/CAIRFILTER .......................225
OPERATING TIPS ..................... .225
168
Page 175 of 364

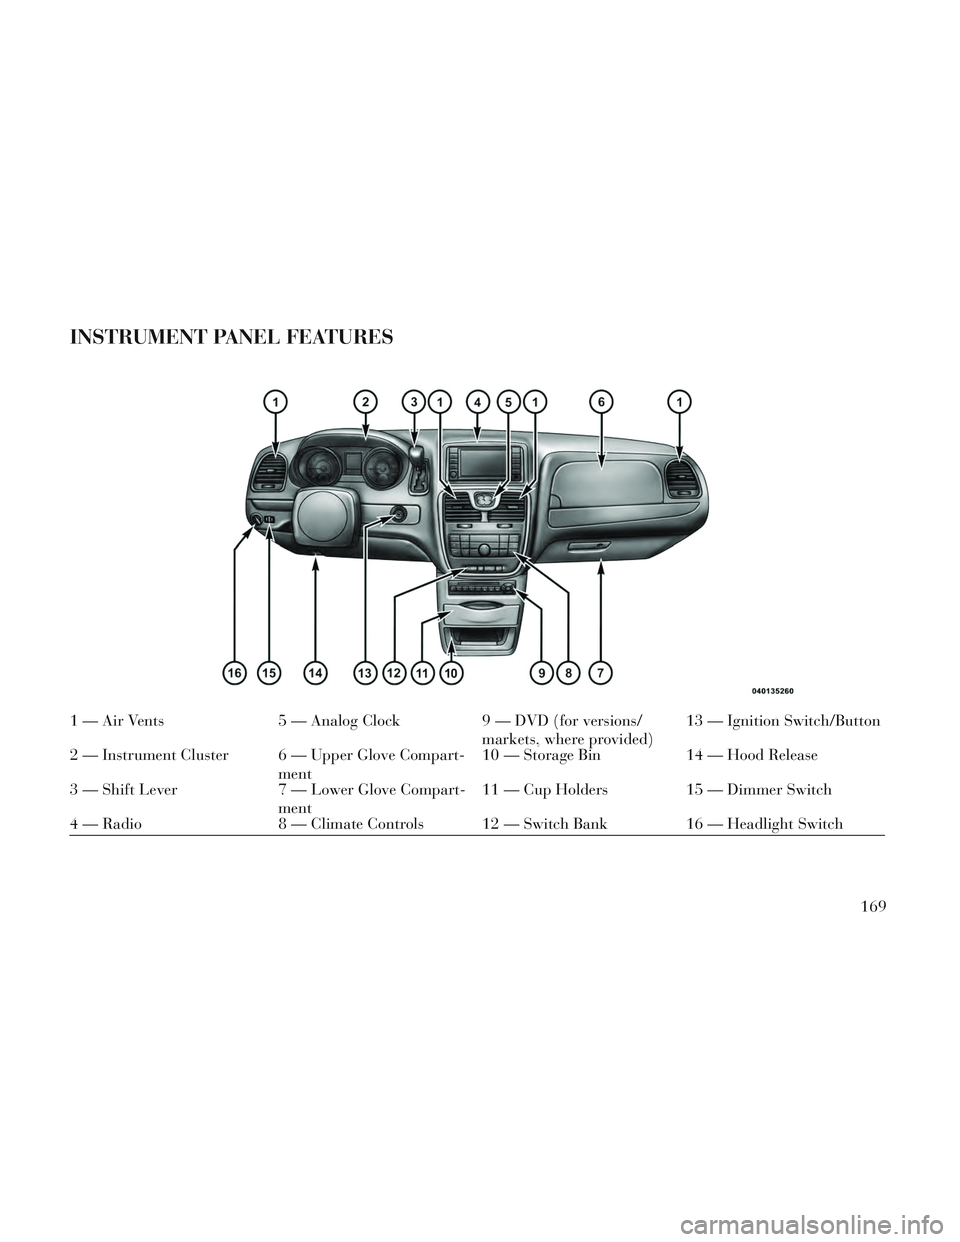
INSTRUMENT PANEL FEATURES
1 — Air Vents5 — Analog Clock9 — DVD (for versions/
markets, where provided)13 — Ignition Switch/Button
2 — Instrument Cluster 6 — Upper Glove Compart- ment10 — Storage Bin
14 — Hood Release
3 — Shift Lever 7 — Lower Glove Compart-
ment11 — Cup Holders 15 — Dimmer Switch
4 — Radio 8 — Climate Controls 12 — Switch Bank 16 — Headlight Switch
169
Page 205 of 364

2. Insert the DVD with the label fac-
ing up. The radio automatically se-
lects the appropriate mode after the
disc is recognized and displays the
menu screen or starts playing the first
track.
3. To watch a DVD on Screen 1 for
second row passengers, ensure the Re-
mote Control and Headphone switch
is on Channel 1.
4. To watch a DVD on Screen 2 for
third row passengers, ensure the Re-
mote Control and Headphone switch
is on Channel 2.
Using The Remote Control
1. Press the SOURCE button on the
Remote Control.
2. While looking at Screen 1 or 2,
highlight DISC by either pressing Up/
Down/Left/Right buttons or by re-
peatedly pressing the SOURCE but-
ton, then press ENTER/OK.NOTE:
Channel/Screen 1 select mode
information is shown on the left
side of the screen.
Channel/Screen 2 select mode information is shown on the
right side of the screen.
The VES™ will retain the last setting when turned off.
Using The Touch-Screen Radio
Controls
1. Press the MENU hard-key on the
radio faceplate.
2. Touch the Rear VES soft-key to
display the Rear VES Controls. If a
channel list is displayed, press the
HIDE LIST soft-key to display the
Rear VES Controls screen.
3. Touch the 1 or 2 soft-key and then
the DISC soft-key in the MEDIA col-
umn. To exit touch the back arrow at
the top left of the screen. NOTE:
To view a DVD on the radio
press the RADIO/MEDIA hard-
key, on the radio faceplate, then
touch the DISC tab soft-key and
then the VIEW VIDEO soft-key.
Viewing a DVD on the Touch- Screen radio screen is not avail-
able in all states/provinces. If
available, the vehicle must be
stopped and the shift lever must
be in the PARK position for ve-
hicles with an automatic trans-
mission. In vehicles with a
manual transmission the park-
ing brake must be engaged.
Touching the screen on a Touch- Screen radio while a DVD is
playing brings up basic remote
control functions for DVD play
such as scene selection, Play,
Pause, FF, RW, and Stop. Press-
ing the X in the upper corner
will turn off the remote control
screen functions.
199
Page 206 of 364

PLAY A DVD USING THE
VES™ PLAYER (for
versions/markets, where
provided)
1. Insert the DVD with the label fac-
ing up. The VES™ player automati-
cally selects the appropriate mode af-
ter the disc is recognized and starts
playing the DVD.
NOTE: The VES™ player has ba-
sic DVD control function such as
Menu, Play, Pause, FF, RW and
Stop.
2. To watch a DVD on Screen 1 for
second row passengers, ensure the Re-
mote Control and Headphone switch
is on Channel 1.
3. To watch a DVD on Screen 2 for
third row passengers, ensure the Re-
mote Control and Headphone switch
is on Channel 2.
Using The Remote Control
1. Press the SOURCE button on the
Remote Control.2. While looking at Screen 1 or 2,
highlight VES DISC by either press-
ing Up/Down/Left/Right buttons or
by repeatedly pressing the SOURCE
button, then press ENTER/OK on the
Remote Control.
NOTE:
Channel/Screen 1 select mode
information is shown on the left
side of the screen.
Channel/Screen 2 select mode information is shown on the
right side of the screen.
The VES™ will retain the last setting when turned off.
Using The Touch-Screen Radio
Controls
1. Press the MENU hard-key on the
radio faceplate.
2. Touch the Rear VES soft-key to
display the Rear VES Controls. If a
channel list is displayed, touch the
HIDE LIST soft-key to display the
Rear VES Controls screen. 3. Touch the 1 or 2 soft-key and then
the DISC soft-key in the VES column.
To exit touch the back arrow soft-key
at the top left of the screen.
NOTE:
To view a DVD on the radio
press the RADIO/MEDIA hard-
key, on the radio faceplate, then
touch the DISC tab soft-key and
then the VIEW VIDEO soft-key.
Viewing a DVD on the Touch- Screen radio screen is not avail-
able in all states/provinces. If
available, the vehicle must be
stopped and the shift lever must
be in the PARK position for ve-
hicles with an automatic trans-
mission. In vehicles with a
manual transmission the park-
ing brake must be engaged.
200
Page 207 of 364

PLAY A Blu-ray DISC
USING THE BLU-RAY
PLAYER (for versions/
markets, where provided)
1. Insert the Blu-ray disc with the
label facing up. The Blu-ray player
automatically selects the appropriate
mode after the disc is recognized and
starts playing the Blu-ray disc.
NOTE: The Blu-ray player has
basic control functions such as
Menu, Play, Pause, FF, RW and
Stop.
2. To watch a Blu-ray disc on Screen
1 for second row passengers, ensure
the Remote Control and Headphone
switch is on Channel 1.
3. To watch a Blu-ray disc on Screen
2 for third row passengers, ensure the
Remote Control and Headphone
switch is on Channel 2.
Using The Remote Control
1. Press the SOURCE button on the
Blu-ray player Remote Control.2. While looking at Screen 1 or 2,
highlight Blu-ray by either pressing
Up/Down/Left/Right buttons or by
repeatedly pressing the SOURCE but-
ton, then press OK on the Remote
Control.
NOTE:
Channel/Screen 1 select mode
information is shown on the left
side of the screen.
Channel/Screen 2 select mode information is shown on the
right side of the screen.
The VES™ will retain the last setting when turned off.
Using The Touch-Screen Radio
Controls
1. Press the MENU hard-key on the
radio faceplate.
2. Touch the Rear VES™ soft-key to
display the Rear VES™ Controls. If a
channel list is displayed, touch the
HIDE LIST soft-key to display the
Rear VES™ Controls screen. 3. Touch the 1 or 2 soft-key and then
the VES™ Disc soft-key in the VES™
column. To exit touch the back arrow
soft-key at the top left of the screen.
NOTE:
To view a Blu-ray Disc on the
radio press the RADIO/MEDIA
hard-key, on the radio faceplate,
then touch the VES™ Disc tab
soft-key and then the VIEW
VIDEO soft-key.
Viewing a Blu-ray Disc on the Touch-Screen radio screen is
not available in all states/
provinces. If available, the ve-
hicle must be stopped and the
shift lever must be in the PARK
position for vehicles with an au-
tomatic transmission. In ve-
hicles with a manual transmis-
sion the parking brake must be
engaged.
201
Page 209 of 364

Controls And Indicators
1. Power – Turns the screen and
wireless headphone transmitter for
the selected Channel on or off. To hear
audio while the screen is closed, press
the Power button to turn the head-
phone transmitter on.
2. Channel Selector Indicators –
When a button is pressed, the cur-
rently affected channel or channel
button is illuminated momentarily.
3. Light – Turns the remote control
backlighting on or off. The remote
backlighting turns off automatically
after five seconds.
4. Channel/Screen Selector Switch -
Indicates which channel is being con-
trolled by the remote control. When
the selector switch is in the Channel 1
position, the remote controls the func-
tionality of headphone Channel 1 (left
side of the screen). When the selector
switch is in the Channel 2, position
the remote controls the functionality
of headphone Channel 2 (right side of
the screen).5.
►► – In radio modes, press to
seek the next tunable station. In disc
modes, press and hold to fast forward
through the current audio track or
video chapter. In menu modes use to
navigate in the menu.
6. ▼/ Prev – In radio modes, press to
select to the previous station. In disc
modes, press to advance to the start of
the current or previous audio track or
video chapter. In menu modes, use to
navigate in the menu.
7. POP UP/MENU – Press to return
to the main menu of a DVD disc, to
select a satellite audio channel from
the Station list, or select playback
modes (SCAN/RANDOM for a CD).
8. ►/||
(Play/Pause) – Begin/resume
or pause disc play.
9. ■(Stop) – Stops disc play
10. PROG Up/Down / Rewind/skip
back and fast fwd/skip forward –
When listening to a radio mode,
pressing PROG Up selects the next
preset and pressing PROG Down se-
lects the previous preset stored in the
radio. When listening to compressed audio on a data disc, PROG Up selects
the next directory and PROG Down
selects the previous directory. When
listening to a disc in a radio with a
multiple-disc changer, PROG Up se-
lects the next disc and PROG Down
selects the previous disc.
11. MUTE – Press to mute the head-
phone audio output for the selected
channel.
12. SLOW – If Equipped – Press to
slow playback of a DVD disc. Press
play (►) to resume normal play.
13. STATUS – If Equipped – Press to
display the current status.
14. MODE/SOURCE – Press to
change the mode of the selected chan-
nel. See the Mode Selection section of
this manual for details on changing
modes.
15. SETUP – When in a video mode,
press the SETUP button to access the
display settings (see the display set-
tings section) to access the DVD setup
menu, select the menu button on the
radio. When a disc is loaded in the
DVD player (if equipped) and the
203