2014 Lancia Thema radio
[x] Cancel search: radioPage 172 of 332

pressing the switches mounted on the
steering wheel. The EVIC consists of
the following:
Radio Info
Fuel Economy Info
Cruise Control Info
Digital Vehicle Speed
Trip Info
Tire Pressure
Vehicle Info
Stored Warning Messages
Turn Menu OFF
The system allows the driver to select
information by pressing the following
buttons mounted on the steering
wheel:UP Button
Press and release the UP
button to scroll upward
through the main menu and
Vehicle Info and Trip Info
sub-menus (Fuel Economy, Vehicle
Info, Tire BAR, Cruise, Messages, Trip
Info, Vehicle Speed, and Turn Menu
OFF) and sub-menus.
DOWN Button
Press and release the
DOWN button to scroll
downward through the
main menu and Vehicle Info
and Trip Info sub-menus (Fuel
Economy, Vehicle Info, Tire BAR,
Cruise, Messages, Trip Info, Vehicle
Speed, and Turn Menu OFF) and
sub-menus.
SELECT Button
Press and release the SE-
LECT button to access the
information screens or sub-
menu screens of a main menu item.
Press and hold the SELECT button for
two seconds to reset displayed/selected
features that can be reset.
BACK Button
Press the BACK button to
return to the main menu
from an info screen or sub-
menu item.
ELECTRONIC VEHICLE
INFORMATION CENTER
(EVIC) DISPLAYS
The EVIC display consists of three
sections:
1. The top line where compass direc-
tion, odometer line and outside tem-
perature are displayed.
NOTE: The system will display
the last known out- side tempera-
ture when starting the vehicle and
may need to be driven several min-
utes before the updated tempera-
ture is displayed. Engine tempera-
ture can also affect the displayed
temperature; therefore, tempera-
ture readings are not updated
when the vehicle is not moving.
2. The main display area where the
menus and pop up messages are dis-
played.
EVIC Steering Wheel Buttons
166
Page 182 of 332
setting soft-keys or by selecting any
point on the scale between the + and –
soft-keys. Then touch the arrow back
soft-key.
Language
Press the Language soft-key to
change this display. When in this dis-
play you may select a different lan-
guage for all display nomenclature,
including the trip functions and the
navigation system (for versions/
markets, where provided). Press the
German, French, Spanish, Italian,
Dutch or English button to select the
language preferred followed by press-
ing the arrow back soft-key. Then, as
you continue, the information will
display in the selected language.
Units
When in this display, you may select
to have the EVIC, odometer, and
navigation system (for versions/
markets, where provided) changed
between US and Metric units of mea-
sure. Touch US or Metric until a
check-mark appears next to the set-
ting, showing that setting has beenselected. Touch the back arrow soft-
key to return to the previous menu.
Voice Response Length
When in this display, you may change
the Voice Response Length settings.
To change the Voice Response Length,
touch the Brief or Detailed soft-key
until a check-mark appears next to
the setting, showing that setting has
been selected. Touch the back arrow
soft-key to return to the previous
menu.
Touchscreen Beep
When in this display, you may turn on
or shut off the sound heard when a
touch screen button (soft-key) is
pressed. Touch the Touchscreen Beep
soft-key until a check-mark appears
next to the setting, showing that set-
ting has been selected. Touch the back
arrow soft-key to return to the previ-
ous menu.
Navigation Turn-By-Turn In
Cluster (for versions/markets,
where provided)
When this feature is selected, the
turn-by-turn directions will appear inthe display as the vehicle approaches
a designated turn within a pro-
grammed route. To make your selec-
tion, touch the Navigation Turn-By-
Turn In Cluster soft-key, until a
check-mark appears next to the set-
ting, showing that setting has been
selected. Touch the back arrow soft-
key to return to the previous menu.
Fuel Saver Display In Cluster
The “ECO” message is located in the
instrument cluster display, this mes-
sage can be turned on or off. To make
your selection, touch the Fuel Saver
Display soft-key, until a check-mark
appears next to the setting, showing
that setting has been selected. Touch
the back arrow soft-key to return to
the previous menu.
Clock
After pressing the Clock soft-key the
following settings will be available.
Sync Time With GPS (for
versions/markets, where provided)
When in this display, you may auto-
matically have the radio set the time.
To change the Sync Time setting
176
Page 184 of 332
than 18 km/h. The system can be
enabled with Sound Only, Sound and
Display, or turned OFF. To change the
Park Assist status, touch and release
the OFF, Sound Only or Sounds and
Display button. Then touch the arrow
back soft-key. Refer to “ParkSense®
Rear Park Assist” in “Understanding
The Features Of Your Vehicle” for
system function and operating
information.
Tilt Mirrors In Reverse (for
versions/markets, where provided)
When this feature is selected, the out-
side sideview mirrors will tilt down-
ward when the ignition is in the RUN
position and the transmission shift le-
ver is in the REVERSE position. The
mirrors will move back to their previ-
ous position when the transmission is
shifted out of REVERSE. To make
your selection, touch the Tilt Mirrors
In Reverse soft-key, until a check-
mark appears next to setting, showing
that setting has been selected. Touch
the back arrow soft-key to return to
the previous menu. Blind Spot Alert (for versions/
markets, where provided)
When this feature is selected, the
Blind Spot Alert feature can be set to
Off, Lights or Lights and Chime. The
Blind Spot Alert feature can be acti-
vated in “Lights” mode. When this
mode is selected, the Blind Spot Moni-
tor (BSM) system is activated and will
only show a visual alert in the outside
mirrors. When “Lights & Chime”
mode is activated, the Blind Spot
Monitor (BSM) will show a visual
alert in the outside mirrors as well as
an audible alert when the turn signal
is on. When “Off” is selected, the
Blind Spot Monitor (BSM) system is
deactivated. To change the Blind Spot
Alert status, touch the Off, Lights or
Lights & Chime soft-key. Then touch
the arrow back soft-key.
NOTE: If your vehicle has expe-
rienced any damage in the area
where the sensor is located, even if
the fascia is not damaged, the sen-
sor may have become misaligned.
Take your vehicle to an authorized
dealer to verify sensor alignment.Having a sensor that is misaligned
will result in the BSM not operat-
ing to specification.
ParkView® Backup Camera (for
versions/markets, where provided)
Your vehicle may be equipped with
the ParkView® Rear Back Up Cam-
era that allows you to see an on-screen
image of the rear surroundings of
your vehicle whenever the shift lever
is put into REVERSE. The image will
be displayed on the radio touchscreen
display along with a caution note to
“check entire surroundings” across
the top of the screen. After five sec-
onds, this note will disappear. The
ParkView® camera is located on the
rear of the vehicle above the rear Li-
cense plate. To make your selection,
touch the ParkView® Backup Cam-
era soft-key, until a check-mark ap-
pears next to setting, showing that
setting has been selected. Touch the
back arrow soft-key to return to the
previous menu.
178
Page 187 of 332
is programmed touching the
handle more than once will only
result in the driver’s door opening.
If driver door first is selected, once
the driver door is opened, the inte-
rior door lock/unlock switch can
be used to unlock all doors (or use
RKE transmitter).
Passive Entry
This feature allows you to lock and
unlock the vehicle’s door(s) without
having to press the Remote Keyless
Entry (RKE) transmitter lock or un-
lock buttons. To make your selection,
touch the Passive Entry soft-key, until
a check-mark appears next to setting,
showing that setting has been selected.
Touch the back arrow soft-key to re-
turn to the previous menu. Refer to
“Keyless Enter-N-Go” in “Things To
Know Before Starting Your Vehicle”.
Personal Settings Linked To FOB
(for versions/markets, where pro-
vided)
This feature provides automatic
driver seat positioning to enhance
driver mobility when entering and ex-
iting the vehicle. To make your selec-
tion, touch the Personal SettingsLinked To FOB soft-key, until a
check-mark appears next to setting,
showing that setting has been se-
lected. Touch the back arrow soft-key
to return to the previous menu.
NOTE: The seat will return to the
memorized seat location (if Recall
Memory with Remote Key Unlock
is set to ON) when the Remote Key-
less Entry (RKE) transmitter is
used to unlock the door. Refer to
“Driver Memory Seat” in “Under-
standing The Features Of Your Ve-
hicle” for further information.
Engine Off Options
After pressing the Engine Off Options
soft-key the following settings will be
available.
Easy Exit Seat (for versions/
markets, where provided)
This feature provides automatic
driver seat positioning to enhance
driver mobility when entering and ex-
iting the vehicle. To make your selec-
tion, touch the Easy Exit Seats soft-
key, until a check-mark appears next
to setting, showing that setting has
been selected. Touch the back arrow
soft-key to return to the previous
menu.
Engine Off Power Delay (for
versions/markets, where provided)
When this feature is selected, the
power window switches, radio,
Uconnect® phone system (for
versions/markets, where provided),
DVD video system (for versions/
markets, where provided), power
sunroof (for versions/markets, where
provided), and power outlets will re-
main active for up to 10 minutes after
the ignition is cycled to OFF. Opening
either front door will cancel this fea-
ture. To change the Engine Off Power
Delay status touch the 0 seconds, 45
seconds, 5 minutes or 10 minutes
soft-key. Then touch the arrow back
soft-key.
Headlight Off Delay
When this feature is selected, the
driver can choose to have the head-
lights remain on for 0, 30, 60, or 90
seconds when exiting the vehicle. To
change the Headlight Off Delay status
touch the + or - soft-key to select your
181
Page 191 of 332
Selecting “Audio Surround” through
the DSS modes activates the Harman
Kardon® Logic7® multichannel
surround-sound technology in your
vehicle. The “Video Surround” mode
is described under Driver-Selectable
Surround (DSS). The Video Surround
Mode will only be available for video
media sources (DVDs, Video CDs, or
other video media supported by the
radio). Some audio will sound better
in DSS modes, others in Stereo mode.
When in “Audio Surround” mode,
balance is set automatically. Fader
control is available in surround mode
but should be set to the center position
for optimal surround performance.
STEERING WHEEL
AUDIO CONTROLS
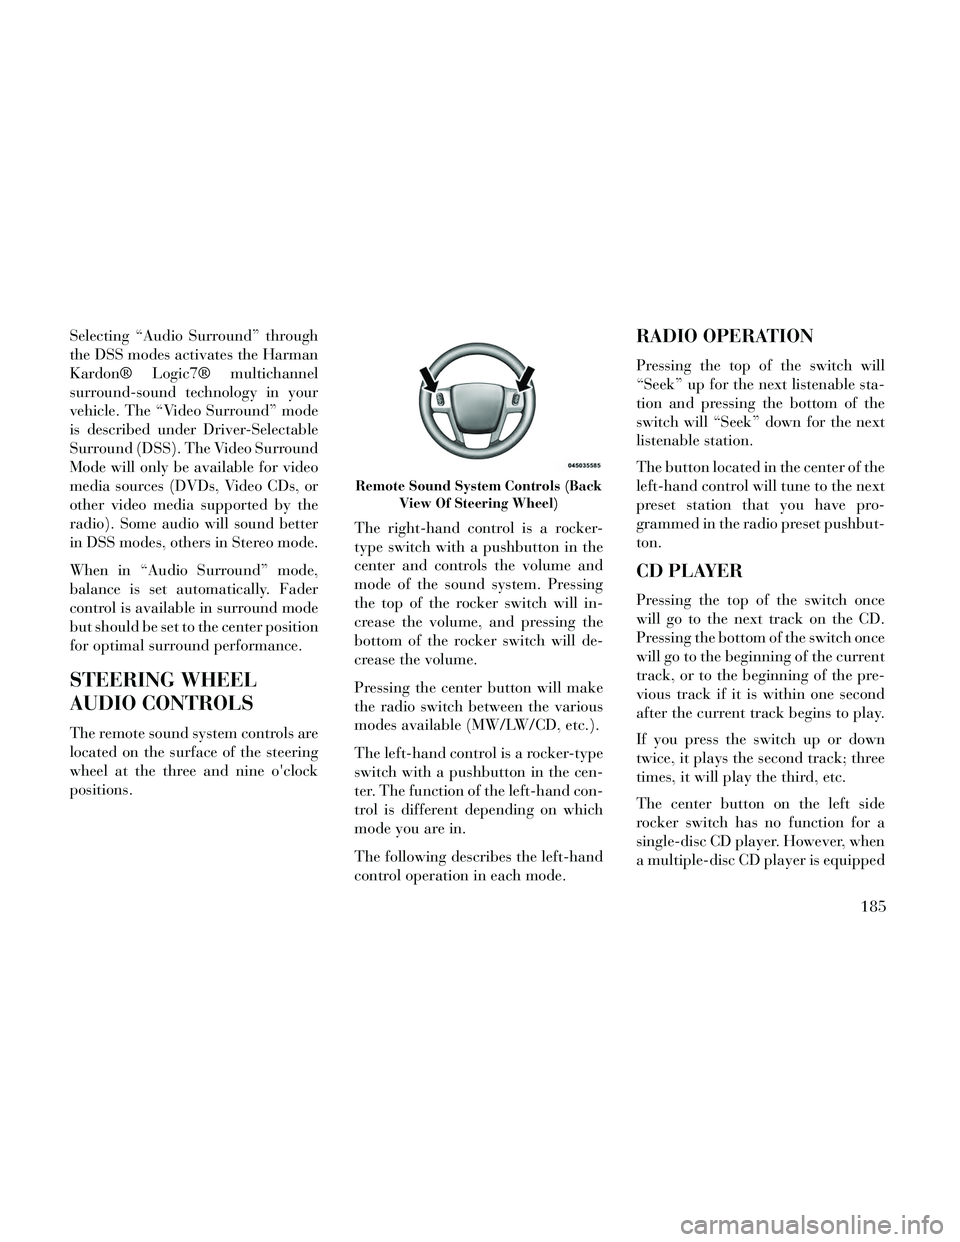
The remote sound system controls are
located on the surface of the steering
wheel at the three and nine o'clock
positions.The right-hand control is a rocker-
type switch with a pushbutton in the
center and controls the volume and
mode of the sound system. Pressing
the top of the rocker switch will in-
crease the volume, and pressing the
bottom of the rocker switch will de-
crease the volume.
Pressing the center button will make
the radio switch between the various
modes available (MW/LW/CD, etc.).
The left-hand control is a rocker-type
switch with a pushbutton in the cen-
ter. The function of the left-hand con-
trol is different depending on which
mode you are in.
The following describes the left-hand
control operation in each mode.
RADIO OPERATION
Pressing the top of the switch will
“Seek” up for the next listenable sta-
tion and pressing the bottom of the
switch will “Seek” down for the next
listenable station.
The button located in the center of the
left-hand control will tune to the next
preset station that you have pro-
grammed in the radio preset pushbut-
ton.
CD PLAYER
Pressing the top of the switch once
will go to the next track on the CD.
Pressing the bottom of the switch once
will go to the beginning of the current
track, or to the beginning of the pre-
vious track if it is within one second
after the current track begins to play.
If you press the switch up or down
twice, it plays the second track; three
times, it will play the third, etc.
The center button on the left side
rocker switch has no function for a
single-disc CD player. However, when
a multiple-disc CD player is equipped
Remote Sound System Controls (Back
View Of Steering Wheel)
185
Page 192 of 332
on the vehicle, the center button will
select the next available CD in the
player.
CD/DVD DISC
MAINTENANCE
To keep a CD/DVD in good condition,
take the following precautions:
1. Handle the disc by its edge; avoid
touching the surface.
2. If the disc is stained, clean the
surface with a soft cloth, wiping from
center to edge.
3. Do not apply paper or tape to the
disc; avoid scratching the disc.
4. Do not use solvents such as ben-
zene, thinner, cleaners, or anti-static
sprays.
5. Store the disc in its case after play-
ing.
6. Do not expose the disc to direct
sunlight.
7. Do not store the disc where tem-
peratures may become too high.NOTE: If you experience diffi-
culty in playing a particular disc, it
may be damaged (i.e., scratched,
reflective coating removed, a hair,
moisture or dew on the disc) over-
sized, or have protection encoding.
Try a known good disc before con-
sidering disc player service.
RADIO OPERATION AND
MOBILE PHONES
Under certain conditions, the mobile
phone being on in your vehicle can
cause erratic or noisy performance
from your radio. This condition may
be lessened or eliminated by relocat-
ing the mobile phone antenna. This
condition is not harmful to the radio.
If your radio performance does not
satisfactorily “clear” by the reposi-
tioning of the antenna, it is recom-
mended that the radio volume be
turned down or off during mobile
phone operation.
CLIMATE CONTROLS
The air conditioning and heating sys-
tem is designed to make you comfort-
able in all types of weather. This sys-
tem can be operated through either
the controls on the instrument panel
or through the Uconnect® system dis-
play.
When the Uconnect® system is in dif-
ferent modes (Radio, Player, Settings,
More, etc.) the driver and passenger
temperature settings will be indicated
at the top of the display.
GENERAL OVERVIEW
Hard-Keys
The hard-keys are located below the
Uconnect® screen, in the center of the
instrument panel.
186
Page 224 of 332

The Electronic Brake Force Distribu-
tion (EBD) prevents the rear wheels
from over-braking and provides
greater control of available braking
forces applied to the rear axle.
When the vehicle is driven over
11 km/h, you may also hear a slight
clicking sound as well as some related
motor noises. These noises are the sys-
tem performing its self check cycle to
ensure that the ABS is working prop-
erly. This self check occurs each time
the vehicle is started and accelerated
past 11 km/h.
ABS is activated during braking un-
der certain road or stopping condi-
tions. ABS-inducing conditions can
include ice, snow, gravel, bumps, rail-
road tracks, loose debris, or panic
stops.
You also may experience the following
when the brake system goes into Anti-
Lock:
The ABS motor running (it maycontinue to run for a short time
after the stop), The clicking sound of solenoid
valves,
Brake pedal pulsations, and
A slight drop or fall away of the brake pedal at the end of the stop.
These are all normal characteristics of
ABS.
WARNING!
The ABS contains sophisticated electronic equipment that may be
susceptible to interference caused
by improperly installed or high
output radio transmitting equip-
ment. This interference can cause
possible loss of anti-lock braking
capability. Installation of such
equipment should be performed
by qualified professionals.
Pumping of the Anti-Lock Brakes will diminish their effectiveness
and may lead to a collision.
Pumping makes the stopping dis-
tance longer. Just press firmly on
your brake pedal when you need
to slow down or stop.
(Continued)
WARNING!(Continued)
The ABS cannot prevent thenatural laws of physics from act-
ing on the vehicle, nor can it in-
crease braking or steering effi-
ciency beyond that afforded by
the condition of the vehicle
brakes and tires or the traction
afforded.
The ABS cannot prevent colli- sions, including those resulting
from excessive speed in turns, fol-
lowing another vehicle too
closely, or hydroplaning.
The capabilities of an ABS equipped vehicle must never be
exploited in a reckless or danger-
ous manner that could jeopardize
the user's safety or the safety of
others.
All vehicle wheels and tires must be
the same size and type and tires must
be properly inflated to produce accu-
rate signals for the computer.
218
Page 241 of 332

will automatically update, the “In-
flate Tire to XX” message will no lon-
ger be displayed, the graphic display
in the EVIC will stop flashing or re-
turn to it's original color, and the TPM
Telltale Light will turn off. The ve-
hicle may need to be driven for up to
20 minutes above 24 km/h in order
for the TPMS to receive this informa-
tion.
Service TPMS Warning
If a system fault is detected, the TPM
Telltale Light will flash on and off for
75 seconds and then remain on solid.
The system fault will also sound a
chime. In addition, the EVIC will dis-
play a "SERVICE TPM SYSTEM"
message for a minimum of five sec-
onds and then display dashes (- -) in
place of the pressure value to indicate
which sensor is not being received.
If the ignition switch is cycled, this
sequence will repeat, providing the
system fault still exists. If the system
fault no longer exists, the TPM Tell-
tale Light will no longer flash, and the
"SERVICE TPM SYSTEM" message
will no longer display, and a pressurevalue will display in place of the
dashes. A system fault can occur due
to any of the following:
1. Signal interference due to elec-
tronic devices or driving next to facili-
ties emitting the same radio frequen-
cies as the TPM sensors.
2. Installing aftermarket window
tinting that contains materials that
may block radio wave signals.
3. Accumulation of snow or ice
around the wheels or wheel housings.
4. Using tire chains on the vehicle.
5. Using wheels/tires not equipped
with TPM sensors.
The EVIC will also display a "SER-
VICE TPM SYSTEM" message for a
minimum of five seconds when a sys-
tem fault related to an incorrect sen-
sor location fault is detected. In this
case, the "SERVICE TPM SYSTEM"
message is then followed with a
graphic display with pressure values
still shown. This indicates that the
pressure values are still being received
from the TPM sensors but they may
not be located in the correct vehicle
position. The system still needs to be
serviced as long as the "SERVICE
TPM SYSTEM" message is displayed.
Vehicles With Compact Spare
1. The compact spare tire does not
have a TPM sensor. Therefore, the
TPMS will not monitor the pressure in
the compact spare tire.
2. If you install the compact spare
tire in place of a road tire that has a
pressure below the low-pressure
warning limit, upon the next ignition
switch cycle, the TPM Telltale Light
will remain ON and a chime will
sound. In addition, the graphic in the
EVIC will still display a flashing or
different color pressure value.
3. After driving the vehicle for up to
20 minutes above 24 km/h, the TPM
Telltale Light will flash on and off for
75 seconds and then remain on solid.
In addition, the EVIC will display a
"SERVICE TPM SYSTEM" message
for a minimum of five seconds and
then display dashes (- -) in place of
the pressure value.
235