2014 KIA Sorento door lock
[x] Cancel search: door lockPage 127 of 508
Features of your vehicle36
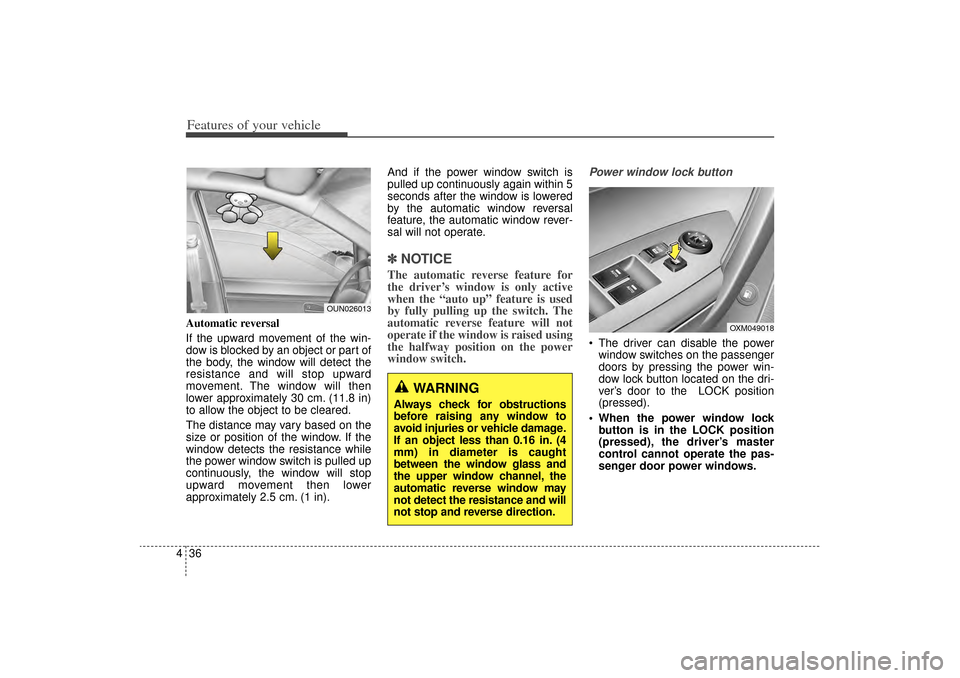
4Automatic reversal
If the upward movement of the win-
dow is blocked by an object or part of
the body, the window will detect the
resistance and will stop upward
movement. The window will then
lower approximately 30 cm. (11.8 in)
to allow the object to be cleared.
The distance may vary based on the
size or position of the window. If the
window detects the resistance while
the power window switch is pulled up
continuously, the window will stop
upward movement then lower
approximately 2.5 cm. (1 in). And if the power window switch is
pulled up continuously again within 5
seconds after the window is lowered
by the automatic window reversal
feature, the automatic window rever-
sal will not operate.
✽ ✽
NOTICEThe automatic reverse feature for
the driver’s window is only active
when the “auto up” feature is used
by fully pulling up the switch. The
automatic reverse feature will not
operate if the window is raised using
the halfway position on the power
window switch.
Power window lock button The driver can disable the power
window switches on the passenger
doors by pressing the power win-
dow lock button located on the dri-
ver’s door to the LOCK position
(pressed).
When the power window lock button is in the LOCK position
(pressed), the driver’s master
control cannot operate the pas-
senger door power windows.
WARNING
Always check for obstructions
before raising any window to
avoid injuries or vehicle damage.
If an object less than 0.16 in. (4
mm) in diameter is caught
between the window glass and
the upper window channel, the
automatic reverse window may
not detect the resistance and will
not stop and reverse direction.
OUN026013
OXM049018
XM(FL) CAN(ENG) 4a(~158).QXP 1/23/2013 3:47 PM Page 36
Page 128 of 508
437
Features of your vehicle
CAUTION
To prevent possible damageto the power window system,do not open or close two win-dows or more at the sametime. This will also ensure thelongevity of the fuse.
Never try to operate the main switch on the driver's doorand the individual door win-dow switch in the oppositedirections at the same time. Ifthis is done, the window willstop and cannot be opened orclosed.
WARNING -
Windows
NEVER leave the ignition key in the vehicle.
NEVER leave any child unat- tended in the vehicle. Even
very young children may inad-
vertently cause the vehicle to
move, entangle themselves in
the windows, or otherwise
injure themselves or others.
Always double check to make sure all arms, hands, head
and other obstructions are
safely out of the way before
closing a window.
Do not allow children to play with the power windows. Keep
the driver’s door power win-
dow lock button in the LOCK
position (pressed). Serious
injury can result from uninten-
tional window operation by
the child.
Do not extend heads or any limbs outside the window
while the vehicle is in motion.
XM(FL) CAN(ENG) 4a(~158).QXP 1/23/2013 3:47 PM Page 37
Page 131 of 508
Features of your vehicle40
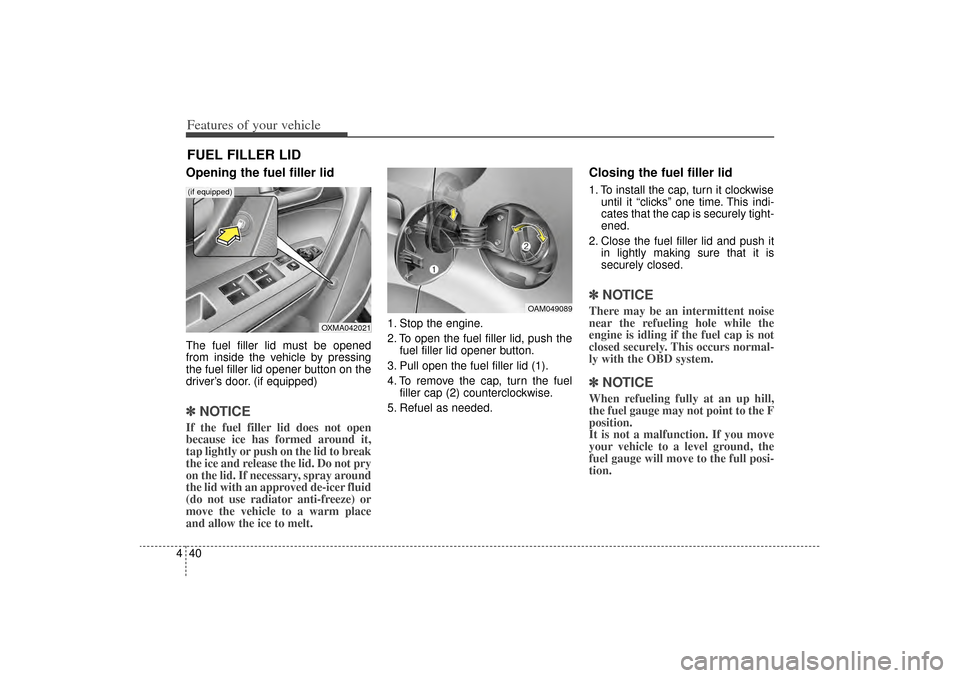
4Opening the fuel filler lidThe fuel filler lid must be opened
from inside the vehicle by pressing
the fuel filler lid opener button on the
driver’s door. (if equipped)✽ ✽
NOTICEIf the fuel filler lid does not open
because ice has formed around it,
tap lightly or push on the lid to break
the ice and release the lid. Do not pry
on the lid. If necessary, spray around
the lid with an approved de-icer fluid
(do not use radiator anti-freeze) or
move the vehicle to a warm place
and allow the ice to melt.
1. Stop the engine.
2. To open the fuel filler lid, push the
fuel filler lid opener button.
3. Pull open the fuel filler lid (1).
4. To remove the cap, turn the fuel filler cap (2) counterclockwise.
5. Refuel as needed.
Closing the fuel filler lid1. To install the cap, turn it clockwise until it “clicks” one time. This indi-
cates that the cap is securely tight-
ened.
2. Close the fuel filler lid and push it in lightly making sure that it is
securely closed.✽ ✽NOTICEThere may be an intermittent noise
near the refueling hole while the
engine is idling if the fuel cap is not
closed securely. This occurs normal-
ly with the OBD system.✽ ✽NOTICEWhen refueling fully at an up hill,
the fuel gauge may not point to the F
position.
It is not a malfunction. If you move
your vehicle to a level ground, the
fuel gauge will move to the full posi-
tion.
FUEL FILLER LID
OAM049089
OXMA042021
(if equipped)
XM(FL) CAN(ENG) 4a(~158).QXP 1/23/2013 3:48 PM Page 40
Page 153 of 508
Features of your vehicle62
4Rolling code programming
To train a garage door opener (or
other rolling code equipped devices)
with the rolling code feature, follow
these instructions after completing
the “Programming” portion of this
text. (A second person may make the
following training procedures quicker
& easier.)
4. Locate the “learn” or “smart” but-
ton on the device’s motor head
unit. Exact location and color of
the button may vary by product
brand. If there is difficulty locating
the “learn” or “smart” button, refer-
ence the device’s owner’s manual
or contact HomeLink at 1-800-
355-3515 or on the internet at
www.homelink.com.
5. Press and release the “learn” or “smart” button on the device’s
motor head unit. You have 30 sec-
onds to complete step number 6. 6. Return to the vehicle and firmly
press and release the pro-
grammed HomeLink button up to
three times. The rolling code
equipped device should now rec-
ognize the HomeLink signal and
activate when the HomeLink but-
ton is pressed. The remaining two
buttons may now be programmed
if this has not previously been
done. Refer to the “Programming”
portion of this text. Operating HomeLink
To operate, simply press the pro-
grammed HomeLink button.
Activation will now occur for the
trained product (garage door, securi-
ty system, entry door lock, estate
gate, or home or office lighting). For
convenience, the hand-held trans-
mitter of the device may also be used
at any time. The HomeLink Wireless
Controls System (once programmed)
or the original hand-held transmitter
may be used to activate the device
(e.g. garage door, entry door lock,
etc.). In the event that there are still
programming difficulties, contact
HomeLink at 1-800-355-3515 or on
the internet at www.homelink.com.
XM(FL) CAN(ENG) 4a(~158).QXP 1/23/2013 3:49 PM Page 62
Page 157 of 508
Features of your vehicle66
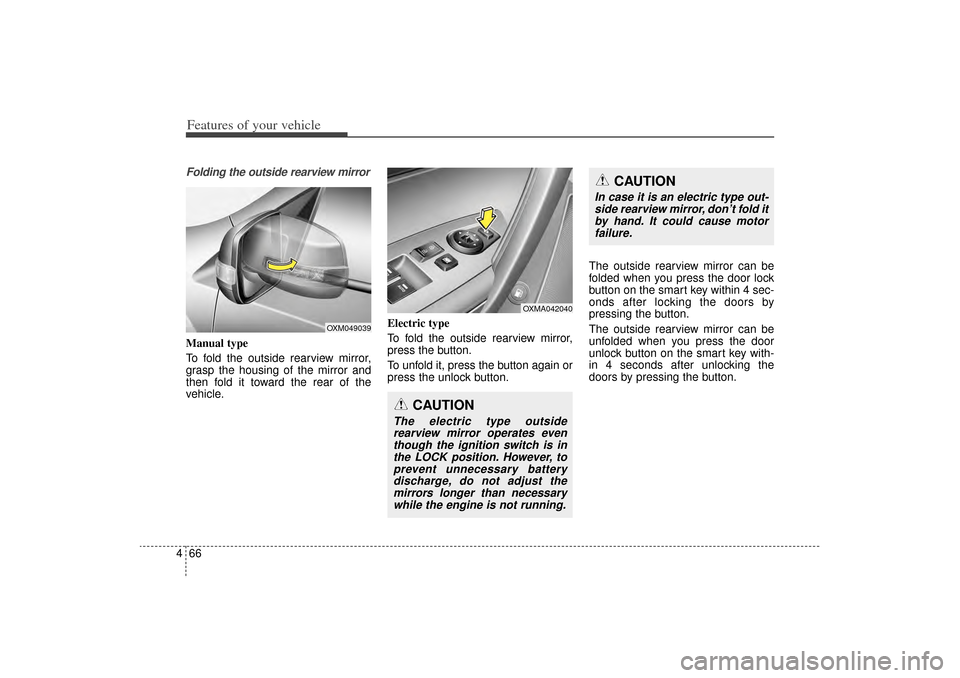
4Folding the outside rearview mirrorManual type
To fold the outside rearview mirror,
grasp the housing of the mirror and
then fold it toward the rear of the
vehicle. Electric type
To fold the outside rearview mirror,
press the button.
To unfold it, press the button again or
press the unlock button.The outside rearview mirror can be
folded when you press the door lock
button on the smart key within 4 sec-
onds after locking the doors by
pressing the button.
The outside rearview mirror can be
unfolded when you press the door
unlock button on the smart key with-
in 4 seconds after unlocking the
doors by pressing the button.
OXM049039
OXMA042040
CAUTION
In case it is an electric type out-
side rearview mirror, don’t fold itby hand. It could cause motorfailure.
CAUTION
The electric type outsiderearview mirror operates eventhough the ignition switch is inthe LOCK position. However, toprevent unnecessary batterydischarge, do not adjust themirrors longer than necessarywhile the engine is not running.
XM(FL) CAN(ENG) 4a(~158).QXP 1/23/2013 3:49 PM Page 66
Page 169 of 508

Features of your vehicle78
4User Settings ModeDescriptionOn this mode, you can change set-
ting of the doors, lamps, and so on.
DoorAuto Door Lock (if equipped)
Off:
The auto door lock operation will
be deactivated.
Speed: All doors will be automatically
locked when the vehicle speed
exceeds 15km/h (9.3mph).
Shift Lever: All doors will be automatically
locked if the automatic transaxle
shift lever is shifted from the P
(Park) position to the R (Reverse),
N (Neutral), or D (Drive) position. Auto Door Unlock (if equipped)
Off:
The auto door unlock operation will
be canceled.
Key Out or Power Off: All doors will be automatically
unlocked when the ignition key is
removed from ignition switch or
Engine Start/Stop Button is set to
the OFF position.
Shift Lever: All doors will be automatically
unlocked if the automatic transaxle
shift lever is shifted to the P (Park)
position.
OXM043120E
XM(FL) CAN(ENG) 4a(~158).QXP 1/23/2013 3:49 PM Page 78
Page 170 of 508

479
Features of your vehicle
Two Press Unlock (if equipped)
Off:The two press unlock function will
be deactivated. Therefore, all doors
will unlock if the door is unlocked.
On: The driver’s door will unlock if the
door is unlocked. When the door is
unlocked again within 4 seconds,
all doors will unlock.
Horn Feedback (if equipped)
Off: The Horn feedback operation will
be deactivated.
On: After locking the door by pressing
the lock button on the transmitter, if
you press the lock button again
within 4 seconds, the warning
sound will operate once to indicate
that all doors are locked.
LampHead Lamp Delay (if equipped)
If this item is checked, the headlamp
delay and headlamp welcome func-
tion will be activated.
Welcome Light (if equipped)
If this item is checked, the welcome
light function of the pocket lamp will
be activated.
Auto Triple Turn (One-touch triple
turn signal) (if equipped)
If this item is checked, the lane
change signals will blink 3 times when
the turn signal lever is moved slightly.
SettingsTemperature Unit
Convert the temperature unit from °C
to °F or from °F to °C.
Welcome Sound
If this item is checked, the welcome
sound function will be activated.
Seat Easy Access (if equipped)
If this item is checked, the driver’s
seat will automatically move forward
or rearward for the driver to enter or
exit the vehicle comfortably.
AVG Fuel Eco Reset
Auto Reset:The average fuel economy will
reset automatically when refueling.
Manual Reset: The average fuel economy will not
reset automatically whenever refu-
eling.
For more details, refer to “Trip
Computer” in this chapter.
XM(FL) CAN(ENG) 4a(~158).QXP 1/23/2013 3:49 PM Page 79
Page 199 of 508
Features of your vehicle108
4Battery saver function The purpose of this feature is to
prevent the battery from being dis-
charged if the lights are left in the
ON position. The system automati-
cally shuts off the parking lights 30
seconds after the ignition key is
removed and the driver’s door is
opened and closed.
With this feature, the parking lights will turn off automatically if the driver
parks on the side of the road at night
and opens the driver’s side door.
If necessary, to keep the parking
lights on when the ignition key is
removed, perform the following:
1) Open the driver-side door.
2) Turn the parking lights OFF and ON again using the light switch
on the steering column.
Headlight escort function
(if equipped)If you turn the ignition switch to the
ACC or OFF position with the head-
lights ON, the headlights remain on
for about 30 minutes. However, if the
driver's door is opened and closed,
the headlights are turned off after 15
seconds.
The headlights can be turned off by
pressing the lock button on the trans-
mitter (or smart key) twice or turning
the light switch to the OFF position.
Headlight welcome function
(if equipped)When the headlight (light switch in
the headlight or AUTO position) is on
and all doors (and tailgate) are
locked and closed, the position light
and headlight will come on for 15
seconds if any of the below is per-
formed.
Without smart key system
- When the door unlock button ispressed on the transmitter.
With the smart key system - When the door unlock button ispressed on the smart key.
At this time, if you press the door lock
button, the position light and head-
light will turn off immediately.
LIGHTING
CAUTION
If the driver gets out of the vehi- cle through other doors (exceptdriver’s door), the battery saverfunction does not operate andthe headlight escort functiondoes not turn off automatically.Therefore, It causes the batteryto be discharged. In this case,make sure to turn off the lampbefore getting out of the vehicle.
XM(FL) CAN(ENG) 4a(~158).QXP 1/23/2013 3:50 PM Page 108