Page 85 of 236
Before Use
Navigation l
3-3
Operating the Navigation
The navigation can be operated via touch. Touch the correspond-
ing button on the screen to operate.
If the button does not respond, take your finger off the screen and try again.
When a button function is operating, the color of the selected button will be displayed differently.
To return to the previous screen, press the button.
Press the button to cancel functions that can be operated
on the current screen.
(Some functions may not be cancelled.)
i Information
• Buttons that cannot be operated will be disabled.
Page 89 of 236

Starting Navigation
Navigation l
3-7
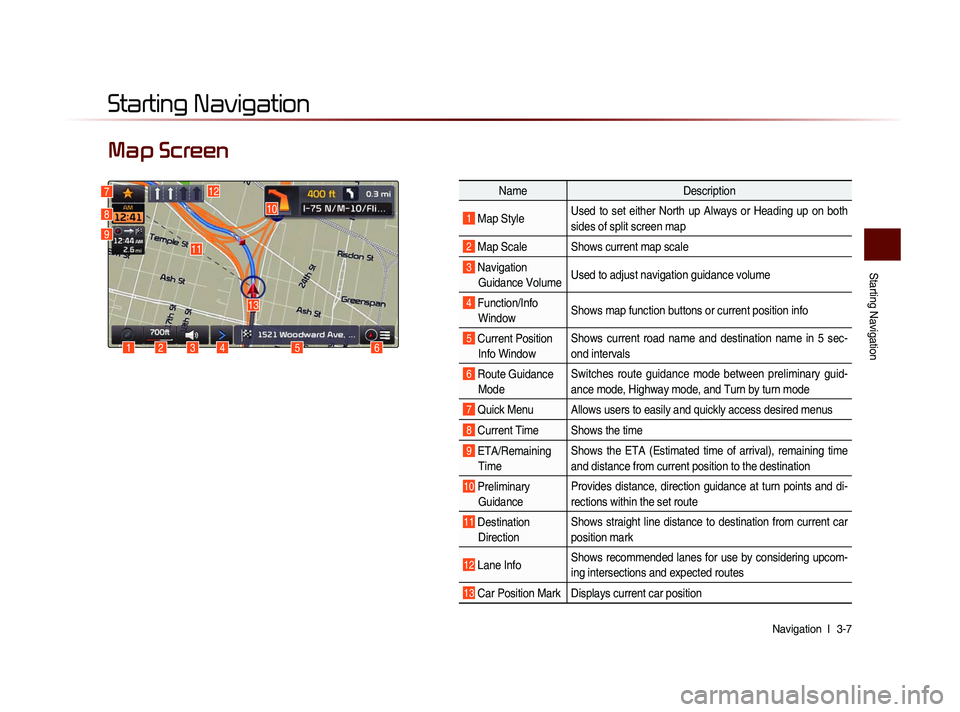
Map Screen
Starting Navigation
6
10
1234
13
127
8
9
Name Description
1 Map Style Used to set either North up Always or Heading up on both
sides of split screen map
2 Map Scale Shows current map scale
3 Navigation
Guidance Volume Used to adjust navigation guidance volume
4 Function/Info
Window Shows map function buttons or current position info
5 Current Position
Info Window Shows current road name and destination name in 5 sec-
ond intervals
6 Route Guidance
Mode Switches route guidance mode between preliminary guid-
ance mode, Highway mode, and Turn by turn mode
7 Quick Menu Allows users to easily and quickly access desired menus
8 Current Time Shows the time
9 ETA/Remaining
Time Shows the ETA (Estimated time of arrival), remaining time
and distance from current position to the destination
10 Preliminary
Guidance Provides distance, direction guidance at turn points and di-
rections within the set route
11 Destination
Direction Shows straight line distance to destination from current car
position mark
12 Lane Info
Shows recommended lanes for use by considering upcom-
ing intersections and expected routes
13 Car Position Mark Displays current car position
5
11
Page 91 of 236

Starting Navigation
Navigation l
3-9
This button is used to set map screen
related options, such as Split screen,
H e a d i n g - U p /N o r th U p , a n d L e ft/R i g h t
screen display.
Name Description
1 Split Screen/
Single ScreenSelect between Split Screen
or Single Screen Map
2 Heading-Up/
North-Up Display Map in Vehicle Trav-
eling Direction (Heading-Up)
or North-Up direction
i Information
• The Heading-Up/North-Up, 2D, and map
scale adjustments can be used when
using Split Screen map.
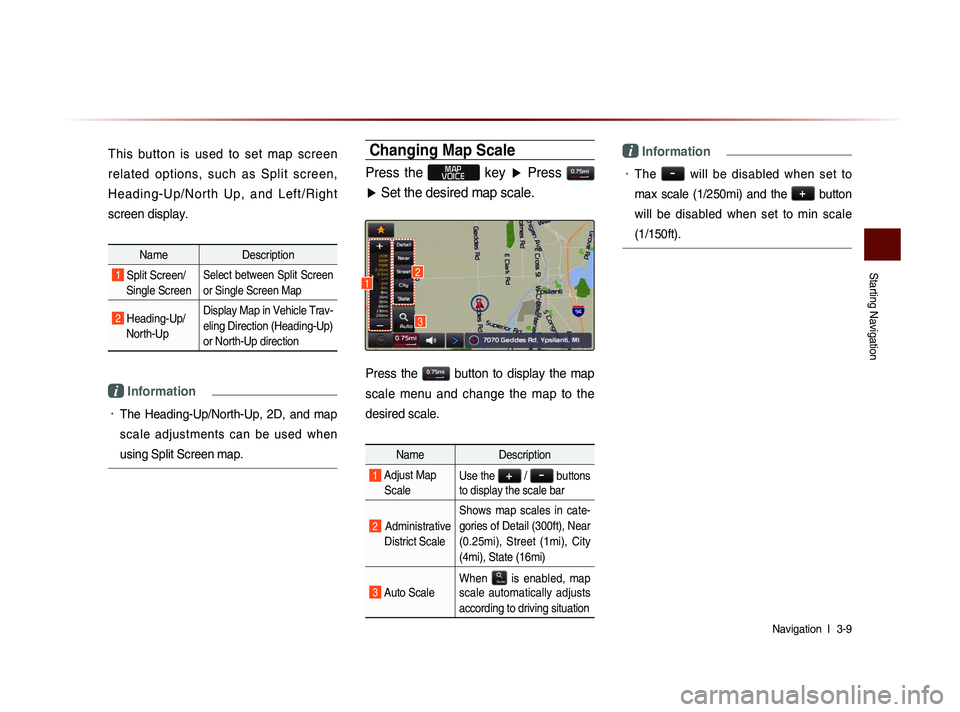
Changing Map Scale
Press the MAP
VOICE key ▶ Press
▶ Set the desired map scale.
Press the button to display the map
scale menu and change the map to the
desired scale.
Name Description
1 Adjust Map
ScaleUse the + / - buttons
to display the scale bar
2 Administrative
District Scale Shows map scales in cate-
gories of Detail (300ft), Near
(0.25mi), Street (1mi), City
(4mi), State (16mi)
3 Auto Scale
When
is enabled, map
scale automatically adjusts
according to driving situation
i Information
• The - will be disabled when set to
max scale (1/250mi) and the
+
button
will be disabled when set to min scale
(1/150ft).
3
12
Page 92 of 236

3-10
Map Menu
Press the > button ▶ Press Menu
button.
Features frequently used within the map
screen, such as
Set as Destination ,
Add Waypoint , View Destination ,
Cancel Route , Call , and Details are
displayed.
i Information
• If the screen is scrolled, then the top menu is
changed to the
Set as Destination button.
• If you have already set a destination, then the
top button will change to the
Recalculate
button.
Adjusting Navigation Volume
Press the button ▶ Adjust volume.
Press the button. The volume menu
is displayed and allows you to adjust the
navigation voice guidance volume.
The volume can be adjusted from 0~45
through the
+ / - button.
Press the
Mute button to turn off the
sound.
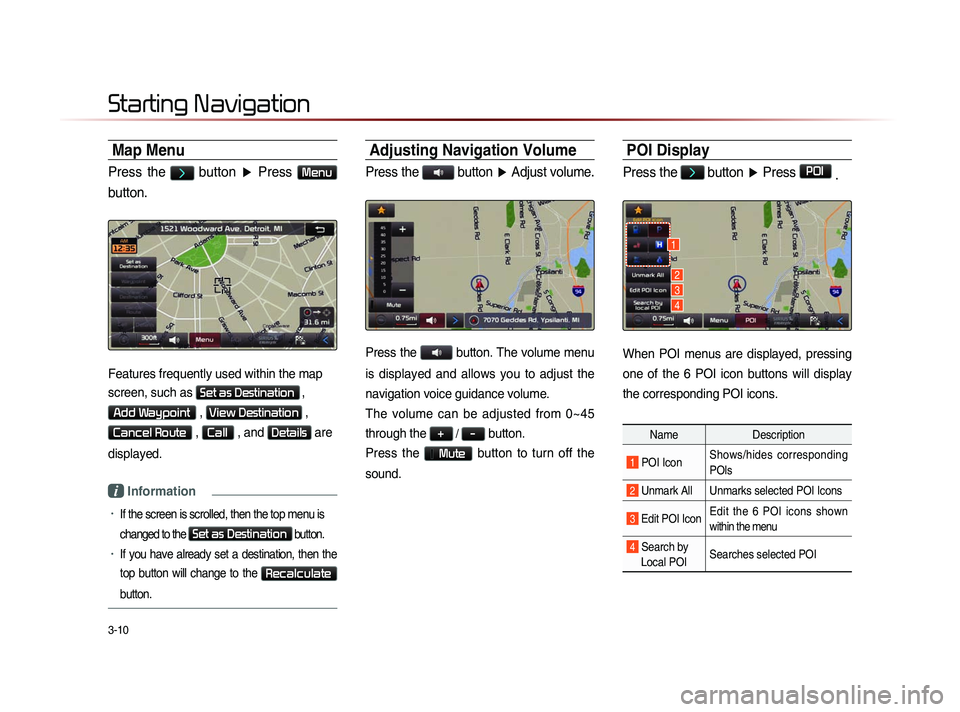
POI Display
Press the > button ▶ Press POI
.
When POI menus are displayed, pressing
one of the 6 POI icon buttons will display
the corresponding POI icons.
Name Description
1 POI IconShows/hides corresponding
POIs
2 Unmark All Unmarks selected POI Icons
3 Edit POI Icon Edit the 6 POI icons shown
within the menu
4 Search by
Local POI Searches selected POI
Starting Navigation
1
2
3
4
Page 106 of 236

3-24
Using the Navigation
Intersection Zoom Mode
This mode provides detailed guidance
nearby intersections before the next turn.
This mode is displayed starting from 300m
before the intersection.
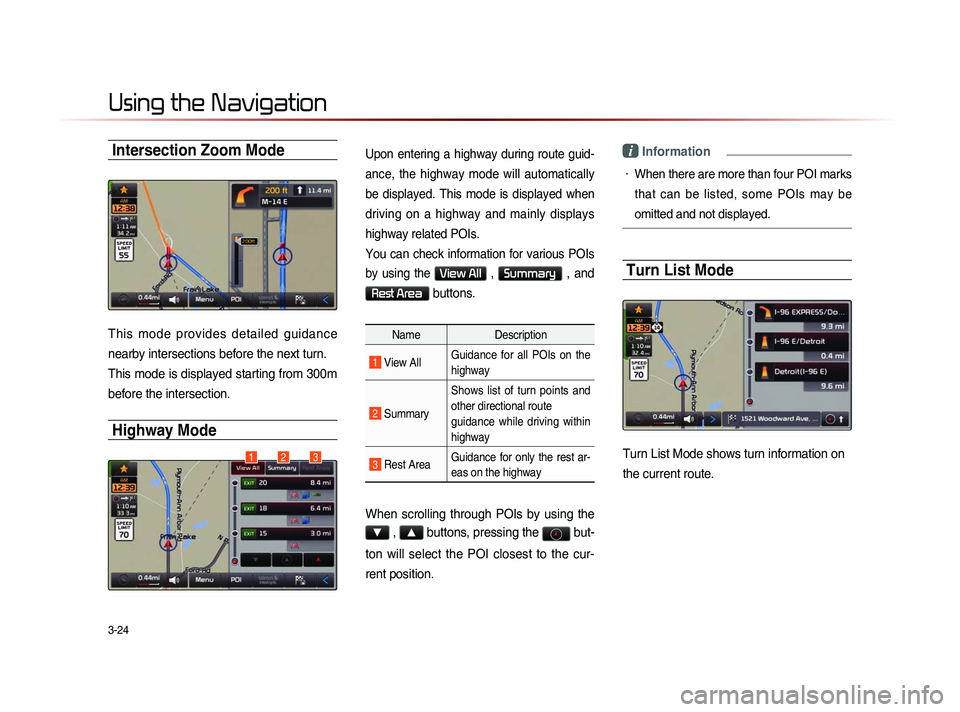
Highway Mode
Upon entering a highway during route guid-
ance, the highway mode will automatically
be displayed. This mode is displayed when
driving on a highway and mainly displays
highway related POIs.
You can check information for various POIs
by using the
View All , Summary , and
Rest Area buttons.
NameDescription
1 View AllGuidance for all POIs on the
highway
2
Summary Shows list of turn points and
other directional route
guidance while driving within
highway
3 Rest Area
Guidance for only the rest ar-
eas on the highway
When scrolling through POIs by using the
▼ , ▲ buttons, pressing the
but-
ton will select the POI closest to the cur-
rent position.
i Information
• When there are more than four POI marks
that can be listed, some POIs may be
omitted and not displayed.
Turn List Mode
Turn List Mode shows turn information on
the current route.123
Page 150 of 236

5-8
Voice Command Lists
Audio System Command List
FM/AM Radio
CommandOperation
Radio Plays the most recent frequency for the most
recently operated band
(Radio) AM Plays the most recent frequency for the corre-
sponding band
(Radio) FM Plays the most recent frequency for the corre-
sponding band In the case of FM.
The most recent frequency within the most re-
cently played FM1 or FM2 band is played
FM1/FM2
Plays the most recent frequency for the corre-
sponding band
AM <530~1710> Plays the desired AM band frequency (e.g. AM
"Five-Hundred Thirty")
FM <87.5~107.9> Plays the desired FM band frequency (e.g. FM
"Eighty-Seven point Five")
AM Preset <1~6> Plays the desired AM band preset frequency
FM1 Preset <1~6> Plays the desired FM1 band preset frequency
FM2 Preset <1~6> Plays the desired FM2 band preset frequency
Command
Operation
Preset <1~6> Plays the desired preset frequency for the cur-
rent band
Seek Up Searches and plays the next frequency of the
current band
Seek Down Searches and plays the previous frequency of
the current band
Preset Up Plays the next preset frequency of the current
band
Preset Down Plays the previous preset frequency of the cur-
rent band
Auto Store Searches all frequencies within the current
band and stores the 6 frequencies with the most
superior reception as preset buttons
Scan On
Scans receivable frequencies from the current
broadcast and plays for 10 seconds each
Scan Off Ends the currently operating Scan or Preset
Scan feature
Preset Scan Plays through all presets 10 seconds each, be-
ginning with the current preset
Page 189 of 236
Using Setup
Setup l
8-3
Starting Mode
Press the key
▶ Press
Setup to display the Setup screen.
Within Setup, you can check and change
the settings for all features found within the
Navigation system.
Sound
Press the
key ▶ Press Setup
▶ Press Sound
.
Setting Balance/Fader
Press the Sound button ▶ Press
Fader/Balance
▶ Set and press
Done
.
Use the ▲ , ▼ , ◀ , ▶ buttons to
move the cursor on the control screen to
the desired position.
Press
Center to restore sound to the
center position.
i Information
• The Balance/Fader settings allows you to
set the sound position. For example, you
can set the sound close to the driver-seat
so that the volume is relatively lower in
the passenger or rear seats.
Setting Bass/Mid/Treble
Press the Sound button ▶ Press
Bass/Mid/Treble ▶ S e t a n d p r e s s
Done
.
Use the ◀ or ▶ buttons to adjust the
Bass/Mid/Treble settings.
Page 191 of 236
Using Setup
Setup l
8-5
Setting Beep
Press the Sound button ▶ Press
Beep ▶ Set and press Done
.
Each press of this button turns the BEEP
tone on/off.
i Information
• When the light on the left side of the but-
ton is turned on, this indicates that the
BEEP tone is active. Press the
Beep
button again to turn off the BEEP tone.
Display
Press the
key ▶ Press Setup
▶ Press
Display
.
Adjusting Brightness
Press the Display button ▶ Press
Brightness ▶ Set and press Done
.
Use the ◀ or ▶ buttons to adjust the dis-
play brightness.
Setting Display Mode
Press the Display button ▶ Press
Display Mode ▶ Set and press Done .
Name Description
1 Automatic Adjusts the brightness auto-
m a t i c a l l y a c c o r d i n g t o s u r -
rounding brightness
2 Daylight
Always maintains the bright-
ness on high
3 Night Always maintains the bright-
ness on low
1
2
3