2014 KIA Sedona audio
[x] Cancel search: audioPage 235 of 382

Features of your vehicle
226
3
Incoming Volume (Bluetooth®Wireless
Technology call volume adjustments)
While in ADVANCED menu, press “In. Vol”
Use the knob key to set the desired vol-
ume and select the button.
Contacts Sync (Automatic Phonebook
download setting)
While in ADVANCED menu, select
“Contacts” To automatically save the
contacts and call history in your mobile
phone each time you connect a mobile
device, select ON. If you do not wish for
automatic download, select OFF.
It’s not available to make a phone call by
Bluetooth®Wireless Technology audio
system while the phonebook is being
downloaded.
Language of Bluetooth®Wireless
Technology voice recognition
While in ADVANCED menu, select
“Language”. To change the language,
select the desired language and press
the button.
Bluetooth®Wireless Technology sys-
tem off
While in ADVANCED menu, select
“BT Off ” to turn off the
Bluetooth®
Wireless Technology System.
■Voice Recognition Activation
in the Bluetooth®Wireless Technology
System can be activated in the follow-
ing conditions:
- Button Activation
The voice recognition system will be
active when the button is pressed
and after the sound of a Beep.
- Active Listening The voice recognition system will be
active for a period of time when the
Voice Recognition system has asked
for a customer response.
from zero to nine while number greater
than ten will not be recognized.
tion mode in following cases : When
pressing the button and saying
“cancel” following the beep. When not
making a call and pressing the
button. When voice recognition has
failed 3 consecutive times. At any time if you say “help”, the system
will announce what commands are
available.
■Menu tree
The menu tree identifies available voice
recognition Bluetooth®Wireless
Technology functions.
ENTER
ENTER
Call [Name]Ex) Call John (at Home)
Ex) Dial 911
Dial [Number]
Redial
Call Back
Add entryPhonebook
Change name
Delete name
By phone
By voice
CallBy name
By number
Page 236 of 382
3227
Features of your vehicle
■Making a Phone Call
➀Press button.
➁Say the following command.- Call
- Call
- Call
- Call
Note:
Calls can be immediately connected
to contacts who name or voice tag are
saved in the phonebook(or contacts).
A phone call can be made by speaking
names registered in the audio system.
➀Press button.
➁Say “Call”.
\bSay “By name” when prompted.
➃Say desired name (in Phonebook or
voice tag).
➄Say desired location (phone number
type). Only stored locations can be
selected.
➅ Say “Yes” to confirm and make a call.
✽ ✽ Tip
A shortcut to each of the following func-
tions is available:
1. Say “Call Name”
✽
✽Tip
■Voice Operation
To get the best performance out of the
Voice Recognition System, observe the
followings:
- Keep the interior of the vehicle as quiet as possible. Close the window
to eliminate surrounding noise
(traffic noise, vibration sounds,
etc), which may disturb recogniz-
ing the voice command correctly.
- Speak a command after a beep sound within 5 seconds. Otherwise
the command will not be received
properly.
- Speak in a natural voice without pausing between words.
- While receiving voice commands, press the button on the steer-
ing wheel remote controller to ter-
minate guidance. Voice command
will convert back to waiting mode
to allow the user to say a new voice
command.
Page 238 of 382
3229
Features of your vehicle
➀Press button.
➁Say "Phonebook".
\bSay "Add Entry" after prompt.
➃Say "By Phone" to proceed.
➄Say “Yes” to confirm.
➅ Your phone will start to transfer
phone/contact list to the audio system.
This process may take over 10 min- utes depending on the phone model
and number of entries
\fWait till the audio displays “Transfer
Complete” message.
Changing Name
The registered names can be modified.
➀Press button.
➁Say “Phonebook”.
\bSay “Change Name” after prompt.
➃Say the name of the entry (voice tag).
➄Say “Yes” to confirm.
➅ Say new desired name.
Deleting Name
The registered names can be deleted.
➀Press button.
➁Say “Phonebook”.
\bSay “Delete Name” after prompt.
➃Say the name of the entry (voice tag).
➄Say “Yes” to confirm.
■Bluetooth®Wireless Technology
Audio Speaker Adaptation
Speaker adaptation will improve perform-
ance of voice recognition system to a
particular user voice.
This will degrade the performance for
other users.
➀Press button for 10sec.
➁Say “Record profile”.
\bSay “Yes”.
➃Say the word displayed on Radio.
➀Press button for 10sec.
➁Say “Delete profile”.
\bSay “Yes”.
Page 240 of 382
3231
Features of your vehicle
Welcome
The Rear Seat Entertainment (RSE)
System is a compact, built-in, easy-to-use
entertainment system designed to provide
family fun while you are on the road. Enjoy
great quality sound from the vehicle
speakers, or have a private, quiet viewing
with the wireless headphones.
The display unit is mounted to the ceiling
in the rear passenger area of the vehicle,
allowing rear-seat passengers to play
DVD movies, video CDs or music CDs.
Users may also plug in a game platform or
VHS player. Headphones, game car-
tridges and other accessories can be kept
neatly out of the way in the 3rd-row arm-
rest compartment.
System Overview
The RSE System includes a mounted
color monitor with a built-in audio/video
control panel and a DVD player. It also
includes a remote control and two (2)
sets of battery-operated wireless head-
phones (batteries are included).
Connections / Setup
The RSE system is designed to make
your time on the road more enjoyable.
Please follow these instructions carefully
to get the most out of your RSE.
✽ ✽NOTICE
RSE operation is prevented during the
first 2 seconds after the ignition switch is
turned to ignition on or accessory mode.
The RSE system is already set up and
ready for use. The system is always
“awake” when the vehicle's ignition is
turned on or when the vehicle is in
“accessory power mode.”
REAR SEAT ENTERTAINMENT SYSTEM (IF EQUIPPED)
CAUTION
Refrain from using food or drinks
near the RSE, the wireless head-phones or the remote control.
Direct sunlight may interfere with the headphone's operation andperformance.
Normal RSE operation cannot be guaranteed with unofficial dupli-cated discs.
In order to prevent inadvertent battery discharge, the RSE willremain in standby mode whenignition switch is turn to ignitionON or accessory mode.
Use of rear seat entertainment system without the engine run-ning will reduce battery power.
CAUTION
Disclaimer: The RSE system is pro- grammed to the regional displayformats for your region (NTSC or PAL). Please note that your RSE willnot read DVDs from a different region.
Page 242 of 382
3233
Features of your vehicle
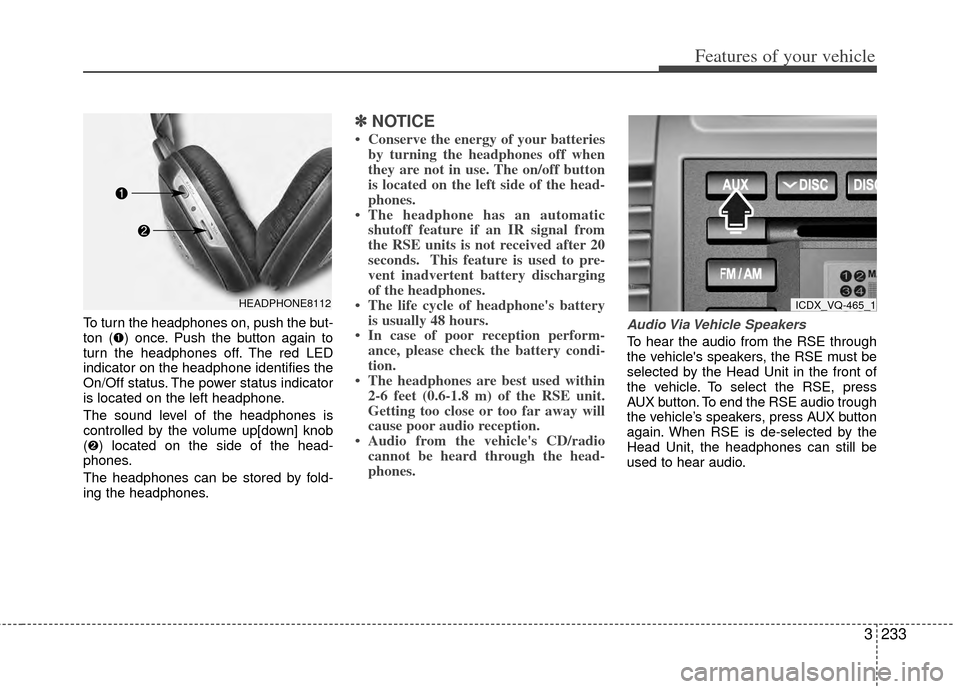
To turn the headphones on, push the but-
ton (➊) once. Push the button again to
turn the headphones off. The red LED
indicator on the headphone identifies the
On/Off status. The power status indicator
is located on the left headphone.
The sound level of the headphones is
controlled by the volume up[down] knob
(➋) located on the side of the head-
phones.
The headphones can be stored by fold-
ing the headphones.
✽ ✽NOTICE
• Conserve the energy of your batteries
by turning the headphones off when
they are not in use. The on/off button
is located on the left side of the head-
phones.
• The headphone has an automatic shutoff feature if an IR signal from
the RSE units is not received after 20
seconds. This feature is used to pre-
vent inadvertent battery discharging
of the headphones.
• The life cycle of headphone's battery is usually 48 hours.
• In case of poor reception perform- ance, please check the battery condi-
tion.
• The headphones are best used within 2-6 feet (0.6-1.8 m) of the RSE unit.
Getting too close or too far away will
cause poor audio reception.
• Audio from the vehicle's CD/radio cannot be heard through the head-
phones.
Audio Via Vehicle Speakers
To hear the audio from the RSE through
the vehicle's speakers, the RSE must be
selected by the Head Unit in the front of
the vehicle. To select the RSE, press
AUX button. To end the RSE audio trough
the vehicle’s speakers, press AUX button
again. When RSE is de-selected by the
Head Unit, the headphones can still be
used to hear audio.
HEADPHONE8112ICDX_VQ-465_1
Page 243 of 382
Features of your vehicle
234
3
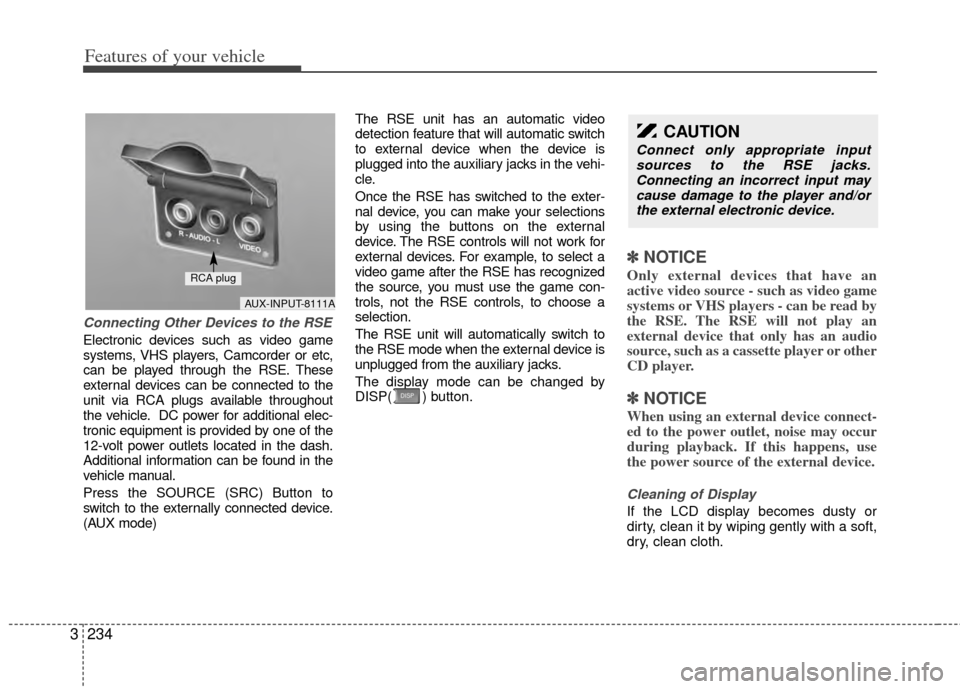
Connecting Other Devices to the RSE
Electronic devices such as video game
systems, VHS players, Camcorder or etc,
can be played through the RSE. These
external devices can be connected to the
unit via RCA plugs available throughout
the vehicle. DC power for additional elec-
tronic equipment is provided by one of the
12-volt power outlets located in the dash.
Additional information can be found in the
vehicle manual.
Press the SOURCE (SRC) Button to
switch to the externally connected device.
(AUX mode) The RSE unit has an automatic video
detection feature that will automatic switch
to external device when the device is
plugged into the auxiliary jacks in the vehi-
cle.
Once the RSE has switched to the exter-
nal device, you can make your selections
by using the buttons on the external
device. The RSE controls will not work for
external devices. For example, to select a
video game after the RSE has recognized
the source, you must use the game con-
trols, not the RSE controls, to choose a
selection.
The RSE unit will automatically switch to
the RSE mode when the external device is
unplugged from the auxiliary jacks.
The display mode can be changed by
DISP( ) button.
✽ ✽
NOTICE
Only external devices that have an
active video source - such as video game
systems or VHS players - can be read by
the RSE. The RSE will not play an
external device that only has an audio
source, such as a cassette player or other
CD player.
✽ ✽NOTICE
When using an external device connect-
ed to the power outlet, noise may occur
during playback. If this happens, use
the power source of the external device.
Cleaning of Display
If the LCD display becomes dusty or
dirty, clean it by wiping gently with a soft,
dry, clean cloth.
CAUTION
Connect only appropriate input
sources to the RSE jacks.Connecting an incorrect input may cause damage to the player and/orthe external electronic device.
AUX-INPUT-8111A
RCA plug
Page 246 of 382

3237
Features of your vehicle
✽
✽NOTICE
The RSE will enter standby mode when
the vehicle ignition is turned off and
back on. Press the SRC or
PLAY/PAUSE( ) button to “wake
up” the unit and resume disc play.
1. Stop/Eject
While the disc is playing, press the
STOP/EJECT ( ) button to stop disc
play. When the disc has stopped, press
the button again to eject the disc.
✽ ✽NOTICE
The player has an Auto-Reload Disc
Protection feature to protect discs from
accidental damage. If an ejected disc is
not removed within 25 seconds after
being ejected, it will be pulled back into
the player. This is to protect the disc
from accidental damage.
2. Speaker Volume Control
You can adjust the volume one of two
ways. First, if you are adjusting the vol-
ume for audio through the vehicle speak-
ers, you can use the VOLUME button on
the control panel or the remote control.
This button is reserved for sending a sig-
nal to the vehicle speakers only, and will
not adjust the headphone volume. Press
“+” to increase the volume and “-” to
decrease the volume.
Second, the volume on the wireless
headphones can be adjusted by turning
the VOL knob located on the left side of
the headphones.
3. Play/Pause
You do not need to press the play button
after first loading a DVD or VCD; it will
start automatically by playing the first
track or bringing up the disc menu.
If the disc does not automatically load,
press PLAY/PAUSE( ) to play the DVD.
While playing a DVD, press PLAY
/PAUSE( ) to pause the DVD. Press
the button again to resume play.
4. Display
When the player is in DVD mode, press the
DISP button to view the DVD title, chapter
number and elapsed time and other infor-
mation about the DVD currently playing.
It will also display brightness. There are
“Day Time” brightness with brightest level
and “Night Time” brightness which has 70%
level of “Day Time” brightness. Adjust the
level of brightness by pressing the
REV(dimmer) or FWD(brighter) buttons.
The next time the player is turned on, it will
return to the brightness level it was adjusted
to when last used.
The RSE unit has two presets of display
brightness. When the headlamp is turned
on, the display brightness level will be
dimmed as the preset. However, when the
headlamp is turned off, the display bright-
ness will return to the daytime brightness.
Press DISP to adjust the image format. The
image format, also known as the aspect
ratio, is a ratio of the height to width of the
image on the screen. For example, a 4:3
ratio would mean an image that is 4 units by
3 units.
Page 248 of 382
3239
Features of your vehicle
When viewing a menu, pressing the
MENU button again will automatically
return to the movie at the point it was
being viewed. You can also select “play” or
any other option by using the NEXT,
PREV, FWD and REV buttons.
Press the NEXT button to move the cursor
up and the PREV button to move the cur-
sor down the menu.
Press the FWD button to move the cursor
to the right, and the REV button to move
the cursor to the left.
✽ ✽NOTICE
You must repeatedly push any button to
move through several items. Pressing
and holding any button will not advance
the cursor beyond the position just
moved.
Press ENTER to select the desired menu
choice.
11. Source
Press the SOURCE button to switch from
the RSE’s internal DVD player to an
external device such as a VCR or video
game. The sound and images from the
external source will be presented
through the RSE. Pressing the SRC button will switch
between the following RSE states:
Playback state - will play DVDs, VCDs, and
CDs
Auxiliary (AUX) state - will play video
games and other external devices
When an external source is selected, the
RSE’s internal DVD player turns off.
Press the SRC button to switch back
from the external source to the internal
DVD player.
If a disc is present in the DVD player, the
disc will begin to play. If another source
has been detected, such as a VCR or
video game, the RSE will enter the AUX
mode automatically and shall remain so
until a disc is inserted or until the PLAY/
SRC button is pressed on the RSE's front
panel or on the remote control. If the
vehicle ignition is on but the player isn't
being used, the display will power off.
The DVD mechanism will be in sleep
mode, but the main RSE's controller will
stay up to accept commands from the
front panel controls or the remote control.
✽ ✽
NOTICE
The external device must be correctly
connected to the RSE in order to play
properly.
Using the CD Player
The RSE will play audio CDs in both the
standard (12 cm) and mini-disc (8 cm)
format.
✽ ✽NOTICE
While the player will accept DVD
ROMs and CD ROMs discs, the RSE
cannot play discs in these formats and
will eject them.
With power applied to your unit, insert
the disc part way into the load slot. The
player will automatically grip the CD disc,
pull it the rest of the way in and begin
playing.
CD Controls
The following functions are available
when playing audio CDs.