Page 138 of 382

3129
Features of your vehicle
Engine oil pressure
warning
This warning light indicates the engine oil
pressure is low.
If the warning light illuminates while dri-
ving:
1. Drive safely to the side of the road andstop.
2. With the engine off, check the engine oil level. If the level is low, add oil as
required.
If the warning light remains on after
adding oil or if oil is not available, call an
Authorized Kia Dealer.
Parking brake & brake
fluid warning
Parking brake warning
This light is illuminated when the parking
brake is applied with the ignition switch in
the START or ON position. The warning
light should go off when the parking
brake is released while engine is run-
ning.
Low brake fluid level warning
If the warning light remains on, it may
indicate that the brake fluid level in the
reservoir is low.
If the warning light remains on:
1. Drive carefully to the nearest safe location and stop your vehicle.
2. With the engine stopped, check the brake fluid level immediately and add
fluid as required. Then check all brake
components for fluid leaks.
3. Do not drive the vehicle if leaks are found, the warning light remains on or
the brakes do not operate properly.
Have it towed to any Authorized Kia
Dealer for a brake system inspection
and necessary repairs. To check bulb operation, check whether
the parking brake and brake fluid warning
light illuminates when the ignition switch
is in the ON position.
Parking start warning chime
If you drive over 10 km/h (6 mph) with the
parking brake applied, the parking start
warning chime will sound.
Front fog light indicator
(if equipped)
This light comes on when the front fog
lights are ON.
Shift pattern indicators
(if equipped)
The individual indicators illuminate to
show the automatic transaxle shift lever
selection.
CAUTION
If the engine is not stopped imme-
diately after the engine oil pressurewarning light is illuminated, severedamage could result.
WARNING
Driving the vehicle with a warning
light on is dangerous. If the brake
warning light remains on, have the
brakes checked and repaired imme-
diately by an authorized Kia Dealer.
Page 148 of 382

3139
Features of your vehicle
Flashing headlights
To flash the headlights, pull the lever
towards you. It will return to the normal
(low-beam) position when released. The
headlight switch does not need to be on
to use this flashing feature.
Turn signals (A)
The ignition switch must be on for the
turn signals to function. To turn on the
turn signals, move the lever up or down.
Green arrow indicators on the instrument
panel indicate which turn signal is oper-
ating. They will self-cancel after a turn is
completed. If the indicator continues to
flash after a turn, manually return the
lever to the OFF position.
Lane change signals (B)
To signal a lane change, move the turn
signal lever slightly and hold it in position.
The lever will return to the OFF position
when released.
If an indicator stays on and does not
flash or if it flashes abnormally, one of the
turn signal bulbs may be burned out and
will require replacement.
✽ ✽NOTICE
If an indicator flash is abnormally quick
or slow, bulb may be burned out or have
a poor electrical connection in the cir-
cuit.OVQ041132OVQ041133
Page 151 of 382

Features of your vehicle
142
3
✽
✽
NOTICE
If there is heavy accumulation of snow
or ice on the windshield, defrost the
windshield for about 10 minutes, or
until the snow and/or ice is removed
before using the windshield wipers to
ensure proper operation.
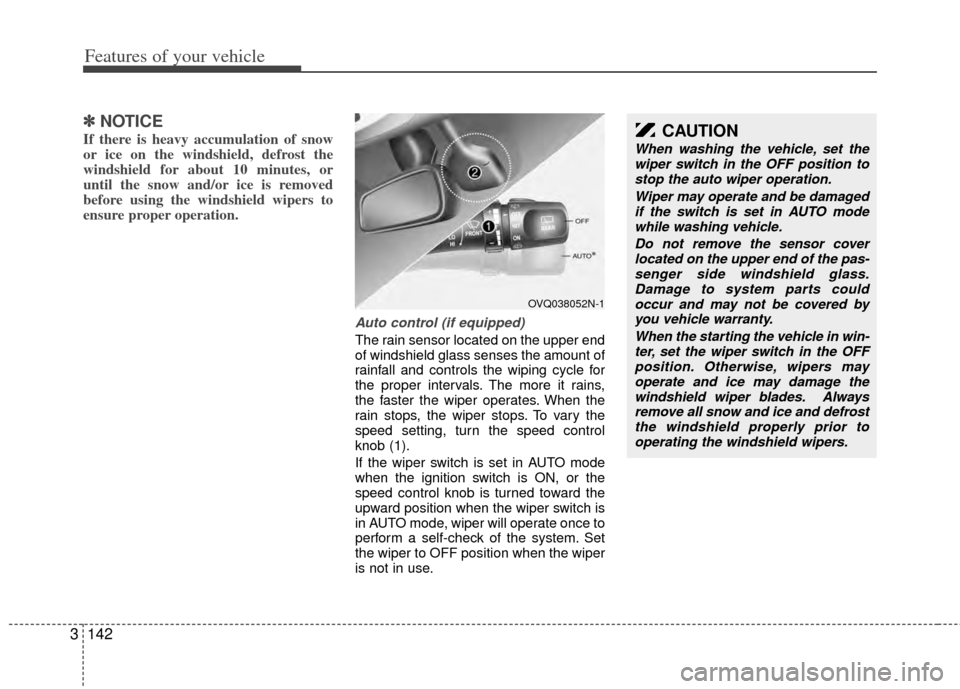
Auto control (if equipped)
The rain sensor located on the upper end
of windshield glass senses the amount of
rainfall and controls the wiping cycle for
the proper intervals. The more it rains,
the faster the wiper operates. When the
rain stops, the wiper stops. To vary the
speed setting, turn the speed control
knob (1).
If the wiper switch is set in AUTO mode
when the ignition switch is ON, or the
speed control knob is turned toward the
upward position when the wiper switch is
in AUTO mode, wiper will operate once to
perform a self-check of the system. Set
the wiper to OFF position when the wiper
is not in use.
OVQ038052N-1
CAUTION
When washing the vehicle, set the
wiper switch in the OFF position tostop the auto wiper operation.
Wiper may operate and be damagedif the switch is set in AUTO modewhile washing vehicle.
Do not remove the sensor coverlocated on the upper end of the pas- senger side windshield glass.Damage to system parts could occur and may not be covered byyou vehicle warranty.
When the starting the vehicle in win-ter, set the wiper switch in the OFFposition. Otherwise, wipers mayoperate and ice may damage the windshield wiper blades. Alwaysremove all snow and ice and defrost the windshield properly prior tooperating the windshield wipers.
Page 152 of 382

3143
Features of your vehicle
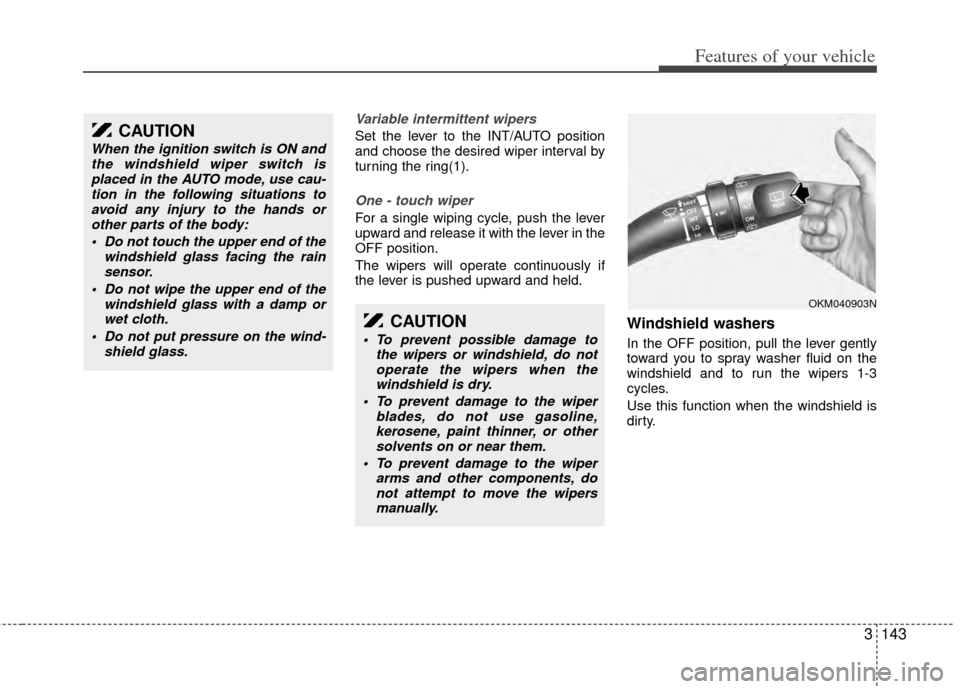
Variable intermittent wipers
Set the lever to the INT/AUTO position
and choose the desired wiper interval by
turning the ring(1).
One - touch wiper
For a single wiping cycle, push the lever
upward and release it with the lever in the
OFF position.
The wipers will operate continuously if
the lever is pushed upward and held.
Windshield washers
In the OFF position, pull the lever gently
toward you to spray washer fluid on the
windshield and to run the wipers 1-3
cycles.
Use this function when the windshield is
dirty.
CAUTION
When the ignition switch is ON andthe windshield wiper switch isplaced in the AUTO mode, use cau-tion in the following situations toavoid any injury to the hands orother parts of the body:
Do not touch the upper end of the windshield glass facing the rainsensor.
Do not wipe the upper end of the windshield glass with a damp orwet cloth.
Do not put pressure on the wind- shield glass.
CAUTION
To prevent possible damage tothe wipers or windshield, do notoperate the wipers when thewindshield is dry.
To prevent damage to the wiper blades, do not use gasoline,kerosene, paint thinner, or othersolvents on or near them.
To prevent damage to the wiper arms and other components, donot attempt to move the wipersmanually.
OKM040903N
Page 159 of 382

Features of your vehicle
150
3
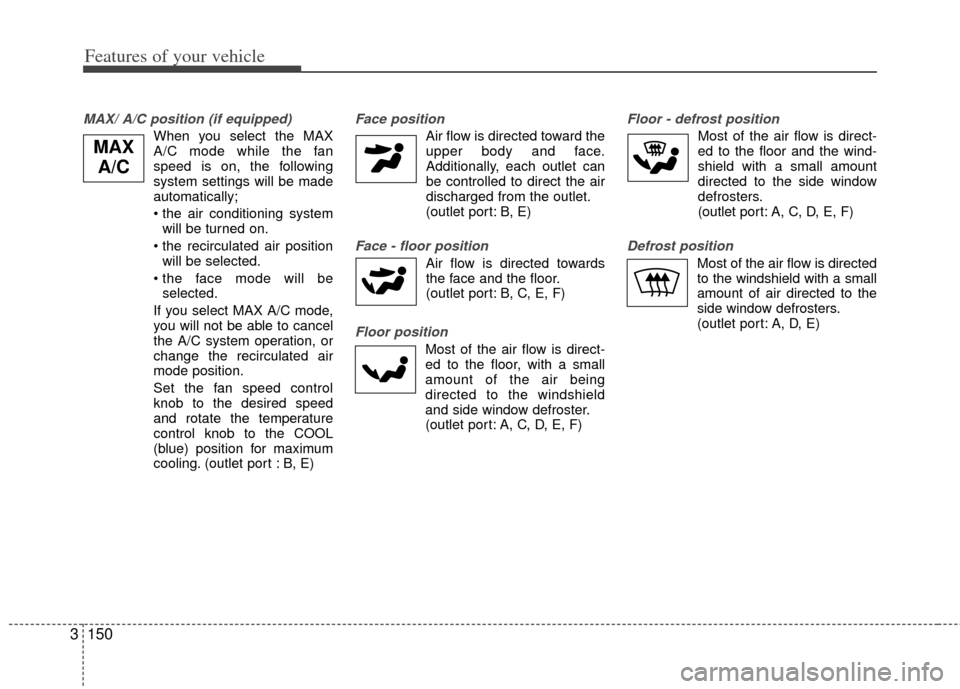
MAX/ A/C position (if equipped)
When you select the MAX
A/C mode while the fan
speed is on, the following
system settings will be made
automatically;
• the air conditioning system
will be turned on.
will be selected.
selected.
If you select MAX A/C mode, you will not be able to cancel
the A/C system operation, or
change the recirculated air
mode position.
Set the fan speed control knob to the desired speed
and rotate the temperature
control knob to the COOL
(blue) position for maximum
cooling. (outlet port : B, E)
Face position
Air flow is directed toward the upper body and face.
Additionally, each outlet can
be controlled to direct the air
discharged from the outlet.
(outlet port: B, E)
Face - floor position
Air flow is directed towardsthe face and the floor.
(outlet port: B, C, E, F)
Floor position
Most of the air flow is direct-
ed to the floor, with a small
amount of the air being
directed to the windshield
and side window defroster.
(outlet port: A, C, D, E, F)
Floor - defrost position
Most of the air flow is direct-
ed to the floor and the wind-
shield with a small amount
directed to the side window
defrosters.
(outlet port: A, C, D, E, F)
Defrost position
Most of the air flow is directed
to the windshield with a small
amount of air directed to the
side window defrosters.
(outlet port: A, D, E)
MAX A/C
Page 174 of 382
3165
Features of your vehicle
Face position
Air flow is directed toward theupper body and face.
Additionally, each outlet can be controlled to direct the air
discharged from the outlet.
(outlet port: B, E)
Face - floor position
Air flow is directed towardsthe face and the floor.
(outlet port: B, C, E, F)
Floor position
Most of the air flow is direct-ed to the floor, with a small
amount of the air being
directed to the windshield
and side window defroster.
(outlet port: A, C, D, E, F)
Floor - defrost position
Most of the air flow is direct-ed to the floor and the wind-
shield with a small amount
directed to the side window
defrosters.
(outlet port: A, C, D, E, F)
Defrost button
Most of the air flow is directed to the
windshield with a small amount of air
directed to the side window defrosters.
(outlet port: A, D, E)
OVQ049328
Page 206 of 382

3197
Features of your vehicle
✽
✽NOTICE
• If you install an after market HID
head lamp, your vehicle’s audio and
electronic device may malfunction.
• Prevent chemicals such as perfume, cosmetic oil, sun cream, hand cleaner,
and air freshener from contacting the
interior parts because they may cause
damage or discoloration.
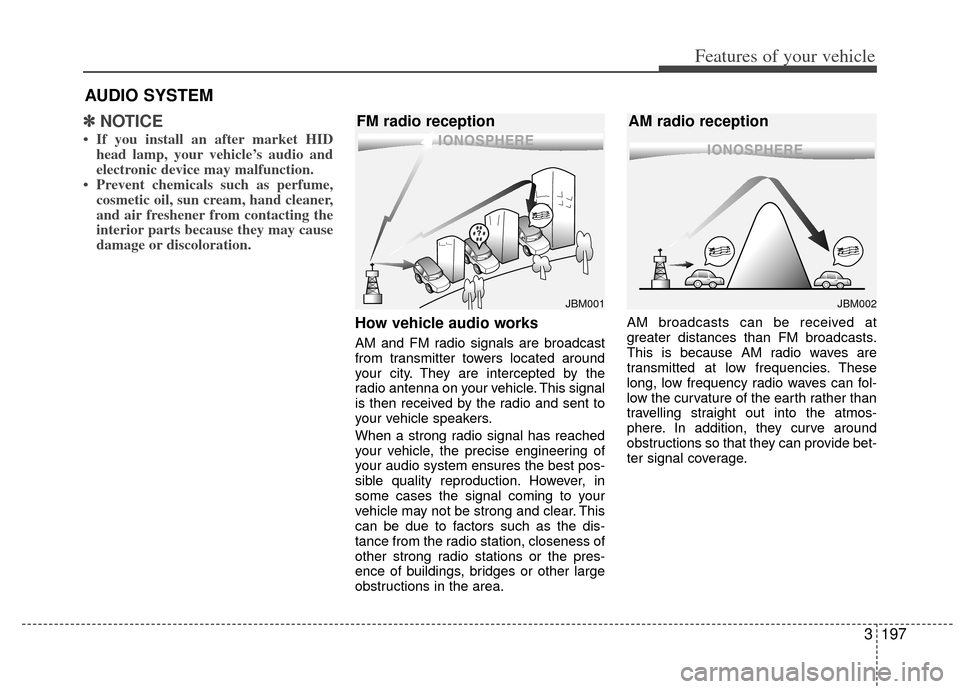
How vehicle audio works
AM and FM radio signals are broadcast
from transmitter towers located around
your city. They are intercepted by the
radio antenna on your vehicle. This signal
is then received by the radio and sent to
your vehicle speakers.
When a strong radio signal has reached
your vehicle, the precise engineering of
your audio system ensures the best pos-
sible quality reproduction. However, in
some cases the signal coming to your
vehicle may not be strong and clear. This
can be due to factors such as the dis-
tance from the radio station, closeness of
other strong radio stations or the pres-
ence of buildings, bridges or other large
obstructions in the area. AM broadcasts can be received at
greater distances than FM broadcasts.
This is because AM radio waves are
transmitted at low frequencies. These
long, low frequency radio waves can fol-
low the curvature of the earth rather than
travelling straight out into the atmos-
phere. In addition, they curve around
obstructions so that they can provide bet-
ter signal coverage.
AUDIO SYSTEM
JBM001
FM radio reception
JBM002
AM radio reception
Page 241 of 382
Features of your vehicle
232
3
Viewing/Adjusting the Monitor
To view the monitor, locate the latch on
the bottom center of the mounted unit
and pull it forward. This will release the
monitor from its locked, stow-away posi-
tion. Use your hands to adjust the moni-
tor into optimal viewing position. Do not
touch the LCD panel itself to avoid dam-
age or smudging. To close the monitor, pull the bottom
edge forward and push it up until it clicks
into the stow-away position.
Headphones
The RSE comes with two (2) sets of wire-
less headphones and four (4) AAA 1.5V
batteries. Install the batteries by opening
the compartment on the right side of the
headphones. Each set of headphones
requires two (2) AAA 1.5V batteries.
RES_OPEN_8111
RES_CLOSED_8111HEADPHONE8112 HEADPHONE8111
Folded
Spread
Close
Open