2014 KIA MOHAVE clock
[x] Cancel search: clockPage 226 of 417

4149
Features of your vehicle
■■Sound Setup mode
Push the AUDIO CONTROL(TUNE knob) button to enter SETUP mode.
Select “SOUND” item by rotating the TUNE knob then push knob.
■
■ TYPE A
■
■ TYPE B
Hierarchy 1
Hierarchy 2 Rotate the knob clockwise by one notch to increase frequency from current fre-
quency. Rotate the knob counterclock-
wise by one notch to decrease frequency
from current frequency.
Pressing the button changes the BASS,
MIDDLE, TREBLE, FADER and BAL-
ANCE TUNE mode. The mode selected
is shown on the display. After selecting
each mode, rotate the Audio control knob
clockwise or counterclockwise.
To increase the BASS, rotate the knob
clockwise, while to decrease the BASS,
rotate the knob counterclockwise.
To increase the MIDDLE, rotate the knob
clockwise, while to decrease the MID-
DLE, rotate the knob counterclockwise.
Control
To increase the TREBLE, rotate the knob
clockwise, while to decrease the TRE-
BLE, rotate the knob counterclockwise.
Turn the control knob clockwise to
emphasize rear speaker sound (frontspeaker sound will be attenuated).
When the control knob is turned counter-
clockwise, front speaker sound will be
emphasized (rear speaker sound will be
attenuated).
Rotate the knob clockwise to emphasize
right speaker sound(left speaker sound
will be attenuated). When the control
knob is turned counter clockwise, left
speaker sound will be emphasized(right
speaker sound will be attenuated).
Selects whether long file names are
scrolled continuously(“ON”) or just once(“OFF”).
Select this item to turn the SDVC (Speed
Dependent Volume Control) feature ON or
OFF. If it is turned ON, volume level isadjusted automatically according to the
vehicle speed.
Page 230 of 417

4153
Features of your vehicle
10. TUNE Knob & ENTER Button
Turn the knob clockwise to display theTrack NO(File name) after the current song.
Turn the knob counterclockwise to dis- play the Track NO(File Name) beforethe current song.
To select the displayed song, press the button.
11. FOLDER Button
Folder name/File name(the first song in the folder) is moved up or down from
the currently playing folder.
To select the displayed folder, press ENTER(NO.10) button.
12. INFO(INFORMATION) Button
Displays the information of the current CD
TRACK(FILE) as below when the button
is pressed each time. CDDA : DISC TITLE ➟DISC ARTIST ➟
TRACK TITLE ➟TRACK ARTIST ➟TOTAL
TRACK...
MP3/WMA : FILE NAME ➟TITLE ➟
ARTIST ➟ALBUM ➟FOLDER NAME ➟
TOTAL FILE...13. DISC Button(CD Changer:PA 960)
Disc is moved up or down from the cur-
rently playing disc.
14. LOAD Button(CD Changer:PA 960)
How to load a CD
Press [LOAD] for less than 0.8 second.
An empty slot is selected and the CD
number indicator(a) blinks on the LCD.
After "WAIT" is displayed for a moment, "INSERT DISC(1~6)" is diplayed and
the CD slot indicator(b) blinks.
Insert a CD while the slot indicator blinks.
How to load CDs(ALL Load)
Press [LOAD] for more than 0.8 sec- ond.
An empty slot is selected and the CD number indicator(a) blinks on the LCD.
After "WAIT" is displayed for a moment, "INSERT DISC(1~6)" is
diplayed and the CD slot indicator(b)
blinks.
Insert a CD while the slot indicator blinks. After the CD is inserted, the rest of the
empty CD slots' number blink.
Repeat step 2 and 3 until all of the slots are loaded.CAUTION
Insert a CD only while "Insert Disc(1~6)" is displayed and theslot indicator blinks.
Don't insert two CDs for one oper- ation.
Page 235 of 417

Features of your vehicle
158
4
Using USB device
1. RANDOM Button
Press this button for less than 0.8 second
to activate 'RDM' mode and more than
0.8 second to activate 'ALL RDM' mode.
RDM : Only files in a folder are played
back in random sequence.
ALL RDM : All files in a USB memory are played back in random sequence.
2. TRACK Button
Press [TRACK ] to return to the beginning of the current file.
Press again within 1 seconds to return
the previous file.
Press and hold [TRACK ] to initiate rewind search.
Press [TRACK ] for less than 0.8 second to advance the next file.
Press and hold [TRACK ] to initiate fast forward search. 3. REPEAT Button
Press this button for less than 0.8 second
to activate 'RPT' mode and more than
0.8 second to activate 'FLD RPT' mode.
RPT : Only a file is played repeatedly.
FLD RPT : Only files in a folder are
played repeatedly.
4. SCROLL Button
File names are scrolled for 5 seconds on
the display.
5. AUX/USB Button
If auxiliary device/USB/ is connected, it turns to USB/AUX mode and toggles
as below when the button is pressed
each time.
AUX/USB : AUX ➟USB ➟AUX...
If no auxiliary device and USB is con- nected, it displays "No Media" for 5
seconds and returns to the previous
mode. 6. INFO(INFORMATION) Button
Displays the information of the current
CD TRACK(FILE) as below when the
button is pressed each time. FILE NAME
➟TITLE ➟ARTIST ➟ALBUM
➟ FOLDER NAME ➟TOTAL FILE...
7. TUNE Knob & ENTER Button
Turn this knob clockwise to display the File name after the current song.
Turn this knob counterclockwise to dis- play the File name before the current song.
To select the displayed song, press the button.
8. FOLDER Button
Folder name/File name(the first song in the folder) is moved up or down from
currently playing folder.
To select the displayed folder, press ENTER(NO.6) button.
9. SCAN Button
Plays back the first 10 seconds of each
song in the USB memory.
Page 315 of 417

What to do in an emergency
8
6
F070200AHM
Removing and storing the spare tire
Your spare tire is stored underneath
your vehicle, directly below the cargoarea.
To remove the spare tire:
1. Open the tailgate.
2. Find the plastic hex bolt cover and
remove the cover. 3. Use the wheel lug nut wrench to
loosen the bolt enough to lower
the spare tire.
Turn the wrench counterclockwise until the spare tire reaches the
ground.
(Continued)
Be sure to use the correctfront and rear jacking posi-
tions on the vehicle; never
use the bumpers or any other
part of the vehicle for jacking
support.
The vehicle can easily roll off the jack causing serious
injury or death.
Do not get under a vehicle that is supported by a jack
Do not start or run the engine while the vehicle is on the
jack.
Do not allow anyone to remain in the vehicle while it is on the
jack.
Make sure any children pres- ent are in a secure place away
from the road and from the
vehicle to be raised with the
jack.
OHM068003OHM068004
Page 316 of 417

69
What to do in an emergency
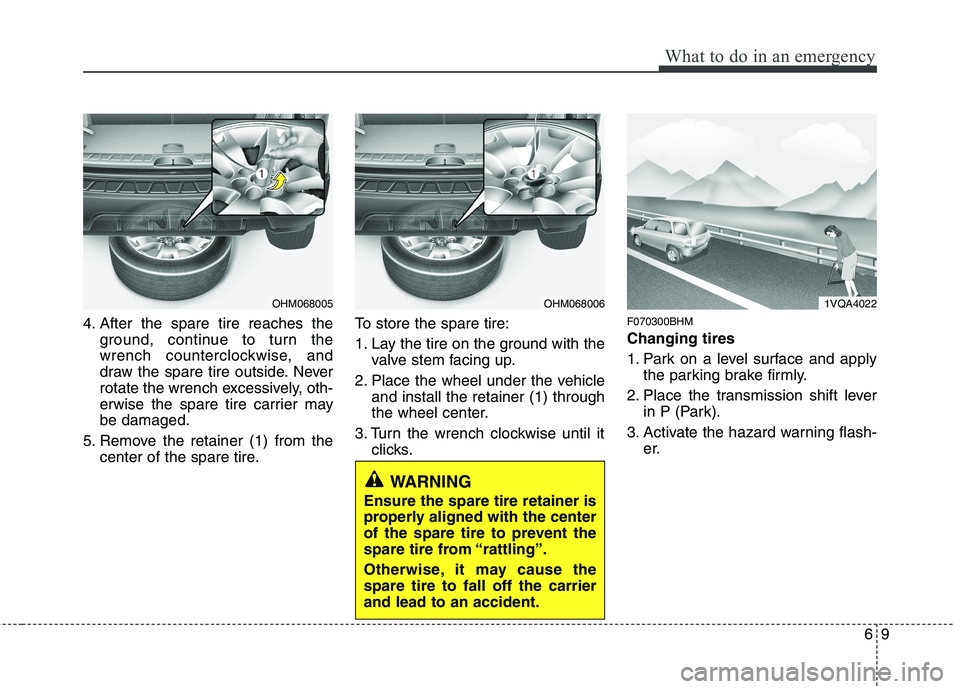
4. After the spare tire reaches theground, continue to turn the
wrench counterclockwise, and
draw the spare tire outside. Never
rotate the wrench excessively, oth-
erwise the spare tire carrier maybe damaged.
5. Remove the retainer (1) from the center of the spare tire. To store the spare tire:
1. Lay the tire on the ground with the
valve stem facing up.
2. Place the wheel under the vehicle and install the retainer (1) through
the wheel center.
3. Turn the wrench clockwise until it clicks. F070300BHM Changing tires
1. Park on a level surface and apply
the parking brake firmly.
2. Place the transmission shift lever in P (Park).
3. Activate the hazard warning flash- er.
OHM068005OHM068006
WARNING
Ensure the spare tire retainer is
properly aligned with the center
of the spare tire to prevent the
spare tire from “rattling”.
Otherwise, it may cause the spare tire to fall off the carrierand lead to an accident.
1VQA4022
Page 317 of 417

What to do in an emergency
10
6
4. Remove the wheel lug nut wrench,
jack, jack handle, and spare tire
from the vehicle.
5. Block both the front and rear of the wheel that is diagonally opposite
from the jack position. 6. Loosen the wheel lug nuts coun-
terclockwise one turn each, but do
not remove any nut until the tire
has been raised off the ground.
1VQA4023
WARNING - Changing a tire
To prevent vehicle movement
while changing a tire, always
set the parking brake fully,
and always block the wheel
diagonally opposite the wheel
being changed.
We recommend that the wheels of the vehicle be
blocked, and that no person
remain in a vehicle that is
being jacked.
OHM068009
Page 318 of 417

611
What to do in an emergency
7. Place the jack at the front or rearjacking position closest to the tire
you are changing. Place the jackat the designated locations under
the frame. The jacking positions
are plates welded to the frame
with two tabs and a raised dot to
index with the jack. 8. Insert the jack handle into the jack
and turn it clockwise, raising the
vehicle until the tire just clears the
ground. This measurement is
approximately 30 mm (1.2 in).
Before removing the wheel lug
nuts, make sure the vehicle is sta-
ble and that there is no chance for
movement or slippage. 9. Loosen the wheel nuts and
remove them with your fingers.Slide the wheel off the studs and
lay it flat so it cannot roll away. To
put the wheel on the hub, pick up
the spare tire, line up the holeswith the studs and slide the wheel
onto them. If this is difficult, tip thewheel slightly and get the top holein the wheel lined up with the top
stud. Then jiggle the wheel back
and forth until the wheel can be
slid over the other studs.
WARNING - Jack location
To reduce the possibility of
injury, be sure to use only the
jack provided with the vehicle
and in the correct jack position;
never use any other part of the
vehicle for jack support.
OCM049013NOCM054012
Page 319 of 417

What to do in an emergency
12
6
10. To install the wheel, hold it on the
studs, put the wheel nuts on the studs and tighten them finger
tight. Jiggle the tire to be sure it iscompletely seated, then tighten
the nuts as much as possible
with your fingers again.
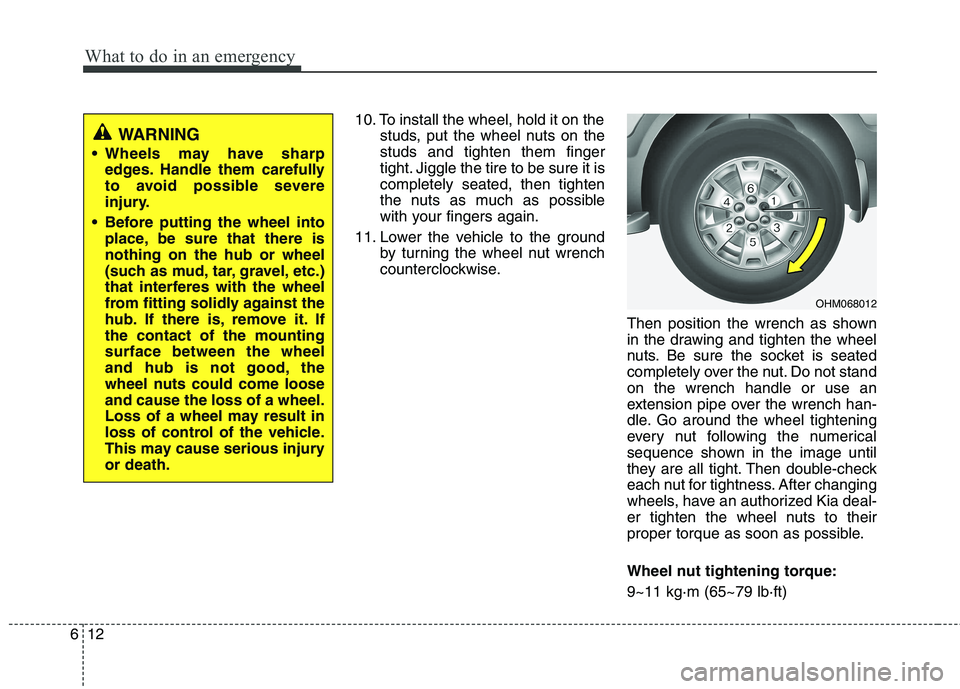
11. Lower the vehicle to the ground by turning the wheel nut wrench
counterclockwise.
Then position the wrench as shown
in the drawing and tighten the wheel
nuts. Be sure the socket is seated
completely over the nut. Do not standon the wrench handle or use an
extension pipe over the wrench han-
dle. Go around the wheel tightening
every nut following the numerical
sequence shown in the image until
they are all tight. Then double-check
each nut for tightness. After changing
wheels, have an authorized Kia deal-
er tighten the wheel nuts to their
proper torque as soon as possible.
Wheel nut tightening torque: 9~11 kg·m (65~79 lb·ft)
WARNING
Wheels may have sharp edges. Handle them carefully
to avoid possible severe
injury.
Before putting the wheel into place, be sure that there isnothing on the hub or wheel
(such as mud, tar, gravel, etc.)
that interferes with the wheel
from fitting solidly against the
hub. If there is, remove it. Ifthe contact of the mountingsurface between the wheel
and hub is not good, the
wheel nuts could come looseand cause the loss of a wheel.
Loss of a wheel may result in
loss of control of the vehicle.
This may cause serious injuryor death.
OHM068012